Sign In
Upload
Manuals
Brands
Hitachi Manuals
Camcorder
DZMV270E
Hitachi DZMV270E USB Camera Cable Manuals
Manuals and User Guides for Hitachi DZMV270E USB Camera Cable. We have
2
Hitachi DZMV270E USB Camera Cable manuals available for free PDF download: Instruction Manual
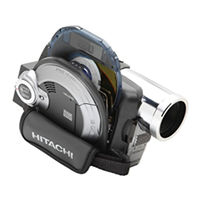
Hitachi DZMV270E Instruction Manual (187 pages)
Hitachi Instruction Manual DVD video camera/recorder DZ-MV550A, DZ-MV580A
Brand:
Hitachi
| Category:
Camcorder
| Size: 7 MB
Table of Contents
Instruction Manual
1
Class 1 Laser Product
2
Important Information
2
For Your Safety
2
Precautions
2
Installation
4
Important Safeguards
4
Cautions When Using
6
Cautions When Storing
9
Suggestions and Restrictions
9
Read this First
10
About this Manual
10
Introduction
11
Table of Contents
13
Checking Provided Accessories
16
Names of Parts
17
Try to Record and Play Back Using Disc (Video and Photo)
21
Try to Record and Play Back Using Card (Photo)
23
Discs and Cards
25
Available Discs
25
Information on DVD-R Disc
26
Examples of Discs that Cannot be Used on this DVD Video Camera/Recorder
26
Handling Discs
27
Available Cards
28
Storage Capacity on Disc or Card
29
Recordable Time of Movie (Video)
29
Recordable Stills (Photos) on Disc
29
Recordable Stills (Photos) on Card
30
Size and Quality of Photos
30
Setups
31
Setting up the DVD Video Camera/Recorder
31
Holding DVD Video Camera/Recorder
31
Attaching Shoulder Strap
32
Attaching Lens Cap
32
Inserting Battery into Remote Control
33
Removing Battery from Remote Control
33
Viewing Subject through Viewfinder
34
Viewing Image on Lcd Monitor Screen
35
Closing Lcd Monitor
36
Setting Date and Time
37
Changing Display Format of Date and Time
38
Setting up the Battery
39
Charging Battery
39
Attaching Battery to DVD Video Camera/Recorder
40
Removing Battery
40
Battery Remaining Level Indicator
42
Efficient Use of Battery
42
Using DVD Video Camera/Recorder with Ac Adapter/Charger
43
Inserting and Removing Disc
44
Inserting Disc
44
Removing Disc
46
Inserting and Removing Card
47
Basic Techniques
48
Basic Handling of DVD Video Camera/Recorder
48
Turning DVD Video Camera/Recorder on and off
48
Recording Movie
49
Recording Stills
50
Compensating for Backlight
51
On-Screen Information
52
Information Display During Recording
52
Disc Access
52
Switching the Information Display Mode
54
Display When Recording an Image of Yourself
55
Zooming
56
Macro Recording
57
Recording Subjects for Stronger Wide-Angle or Telephoto Effect
57
Playing Back
58
Playback from Start of Disc or Card
59
Search Playback of Movie
59
Frame Advance/Frame Back/Slow Playback of Movie
59
Skip Playback of Movie
60
Playing Back Stills
60
Jumping to Specified Point (Go To)
61
On-Screen Information Display
62
Information Display During Playback
62
Checking Flow of Quick Mode
63
Camera Functions
63
Flow of Quick Mode When Recording Movie
64
Flow of Quick Mode When Recording Photo (Disc)
65
Flow of Quick Mode When Recording Photo (Card)
66
Initial Setup
67
Disc Navigation Functions
68
Flow of Quick Mode (with DVD-Ram Disc)
68
Flow of Quick Mode (with DVD-R Disc)
69
Flow of Quick Mode (with Card)
70
Manually Focusing Subject
71
Focusing During Recording
71
Adjusting Brightness of Image to be Recorded (Exposure)
73
Using Full Auto Function
74
Setting Video Flash (for DZ-MV580A)
75
Using External Microphone
76
Viewing on TV Screen
77
Connecting to a Tv
77
Viewing on Tv Screen
78
Playback on DVD Video Recorder/Player
79
Playing Back DVD-Ram Disc
79
Playing Back DVD-R Disc
80
Removing and Replacing From/In Round DVD Holder
81
How to Remove Disc
81
Replacing Disc in Round DVD Holder
82
When the Hinge of Round DVD Holder Comes off
82
Disc Cleaning
82
Recording (Dubbing) Images
83
Recording (Dubbing) Images from Other Video Device
83
Recording (Dubbing) Images from Other Video Cameras
85
Recording (Dubbing) Images on Other Video Devices
86
Advanced Techniques
87
Camera Functions
87
Off
87
Auto
87
Program AE
88
White Balance
88
EIS on
88
MIC.filter off
89
Checking Flow of Normal Display Mode
87
Setting up Camera Functions
90
Selecting Shooting Mode to Match the Subject (Switching Program Ae Mode)
90
Adjusting Color (White Balance)
91
Setting White Balance Manually
92
Using the Electronic Image Stabilizer (Eis)
93
Reducing Wind Noise During Recording (MIC.filter)
93
Setting to Wide Tv Screen Mode (16:9 Mode)
94
Setting up Record Functions
96
Switching Movie Quality (Video Mode)
96
Switching Quality of Still Image (Quality)
97
Receiving Image from Another Device (Input Source)
98
Switching External Input Recording Method (Photo Input)
98
Self-Timer
99
Setting On-Screen Display Output on or off (Osd Output)
100
LCD Setup
101
Setting Brightness of Lcd Screen (Brightness)
101
Setting Color Density of Lcd Screen (Color Level)
101
Initial Settings
102
Switching Operating Sound on or off (Beep)
102
Turning DVD Video Camera/Recorder off Automatically (Power Save)
102
Turning Record Led on or off (Record Led)
103
Changing Display Language (Language)
103
Resetting Menu Settings to Defaults (Reset)
104
Disc Navigation
105
Using Disc Navigation
105
Starting or Terminating Disc Navigation
105
Playing Back from Disc Navigation Screen
107
Selecting Multiple Scenes
108
Selecting Consecutive Scenes Together
108
Functions Available with Disc Navigation
109
Understanding Flow of Disc Navigation Menu
110
Scene
111
Deleting Scenes (Delete)
111
Editing Using Submenu
112
Changing Images for Thumbnails (Edit - Thumbnail)
113
Playing Back by Skipping Scenes (Edit - Skip)
114
Arranging Order of Scenes (Edit - Move)
114
Directing Scenes Effectively (Edit - Fade)
115
Combining Multiple Scenes (Edit - Combine)
116
Dividing Movies (Edit - Divide)
117
Copying Stills on DVD-Ram Disc to Card (Copy)
118
Locking Scenes on Card (Lock)
119
Designating Scenes to be Printed (Dpof)
120
Selecting Scenes Using Menu Screen (Select)
121
Displaying Information Using Menu Screen (Detail)
122
Program
123
What Is "Program
123
Switching to Thumbnail Display of Specific Date (Switch)
123
Playing Back Program (Play)
124
Changing Title of Program (Title)
124
Play List
126
What Is "Play List
126
Creating New Play List (Create)
126
Switching to Display of each Play List (Switch)
127
Playing Back a Play List (Play)
127
Adding Scenes to Play List (Editing Play List)
128
Deleting Scenes from Play List (Editing Play List)
129
Adding Scenes Using Submenu for Editing (Editing Play List)
129
Deleting Scenes Using Submenu for Editing (Editing Play List)
130
Selecting Scenes Using Submenu for Editing (Editing Play List)
130
Arranging Order of Scenes (Move)
131
Changing Title of Play List (Title)
132
Deleting Play List (Delete)
132
Go to
133
Top (End)
133
Disc or Card Management
134
Verifying Remaining Free Space on Disc or Card (Capacity)
134
Protecting Disc from Writing (Protect Disc)
134
Initializing DVD-Ram Disc or Card (Format Disc. Format Card)
135
Updating Control Information of DVD-Ram Disc (Update Control Info.)
136
Finalizing DVD-R Disc (Finalize Disc)
137
Others
138
Displaying Movies or Stills Independently (Category)
138
Playing Back Scenes Repeatedly (Repeat Play)
138
Slide Show (Continuous Playback of Stills)
139
The Following Are Available When Connecting to Pc
140
Contents on Provided CD-ROM
142
Requirements of Available Pc
143
Installing Software
144
Displaying Installer Screen
144
Installing Usb Driver
145
Installing Udf Driver (DVD-Ram Driver)
146
INSTALLING DVD-Moviealbumse
148
INSTALLING Mydvd
150
Creating DVD Video on PC from DVD-RAM Disc Recorded on DVD Video Camera/Recorder
152
Uninstalling Software
154
Uninstalling Usb Driver
154
Deleting Other Applications
155
Cautions When Using DVD Video Camera/Recorder by Connecting It to PC
156
Subsidiary Information
157
Introduction to Optional Accessories
157
Camera Accessories
157
Power Supply
157
Information on Square Adapter
157
Cleaning
158
Changing Setting of Demonstration
159
Terminology
160
Sd Memory Card
162
No DVD Video Camera/Recorder Operation - Check the Following
163
Trouble Messages
165
Cannot Record
166
Troubleshooting
172
System Reset
181
Major Specifications
182
Declaration of Conformity
184
To Order in the Canada
184
To Order in the United States
184
Index
185
Be Sure to Read the Following before Opening the Package of CD-ROM
187
Advertisement
Hitachi DZMV270E Instruction Manual (115 pages)
Brand:
Hitachi
| Category:
Camcorder
| Size: 5 MB
Table of Contents
Important Information
2
For Your Safety
2
Important Safeguards
4
Table of Contents
7
Read this First
7
About this Manual
10
Checking Provided Accessories
11
Names of Parts
12
Viewing Demonstration
16
Features of DVD Video Camera/Re- C O R D E
17
Versatile Functions Available
17
Recording on Disc
18
Recording Movie and Still
18
Immediate Reviewing of Recorded Image
18
Editing in Various Ways on DVD Video Camera/Recorder Alone
18
Using with Various Devices
18
Cautions When Using
19
Cautions When Storing
22
Suggestions and Restrictions
22
Discs
23
Removing and Replacing Disc From/In Cartridge or Caddy
24
Disc Storage Capacity
26
Setups
27
Setting up the DVD Video Camera/Recorder
27
Holding DVD Video Camera/Recorder
27
Attaching Shoulder Strap
27
Attaching Lens Cap
28
Attaching Ferrite Cores
28
Inserting Batteries into Remote Control
29
Setting up the Battery
30
Attaching Battery to DVD Video Camera/Recorder
30
Removing Battery
30
Charging Battery
31
Battery Remaining Level Indicator
33
Using DVD Video Camera/Recorder with AC Adapter
34
Setting Date and Time
35
Changing Display Format of Date and Time
36
Inserting and Ejecting Disc
37
Inserting Disc
37
Removing Disc
39
Basic Techniques
40
Basic Handling of DVD Video Camera/Recorder
40
Turning DVD Video Camera/Recorder on
40
Opening LCD Monitor
40
LCD Screen Brightness Adjustment
41
Closing LCD Monitor
41
Viewing Subject through Viewfinder
41
Recording Movie
42
Using External Microphone
42
Recording Stills
43
Immediately Checking Recorded Scene
44
Playing Back
44
Skip Playback
44
Search Playback
45
Frame Advance/Frame Back/Slow Playback
45
Searching for Point You Wish to View by Specifying It (Go To)
46
Zooming
47
Focusing When Recording Movie
48
Macro Recording
48
Manually Focusing Subject During Movie Recording
49
Adjusting Exposure Manually
50
On-Screen Information
51
Information Display During Recording
51
Switching the Information Display Mode
52
Information Display During Playback
53
Advanced Techniques
54
Setting up Camera Functions
54
Selecting Shooting Mode to Match the Subject (Switching Program AE Mode)
54
White Balance (Auto/Hold)
55
Using the Electronic Image Stabilizer (EIS)
56
Switching Digital Zoom off
57
Switching to 16:9 Mode
58
Setting up Record Functions
59
Switching Movie Quality Mode
59
Input Selection
60
Changing Method for Recording Stills
61
Self-Timer
62
Switching On-Screen Display Output on or off
63
Initial Settings
64
Switching Operating Sound on or off
64
Setting or Releasing Power Save
64
Turning Record LED on or off
65
Changing Display Language
65
Initializing All Settings to Defaults
66
Disc Navigation
67
Before Using Disc Navigation
67
Structure of Data Recorded on this DVD Video Camera/Recorder
67
Functions Available with Disc Navigation
68
Using Disc Navigation
68
Starting Disc Navigation and Interpreting Navigation Screen
70
Playing Back Scenes
71
Selecting Random Scenes
71
Selecting Consecutive Scenes Together
71
Understanding Flow of Disc Navigation Menu
72
Program
73
Switching to Thumbnail Display of Specific Date (Selecting Program)
73
Playing Back Program
73
Changing Title of Program
74
Play List
75
Creating New Play List
75
Switching Play List (Switching to Display of each Play List)
76
Playing Back a Play List
76
Adding Scenes to Play List
77
Deleting Scenes from Play List
78
Editing Play List (Adding Scenes Using Menu)
78
Editing Play List (Deleting Scenes Using Menu)
79
Editing Play List (Selecting Scenes Using Menu)
79
Changing Title of Play List
80
Deleting Play List
80
Scene
81
Deleting Scenes
81
Adding Special Effects (Fade)
82
Combining Multiple Scenes
84
Dividing Movies
84
Arranging Order of Scenes (Move)
85
Playing Back by Skipping Scenes (Skip)
86
Selecting Scenes Using Menu Screen
86
Displaying Information Using Menu Screen
87
Disc Management
88
Verifying Remaining Free Space on Disc (Capacity)
88
Initializing DVD-RAM Disc
88
Updating Control Information
89
Finalizing Disc
90
Playing Back Scenes Repeatedly (Repeat Play)
90
Connecting to a TV and Viewing
91
Connecting to Other Devices
91
Viewing on TV Screen
91
Connecting to a TV
91
Viewing on TV Screen
92
Recording Image from Other AV Devices
93
Connecting to Other AV Device
93
Recording Image from Other Camcorder or AV Device
94
Cautions When Connecting DVD Video Camera/Recorder to PC
95
Connecting to Your PC
95
Capturing Data for PC
96
Using DZ-WINPC3(W) PC Kit
96
Using Disc on PC
98
Subsidiary Information
99
Cleaning
99
If Dust Adheres to Viewfinder Lens
99
Trouble Messages
100
Troubleshooting
105
During Recording
106
During Playback
107
System Reset
110
Major Specifications
111
Introduction to Optional Accessories
112
Camera Accessories
112
Power Supplies
112
Miscellaneous
112
Index
113
Advertisement
Related Products
Hitachi DZ-MV200A - Camcorder
Hitachi DZ-MV230A - Camcorder
Hitachi DZ-MV270A - Camcorder
Hitachi DZMV208EAU
Hitachi DZMV200EUK
Hitachi DZMV230EUK
Hitachi DZMV238EAU
Hitachi DZMV230E
Hitachi DZMV200E
Hitachi DZMV2000E
Hitachi Categories
Air Conditioner
Projector
Drill
Refrigerator
TV
More Hitachi Manuals
Login
Sign In
OR
Sign in with Facebook
Sign in with Google
Upload manual
Upload from disk
Upload from URL