
Related Manuals for AEG 68031K-MN


Summary of Contents for AEG 68031K-MN
- Page 1 68031K-MN User Manual Ceramic glass Notice d’utilisation induction hob Gebruiksaanwijzing Table de cuisson vetrocéramique à induction Glaskeramische inductie-kookplaat...
- Page 2 Dear Customer Thank you for choosing one of our high-quality products. With this appliance you will experience the perfect combination of functional design and cutting edge technology. Convince yourself that our appliances are engineered to deliver the best per- formance and control - indeed we are setting the highest standards of excel- lence.
-
Page 3: Table Of Contents
Contents Safety instructions Description of the Appliance Cooking surface layout Control panel layout Touch Control sensor fields Displays Residual heat indicator Operating the appliance Switching the appliance on and off Setting the heat setting Locking/unlocking the control panel Switching the STOP+GO function on and off Using the automatic warm-up function Using the child safety device Switching the power function on and off... -
Page 4: Operating Instructions
Safety instructions Operating Instructions 1 Safety instructions Please comply with these instructions. If you do not, any damage resulting is not covered by the warranty. Correct use • This appliance is not intended for use by children or other persons whose physical, sensory or mental capabilities or lack of experience and knowledge prevents them from using the appliance safely without supervision or instruc- tion by a responsible person to ensure that they can use the appliance safely. -
Page 5: Safety During Use
Safety instructions Safety during use • Remove stickers and film from the glass ceramic. • There is the risk of burns from the appliance if used carelessly. • Cables from electrical appliances must not touch the hot surface of the appli- ance or hot cookware. -
Page 6: Description Of The Appliance
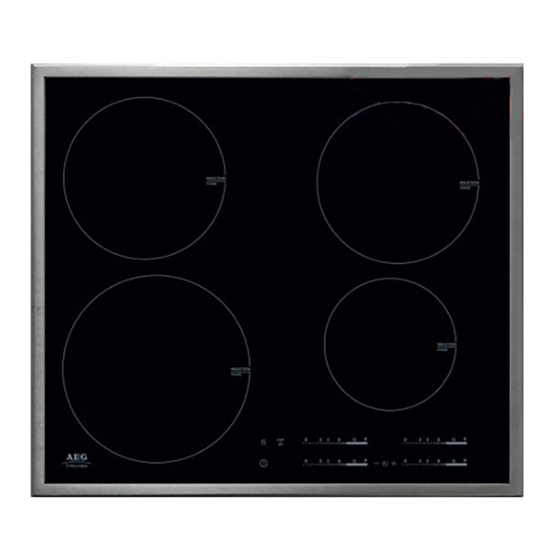
Description of the Appliance Description of the Appliance Cooking surface layout Induction cooking zone 1850 W Induction cooking zone 1850 W with power function 2500 W with power function 2500 W Induction cooking zone 2300 W Control panel Induction cooking zone 1400 W with power function 3700 W with power function 1800 W... -
Page 7: Control Panel Layout
Description of the Appliance Control panel layout Child lock with display Cooking zone indicators Power function Timer function Timer display STOP+GO with indicator Heat setting selection On/Off Timer Heat setting indicator with indicator... -
Page 8: Touch Control Sensor Fields
Description of the Appliance Touch Control sensor fields The appliance is operated using Touch Control sensor fields. Functions are con- trolled by touching sensor fields and confirmed by displays and acoustic signals. Touch the sensor fields from above, without covering other sensor fields. Sensor field Function On / Off... - Page 9 Description of the Appliance Control bar The control bar is a special Touch Control field. The control bar is touched where the de- sired heat setting is positioned. The heat setting is shown in the display. Correct to the left or the right, if necessary. Do not release before the desired heat set- ting is reached.
-
Page 10: Operating The Appliance
Operating the appliance Operating the appliance Use the induction cooking zones with suitable cookware. Switching the appliance on and off Control panel Display Pilot light Switch on Touch for 1 second lights up Switch off Touch for 1 second / none goes out After switching on, within approx. -
Page 11: Switching The Stop+Go Function On And Off
Operating the appliance Switching the STOP+GO function on and off The STOP+GO function simultaneously switches all cooking zones that are switched on to the keep warm setting and then back to the heat setting that was previously set. Control panel Display To switch on Touch To switch off Touch... - Page 12 Operating the appliance Heat setting Length of the automatic warm up [min:sec] 1:00 1:40 2:40 4:50 5:30 6:30 8:10 10:10 12:20 2:30 2:30 3:30 4:30...
-
Page 13: Using The Child Safety Device
Operating the appliance Using the child safety device The child safety device prevents unintentional use of the appliance. Switching on the child safety device Step Control panel Display/Signal Switch on appliance. (Do not set a heat setting.) Touch for 4 seconds The child safety device is switched on. -
Page 14: Switching The Power Function On And Off
Operating the appliance Switching the power function on and off The power function makes more power available to the induction cooking zones, e.g. to bring a large quantity of water to the boil quickly. The power function is activated for 10 minutes at most. After that the induction cooking zone automatically switches back to heat setting 14. -
Page 15: Using The Timer
Operating the appliance Using the timer Function Condition Outcome after the time has elapsed Automatic cut-out a heat setting is set acoustic signal flashes Cooking zone switches Countdown timer cooking zones not in use acoustic signal flashes If a heat setting is set on this cooking zone in addition to a countdown timer, the cooking zone is switched off after the time set has elapsed. -
Page 16: Setting The Time
Operating the appliance Setting the time Step Control panel Indicator Select cooking zone Pilot light for the cooking zone selected flashes Touch minutes After a few seconds the pilot light flashes more slowly. The time is set. The time counts down. Switching off the timer function Step Control panel... -
Page 17: Displaying The Time Remaining For A Cooking Zone
Operating the appliance Displaying the time remaining for a cooking zone Step Control panel field Display Select cooking zone Pilot light of the cooking zone selected flashes faster The time remaining is displayed After a few seconds the pilot light flashes more slowly. Switching off the acoustic signal Step Control panel field... -
Page 18: Automatic Switch Off
Operating the appliance Automatic switch off Cooking surface • If after switching on the cooking surface, a heat setting is not set for a cook- ing zone within approx. 10 seconds, the cooking surface automatically switch- es itself off. • If one or more sensor fields are covered by objects (a pan, etc.) for longer than approx. -
Page 19: Tips On Cooking And Frying
Tips on Cooking and Frying Tips on Cooking and Frying Information on acrylamides According to the latest scientific knowledge, intensive browning of food, espe- cially in products containing starch, can constitute a health risk due to acryla- mides. Therefore we recommend cooking at the lowest possible temperatures and not browning foods too much. -
Page 20: Tips On Energy Saving
Tips on Cooking and Frying Bottom of the cookware The bottom of the cookware should be as thick and flat as possible. Pan size Induction cooking zones adapt automatically to the size of the bottom of the cookware up to a certain point. However the magnetic part of the bottom of the cookware must have a minimum diameter depending on the size of the cooking zone. -
Page 21: Examples Of Cooking Applications
Tips on Cooking and Frying Examples of cooking applications The information given in the following table is for guidance only. Heat Cooking- Cooking suitable for Tips/Hints setting process time Off position Keeping Keeping cooked foods warm as required Cover food warm Hollandaise sauce, Melting melting butter, chocolate,... -
Page 22: Cleaning And Care
Cleaning and Care Cleaning and Care Take care! Risk of burns from residual heat. Warning! Sharp objects and abrasive cleaning materials will damage the appli- ance. Clean with water and washing up liquid. Warning! Residues from cleaning agents will damage the appliance. Remove residues with water and washing up liquid. -
Page 23: What To Do If
What to do if … What to do if … Problem Possible cause Remedy The cooking zones cannot be More than 10 seconds have Switch the appliance on again. switched on or are not operat- passed since the appliance was switched on The lock is switched on Switch off the lock (See the... - Page 24 What to do if … Problem Possible cause Remedy lights up Unsuitable cookware Use suitable cookware No cookware on the cooking Place cookware on the cooking zone zone The diameter of the bottom of Move onto a smaller cooking the cookware is too small for zone the cooking zone Use suitable cookware...
-
Page 25: Disposal
Disposal Disposal Packaging material The packaging materials are environmentally friendly and can be recycled. The plastic components are identified by markings, e.g. >PE<, >PS<, etc. Please dis- pose of the packaging materials in the appropriate container at the community waste disposal facilities. Old appliance The symbol on the product or on its packaging indicates that this product... -
Page 26: Installation Instructions
Installation Instructions Installation Instructions Safety instructions Warning! This must be read! The laws, ordinances, directives and standards in force in the country of use are to be followed (safety regulations, proper recycling in accordance with the regu- lations, etc.) Installation may only be carried out by a qualified electrician. The minimum distances to other appliances and units are to be observed. - Page 27 Installation Instructions Risk of injury from electrical current. • Loose and inappropriate plug and socket connections can make the terminal overheat. • Have the clamping connections correctly installed by a qualified electrician. • Use strain relief clamp on cable. • In the event of single-phase or two-phase connection, the appropriate mains cable of type H05BB-F Tmax 90°C(or higher) must be used.
-
Page 28: Guarantee/Customer Service
Assembly / Montage / Montage Assembly / Montage / Montage... - Page 29 Assembly / Montage / Montage...
- Page 30 Assembly / Montage / Montage...
- Page 31 Rating Plate / Plaque signalétique / Typeplaatje 68031K-MN 949 592 871 55GAD80AG 230 V 50 Hz 7,4 kW AEG-ELECTROLUX...
-
Page 32: Service
Guarantee/Customer Service Centres EURO-LINE APPLIANCES LENGTH OF WARRANTY EURO-LINE WILL PAY FOR: TWO YEAR FULL WARRANTY Replacement parts and/or labour to repair defects in materials or workmanship. Service from original date of purchase, including parts must be provided by an authorized Euro-Line and labour, to the first purchaser of this company (unless advised otherwise). -
Page 33: Rating Plate
EURO-PARTS, USA EURO-PARTS, CANADA EURO-LINE APPLIANCES Tel: 1-800-561-4614 Tel: 1-800-678-8352 1-800-421-6332 Fax: 1-519-528-5001 Fax: 1-519-528 5001 Tel. Direct: 1-905-829-3980 Fax: 1-905-829-3985 User Instructions & Installation Manual Service & Repair To save you time and money please have the following information ready in case you have to call for service: •...
Need help?
Do you have a question about the 68031K-MN and is the answer not in the manual?
Questions and answers