
Related Manuals for AEG 68002KF-N


Summary of Contents for AEG 68002KF-N
- Page 1 68002KF-N Glaskeramische inductie-kookplaat Ceramic glass induction hob Montage- en gebruiksaanwijzing Installation and Operating Instructions...
- Page 2 Geachte klant, Lees deze gebruiksaanwijzing zorgvuldig door en bewaar de gebruiks- aanwijzing zodat deze later kan worden geraadpleegd. Geef deze gebruiksaanwijzing door aan een eventuele volgende eige- naar van het apparaat. De volgende symbolen worden in de tekst gebruikt: Veiligheidsvoorschriften Waarschuwing! Aanwijzingen ten behoeve van uw persoonlijke veilig- heid.
-
Page 3: Table Of Contents
Inhoud Gebruiksaanwijzing ........Veiligheidsvoorschriften . -
Page 4: Gebruiksaanwijzing
Gebruiksaanwijzing 1 Veiligheidsvoorschriften Neem deze aanwijzingen in acht, omdat anders bij eventuele schade het recht op garantie vervalt. Dit apparaat is in overeenstemming met de volgende EG-richtlijnen: – 73/23/EEG van 19.02.1973 Laagspanningsrichtlijn – 89/336/EEG van 03.05.1989 EMC-richtlijn inclusief aangepaste richt- lijn 92/31/EEG –... - Page 5 Veiligheid tijdens het gebruik • Verwijder stickers en folies van het glaskeramiek. • Wanneer u onoplettend bent tijdens het werken met het apparaat, bestaat er risico op verbranding. • De snoeren van elektrische apparaten mogen niet tegen het hete ap- paraatoppervlak resp.
-
Page 6: Beschrijving Van Het Apparaat
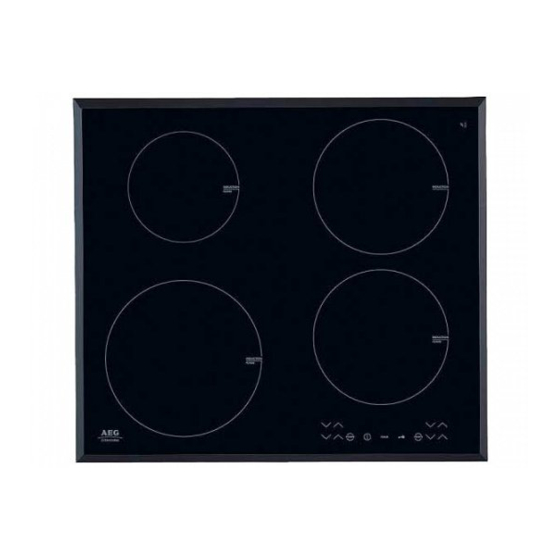
Beschrijving van het apparaat Uitrusting kookplaat Inductie-kookzone Inductie-kookzone 1400 W 1800 W Inductie-kookzone 2200W Bedieningsveld Inductie-kookzone 1800 W met Powerfunctie 2800W met Powerfunctie 2800 W Uitrusting bedieningsveld Kookzone-indicaties Indicatie Timerfunctie Kookstandkeuze Timer-indicatie Timer Aan/uit Powerfunctie met controlelampje Vergrendeling... -
Page 7: Touch-Control-Sensorvelden
Touch-control-sensorvelden Het apparaat wordt bediend door middel van touch-control-sensorvel- den. Functies worden door het aanraken van de sensorvelden gestuurd en door indicaties en akoestische signalen bevestigd. De sensorvelden moeten van bovenaf worden aangeraakt, zonder ande- re sensorvelden te bedekken. Sensorveld Functie Aan/uit Apparaat in- en uitschakelen... -
Page 8: Restwarmte-Indicatie
Restwarmte-indicatie Waarschuwing! Verbrandingsgevaar door restwarmte. Na het uitscha- kelen duurt het nog enige tijd voordat de kookzones zijn afgekoeld. Let op de restwarmte-indicatie. Restwarmte kan worden gebruikt voor het smelten en warmhouden van gerechten. De inductie-kookzones geven de voor het koken benodigde warmte, direct aan de onderkant van de pannen af. -
Page 9: Bedieningsveld Vergrendelen / Ontgrendelen
Bedieningsveld vergrendelen / ontgrendelen Het bedieningsveld kan met uitzondering van het sensorveld ”Aan/Uit“ op ieder gewenst moment worden vergrendeld, bijv. om het wijzigen van de instellingen als gevolg van het met een lap afnemen, te voorko- men. Bedieningsveld Indicatie Inschakelen aanraken (na 3 seconden) Uitschake-... -
Page 10: Kinderbeveiliging Gebruiken
Kinderbeveiliging gebruiken De kinderbeveiliging voorkomt ongewenst gebruik van het apparaat. Kinderbeveiliging inschakelen Stap Bedieningsveld Indicatie/signaal apparaat inschakelen (geen kookstand instellen) aanraken tot het signaal akoestisch signaal klinkt aanraken Apparaat wordt uitgeschakeld. Kinderbeveiliging is ingeschakeld. Kinderbeveiliging tijdelijk uitschakelen De kinderbeveiliging kan op deze manier eenmalig worden uitgescha- keld;... -
Page 11: Powerfunctie In-En Uitschakelen
Powerfunctie in-en uitschakelen De Powerfunctie geeft de voorste inductie-kookzones extra vermo- gen, om bijvoorbeeld een grote hoeveelheid water snel aan de kook te brengen. De Powerfunctie wordt bij de kookzone links voor 8 minuten en bij de kookzone rechts voor 5 minuten geactiveerd. Daarna schakelt de induc- tie-kookzone automatisch terug naar de kookstand Bedieningsveld Indicatie... -
Page 12: Timer Gebruiken
Timer gebruiken Alle kookzones kunnen tegelijk een van de beide Timerfuncties gebrui- ken. Functie Vereisten Resultaat na verloop van de tijd Automatische uit- bij een ingestelde akoestisch signaal schakeling kookstand knippert kookzone wordt uit- geschakeld Kookwekker bij niet gebruikte akoestisch signaal kookzones knippert Als een kookzone wordt uitgeschakeld, dan wordt tevens de ingestelde... - Page 13 Als meerdere Timerfuncties zijn ingesteld, dan wordt na een aantal se- conden de kortste resterende tijd van alle Timerfuncties aangegeven en knippert het bijbehorende controlelampje. Tijd instellen Stap Bedieningsveld Indicatie Kookzone se- Het controlelampje van de geselec- lecteren teerde kookzone knippert van de ge- minuten selecteerde kookzo-...
- Page 14 Tijd wijzigen Stap Bedieningsveld Indicatie kookzone se- Controlelampje van de geselecteerde lecteren kookzone knippert sneller Resterende tijd wordt aangegeven van de ge- minuten selecteerde kookzo- ne aanraken Na een aantal seconden knippert het controlelampje langzamer. De tijd is ingeschakeld. De tijd geeft de resterende tijd aan (loopt terug). Resterende tijd van een kookzone aangeven Stap Bedieningsveld...
-
Page 15: Veiligheidsuitschakeling
Veiligheidsuitschakeling Kookplaat • Als na het inschakelen van de kookplaat niet binnen ca. 10 seconden bij een kookzone een kookstand wordt ingesteld, schakelt de kook- plaat automatisch uit. • Wanneer alle kookzones worden uitgeschakeld, schakelt de kookplaat na ca. 10 seconden automatisch uit. Bedieningsveld Vochtigheid (bijv. -
Page 16: Tips Voor Koken En Braden
Tips voor koken en braden Aanwijzing met betrekking tot acrylamide Volgens de laatste wetenschappelijke inzichten kan een intensieve brui- ning van levensmiddelen, met name bij zetmeelhoudende producten, een gevaar voor de gezondheid door acrylamide veroorzaken. Om die reden adviseren wij levensmiddelen zoveel mogelijk bij lage temperatu- ren te bereiden en de gerechten niet te veel te bruinen. -
Page 17: Tips Voor Energiebesparing
Grootte van de pan Inductiekookzones passen zich tot op zekere hoogte automatisch aan de grootte van de bodem van het kookgerei aan. Het magnetische deel van de panbodem moet echter afhankelijk van de grootte van de kook- zone een minimale diameter hebben. Diameter Minimumdiameter kookzone [mm]... -
Page 18: Toepassingsvoorbeelden Voor Het Koken
Toepassingsvoorbeelden voor het koken De gegevens in de volgende tabel dienen slechts als richtlijn. Kook- Kook- Geschikt voor Duur Aanwijzingen/tips stand proces uit-stand Warm Warm houden van gare Naar be- Afdekken houden gerechten hoefte Hollandaisesaus, Smelten smelten van boter, 5-25 min. Tussendoor omroeren chocolade, gelatine Schuimomelet, bouillon... -
Page 19: Reiniging En Onderhoud
Reiniging en onderhoud Voorzichtig! Verbrandingsgevaar door restwarmte. Let op! Bijtende en schurende schoonmaakmiddelen beschadigen het apparaat. Schoonmaken met water en handafwasmiddel. Let op! Resten van schoonmaakmiddelen beschadigen het apparaat. Verwijder resten met water en handafwasmiddel. Reinig het apparaat na ieder gebruik 1. -
Page 20: Wat Is Er Aan De Hand Als
Wat is er aan de hand als … Storing Mogelijke oorzaak Oplossing De kookzones kunnen niet Sinds het inschakelen van Apparaat opnieuw inscha- worden ingeschakeld of het apparaat zijn meer dan kelen. werken niet 10 seconden verstreken De vergrendeling is inge- Vergrendeling uitschake- schakeld len (zie hoofdstuk ”Bedie-... - Page 21 Storing Mogelijke oorzaak Oplossing knippert Ongeschikt kookgerei Geschikt kookgerei gebrui- Geen kookgerei op de Kookgerei plaatsen kookzone De diameter van de bodem Op een kleinere kookzone van het kookgerei is te plaatsen klein voor de kookzone Geschikt kookgerei gebrui- brandt Oververhittingbeveiliging Kookzone uitschakelen van de kookzone is geacti-...
-
Page 22: Afvalverwerking
Afvalverwerking Verpakkingsmateriaal De verpakkingsmaterialen zijn niet schadelijk voor het milieu en her- bruikbaar. De kunststoffen hebben de volgende aanduidingen, bijv. >PE<, >PS<, enz. Verwijder de verpakkingsmaterialen in overeenstem- ming met de aanduiding bij de gemeentelijke inzamelplaatsen in de daarvoor bestemde containers. Oud apparaat verwijderen Het symbool op het product of op de verpakking wijst erop dat dit... -
Page 23: Montageaanwijzing
Montageaanwijzing Veiligheidsvoorschriften De in het land van gebruik geldende wetgeving, verordeningen, richtlij- nen en normen dienen te worden nageleefd (veiligheidsvoorschriften, vakkundige recycling volgens de voorschriften, enz.). De montage mag slechts door een gekwalificeerd technicus worden uit- gevoerd. De minimumafstanden tot andere apparaten en meubelen dienen in acht te worden genomen. - Page 24 • Als de aansluitkabel van dit apparaat beschadigd is, moet deze door een speciale aansluitkabel (type H05BB-F Tmax 90°; of hoger) worden vervangen. Deze is verkrijgbaar bij de service-dienst. • De netkabel van dit apparaat is rechtstreeks op de printplaat gemon- teerd.
-
Page 25: Garantievoorwaarden
Garantievoorwaarden Nederland Onze producten worden met de grootst mogelijke zorgvuldigheid geproduceerd. Desondanks kan het voorkomen dat er een defect optreedt. Onze servicedienst zal dit op verzoek herstellen, zowel binnen als buiten de garantietermijn. De levensduur van het product wordt daardoor niet negatief beïnvloed. - Page 26 producten dient de gebruiker zich te vergewissen van de bepalingen in Nederland. Noodzakelijke of gewenste aanpassingen vallen niet onder de garantie, en kunnen niet altijd worden aange- bracht. Ook na afloop van de garantietermijn staat onze servicedienst u ter beschikking. Adres Servicedienst: Electrolux Service Vennootsweg 1...
-
Page 27: Adres Service-Afdeling
Adres service-afdeling Nederland AEG fabrieksservice Postbus 120 2400 AC Alphen aan den Rijn Service-informatielijn tel. 0172-468 300 (voor bezoek servicetechnicus en onderdelen) Consumentenbelangen tel. 0172-468 172 (voor algemene, product- of gebruiksinformatie) www.aeg.nl... -
Page 29: Service
Service Controleer bij technische storingen eerst of u met behulp van de ge- bruiksaanwijzing (hoofdstuk „Wat te moet doen als…“) het probleem zelf kunt oplossen. Wanneer u het probleem niet kunt oplossen, neemt u contact op met onze service-afdeling. Om u snel te kunnen helpen, hebben wij de volgende gegevens nodig: –... -
Page 30: Dear Customer
Dear Customer, Please read these user instructions carefully and keep them to refer to later. Please pass the user instructions on to any future owner of the appli- ance. The following symbols are used in the text: Safety instructions Warning! Notes that concern your personal safety. Important! Notes that show how to avoid damage to the appliance. - Page 31 Contents Operating Instructions ........32 Safety instructions.
-
Page 32: Operating Instructions
Operating Instructions 1 Safety instructions Please comply with these instructions. If you do not, any damage re- sulting is not covered by the warranty. This appliance conforms with the following EU Directives: – 73/23/EEC dated 19.02.1973 Low Voltage Directive – 89/336/EEC dated 03.05.1989 EMC Directive inclusive of Amending Directive 92/31/EEC –... -
Page 33: Safety During Use
Safety during use • Remove stickers and film from the glass ceramic. • There is the risk of burns from the appliance if used carelessly. • Cables from electrical appliances must not touch the hot surface of the appliance or hot cookware. •... -
Page 34: Description Of The Appliance
Description of the Appliance Cooking surface layout Induction cooking zone 1800 W Induction cooking zone 1400 W Induction cooking zone 2200 W Control panel Induction cooking zone 1800 W with power function 2800 W with power function 2800 W Control panel layout Cooking zone indicators Display Timer function... -
Page 35: Touch Control Sensor Fields
Touch Control sensor fields The appliance is operated using Touch Control sensor fields. Functions are controlled by touching sensor fields and confirmed by displays and acoustic signals. Touch the sensor fields from above, without covering other sensor fields. Sensor field Function On / Off Switches appliance on and off... -
Page 36: Residual Heat Indicator
Residual heat indicator Warning! Risk of burns from residual heat. After being switched off, the cooking zones need some time to cool down. Look at the residual heat indicator Residual heat can be used for melting and keeping food warm. The induction cooking zones create the heat required for cooking di- rectly in the base of the cookware. -
Page 37: Locking/Unlocking The Control Panel
Locking/unlocking the control panel The control panel, with the exception of the “On/Off” sensor field, can be locked at any time in order to prevent the settings being changed e.g. by wiping over the panel with a cloth. Control panel Display Switch on Touch... - Page 38 Releasing the child safety device Step Control panel Display/Signal Switch on the appliance Touch until the signal sounds Acoustic signal Touch Appliance switches off. The child safety device is released.
-
Page 39: Switching The Power Function On And Off
Switching the power function on and off The power function makes additional power available to the front induction cooking zones, e.g. to bring a large volume of water to the boil. The power function is activated for 8 minutes for the front left cooking zone and for 5 minutes for the front right cooking zone. -
Page 40: Using The Timer
Using the timer All cooking zones can use each use one of the two timer functions at the same time. Function Condition Outcome after the time has elapsed Automatic cut-out a heat setting is set acoustic signal flashes Cooking zone switches off Countdown timer cooking zones not in use... -
Page 41: Switching Off The Timer Function
If the pilot light is flashing more slowly, the heat setting indicator ap- pears again and the heat setting can be re-set or modified. If other timer functions are set, after a few seconds the shortest re- maining time of all the timer functions is displayed and the corre- sponding pilot light flashes. -
Page 42: Changing The Time
Changing the time Step Control panel field Display Select cooking Pilot light of the cooking zone select- zone ed flashes faster The time remaining is displayed 01 to 99 minutes Touch the cooking zone se- lected After a few seconds the pilot light flashes more slowly. The time is set. -
Page 43: Safety Cut-Out
Safety cut-out Cooking surface • If after switching on the cooking surface, a heat setting is not set for a cooking zone within approx. 10 seconds, the cooking surface auto- matically switches itself off. • If all cooking zones are switched off, the cooking surface automati- cally switches itself off after approx. -
Page 44: Tips On Cooking And Frying
Tips on cooking and frying Information about acrylamides According to the latest scientific research, intensive browning of food, especially in products containing starch, may present a health risk due to acrylamide. Therefore we recommend cooking at low temperatures and not browning foods too much. Cookware for induction cooking zones Cookware material Cookware material... -
Page 45: Tips On Energy Saving
Pan size Induction cooking zones adapt automatically to the size of the bottom of the cookware up to a certain limit. However the magnetic part of the bottom of the cookware must have a minimum diameter depending upon the size of the cooking zone. Diameter of cooking zone Minimum diameter of dish base [mm]... -
Page 46: Examples Of Cooking Applications
Examples of cooking applications The information given in the following table is for guidance only. Heat Cooking set- suitable for Cook time Tips/Hints process ting Off position Keeping Keeping cooked foods food as required Cover warm warm Hollandaise sauce, Melting melting butter, chocolate, 5-25 mins. -
Page 47: Cleaning And Care
Cleaning and care Take care! Risk of burns from residual heat. Important Sharp objects and abrasive cleaning materials will damage the appliance. Clean with water and washing up liquid. Important Residues from cleaning agents will damage the appliance. Remove residues with water and washing up liquid. Cleaning the appliance after each use 1. -
Page 48: What To Do If
What to do if … Problem Possible cause Remedy The appliance cannot be More than 10 seconds have Switch the appliance on switched on or is not oper- passed since the appliance again. ating was switched on The lock is switched on Switch off the lock (See the section “Locking/un- locking the control panel”) - Page 49 Problem Possible cause Remedy flashes Unsuitable cookware Use suitable cookware No cookware on the cook- Place cookware on the ing zone cooking zone The diameter of the bot- Move onto a smaller cook- tom of the cookware is too ing zone small for the cooking zone Use suitable cookware is lit...
-
Page 50: Disposal
Disposal Packaging material The packaging materials are environmentally friendly and can be recy- cled. The plastic components are identified by markings, e.g. >PE<, >PS<, etc. Please dispose of the packaging materials in the appropriate container at your local waste disposal facilities. Old appliance The symbol on the product or on its packaging indicates that this... -
Page 51: Installation Instructions
Installation Instructions Safety instructions The laws, ordinances, directives and standards in force in the country of use are to be followed (safety regulations, proper recycling in accord- ance with the regulations, etc.) Installation may only be carried out by a qualified electrician. The minimum distances to other appliances and units are to be ob- served. - Page 52 • If this appliance’s mains cable is damaged, it must be replaced by a special cable (type H05BB-F Tmax 90°; or higher). The latter is availa- ble from the Customer Care Department. • This appliance’s mains cable is fixed directly to the board. If the mains cable is damaged, it must only be replaced by a qualified ecletrician or our Customer Care Department.
-
Page 53: Warranty Conditions
Great Britain Standard guarantee conditions We, AEG, undertake that if within 12 months of the date of the purchase this AEG appliance or any part thereof is proved to be defective by reason only of faulty workmanship or materials, we... -
Page 54: Service And Spare Parts
AEG appliance, or for further information on AEG products please contact our Customer Care Depart- ment by letter or telephone at the address below or visit our website at www.aeg.co.uk. Customer Care Department For Customer Service in the Republic Major Appliances... -
Page 55: Montage
Montage / Assembly... - Page 59 Typeplaatje / Rating Plate 68002KF-N 949 592 559 55GADD5AU 230 V 50 Hz Induction 7,2 kW 7,2 kW AEG - ELECTROLUX...
- Page 60 USD 14 billion in more than 150 countries around the world. AEG Hausgeräte GmbH Postfach 1036 D-90327 Nürnberg http://www.aeg-electrolux.de © Copyright by AEG Wijzigingen voorbehouden 822 930 212-A-010206-01 Subject to change without notice...
Need help?
Do you have a question about the 68002KF-N and is the answer not in the manual?
Questions and answers