Table of Contents
Advertisement
Quick Links
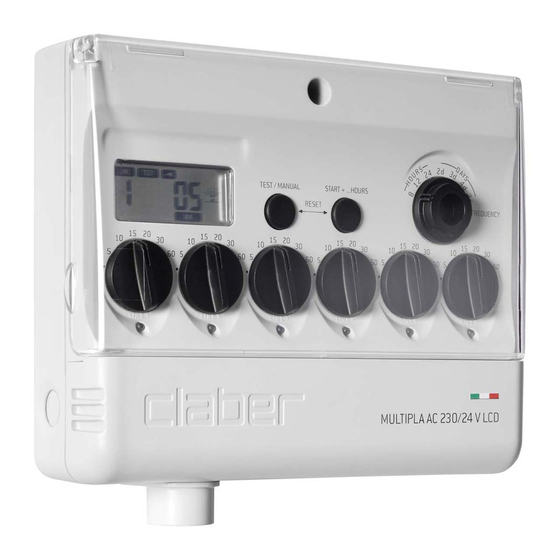
Fix the timer to a wall in a covered location, sheltered from weather and splashing water; ambient temperature
between 0 and 50 °C. Do not install the timer outdoors or in underground valve box.
1
1
OK!
2d
3d
4d
7d
ENCY
24h
FREQU
12h
URS
8h
20
30
60
T +
...HO
10
STAR
15
20
30
5
60
MAN
RESE
UAL
T
10
TEST/
15
20
30
5
60
10
15
20
60
30
5
10
15
30
20
5
60
10
15
20
60
30
5
/24V
LCD
10
230
5
LA
AC
MU
LTIP
NO!
3d
4d
24h
2d
7d
ENCY
12h
FREQU
8h
20
30
...HO
URS
60
T +
STAR
20
30
10
T
15
5
60
MAN
UAL
RESE
20
30
10
TEST/
15
5
60
20
30
10
15
60
5
20
10
15
30
60
5
10
LCD
15
20
30
60
5
/24V
10
AC
230
5
LTIP
LA
MU
For Multipla AC 230/24V LCD (p/n): 8058
Electrical connections.
For Multipla AC 230/24V LCD (p/n): 8058
Multipla AC LCD
Multipla AC LCD
2
2
max. 50°C
min. 0°C
6mm
2d
3d
4d
7d
Y
24h
FREQ
UENC
12h
20
30
URS
8h
60
T +
...HO
10
STAR
15
20
30
60
5
UAL
T
10
TEST
/MAN
RESE
15
20
30
5
10
60
20
30
15
5
60
10
15
20
30
5
60
10
15
20
60
30
5
/24
V LCD
10
230
5
LA
AC
MU
LTIP
24AC
Grommet
1
2
A
B
Relè
Claber
to pump
220 V
Claber
relay
Page 1
a
a
6mm
b
b
TSP 4x30
c
c
3d
4d
2d
7d
CY
U EN
h
24
EQ
FR
h
12
20
30
8h
R S
O U
60
... H
T +
10
A R
ST
20
30
5
15
60
U A
L
T
S E
10
A N
R E
/M
ST
20
30
TE
5
15
60
10
20
30
5
15
60
10
20
30
5
15
60
10
D
L C
20
30
4 V
5
15
60
0 /2
2 3
10
A C
IP L
A
5
L T
M U
MULTIPLA AC 230/24V
9Volt
ALCALINA
Jumper
3
4
5
6
Line valves
User manual
User manual
3
3
24
h
h
12
8h
R S
O U
... H
T +
A R
ST
20
30
15
L
U A
T
A N
S E
10
R E
/M
ST
20
30
TE
5
15
60
10
20
30
5
15
60
10
20
30
5
15
60
10
20
30
15
5
60
10
5
L T
M U
a
a
3 d
4 d
2 d
7 d
Y
N C
U E
2 4
h
E Q
FR
1 2
h
2 0
3 0
8 h
c
6 0
c
.. .
T +
1 0
A R
S T
2 0
3 0
1 5
5
L
6 0
U A
A N
T
1 0
S E
/M
S T
R E
2 0
3 0
T E
5
1 5
6 0
1 0
2 0
3 0
5
1 5
6 0
1 0
2 0
3 0
5
1 5
6 0
1 0
2 0
3 0
5
1 5
6 0
1 0
5
6mm
U A
L
e
A N
S E
e
R E
/M
T E
ST
20
30
5
15
60
10
20
30
5
15
60
10
20
30
5
15
60
10
5
6mm
d
d
RS
Rain
Sensor
(optional)
a
a
3d
4d
2d
7d
CY
U EN
FR
EQ
20
30
60
10
5
60
D
L C
4 V
0 /2
2 3
A C
A
IP L
b
b
TSP 4x30
3d
4d
2d
7d
C Y
U EN
h
24
EQ
FR
h
12
20
30
8h
R S
O U
60
.. .H
T +
10
A R
20
30
ST
5
15
60
T
10
20
30
5
15
60
10
f
f
Advertisement
Table of Contents

Related Manuals for claber Multipla AC LCD


Summary of Contents for claber Multipla AC LCD
- Page 1 Multipla AC LCD Multipla AC LCD User manual User manual Page 1 Fix the timer to a wall in a covered location, sheltered from weather and splashing water; ambient temperature between 0 and 50 °C. Do not install the timer outdoors or in underground valve box.
- Page 2 Multipla AC LCD Multipla AC LCD User manual User manual Page 2 Remove the cover of the battery pocket from its seat, connect the battery and position it in the pocket, with a light pressure. Use only a new 9 volt alkaline battery, type IEC 6LR61. When the battery is inserted, the message OFF will be displayed.
- Page 3 Multipla AC LCD Multipla AC LCD User manual User manual Page 3 The test function can be used to perform a quick check on the system that will ensure its correct operation, by activating a given valve manually for a preset duration of 5 minutes. If there is a watering cycle in progress, it can be interrupted by pressing TEST and START+…...
- Page 4 Multipla AC LCD Multipla AC LCD User manual User manual Page 4 To set the watering frequency, turn the FREQUENCY selector to the required position (every 8, 12 or 24 hours, or 2, 3, 4 or 7 days) 12 1 For Multipla AC 230/24V LCD (p/n): 8058 To start the programme immediately, press START+…once.
- Page 5 Multipla AC LCD Multipla AC LCD User manual User manual Page 5 To delay the start of the programme, press START+… a second time before 5 seconds have elapsed, to set a delay of one hour, a third time for two hours, and so on up to 23 hours. The display temporarily indicates the number of hours delay selected, then the watering standby signal appears, along with the time remaining until the start of the rst cycle.
- Page 6 Multipla AC LCD Multipla AC LCD User manual User manual Page 6 Example of programming: at 16:30, the duration is selected for all of the watering lines (LINE selectors) and the frequency is set at 8h (FREQUENCY selector). Suppose that watering is not required immediately, but at 22:30 (i.e.
- Page 7 Multipla AC LCD Multipla AC LCD User manual User manual Page 7 The STOP function interrupts the watering cycle currently in progress. Watering will restart as normal with e ect from the cycle following the selected pause, as programmed by positioning the FREQUENCY selector.
Need help?
Do you have a question about the Multipla AC LCD and is the answer not in the manual?
Questions and answers