Table of Contents
Advertisement
Quick Links
Advertisement
Table of Contents

Related Manuals for Marantz DLPTM VP-12S3/VP-12S3L


Summary of Contents for Marantz DLPTM VP-12S3/VP-12S3L
- Page 1 Model VP-12S3 / VP-12S3L User Guide Projector...
-
Page 2: For The Customers In Canada
CAUTION: TO REDUCE THE RISK OF ELECTRIC SHOCK, REFER SERVICING TO QUALIFIED SERVICE PERSONNEL WARNING TO REDUCE THE RISK OF FIRE OR ELECTRIC SHOCK, DO NOT EXPOSE THIS PRODUCT TO RAIN OR MOISTURE. CAUTION: TO PREVENT ELECTRIC SHOCK, MATCH WIDE BLADE OF PLUG TO WIDE SLOT, FULLY INSERT. -
Page 3: Important Safety Instructions
IMPORTANT SAFETY This product was designed and manufactured to meet strict quality and safety standards. There are, however, some installation and operation precautions which you should be particularly aware of. Read these instructions - All the safety and operating instructions should be read before the product is operated. Keep these instructions - The safety and operating instructions should be kept for future reference. - Page 4 • If the lamp breaks, unplug the AC power cord from AC power outlet and call for Marantz authorized dealer to replace it. Do not replace the lamp yourself or clean up broken glass inside the projector as this can result in cuts and burns to you or damages inside the projector.
- Page 5 • Se a lâmpada quebrar, desligue o cabo de alimentação de CA da tomada e entre em contacto com o representante autorizado da Marantz para que faça a substituição. Não tente fazer a substituição nem limpar os estilhaços de vidro de dentro do projector, pois pode resultar em cortes e queimaduras ou ainda danos ao projector.
-
Page 6: Table Of Contents
TABLE OF CONTENTS IMPORTANT SAFEGUARDS ...1 Caution:Concerning the Lamp Replacement ...1 Caution:Concerning the Lamp Unit ...1 Caution:Concerning the Setup of the Projector ...1 Notes on Operation ...1 FEATURES ...2 ACCESSORIES ...3 PROJECTOR LAYOUT AND FUNCTIONAL OVERVIEW...4 Front and Top View ...4 Rear and Terminals View ...5 Bottom View ...5 Remote Controller ...6... -
Page 7: Important Safeguards
Caution Concerning the Lamp Unit There is a potential hazard of glass particle if the lamp ruptures. In case of lamp rupture,contact your nearest Marantz Authorized Dealer or Service Center for a replacement. See “Replacing Lamp Unit”. ( P.34) WARNING... -
Page 8: Features
• Incorporates a Minolta optical system custom-made for Marantz projectors featuring a 13-section 14-lens system that uses anomalous dispersion glass to minimize color aberration. Images come out sharply focused. • O.R.C.A. (Optically Reproducing Color Accurately) filter that greatly improves color purity. -
Page 9: Accessories
It is almost impossible to have zero pixel defects, even using the most advanced technology. This is not a problem only for Marantz, but all projector manufactures. Therefore we have to note that the warranty does not cover the DMD defects. -
Page 10: Projector Layout And Functional Overview
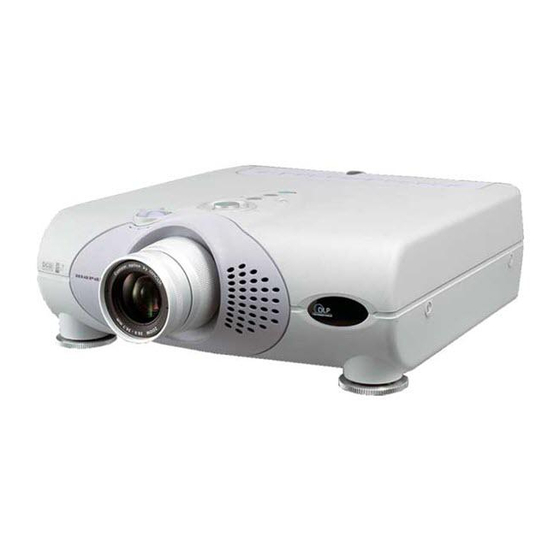
PROJECTOR LAYOUT AND FUNCTIONAL OVERVIEW Front and Top View Projection Lens q Focus ring ( P.10) Adjust the picture focus. w Zoom ring ( P.10) Adjust the size of the projected image. e Lens Shift knob ( P.10) Manually adjust the position of the image vertically. r POWER button ( P.10) Press to turn the projector ON or STANDBY mode. -
Page 11: Rear And Terminals View
REMOTE switch (EXT. / INT.) When using this projector independently, set this switch to "INT.". When using this projector in a system with a Marantz DVD player or AV Receiver equipped with a remote sensor, set the switch to "EXT.". -
Page 12: Remote Controller
Remote Controller STANDBY POWER ON PATTERN PATT. MENU V-MUTE ENTER INPUT ASPECT INPUT MODE ASPECT COMP.1 THEATER FULL COMP.2 NORMAL S-VIDEO DYNA. ZOOM VIDEO USER THROUGH CINEMA INFO ¡0 LIGHT ¡1 REMOTE CONTROLLER RC-12VPS3 a STANDBY button ( P.21) Turn the projector off. s MENU button ( P.23) Display the on-screen menu. -
Page 13: Remote Controller Operational Range
™4 USER button ( P.32) Selects the user mode. The user mode is for enjoying images at a user-selected gamma curve. Every time the button is pressed, the selection rotates in the order of User A1 ➔ User A2 ➔ User A3 ➔ User B1 ➔ User B2 ➔... -
Page 14: Connection
CONNECTION ❖ When making connections be sure to: • Turn off all equipment before making any connections. • Use the proper cables for each connection. • Securely insert the plug into the port to connect cables. Loose cables can lead to trouble and damage. ❖... -
Page 15: Connection With A Hd-Video, Satellite, Cable Tuner Or Pc
For the details of the DVI-D terminal on the device connected with the unit, see the instruction manual of the device. RGB (D-Sub monitor) cable (commercially available) Advanced Connection You can control total home theater system using PC or Marantz receiver equipment. For installing below system, consult with Marantz authorized dealer. RS-232C cable (straight type, commercially available) -
Page 16: Initial Setting
INITIAL SETTING Turning on the Power Connect the supplied AC power cord. ( Press the POWER ON button on the remote controller or the POWER button on the projector. The POWER ON indicator lights up. Zooming and Focusing Project an image on the screen roughly at first. Turn the Zoom ring and adjust to the desired size within the zoom range. -
Page 17: Adjusting The Height
❖ Turn the Lens Shift knob to counterclockwise : The image goes down. Down Adjusting the Height You can position the projected image by changing the height of the projector’s adjusters. Move the adjuster lever to the left or right to enable adjuster changing. Carefully lift the projector. Once having positioned the projector, return the adjuster lever as before to lock in place. -
Page 18: Keystone Correction
Turn the Focus ring to make an adjustment. Adjust the focus for the sharpest image possible to obtain, using focus pattern. Press the PATTERN button again to hide the focus pattern. This completes fine focusing. Keystone Correction When the projecting image is a trapezoid, correct it in Keystone-V and/or Keystone-H in the Display Menu. See “Display”. -
Page 19: Installation
Screen Range from light axis to upper end CAUTION – For ceiling installation, consult with Marantz authorized dealer. – Do not look into the lens when the projector is turned on. It could damage your eyesight. Screen upper end Range from light axis to upper end... -
Page 20: Screen Size And Projection Distance (Inch) Vp-12S3
Screen Size and Projection Distance (inch) VP-12S3 ❖ 16 : 9 Screen In case of displaying the 16:9 picture on the whole of the 16:9 screen. Width : Image size = Screen size ❖ 4 : 3 Screen In case of displaying the 16:9 picture on the whole of the 4:3 screen. -
Page 21: Screen Size And Projection Distance (M) Vp-12S3
Screen Size and Projection Distance (m) VP-12S3 ❖ 16 : 9 Screen In case of displaying the 16:9 picture on the whole of the 16:9 screen. Width : Image size = Screen size ❖ 4 : 3 Screen In case of displaying the 16:9 picture on the whole of the 4:3 screen. -
Page 22: Screen Size And Projection Distance (Inch) Vp-12S3L
Screen Size and Projection Distance (inch) VP-12S3L ❖ 16 : 9 Screen In case of displaying the 16:9 picture on the whole of the 16:9 screen. Width : Image size = Screen size ❖ 4 : 3 Screen In case of displaying the 16:9 picture on the whole of the 4:3 screen. -
Page 23: Screen Size And Projection Distance (M) Vp-12S3L
Screen Size and Projection Distance (mm) VP-12S3L ❖ 16 : 9 Screen In case of displaying the 16:9 picture on the whole of the 16:9 screen. Width : Image size = Screen size ❖ 4 : 3 Screen In case of displaying the 16:9 picture on the whole of the 4:3 screen. -
Page 24: Basic Operations
BASIC OPERATIONS Turning on the Power Press the POWER ON button on the remote controller or the POWER button on the projector. The POWER ON indicator lights up. Selecting the Input Signal Source Switch to the equipment connected to the projector. Pressing the INPUT button on the projector or remote control rotates the input signal in the order of COMPONENT1 ➔... -
Page 25: The Screen Images In A 16:9 Screen
The Screen Images in a 16:9 screen • Press the ZOOM button, the NORMAL button or the FULL button on the remote controller for the 4:3 aspect ratio video source. • Press the FULL button on the remote controller for 16:9 aspect ratio video source, such as 1080i, 1035i, and 720p video systems. •... -
Page 26: The Screen Images In A 4:3 Screen
The Screen Images in a 4:3 screen • Press the ZOOM button, the NORMAL button or the FULL button on the remote controller for the 4:3 aspect ratio video source. • Press the FULL button on the remote controller for 16:9 aspect ratio video source, such as 1080i, 1035i, and 720p video systems. •... -
Page 27: To Turn Off The Power
To Turn off the Power Press the STANDBY button on the remote controller or the POWER button on the projector. The fan continues running for about 1 minute to internally cool the projector. In the meantime, the POWER ON indicator on the projector flashes a blue color and buttons on the projector and remote control are irresponsive to touch. -
Page 28: Operations
OPERATIONS Menu Structure Main Menu Picture Adjust Contrast P.24 Brightness Color Sharpness Tint Noise Reduction Color Temp. (Temperature) Fine Menu Setting Lamp mode P.27 High Bright Aspect VCR Mode Cinema Iris Black Setup During DVI input, “NORMAL” or “EXPAND” is shown. System Component 1 P.28... -
Page 29: How To Operate Menus
How to Operate Menus This projector has menus that make setting and adjustment easy. Press the MENU button. The MENU screen appears on the screen. Use the buttons to select a menu (Picture Adjust, Setting, System, Display, Configuration, Trigger2, Preset) and press the button. -
Page 30: Picture Adjust
Picture Adjust Picture quality in each of the picture modes can be adjusted to your liking and those adjustments can be saved in memory. This projector makes 3 memory indexes available for each of the picture modes. ❖ For a video signal input, the following adjustments can be made: Item Contrast Weak... -
Page 31: Fine Menu
Fine Menu By adjusting this Fine Menu, you can make fine picture adjustment. Note : There are some parameters can not adjust according to input signal. ❖ Luminance FineMenu Luminance H Detail Gain Chrominance H Detail Threshold Sub Control H Edge Gain Miscellaneous H Edge Threshold V Detail Gain... -
Page 32: Sub Control
❖ Sub Control FineMenu Luminance Contrast Red Chrominance Contrast Green Sub Control Contrast Blue Miscellaneous Brightness Red Brightness Green Brightness Blue Clamp Position Clamp Width Contrast Red : This menu allows the users to set the contrast for red. Contrast Green : This menu allows the users to set the contrast for green. -
Page 33: Setting
Setting The following settings can be made: Menu Picture Adjust Lamp Mode High Setting High Bright System Aspect Normal Display VCR Mode Auto Config Cinema F5.0 Trigger 2 Iris 0 IRE Preset Black Setup Lamp Mode High, Low High Bright On, Off High Bright On : Display brightest image. -
Page 34: System
System The following settings can be made: Menu Picture Adjust Component 1 Auto Setting Component 2 Auto System S-Video Auto Display Video Auto Auto Config Trigger 2 Preset Component1 Auto, NTSC, PAL, 480p, 540p, 576p, 720p, 1035i, 1080i Component2 Auto, NTSC, PAL, 480p, 540p, 576p, 720p, 1035i, 1080i S-Video System Auto, NTSC, PAL, SECAM Video System Auto, NTSC, PAL, SECAM... -
Page 35: Display
Display The following adjustments can be made: Menu Picture Adjust Keystone V Setting Keystone H System Auto Adjust Display Picture Shift V Config Size V Trigger 2 Picture Shift H Size H Preset Phase – Keystone H, V Adjust trapezoid image to rectangle image. –... -
Page 36: Configuration
Configuration The following adjustments can be made: Menu Picture Adjust Auto Power Off Disable Setting OSD Position 16:9 System Language English Display Ceiling Config Rear Trigger 2 Color Temp. Calibration Reset Lamp Life Preset Reset All – Auto Power Off When the auto power off feature is turned on, power to the projector automatically shuts off if no signals are received and no operations are performed for about 10 consecutive minutes. -
Page 37: Trigger 2
– Reset All All settings are reset to the factory default settings except the lamp life. When the user selects “Yes”, the following message appears: Again, select “Yes”, and press the ENTER button. ❖ Setting the Config Menu Select the desired menu item and press the Setting items appears on the screen. -
Page 38: Preset
Preset The picture mode can also be selected from the MENU screen. This projector offers 6 picture modes: Theater, Standard, Dynamic, User A, User B and User C. Moreover, each of these picture modes has 3 indexes for memorizing picture quality adjustments. •... -
Page 39: Maintenance
MAINTENANCE Lamp Life and Replace Lamp ❖ Lamp Life Display the remaining lamp life by pressing the INFO. button on the remote controller. Information Video Input Component-1080i Preset User A1 Gamma Cinema Mode Auto Aspect Normal Trigger 2 Lamp Life 921 Hours Total Hours 3653 Hours... -
Page 40: Replacing Lamp Unit
• Do not loosen any screws except for those mentioned below. • The lamp may break if handled improperly. • Do not use other than a Marantz replacement lamp unit. ❖ How to replace the Lamp Unit PREPARATION: When replacing the lamp, turn off the power for the projector. - Page 41 Remove the lamp cover screw. Remove the lamp cover in the direction of the arrow. Lamp cover Open the cover sheet and remove the two screws (slotted head screwdriver required) that lock down the lamp unit. Do not remove any other screws. Cover sheet Holding the handle and pull the lamp unit out toward your side.
-
Page 42: Color Temperature Adjustment
Color Temperature Adjustment After replacing the lamp or in other cases where the lighting changes, color temperature can be adjusted using the included color temperature sensor. In the adjustment procedure, you must first initialize the sensor itself before adjusting color temperature. -
Page 43: Cleaning The Lens
: MOUNT 12 This kit is specially designed to mount the unit on ceiling. • Extension Pole : EXT-81 This tool is to adjust height with the Ceiling Mount Kit MOUNT 12. CAUTION: For ceiling installation, consult with the Marantz Authorized dealer. -
Page 44: Troubleshooting
(center) position? Note: • If the lamp still does not function after the replacement and initialization of the lamp life, contact a Marantz authorized dealer, or service center. Note: This projector uses a microcomputer. External noise can cause malfunctions. In such case, shut power OFF and unplug the power cable from AC power outlet. -
Page 45: Error Mode
ERROR MODE WARNING/LAMP indicator, POWER ON indicator, and STANDBY indicator diagnose error mode of the projector as follows. Error mode WARNING /LAMP Lamp cover Lamp Temperature Flashing Flashing Color temperature adjustment Other Flashing ON SCREEN MESSAGE Use the list below to check the message displayed on the screen. Message NO SIGNAL No input signal. -
Page 46: Specifications
SPECIFICATIONS ❖ Optical characteristics Panel 0.8 inch 16:9 1280 x 720 pixels Digital Micromirror Device Lamp Super High Pressure 200W DC Lens f: 26.5 to 30.7mm (VP-12S3) 40.9 to 55.3mm (VP-12S3L) F: F3.0/F5.0 Projection size 40 to 250 inches Light output 600/700 ANSI LUMEN typical (F5.0/F3.0) ❖... -
Page 47: Timing Chart
❖ Timing chart V ( Hz ) System Resolution NTSC 768x240 59.94 / 60 PAL-B/G 960x287.5 SECAM 960x287.5 480/60p 720x480 59.94 / 60 576/50p 720x576 1035/60i 1920x518 59.94 / 60 1080/60i 1920x540 59.94 / 60 1080/50i 1920x540 1080/48i 1920x540 720/60p 1280x720 59.94 / 60 720/50p... -
Page 48: Dimensions
DIMENSIONS ❖ POWER POWER STANDBY MENU LAMP WARRNING ENTER PATTERN INPUT DOWN RIGHT LEFT SHIFT LENS 3/16 ( 82.6) (182.5) ❖ Front VP-12S3 ❖ Bottom (145.75) 11/16 (93.5) (110.0) 25/32 (19.75) 21/32 (222.0) ❖ Rear (171.0) 23/32 9/32 (185.25) 11/16 1/32 (153.5) (105.0) -
Page 49: Glossary
GLOSSARY Aspect ratio Width and height ratio of an image. The normal aspect ratio of a computer and video image is 4 : 3. There are also wide images with an aspect ratio of 16 : 9 and 21 : 9. Black Level (Black setup) The signal level which represents black picture intensity. - Page 50 You can find your nearest authorized distributor or dealer on our website. JAPAN Marantz Japan, Inc. U.S.A. Marantz America, Inc. EUROPE Marantz Europe B.V. Printed in Japan 35-1 Sagami Ohno 7-Chome, Sagamihara-shi, Kanagawa 228-8505, Japan 1100 Maplewood Drive, Itasca, IL 60143, U.S.A.
Need help?
Do you have a question about the DLPTM VP-12S3/VP-12S3L and is the answer not in the manual?
Questions and answers