Advertisement
Quick Links
Advertisement

Related Manuals for Heatmiser RC2-WTS1


Summary of Contents for Heatmiser RC2-WTS1
- Page 1 Model: RC2-WTS Model: RC2-WTS...
-
Page 2: Product Image
Model: RC2-WTS Wireless Receivers Wireless Receivers... -
Page 3: Table Of Contents
Table of Contents Product Image Table of Contents Installation Procedure Pairing Instructions LED’s Explained Wiring Diagram Notes 9-10 Model: RC2-WTS... -
Page 4: Installation Procedure
Installation Procedure Please read the instructions fully so you get the best from our product. This receiver is designed to be flush mounted and requires a back box of 35mm (minimum depth) to be sunk into the wall prior to installation. Step 1 Carefully separate the front half of the receiver from the back plate by placing a small flat head terminal driver into the slots on the bottom face of the receiver. - Page 5 Model: RC2-WTS...
-
Page 6: Pairing Instructions
Pairing the Thermostat To pair the thermostat with the RC2-WTS receiver, follow these steps. On the receiver; Press the Pair button once. The Communication LED will light up. On the thermostat; • Press PROG and then SETUP ................... • At the top of the LCD, you will see 01. •... - Page 7 Pair Successful The Comms LED on the receiver should flash and then go out to indicate the pair is successful. The thermostat will display the communication icon. Pair Fail If the Comms LED does not flash there is a problem with the RF signal and you should reduce the distance between the thermostat and receiver.
-
Page 8: Led's Explained
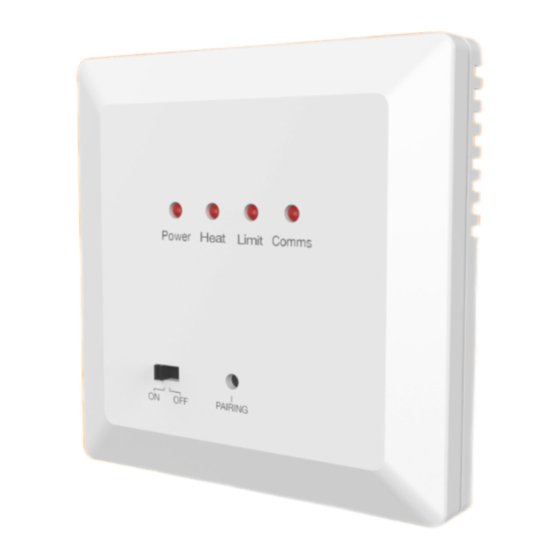
LED’s Explained There are 4 LED lights on the receiver: Power – Permanently on when RC2-W is powered. Heat – Lights up when heating output is on. Limit – Flashes when no floor probe is detected. Shown permanently on when floor probe has reached the floor temperature limit set by the thermostat. -
Page 9: Wiring Diagram
Wiring Diagram - RC2-WTS Floor Probe (Fit in tubing) Matting supply must be fused correctly Neutral Mains Supply Live LOAD Floor Sensor 230VAC RC2-WTS Model: RC2-WTS... -
Page 10: Notes
Notes ........................................................................................................................................................................................................................................................................................................................................................................................................................................................Wireless Receivers... - Page 11 Notes ........................................................................................................................................................................................................................................................................................................................................................................................................................................................Model: RC2-WTS...
- Page 12 Want More Information? Call our support team on: +44 (0)1254 669090 Or view technical specifications directly on our website: www.heatmiser.com Twitter: heatmiseruk Facebook: facebook.com/thermostats Wireless Receivers...
Need help?
Do you have a question about the RC2-WTS1 and is the answer not in the manual?
Questions and answers