Table of Contents
Advertisement
Quick Links
Download this manual
See also:
User Manual
Advertisement
Table of Contents

Subscribe to Our Youtube Channel
Related Manuals for CB ELECTRONICS TMC-1


Summary of Contents for CB ELECTRONICS TMC-1
- Page 1 CB Electronics TMC-1 Monitor Remote Release Technical Guide Version 1.0...
- Page 2 TMC-1 Monitor Controller CB Electronics CB Electronics has made every effort to ensure the accuracy of information contained within this document, which is nevertheless supplied for information purposes only and does not constitute any form of warranty or guarantee. All trademarks acknowledged.
-
Page 3: Table Of Contents
TMC-1 Monitor Controller Contents CB ELECTRONICS CONTENTS INTRODUCTION CONNECTIONS INSTALLATION Connecting to XMon SETTING UP TMC-1 AND XMON FOR THE FIRST TIME OR AFTER SOFTWARE UPDATE Factory Default: T/B Gain 1 & 2 Listen Gain 1 & 2 AFL Gain ROTECTED ALIBRATED... - Page 4 Solo Page In/Out Page - Speaker [3]: TALKBACK Internal Talkback and Listen-back Latching [1] and [6] TMC-1 Internal/External Microphone Gain adjust SYSTEM SETUP Setup Menu: Menu 01 – User key and setup Select Menu 02 – Volume Knob push switch Function Menu 03 –...
- Page 5 TMC-1 Monitor Controller Contents Menu 09 – Top Display Menu 10 – Hui AFL Enable Adv Menu 01 – Lock/Un-Lock User Keys Adv Menu 02 – Calibration Mode Enable Adv Menu 03– External T/B Dim Adv Menu 04 – Alt Output Select Adv Menu 05, 06, 07, 08, 09,10 –...
-
Page 6: Introduction
TMC-1 Monitor Controller Introduction The TMC-1 Monitor Controller is supplied with different software to suit the system controlled. This document describes the operation with the Avid XMon Monitor Control Unit. Features Connects to XMon via 15 pin ‘D’ connector (1:1). -
Page 7: Cb Electronics
Microphone. The XMon communications are via MIDI or RS-422. We have tested this with both 5m and 10m cables. If using the talkback Mic in the TMC-1, you may need to screen this separately, as the XMon input is unbalanced. -
Page 8: Contents
TMC-1 The TMC-1 is designed as a desktop unit but may be mounted flush with the desktop. The unit should be sited in any convenient position away from sources of moisture or excessive heat. The TFT display brightness may be adjusted via the Setup menu to optimise viewing under different lighting conditions. -
Page 9: Connecting To Xmon
Tip: It there is a long distance between the XMon and TMC-1, use RS-422 The TMC-1 will recognize and configure XMON to the last TMC-1 setting on power up. If the XMON is not discovered, then No XMON will be displayed in the top right of the TFT Display. -
Page 10: Update
[Page] and select [Setup], then depress [Select] and the [>] key to access the Advanced Menus Input Trim: Each input has a -10db to +20dB input trim in 1dB steps. 1. Enable Calibration 22 June 2015 © CB Electronics Version 1.1... -
Page 11: Speaker Trim
2. Select the Meters page 3. Hold the [Mono] key depressed, a Green Box in the lower right will display the Mono trim 4. Adjust as required whilst holding [Mono] Depressed 5. Disable Calibration 22 June 2015 © CB Electronics Version 1.1... -
Page 12: Trim
The factory reset value for Cal A is 85 and Cal B is 80. However, these values can be adjusted when calibration is enabled. 1. Enable Calibration Mode 2. Hold Cal A or Cal B depressed. 3. Adjust as required 4. Disable calibration 22 June 2015 © CB Electronics Version 1.1... -
Page 13: Operation
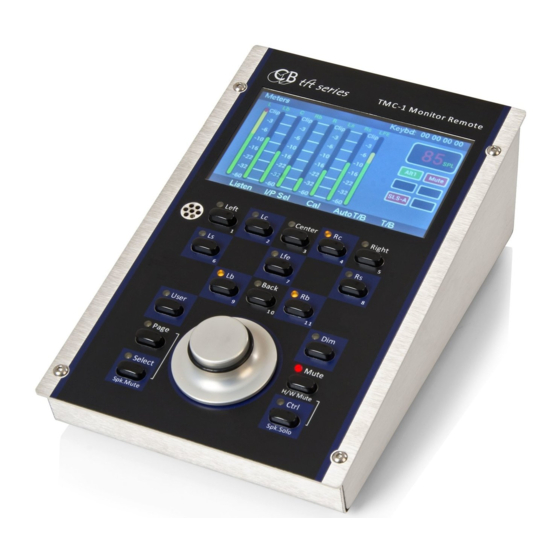
TMC-1 The TMC-1 control panel provides access to all the available functions of XMon. There are a number of different pages that may be selected on the TFT Display. The Two main pages are selected by depressing the [Page] key quickly to display the screens shown below. -
Page 14: Input Select/Mute
The [Select] key on the Meters will enable the Speaker Mute page. Use keys [1] to [8] to enable/ disable Outputs. If Input Mute is displayed, key [9] will select Speaker Mute. 22 June 2015 © CB Electronics Version 1.1... -
Page 15: Speaker Solo Page
The Sum key enables/disables the Sum Mode. If Sum is not enabled, then the Input key selects the individual inputs. If Sum is enabled, the Input key will display the input/ stem mute page. 22 June 2015 © CB Electronics Version 1.1... -
Page 16: Information Display: Shown Below
• Mute/Dim • Mono on/off • Talk/Back on/off • Studio Loudspeaker on/off • Encoder control destination if not the Main output level. • In this case, the encoder controls Internal T/B Gain. 22 June 2015 © CB Electronics Version 1.1... -
Page 17: Auto Mode
Studio L/S output. Switching on change of state as per Auto mute. To set, select line using [<] and [>] then depress the Select key for Off/Mute/Enable of the selected sources. 22 June 2015 © CB Electronics Version 1.1... -
Page 18: User Keys, Gpio's And Auto
The remaining pages are available from the Select Page screen. As usual, depressing the [Page] key alone will return you to the Meters page. The most important extra page is shown below [Levels] 22 June 2015 © CB Electronics Version 1.1... -
Page 19: T/B, L/B, Afl Page: Key 5
Encoder is not controlling the Monitor Volume. In this case, Talkback 1 input gain has been selected and can be adjusted via the Encoder. Use the [<] and [>] keys to change the selection 22 June 2015 © CB Electronics Version 1.1... -
Page 20: Tmc-1 C Ontrols
Dim the Monitor output, Hold [Dim] key down to adjust the dim amount, between – 10 to -40dB in 1dB steps. A green icon with the dim value is displayed in the centre of the screen. [Page]: 22 June 2015 © CB Electronics Version 1.1... -
Page 21: Contents
The LEDs follow the selected function. Function Keys - normal operation after factory Reset Speaker Select [10] A/B - Select between two In/Out selections A and B, the Display shows the current selection in the middle Top. 22 June 2015 © CB Electronics Version 1.1... -
Page 22: User Function Keys
You can modify the user keys directly from the TMC-1 (You can lock this in the advanced setup) but it is easier to use the TMC-1 configuration tool which is available for Mac or Windows. - Page 23 Enable/Disable Listen Inputs 2, (a quick push and release will latch) When held down allows listen input 2 gain adjust. Cal A Se Set Output to Cal A – Default 85dB SPL 22 June 2015 © CB Electronics Version 1.1...
-
Page 24: Knob Push
If any of the below are active it will clear them and require a second knob push to perform any programmed action Solo, Talkback, listen back, and Cal Lock The Knob Push action can be programmed from the Setup Menu. 22 June 2015 © CB Electronics Version 1.1... -
Page 25: Display Keys [1] – [8]
Display Keys [1] – [8] The functions of the 8 keys in the top two rows (1..8) are defined by the selected page of the TFT display and will depend on the selected page. 22 June 2015 © CB Electronics Version 1.1... -
Page 26: Meter Page
Listen 1 [1] Listen 2 [6]: User keys: [1], [2], [3], [4], [5], [6], [7], [8]: User programmable, hold down [Select] and press [2] to select function, see User Key for options 22 June 2015 © CB Electronics Version 1.1... -
Page 27: User Keys: [1], [5], [6], [8]
Mute/Un-mute selected Cue (press Select to display Mute/Mon legends) Mon [7]: If Selected to Studio L/S and Menu 18 enabled, connects monitors to Stereo Input 4 [Select] Depress to display the Cue Send enable/disable keys 22 June 2015 © CB Electronics Version 1.1... -
Page 28: Mute
Speakers/Stems are enabled Stem.Input Select keys [1]-[8]: Switches [1] – [6] enable /disables the inputs, [8] Enables/ disables Sum [Speaker(9)] – selects the Speaker Mute Page [Stem (10)] - selects Input/stem Mute page 22 June 2015 © CB Electronics Version 1.1... -
Page 29: Solo
TMC-1 Solo Page In/Out Page - Speaker [3]: Select the monitor speaker Output. If the Alt output is not used, it may be disabled by Menu 17. 22 June 2015 © CB Electronics Version 1.1... -
Page 30: Talkback
TB/LB/UTIL Connector. The two inputs have individual gain settings that can be adjusted from TMC-1. The two inputs are summed within the XMon to provide a single Talkback Output available on the TB/LB/UTIL Connector. -
Page 31: Setup Menu
After Factory reset the TMC-1 will default to User-1. When an unused memory is selected User-1 will be copied to the selected memory. If you need to reset a user memory to factory defaults, select Factory and exit setup. -
Page 32: Menu 02 – Volume Knob Push Switch Function
L C R LFE Ls Rs lb Rb This layout is good for 5.1 and 7.1 and the surrounds in stereo pairs L R C LFE Ls Rs Lb Rb This follows a standard stereo pair layout 22 June 2015 © CB Electronics Version 1.1... -
Page 33: Menu 05 – Talkback Latch Enable
When the [Stereo] function key is enabled this menu allows you to switch to a different at the same time. When disabled the Input selection will switch back. Current: Use Input selection St-1: Use Stereo Input 1 (Alt2 on TMC-1-Penta) St-2: Use Stereo Input 2 (Alt3 on TMC-1-Penta) St-3: Use Stereo Input 3 (Alt4 on TMC-1-Penta Menu 07 –... -
Page 34: Menu 08 – Tft Brightness
7 Max TFT Brightness can be adjusted to suit ambient light levels. Note: The TMC-1 is set to full brightness on power on. There is some interference from the TFT Backlight when not set to Max. Menu 09 – Top Display... -
Page 35: Adv Menu 01 – Lock/Un-Lock User Keys
Dim Control Room Speakers when External Talkback is enabled Off: No Dim with External Talkback Note: Internal (TMC-1) Talkback will always dim the control room speakers. Adv Menu 04 – Alt Output Select Adv Menu 04 - Alt Output Select... -
Page 36: Adv Menu 05, 06, 07, 08, 09,10 – Gpi Inputs
Int T/B 1 Int T/B 2 AFL/PFL: Enable AFL/PLF to Control room Monitors Listen1: Enable Listen Microphone 1 to Control room Monitors Listen 2: Enable Listen Microphone 1 to Control room Monitors 22 June 2015 © CB Electronics Version 1.1... -
Page 37: Adv Menu 11 – Afl/Pfl Gpio Input Active Level
Reset to factory and default user keys with T/B and L/B Keys Factory T/B only: Reset to factory and default user keys with T/B Keys only Factory NO T/B or L/B: Reset to factory and default user keys without T?B and L/B Keys 22 June 2015 © CB Electronics Version 1.1... -
Page 38: Tmc-1-P Enta A Dvanced M Enu ' S
Slv 3 Slv 4 When connecting more than one TMC-1 to a Ax32/Penta 720 one of the units is the master and the others slaves. If using the default ip address xxx.xxx.xxx.246 … xxx.xxx.xxx.250 this parameter will also set the ip address as follows;- Master xxx.xxx.xxx.250... -
Page 39: Tmc-1-Xm On A Dvanced M Enu ' S
TMC-1 TMC-1-XMon Advanced Menu’s These Menu’s are only present on the TMC-1-XMon Adv Menu 15 – Stereo Input to Studio L/S via Cue Input 3 Adv Menu 15 – Cue Input 3 Label Cue 3 St 3 To independently play back a stereo source on the Studio L/S while monitoring other source material in the control room, it can be routed to a cue input. -
Page 40: Gpio
Talkback 1 On H/W Mute Ground Input LTC- Input LTC+ Note1. PFL/AFL Enable Connect to the PFL/AFL control output of your console/DAW, active low input will switch the monitor output to AFL/PFL Input. 22 June 2015 © CB Electronics Version 1.1... -
Page 41: Connecting To The Avid
Dim is available as an option on any of 5 GPI inputs via menu selection Note 2: Mute/Cut is available as an option on any of 5 GPI inputs via menu selection Note 3: Common connection – Connect to pin 7 on TMC-1 GPIO. 22 June 2015 © CB Electronics Version 1.1... -
Page 42: Usb Port
Play tally drive the automated switching. You can check the interface by enabling the MTC positional display in the top line. Firmware Updates The USB Port is also used to update the TMC-1 firmware. Updates are posted on the TMC-1 – Xmon or TMC-1-Penta product page: http://www.colinbroad.com/cbsoft/tmc1/tmc1.html http://www.colinbroad.com/cbsoft/tmc1/tmc1penta.html... -
Page 43: R Ecovery
TMC-1 Note: the progress bar on the TMC-1 shows the total memory space available and will not reach the end. The Progress bar on “midiupd” shows the update length and will be cleared once finished Recovery In the case of power failure or other problems when updating the TMC-1 firmware. -
Page 44: S Etting The Tmc-1 User Key Functions
MidiUpd the programming tool (for Mac or Windows) connected via the USB port. Note. These user key functions can also be set on the TMC-1 diectly Setting the Input, Output, Speaker, Meter and User Names After a Factory Reset these names are set... - Page 45 When mounting into a panel, a cut-out of 190 x 124 mm or 7.48” x 4.88” should be made. There is a 1mm overhang on each side and a 3mm overhang at Top and bottom. 22 June 2015 © CB Electronics Version 1.1...
- Page 46 9 Input RS422 INPUT - Output RS422 Output + RS422 or MIDI Used not both – 10 Output RS422 Output - See RS422/MIDI select in TMC-1 Output MIDI Output - menu 11 Output MIDI Output + Input MIDI Input -...
- Page 47 Connecting a LED to a Open Collector Output The Current Limit resistor cab be calculated typically 330R for a 5v Supply and 1K for a 12v Supply. Connecting a Relay to a Open collector output 22 June 2015 © CB Electronics Version 1.1...
- Page 48 TMC-1 The Diode id optional 22 June 2015 © CB Electronics Version 1.1...
- Page 49 As can be seen in the chart below, the signal-to-noise remains the same for the first 4dB of attenuation but then the noise floor levels out so that the signal-to-noise degrades as attenuation is increased. 22 June 2015 © CB Electronics Version 1.1...
- Page 50 86.5 Noise Note. The increase in distortion at increased attenuation is largely due to the noise content The factory default settings of the TMC-1 XMon controller are as follows: Main Gain Section +4dB gain. Speaker Trim -4dB Overall gain 0dB...
- Page 51 Although not always documented, the XMon that we tested has both a stereo Cue 3 input and a stereo Cue 3 output. The TMC-1 can access and control both the Cue 3 input and Cue 3 output. The table below shows the Cue input/output connections including Cue 3.
- Page 52 TMC-1 22 June 2015 © CB Electronics Version 1.1...
- Page 53 Hardware Mute, normal mute function and the Hardware mute GPO is active to drive mute relays to protect your speakers and ears from digital noise and power on/off clicks Input and Speaker Set names Main (Input) Alt (Input) 22 June 2015 © CB Electronics Version 1.1...
- Page 54 TMC-1 St-1..St4 Main (Output) Alt (Output) Mini (output) 22 June 2015 © CB Electronics Version 1.1...
Need help?
Do you have a question about the TMC-1 and is the answer not in the manual?
Questions and answers