CB ELECTRONICS TMC-1 User Manual
Monitor remote
Hide thumbs
Also See for TMC-1:
- Reference (94 pages) ,
- Technical manual (54 pages) ,
- Setup manual (14 pages)
Table of Contents
Advertisement
Quick Links
Advertisement
Table of Contents

Subscribe to Our Youtube Channel
Related Manuals for CB ELECTRONICS TMC-1


Summary of Contents for CB ELECTRONICS TMC-1
- Page 1 CB Electronics TMC-1 Monitor Remote Release User Guide Version 4.0...
- Page 2 TMC-1 Monitor Controller Introduction The TMC-1 Monitor Controller is supplied with different software to suit the system controlled. This document describes the operation with the Avid XMon, DAD AX32/NTP Penta, D-Mon and A-Mon. Monitor Control Unit and with XPand 8 channel Monitor Expansion unit.
- Page 3 RJ45: Ethernet: Network connection for Penta and D-MonVersion • The TMC-1 is designed as a desktop unit but may be mounted flush with the desktop. The unit should be sited in any convenient position away from sources of moisture or excessive heat.
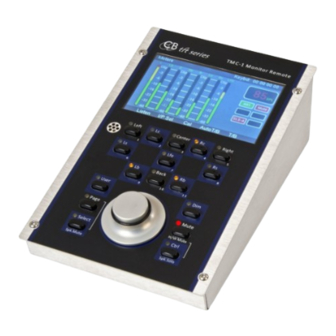
- Page 4 TMC-1 TMC-1 and TMC-1-S6 Views TMC-1 and TMC-1-S6 , TMC-1 Rear view with Ethernet and T/B Mic Input 09 August 2016 © CB Electronics Version 3.0...
-
Page 5: Factory Default
SPL level and trim the speaker outputs where necessary. Note: After a factory reset the input and output names are reset to there default values. Use TMC-1-Penta2 or TMC1-mac/Win to reprogram. Protected/Calibrated Settings To remove the protection and enable calibration 1) Depress [select] and [Page] to access the “Select Page”... -
Page 6: Speaker Trim
3. Hold the [Mono] key depressed (Mono is a User key), a Green Box in the lower right will display the Mono trim 4. Adjust as required whilst holding [Mono] Depressed 5. Disable Calibration 09 August 2016 © CB Electronics Version 3.0... - Page 7 The XMon/A-Mon and Penta have two talkback inputs, one from the controller via the 15 Way Control cable and an external talkback input on the TB/LB/UTIL Connector. The two inputs have individual gain settings that can be adjusted from TMC-1. CUE 1 T/B 1 Int.
- Page 8 TMC-1 The Talkback output may be routed by the TMC-1 user keys [T/B 1] and [T/B 2] and [T/B 1x] and [T/B 2x] which enable the internal or external talkback microphones. GP Inputs may also be assigned via the menu to enable the internal and external talkback. The two Talkback GP Outputs may be used to drive relays that switch the talkback output destination.
-
Page 9: Meters Page
TMC-1 The TMC-1 has a A/B User key to select between two input selections which can be individual or the sum of multiple inputs. The TMC-1 control panel provides access to all the available functions of Monitoring hardware. There are a number of different pages that may be selected on the TFT Display. -
Page 10: Input Selection
The [I/P Sel] User key will change the bottom line display from the Meters or In/out page. When [Sum] is enabled multiple inputs can be combined. TMC-1-Penta only the [Pallet] key enables the Pallet Display. Input Select with Sum Enabled Cue Sends Page: XMon has 5 Cue outputs, All others have 4 Cue outputs. - Page 11 The Sum key enables/disables the Sum Mode. If Sum is not enabled, then the Input key selects the individual inputs. If Sum is enabled, the Input Inc will display the input select page. 09 August 2016 © CB Electronics Version 3.0...
- Page 12 T/B only) Studio Loudspeaker on/off • Record/Play Indicator • Knob control destination if not the Main output level. In • this case, the knob controls Internal SLS Gain. Cue O/P status • 09 August 2016 © CB Electronics Version 3.0...
- Page 13 For each output there is an enable key (Blue = Enabled) and then Play Start, Play Stop, Record Start, Record Stop, where you can determine the action. This provides an equivalent to the Before/During/After selection used in the USA 09 August 2016 © CB Electronics Version 3.0...
- Page 14 TMC-1 Auto Talkback The auto talkback will disable both T/B1 and T/B2 but only enable T/B1 Note: Check out the “Auto Resume T/B” [A/R T/B] user key in the TMC-1 Reference Auto Studio L/S Not yet Available Before, During and After style monitor control of Studio L/S output.
- Page 15 Encoder is not controlling the Monitor Volume. In this case, Talkback 1 input gain has been selected and can be adjusted via the Encoder. Use the [<] and [>] keys to change the selection 09 August 2016 © CB Electronics Version 3.0...
- Page 16 Use to return to the meters page, When the Meters are displayed the Page key • function may be programmed from the Setup menu. Default action: Select the second Bank of user keys 09 August 2016 © CB Electronics Version 3.0...
-
Page 17: Volume Knob
Unless a key is depressed or Cal Locked the Volume Knob will ALWAYS adjust the main monitor volume. The Knob Click action ca be programmed from the TMC-1-Win/Mac App or the TMC- Setup Menu. Note: If any Solo or Cal Lock is active the Knob click will clear this in the 1stb depression and require a second depression to perform the programmed action. - Page 18 Note. Not all macros are available on all versions, the TMC-1 program will only display available macro’s A screen shot from the TMC-1 configuration tool is shown to the right. Use the Bank buttons to select the bank to program. If you just want to modify individual keys red the current setup before changing.
- Page 19 Note. If any of the below are active the initial knob push will clear them and require a second knob push to perform any programmed action Solo, Talkback, listen back, AFL, PFL and Cal Lock 09 August 2016 © CB Electronics Version 3.0...
-
Page 20: Setup Menu
See the TMC-1 Reference for a full list of the menu’s Advanced Setup The TMC-1 Setup is split into two sections, normal and advanced, the normal setup is for operator use and the advanced is used to enable calibration mode and configure installation variable. -
Page 21: Hui Emulation
The TMC-1 uses between 300mA and 400mA, this is within the 500mA maximum for a USB port. We recommend that the TMC-1 is the only device connected to the port. If you are not using the MTC or HUI functions, you can use a 5v USB power supply. -
Page 22: Recovery Mode
TMC-1 The USB Port is also used to update the TMC-1 firmware. Updates are posted on the TMC-1 – Xmon or TMC-1-Penta product page. See the TMC-1 Reference for more information: http://www.colinbroad.com/cbsoft/tmc1/tmc1.html http://www.colinbroad.com/cbsoft/tmc1/tmc1penta.html http://www.colinbroad.com/cbsoft/tmc1/tmc1dmon.html http://www.colinbroad.com/cbsoft/amon/amon.html Recovery Mode If for any reason there is a problem when reprogramming (eg. Power Failure whist programming) a recovery mode is provided. -
Page 23: Network Page
E-Net Pages – NTP Penta, DAD AX32 and Trinnov D-Mon Discovery This page displays unit discovered by the TMC-1 (Max 4). The unit highlighted in Yellow is the currently connected unit. To select, use the [<] and [>] keys and then depress the [Select] key. - Page 24 Fn1, Fn2, Fn3. H.Mute Hardware Mute, normal mute function and the Hardware mute GPO is active to drive mute relays to protect your speakers and ears from digital noise and power on/off clicks 09 August 2016 © CB Electronics Version 3.0...
Need help?
Do you have a question about the TMC-1 and is the answer not in the manual?
Questions and answers