
Related Manuals for Melitta Caffeo Solo & MilkE 953-10x


Summary of Contents for Melitta Caffeo Solo & MilkE 953-10x
- Page 1 型号: E 953-10x Version 2.0 05/2012 操作说明书 사용 설명서 Melitta Haushaltsprodukte 操作說明書 Operating Instructions GmbH & Co. KG D-32372 Minden...
- Page 3 亲爱的顾客朋友们: 衷心感谢您购买美乐家SOLO&milk全自动咖啡机。 欢迎您加入成为享受美乐家SOLO&milk的品尚人士。 拥有美乐家高质量的SOLO&milk全自动咖啡机,您将体验到不同寻常 的咖啡时光。品鉴个人喜爱的口味,尽情享受每个感官带来的刺激! 为使您或您的客人能够更长久地体验美乐家SOLO&milk全自 动咖啡机所带来的乐趣,请仔细阅读本操作说明书,并妥善保管。 如需了解咖啡机的更多信息或有任何疑问,您可直接与我们联系,或 者访问我们的网站:www.melitta.cn 我们真诚希望您会满意美乐家Solo&milk全自动咖啡机带给您的美味 咖啡。 您的美乐家SOLO&milk团队 ® 美乐家集团旗下公司的注册商标...
-
Page 4: Table Of Contents
目录 1 本操作说明书的相关信息 ................4 1.1 操作说明书文本中的图标 ..............4 1.2 按规定使用 ..................5 1.3 不当使用 ..................5 2 一般安全注意事项 ...................6 3 机器说明....................7 3.1 图示A ....................7 3.2 显示面板 ..................8 4 启动 ......................9 4.1 安置 ....................9 4.2 连接 ....................10 4.3 装填咖啡豆槽 ................10 4.4 水箱加水 ..................11 4.5 首次开机 ..................11 4.6 设置咖啡杯量... - Page 5 11 功能设置....................19 11.1 设置水硬度 ..................19 11.2 节能模式定时器 ................20 11.3 自动关机功能定时器 ..............21 11.4 烹煮温度 ..................22 11.5 恢复出厂设置 ................23 11.6 研磨度 ...................23 12 维护与保养 ....................24 12.1 一般清洁 ..................24 12.2 清洁滤煮器 ..................25 12.3 综合清洁程序 ................26 12.4 综合除垢程序 ................29 13 运输和处置 ....................32 13.1 运输准备、防冻保护和长期不使用时应采取的措施 .......32 14 故障排除....................34...
-
Page 6: 本操作说明书的相关信息
本操作说明书的相关信息 为了更好地了解有关内容,请打开本操作说明书正面和背面的折叠页。 操作说明书文本中的图标 本操作说明书中的图标用于标注在使用美乐家SOLO&milk全自动咖啡机过程 中可能出现的特定危险,或为您提供一些实用的小窍门。 警告! 带有此标志的文字中包含了与您安全相关的信息,并指出可能发 生的事故和伤害危险。 小心! 带有此标志的文字含有避免误操作的信息,并表明可能出现财产 损失危险。 提示 带有此标志的文字含有对使用美乐家SOLO&milk全自动咖啡机很 有价值的补充信息。... -
Page 7: 按规定使用
按规定使用 美乐家SOLO&milk全自动咖啡机只能用于制作咖啡和特色咖啡、制作热水和 加热牛奶以及制作奶泡。 按规定使用包括: • 仔细阅读、理解并遵守本操作说明。 • 尤其要重点注意安全提示。 • 严格按照本操作说明书所述操作条件来使用美乐家SOLO&milk全 自动咖啡机。 不当使用 不遵守本操作说明书所述内容而使用美乐家SOLO&milk全自动咖啡机的情 况,均视为不当使用。 警告! 您可能因不当使用而受伤或者被水或蒸汽烫伤。 提示 因不当使用而造成的损失,制造商概不承担任何责任。... -
Page 8: 一般安全注意事项
一般安全注意事项 请仔细阅读以下提示。如果您没有遵守这些提示,可能会影响到您自身以及 咖啡机的安全。 警告! 务必将下列类似物品存放在儿童无法接触到的地方:包装材 – 料、小零件。 所有使用本机的人员都必须事先熟知操作规程并了解可能出现 – 的危险。 切勿让儿童使用本咖啡机或在无人照看的情况下在咖啡机旁玩 – 耍。 本机不得由身体、感官或智力存在缺陷的人员、缺乏经验和/或 – 缺少相关知识的人员(包括儿童)使用,除非是在其监护人的 看护下并指导其如何使用本机。 只能在机器完好的状态下使用本机。 – 切勿擅自修理本机。如有维修需要,请拨打美乐家服务热线。 – 请勿对本机及其组成部件和随机配件进行任何改装。 – 请勿将本机浸入水中。 – 手脚沾水或潮湿时,禁止接触本机。 – 禁止接触本机的热表面! – 运行期间请勿将手伸入咖啡机内。 – 在运行期间禁止打开右盖板,除非本操作说明书中有明确要 – 求。 还应注意遵守本操作说明书其他章节中所述的安全注意事项。 – 此咖啡机按设计目的可用于家庭及其它类似场所,例如:员工 – 餐厅,办公室。或其它商用场所:农场,酒店等。... -
Page 9: 机器说明
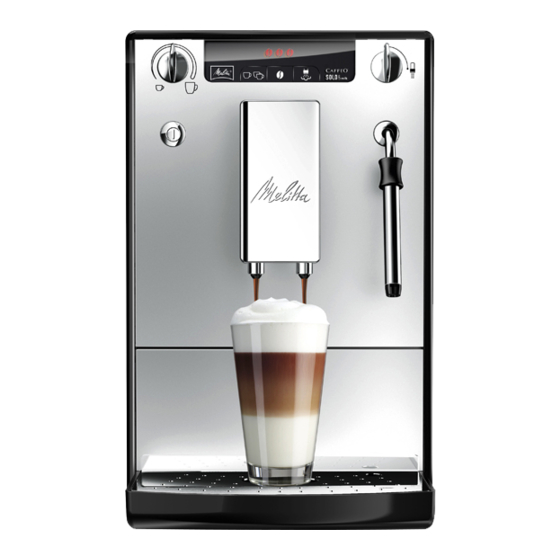
机器说明 图示A 图中编号 说明 带托杯板的接水盘和废渣盒(内置)以及浮标(显示 接水盘的积水情况) 可调节高度的咖啡出口 开/关键 咖啡杯量调节钮 单/双杯咖啡键 咖啡浓度键 水箱 豆槽 蒸汽操作键 显示面板 用以释放蒸汽及热水的阀门 蒸汽管 右盖板(可拆卸,内装研磨度调节钮、滤煮器和型 号铭牌)... -
Page 10: 显示面板
显示面板 图标 含义 显示 说明/提示 咖啡机正在预热或处于制作咖啡过程 闪烁 中。 待机 常亮 咖啡机处于准备就绪状态。 常亮 需更换美乐家Claris 滤水器 ® 美乐家Claris 滤 ® 水器 闪烁 正在更换滤水器 常亮 需向水箱加水 水箱 闪烁 需放入水箱 常亮 需清空接水盘和废渣盒 接水盘和废渣盒 闪烁 需装入接水盘和废渣盒 1咖啡豆:清淡 常亮 2咖啡豆:正常 3咖啡豆:浓烈 咖啡浓度 需装填豆槽;将会在下次冲煮咖啡后 闪烁 停止闪烁。 常亮 需执行综合清洁程序... -
Page 11: 启动
启动 首次启动机器时,请认真执行以下几项操作。 如果您已执行了这些操作,那么咖啡机已准备就绪,接着您就可以制作咖啡 了。我们建议丢弃第一次开机运行后首次制作的两杯咖啡。 安置 • 将咖啡机放在稳定、平整且干燥的表面上。确保咖啡机与墙和 其他物品至少保持10厘米距离。 • SOLO&milk后边缘上有两只滚轮,因此可以从前面抬起轻松自由 移动机器。 小心! 切勿将咖啡机放在热表面或潮湿区域。 – 请勿在温度较低的运输工具中运输咖啡机或存放在低温房间 – 内,否则残留的水可能结冰并损坏机器。请参见第32页上的 提示。 • 废渣盒已经放入接水盘中。注意将接水盘完全推入咖啡机,直至 停止。 提示 妥善保管好包装材料,包括用于运输和退货的硬泡沫材料,以 – 方便运输或者可能出现的退货反运,从而避免在运输过程中出 现损坏。 首次开机启动前发现机器里有咖啡和水的痕迹属于正常情况, – 因为本机会在出厂前进行无故障功能测试。... -
Page 12: 连接
连接 • 将电源插头与其规格一致的接地电源插座相连接。 警告! 电源电压不正确、连接不正确或电源线损坏,会引发火灾或触电 危险。 确保电源电压与本机型号铭牌所规定的电压一致。型号铭牌位 – 于咖啡机右侧盖板(图A,编号13)的下方。 确保所用插座符合现行电气安全标准。如有疑问,请咨询专业 – 电气技师。 严禁使用损坏的电源线(绝缘层受损、线芯裸露)。 – 损坏的电源线在保修期内只能由制造商负责更换,如果超出保 – 修期,则只能由有资质的专业人员更换。 装填咖啡豆槽 • 打开豆槽盖并装入新鲜的咖啡豆。 小心! 豆槽中只能装填咖啡豆。 – 禁止向豆槽内装入研磨过的、冻干的或经糖化处理的咖啡豆。 – • 盖上豆槽盖。... -
Page 13: 水箱加水
水箱加水 • 向上打开水箱盖向上拉动并取出水箱(图示A,编号7)。 • 向水箱注入新鲜水,直至达到最高水位标记,然后将其重新装回 咖啡机中。 提示 如果在运行过程中(例如在咖啡流出过程)中水箱中的水流尽, 那么水箱图标就会点亮。必须在启动下一操作前注满水箱。 首次开机 小心! 咖啡机只允许在未安装美乐家Claris 滤水器且水箱注满水的情况 ® 下进行排气操作。 排气结束后,才能将美乐家Claris 滤水器安装到水箱内。 – ® 排气之前向水箱注入新鲜水,直至达到最高水位标记处。 – • 按下开/关键 ,启动咖啡机。 → 阀门图标 将会亮起,机器需要排空内部管路中的空气。 • 将一个较大容器放置在蒸汽管下。 • 顺时针方向旋转阀门(图A,编号11)至终止位以打开阀门。 → 阀门图标 闪烁。水流入蒸汽管下的容器中。 • 一旦不再流水且阀门图标 将常亮,要立即沿逆时针方向旋转阀 门开关,关闭阀门。 → 咖啡机处于准备就绪状态。... -
Page 14: 设置咖啡杯量
设置咖啡杯量 • 旋转咖啡杯量调节钮(图A,编号4),设置杯量(调节钮 向左:较少量的咖啡,调节钮向右:较多量的咖啡)。 咖啡量调节钮 调节钮在中间 调节钮完全 咖啡杯量 完全向左 向右 单杯 30 ml 125 ml 220 ml 双杯 2 x 30 ml 2 x 125 ml 2 x 220 ml 设置咖啡浓度 • 反复按压咖啡浓度键 ,在三个浓度等级之间进行选择。 → 您的选择将以咖啡豆图标 的形式显示在显示面板上。 显示 咖啡浓度 清淡 正常(出厂设置)... -
Page 15: 开机和关机
开机和关机 开机 提示 每次开机时将自动进行冲洗 • 在咖啡出口处放置一个接水容器。 • 按下开/关机按钮连接电源。 → 待机图标闪烁。机器预热。机器进行自动冲洗,同时热水从出水口流 出。然后待机图标亮起。机器准备就绪可制作咖啡了。 关机 • 在咖啡出口处放置一个接水容器。 • 按下开/关机按钮断开电源。 → 一旦冲泡咖啡完成,机器将自动冲洗咖啡通道。烹煮器处于复位状 态。待机图标熄灭。... -
Page 16: 安装美乐家Claris 滤水器
安装美乐家Claris 滤水器 ® 本机配有一个美乐家Claris 滤水器,用以滤除水中的杂质。请先进行首次开 ® 机运行排气之后,再将滤水器安装到咖啡机中。在您使用滤水器时,无需频 繁对咖啡机进行除垢,并且水硬度会自动设置为1级(请参见第19页)。 这种防水垢安全措施可以延长咖啡机的使用寿命。定期(每2个月)更换滤 水器,最迟要在滤水器图标 出现在显示面板上时进行更换。 前提条件:咖啡机已关闭。(请参见第13页,开机和关机) • 同时按住咖啡浓度键 和开/关键2秒钟以上。 → 在整个更换过程中,滤水器图标 一直闪烁。然后接水盘图标 亮 起。 • 清空接水盘,然后重新装回咖啡机中。 → 水箱图标 亮起。 • 在插入滤水器前,先将其浸泡于清水中数分钟。 • 打开水箱盖并向上拉动取出水箱。 • 清空水箱。 • 美乐家Claris 滤水器固定在水箱底部的螺纹支架上。 ® • 请仔细的把向水箱注入新鲜水,直至达到最高水位标记,然后将 其重新装回咖啡机中。 → 阀门图标 将亮起。... -
Page 17: 制作咖啡/意式特浓咖啡
提示 美乐家Claris 滤水器不应长期处于干燥状态之下。因此我们建 – ® 议将滤水器浸于水中,放入冰箱里保存。 安装美乐家Claris 滤水器后,第一次冲洗时会从滤水器中冲出 – ® 多余的活性炭。因此开始冲出来的水是浅灰色,随后水会重新 变得清澈。 制作咖啡/意式特浓咖啡 前提条件:咖啡机处于准备就绪状态。(请参见第13页,开机和关 机) • 在咖啡出口下方放置一个或并排放置两个咖啡杯。 • 按下咖啡浓度键 ,设置咖啡浓度。 • 旋转咖啡杯量调节钮(图A,编号4),设置每杯的注入量。 • 如果您想冲一杯咖啡,只需按一下单/双杯咖啡键 。 • 如果您想冲两杯咖啡,则要按两下单/双杯咖啡键 。 → 在您按了两下后,咖啡豆图标会在冲煮期间快速短暂闪烁两次,等待 确认。 → 咖啡机将启动(两次)研磨和出咖啡工序。待机图标 闪烁。在达到 所设置的单杯杯量后,咖啡会自动停止流出。 • 如需提前中止出咖啡程序,请按下单/双杯咖啡键 。如果 您已经启动双杯咖啡制作程序,在咖啡制作程序启动三秒钟后, 才能再按该键。 提示... -
Page 18: 制作奶泡
制作奶泡 前提条件:咖啡机处于准备就绪状态。(请参见第13页,开机和关 机) • 注意,务必向下移动蒸汽管的镀铬外管(图K,编号1)。 • 按下蒸汽操作键 。 → 待机图标 闪烁。咖啡机开始预热。随后阀门图标 将亮起。 • 最多向容器中注入三分之一的牛奶,因为打奶泡时牛奶的体积会 急剧膨胀。 • 将装有牛奶的容器放置在蒸汽管下。注意将蒸汽管顶端浸入牛奶 中。 警告! 热蒸汽和蒸汽管有造成烫伤的危险 切勿用手接触喷出的热蒸汽。 – 在使用过程中或刚刚使用后,请勿触碰蒸汽管。 – • 顺时针方向旋转阀门(图A,编号11)至终止位以打开阀门。 → 阀门图标 闪烁。从蒸汽管中喷出的热蒸汽会对牛奶进行加热并使其 发泡。如需得到更好的奶泡效果,请在打奶泡时上下移动装有牛奶的 容器。 • 沿逆时针方向旋转阀门开关,关闭阀门并结束打奶泡操作。此时牛 奶的体积应几乎膨胀了一倍并能明显感觉到容器变热。 • 每次使用完后,立即通过制作蒸汽或热水的形式彻底冲洗蒸汽喷 嘴。 • 冲洗蒸汽管: 向容器中注入一半的清水并将其放置在蒸汽管下方。确保将蒸汽管 顶端浸入水中。将阀门打开大约5秒钟,然后再关闭。... -
Page 19: 加热牛奶
提示 我们建议使用高蛋白质含量的冰牛奶。对制作优质奶泡起决定 – 作用的是牛奶中的蛋白质含量,而非脂肪含量。 为确保蒸汽喷嘴能够正常工作,应定期冲洗喷嘴,请参见第 – 24页。 加热牛奶 前提条件:咖啡机处于准备就绪状态。(请参见第13页,开机和关 机) • 向上移动蒸汽管的镀铬外管(图K,编号2)。 • 将装有牛奶的容器放置在蒸汽管下。注意将蒸汽管顶端浸入牛奶 中。 • 按下蒸汽操作键 。 → 待机图标 闪烁。咖啡机开始预热。随后阀门图标 亮起。 警告! 热蒸汽和蒸汽管有造成烫伤的危险 切勿用手接触喷出的热蒸汽。 – 在使用过程中或刚刚使用后,请勿触碰蒸汽管。 – • 顺时针方向旋转阀门(图A,编号11)至终止位以打开阀门。 → 阀门图标 闪烁。从蒸汽管中喷出的热蒸汽会对牛奶进行加热。 如需得到更好的加热效果,请在加热时上下移动装有牛奶的容器。 • 当牛奶达到想要的温度时,逆时针方向旋转阀门至终止位以关闭 阀门... -
Page 20: 制作热水
• 冲洗蒸汽管: 向容器中注入一半的清水并将其放置在蒸汽管下方。确保将蒸汽管 顶端浸入水中。将阀门打开大约5秒钟,然后再关闭。 • 30秒钟后咖啡机自动从蒸汽模式切换到正常运行模式。按下蒸汽 操作键 可以提前切换到正常运行模式。 提示 为确保蒸汽喷嘴能够正常工作,应定期冲洗喷嘴,请参见第24 页。 制作热水 前提条件:咖啡机处于准备就绪状态。(请参见第13页,开机和关 机) • 将蒸汽管的镀铬外管向上拉动。 • 将一个容器放置在蒸汽管下。 警告! 热出水端和热蒸汽管有造成烫伤的危险 如果在制作蒸汽后直接制作热水,那么首先会从蒸汽管中排出剩 余的热蒸汽,而且有可能从热水的出水端逸出。 避免直接接触到热水和热蒸汽管。 – • 顺时针方向旋转阀门(图A,编号11)至终止位以打开阀门。 → 阀门图标 亮起。热水从蒸汽管流入容器中。 • 达到所需水量后,立即沿逆时针方向旋转阀门开关,关闭阀门。 提示 当热水释放量达到大约150毫升时,会自动停止。如果你需要制 备更多热水,请将阀门关闭后再打开。... -
Page 21: 功能设置
功能设置 11.1 设置水硬度 请使用随机附赠的测试条测出您所在区域的水硬度。请参见测试条包装上的 说明。机器出厂时设置的默认水硬度为4级。如果您安装了美乐家Claris 滤 ® 水器,水硬度会自动调成1级(请参见第14页) 前提条件:咖啡机处于准备就绪状态,待机图标 常亮。(请参见第 13页,开机和关机) 为确保咖啡机在良好工作状态下运行,请如下设置水硬度: • 同时按住单/双杯咖啡键 和咖啡浓度键 2秒钟以上。 → 待机图标 快速闪烁。 • 按一下单/双杯咖啡键 ,调出水硬度设置菜单。 → 滤水器图标 亮起。 • 反复按压咖啡浓度键 ,在四个水硬度等级之间进行选择。 → 您选择的水硬度将根据下表以咖啡豆图标 的形式显示在显示面板。 水硬度范围 特性 °dH °f 软 0 - 7 .2 °dH 0 ... -
Page 22: 节能模式定时器
提示 如果在设置过程中60秒内未按下任何按键,咖啡机会自动切换回 到待机模式。 11.2 节能模式定时器 机器会依据设定自动进入到节能模式(节能模式会消耗很低的电能)。定时 器可分段设置,出厂设置为5分钟。 前提条件:咖啡机处于准备就绪状态,待机图标 常亮。(请参见第 13页,开机和关机) 请按下述操作设置定时器: • 同时按住单/双杯咖啡键 和咖啡浓度键 2秒钟以上。 → 待机图标 快速闪烁。 • 按两下单/双杯咖啡键 ,调出节能模式菜单。 → 水箱图标 亮起。 • 反复按下咖啡浓度键 ,在四个时间选项之间进行选择。 显示 时间 5分钟 (出厂设置) 15分钟 30分钟 关闭 闪烁 • 按下开/关 ,确认选定的时间。 → 显示面板上的所有图标都快速闪烁,等待确认。咖啡机处于准备就绪 状态,待机图标... -
Page 23: 自动关机功能定时器
提示 按下咖啡浓度键 可以将咖啡机从节能模式中唤醒。随后您就可 以直接制作咖啡了。 11.3 自动关机功能定时器 机器会依据设定自动关机。定时器可分段设置,出厂设置为1小时。 前提条件:咖啡机处于准备就绪状态,待机图标 常亮。(请参见第 13页,开机和关机) 请按下述操作设置定时器: • 同时按住单/双杯咖啡键 和咖啡浓度键 2秒钟以上。 → 待机图标 闪烁。 • 按三下单/双杯咖啡键 ,调出自动关机功能菜单。 → 接水盘图标 亮起。 • 反复按下咖啡浓度键 ,在四个时间选项之间进行选择。 显示 时间 1小时 (出厂设置) 2小时 4小时 8小时 闪烁 • 按下开/关键 ,确认选定的时间。 → 显示面板上的所有图标都快速闪烁,等待确认。咖啡机处于准备就绪 状态,待机图标... -
Page 24: 烹煮温度
11.4 烹煮温度 烹煮温度的出厂设置为2级(中等)。 前提条件:咖啡机处于准备就绪状态,待机图标 亮起。(请参见第 13页,开机和关机) 请按下述操作设置您需要的烹煮温度: • 同时按住单/双杯咖啡键 和咖啡浓度键 2秒钟以上。 → 待机图标 闪烁。 • 按四下单/双杯咖啡键 ,调出烹煮温度菜单。 → 清洁图标 闪烁。 • 反复按压咖啡浓度键 ,在三种烹煮温度之间进行选择。 显示 烹煮温度 低 中等(出厂设置) 高 • 按下开/关键 ,确认选定的烹煮温度。 → 显示面板上的所有图标都快速闪烁,等待确认。咖啡机处于准备就绪 状态,待机图标 亮起。... -
Page 25: 恢复出厂设置
11.5 恢复出厂设置 前提条件:咖啡机处于准备就绪状态,待机图标 常亮。(请参见第 13页,开机和关机) • 同时按住蒸汽操作键 和开/关键 2秒钟以上。 → 所有设置均恢复到出厂设置。待机图标 快速闪烁,等待确认。 出厂设置一览表: 功能设置 出厂设置 水硬度 水硬度4级 节能模式 (5分钟) 自动关机功能 (1小时) 烹煮温度 (中等) 11.6 研磨度 在出厂前,研磨度已设置为最佳状态。因此我们建议您在冲煮大约1000杯咖 啡(大约1年)后,再调整研磨度。 您只能在咖啡研磨过程中设置研磨度。所以请在咖啡制作过程开始后立即设 置研磨度。 如果咖啡香气不够浓郁,那么我们建议将研磨度调得更细一些。 • 拉住咖啡机右侧(图A,编号13)的凹槽并向右拉取下右盖板。 • 正常启动咖啡制作程序。 • 在研磨机运转过程中:将调节杆设在三个位置之一(图E)。 • 将右盖板的四个卡子插入咖啡机后端并向左轻晃右盖板,直至其 合上卡住。 调节杆位置 研磨度... -
Page 26: 维护与保养
维护与保养 12.1 一般清洁 • 用柔软的湿布和普通餐具洗涤剂擦拭咖啡机外部。 • 定期清空并清洁接水盘(图A,编号1),至少要在浮标超出托杯 板时进行清洁。 • 定期清洁废渣盒。 清洁蒸汽管 • 在使用后立即清洁蒸汽管。 • 等到蒸汽管冷却后,再用一块湿布擦拭其外部。 • 为彻底进行日常清洁,可沿逆时针方向旋下(图F)并拆开(图 G)蒸汽管。 • 在流水中或洗碗机内冲洗所有部件。特别要使用尖头物品或刷子 (图H)清洁喷嘴。 • 清洁完成后,沿顺时针方向将清洁干净的蒸汽管拧紧在固定座上。 小心! 为避免损伤咖啡机表面,请勿使用砂布、海绵或清洁剂。 – 请勿在洗碗机内清洁接水盘,否则可能导致部件变形。 – 提示 废渣盒(图A,编号1)耐机洗,因此可以放在洗碗机内清洁。频 繁在洗碗机内清洗可能会导致废渣盒轻微褪色。... -
Page 27: 清洁滤煮器
12.2 清洁滤煮器 前提条件:咖啡机必须关机(请参见第13页,开机和关机)。 提示 为对咖啡机进行最佳保护,我们建议您每周用清水清洁一次滤煮 器。 • 拉住咖啡机右侧(图A,编号13)的凹槽并向右拉取下右盖板。 • 按压滤煮器把手上的红色按钮(图B,编号1)并沿顺时针方向旋 转把手,直至无法继续旋转(大约75°)。 • 抓住把手从咖啡机中取出滤煮器。 • 将滤煮器维持原状(请勿移动或转动滤煮器上的部件)。 • 在流水下彻底冲洗整个滤煮器的各个面。尤其要注意图D所示的表 面必须清洁无咖啡渣。 小心! 切勿将滤煮器放入洗碗机内清洗。 • 让滤煮器滴干。 • 如有必要,同样也要清除咖啡机内部滤煮器安装表面上的咖啡渣。 • 将滤煮器重新装回咖啡机中,并沿逆时针方向旋转滤煮器把手,直 至无法再转,以锁紧滤煮器。 • 将右盖板的四个卡子插入咖啡机后端并向左轻晃右盖板,直至其 合上卡住。... -
Page 28: 综合清洁程序
12.3 综合清洁程序 综合清洁程序可以除去手动无法清除的咖啡残渣和残油。程序用时共计15分 钟左右。在整个清洁过程中,清洁图标 持续闪烁。 前提条件:咖啡机已关闭。(请参见第13页,开机和关机) 小心! 每2个月或大约冲煮200杯咖啡后,至少在显示面板上的清洁图 – 标 常亮时,执行一次综合清洁程序。 只能使用美乐家全自动咖啡机专用清洁药片。该清洁药片专为 – 美乐家SOLO&milk全自动咖啡机设计。如果使用其他清洁用 具,可能损坏咖啡机。 请按下述操作执行综合清洁程序: 1 向上拉动并取出水箱(图A,编号6)。向水箱注入新鲜冷水,直至达 到最高水位标记,并将其重新装回咖啡机内 2 同时按住单/双杯咖啡键 和开/关键 2秒钟以上。 → 清洁图标 闪烁。 接水盘图标 亮起。 3 清空接水盘和废渣盒。 4 重新装入接水盘而不装上废渣盒,并将废渣盒放到出口下。 第1阶段 在第1阶段中显示面板上会显示一个咖啡豆图标 。 → 首先执行两个自动冲洗程序。然后待机图标 亮起。 5 拉住咖啡机右侧(图A,编号13)的凹槽并向右拉取下右盖板。 6 按压滤煮器把手上的红色按钮(图B,编号1)并沿顺时间方向旋... - Page 29 小心! 有损伤滤煮器的危险 在综合清洁程序运行期间,只能在此处所述的时间点上取出 – 滤煮器。 8 将滤煮器维持原状(请勿移动或转动滤煮器上的部件)。 9 在流水下彻底冲洗整个滤煮器的各个面。 10 将清洁药片放入滤煮器内(图C)。 11 将滤煮器重新装回到咖啡机中,并沿逆顺时针旋转滤煮器把手,直 至无法再转,以锁紧滤煮器。 → 第1阶段结束。 第2阶段 在第2阶段中显示面板上会显示两个咖啡豆图标。 → 清洁图标 继续闪烁,待机图标 熄灭。水箱图标 亮起。 12 将右盖板的四个卡子插入咖啡机后端并向左轻晃右盖板,直至其合 上卡住。 13 向上拉动并取出水箱(图A,编号6)。向水箱注入新鲜冷水,直至达 到最高水 位标记,并将其重新装回咖啡机内。 14 按下蒸汽操作键 ,以继续运行综合清洁程序。 → 综合清洁程序继续运行。该过程大约会持续5分钟。水从咖啡出口流 出,同时咖啡机内部的水流入接水盘。随后接水盘图标 点亮。 → 第2阶段结束。...
- Page 30 第3阶段 在第3阶段中显示面板上会显示三个咖啡豆图标。 15 清空接水盘和废渣盒。 16 重新装入接水盘而不装上废渣盒,并将废渣盒放到出口下。 → 第3阶段结束。 第4阶段 在第4阶段中显示面板上会显示三个咖啡豆图标 。中间的咖啡豆闪 烁。 → 综合清洁程序继续运行。该过程大约会持续5分钟。水从咖啡出口流 出,同时咖啡机内部的水流入接水盘。随后接水盘图标 点亮。 17 清空接水盘和废渣盒并重新插入。 → 在短暂的预热阶段后,待机图标 亮起。 咖啡机处于准备就绪状态。...
-
Page 31: 综合除垢程序
12.4 综合除垢程序 综合除垢程序可以清除咖啡机内的水垢。程序用时共计30分钟左右。在整个 过程中,除垢图标 一直闪烁。 前提条件:咖啡机已关闭。(请参见第13页,开机和关机) 小心! 每3个月或当显示面板上的除垢图标 常亮时,需执行一次综 – 合除垢程序。 只能使用美乐家全自动咖啡机专用除垢剂。该除垢剂专为美乐 – 家SOLO&milk全自动咖啡机设计。 请勿使用醋或其他除垢剂。 – 请按下述操作执行综合除垢程序: 提示 为了避免在除垢过程中液体会从蒸汽管中溅出,我们建议使用附 配的管子(在配件包中)。因此,请将管子套在蒸汽管上大于 0.5-1厘米处如图(J)所示,将废渣盒放在咖啡机的右侧近邻咖 啡机处(以保护管子的旋转度)。这样除垢过程就可以毫无喷溅 的开始了。 除垢前,请从水箱里取出滤水器(如有),参见第13页。 1 同时按住蒸汽操作键 和开/关键 2秒钟以上。 → 除垢图标 闪烁且接水盘图标 点亮。 第1阶段 在第1阶段中显示面板上会显示一个咖啡豆图标。 2 清空接水盘并重新装回咖啡机,但不装上废渣盒,而将废渣盒放到 蒸汽管下。 → 水箱图标 点亮。 3 向上拉动并取出水箱(图A,编号6),将水箱完全清空。... - Page 32 4 根据用量,加入除垢剂在水箱里。例如使用美乐家全自动咖啡机专 用除垢剂。 警告! 除垢剂有刺激皮肤的危险 请按照除垢剂包装上的安全注意事项和用量说明来操作。 5 重新装上水箱。 6 按下蒸汽操作键 ,启动综合除垢程序。 → 综合除垢程序启动。水流多次间断地经咖啡机内部流到接水盘中。该 过程大约会持续15分钟。随后阀门图标 亮起。 → 第1阶段结束。 第2阶段 在第2阶段中显示面板上会显示两个咖啡豆图标。 7 注意将废渣盒放到蒸汽管下方。 8 顺时针方向旋转阀门(图A,编号11)至终止位以打开阀门。 → 水流多次间断地从蒸汽管中流到废渣盒中,在此过程中阀门图标 持续闪烁。随后接水盘图标 亮起。 9 保持打开阀门处于开启状态。 10 清空废渣盒和接水盘并将接水盘重新装回咖啡机内。再次将废渣盒 放在蒸汽管下。 → 水箱图标 亮起。 11 冲洗水箱并注入自来水,直至达到最高水位标记。 12 按下蒸汽操作键 ,以继续运行综合除垢程序。 →...
- Page 33 第3阶段 在第3阶段中显示面板上会显示三个咖啡豆图标。 13 逆时针方向旋转阀门至终止位以关闭阀门。 → 水经咖啡机内部流入接水盘中。随后接水盘图标 亮起。 14 清空接水盘并将其与废渣盒重新装回咖啡机内。 → 在短暂的预热阶段后,待机图标 点亮。咖啡机处于准备就绪状态。 15 将美乐家Claris 滤水器重新装入水箱中。 ®...
-
Page 34: 运输和处置
运输和处置 13.1 运输准备、防冻保护和长期不使用时应采取的措施 排空咖啡机 我们建议在长期不用时或运输前排空咖啡机,以防止机器内部由于结冻而损 坏。 前提条件:咖啡机处于准备就绪状态(请参见第13页,开机和关 机)。 • 从水箱中取出美乐家Claris 滤水器。 ® • 同时按住单/双杯咖啡键 和开/关键 2秒钟以上。 → 在快速预热阶段中待机图标 一直闪烁。随后水箱图标 亮起。 • 向上打开水箱盖向上拉动并取出水箱(图A,编号7)。 → 阀门图标 点亮。 • 将一个容器放置在蒸汽管下。 • 顺时针方向旋转阀门(图A,编号11)至终止位以打开阀门。 → 水从蒸汽管流入容器中,此外还逸出蒸汽。阀门图标 闪烁。 警告! 热蒸汽有造成烫伤的危险 注意切勿被排空期间蒸汽管内逸出的蒸汽烫伤。 • 当不再逸出蒸汽时,沿逆时针方向旋转阀门开关,关闭阀门。 → 咖啡机已排空。 提示 美乐家Claris 滤水器不应长期处于干燥状态之下。因此我们强烈... - Page 35 运输 • 排空咖啡机(请参见第32页)。 • 清空并清洁接水盘和废渣盒。 • 清空水箱和豆槽。吸出深陷在豆槽中的咖啡豆,必要时使用吸尘 器。 • 清洁滤煮器(请参见第25页)。 • 尽可能使用原装包装(包括硬泡沫材料)进行运输,以避免运输 损伤。 小心! 切勿在温度较低的运输工具中运输咖啡机或放置在低温房间内, 否则残留的水可能结冰并造成咖啡机损坏。 报废 • 请通过适合的收集系统,以环保方式处置咖啡机。...
-
Page 36: 故障排除
故障排除 故障现象 故障原因 处理措施 咖啡仅一滴一滴 研磨度过细 将研磨度设置得粗一些 流出 清洁滤煮器 必要时执行综合除垢程序 必要时执行综合清洁程序 流不出咖啡 水箱缺水或者未正确安 向水箱加水并检查其是否正 装水箱 确安装 必要时打开阀门,直至水从 咖啡机中流出,再重新关闭 阀门 滤煮器堵塞 清洁滤煮器 研磨装置不研磨咖 咖啡豆未落入研磨机中 轻轻敲击豆槽 啡豆 (咖啡豆油份过大) 研磨机内有异物 请拨打服务热线 研磨装置噪音过大 研磨机内有异物 请拨打服务热线 当豆槽已填满,咖 烹煮腔内咖啡粉不足 按下单/双杯咖啡键 或 啡豆图标 仍一 咖啡浓度键 直闪烁 咖啡机内部管路中有 打开阀门,直至水从咖啡机... - Page 37 故障现象 故障原因 处理措施 未安装或未正确安装 正确安装滤煮器 清洁图标 和待机 滤煮器 图标 交替闪烁 冲煮腔内水过满 按开/关键关闭,再打开咖啡 机(必要时重复此操作), 直至显示准备就绪模式 所有操作键持续 系统故障 按开/关键关闭,再打开咖啡 闪烁 机,若此方法无效,请将咖 啡机送修。 如以上解决方案无法解决您的问题,请致电美乐家服务热线。 (+86 800-999-5859)
- Page 39 親愛的顧客朋友們: 衷心感謝您購買美樂家SOLO&milk全自動咖啡機。 歡迎您加入成為享受美樂家SOLO&milk的品尚人士。 擁有美樂家 SOLO&milk全自動咖啡機,您將體驗到不同尋常的咖啡 時光。品味個人喜愛的口味,盡情享受每個感官帶來的刺激! 為使您或您的客人能夠更長久地體驗美樂家SOLO&milk全自 動咖啡機所帶來的樂趣,請仔細閱讀本操作說明書,並妥善保管。 如需瞭解咖啡機的更多資訊或有任何疑問,您可直接與我們聯繫,或 者訪問我們的網站:www.melitta.cn 我們真誠希望您會滿意美樂家Solo&milk全自動咖啡機帶給您的美味 咖啡。 您的美樂家SOLO&milk團隊 ® 美樂家集團旗下公司的注冊商標...
- Page 40 目录 1 本操作說明書的相關資訊 ..............40 1.1 按規定使用 ..................41 1.2 不當使用 ..................41 2 一般安全注意事項 .................42 3 機器說明....................43 3.1 圖示A ....................43 3.2 顯示面板 ..................44 4 啟動 .......................45 4.1 安置 ....................45 4.2 連接 ....................46 4.3 裝填咖啡豆槽 ................46 4.4 水箱加水 ..................47 4.5 開機與排氣 ..................47 4.6 設置咖啡杯量 ................48 4.7 設置咖啡濃度...
- Page 41 11 功能設置....................55 11.1 設置水硬度 ..................55 11.2 設置節能待機模式計時器 ..............56 11.3 設置自動關機功能計時器 ..............57 11.4 設置烹煮溫度 ................58 11.5 恢復出廠設置 ................58 11.6 設置研磨度 ..................59 12 維護與保養 ....................60 12.1 一般清潔 ..................60 12.2 清潔濾煮器 ..................61 12.3 綜合清潔程式 ................62 12.4 綜合除垢程式 ................65 13 運輸和處置 ....................67 13.1 運輸準備、防凍保護和長期不使用時應採取的措施 .......67 14 故障排除....................69...
-
Page 42: 本操作說明書的相關資訊
本操作說明書的相關資訊 為了更好地瞭解有關內容,請打開本操作說明書正面和背面的折疊頁。 操作說明書文本中的圖示 本操作說明書中的圖示用於標注在使用美樂家SOLO&milk全自動咖啡機過程 中可能出現的特定危險,或為您提供一些實用的小竅門。 警告! 帶有此標誌的文字中包含了與您安全相關的資訊,並指出可能發 生的事故和傷害危險。 小心! 帶有此標誌的文字含有避免誤操作的資訊,並表明可能出現財產 損失危險。 提示 帶有此標誌的文字含有對使用美樂家SOLO&milk全自動咖啡機很 有價值的補充資訊。... -
Page 43: 按規定使用
按規定使用 美樂家SOLO&milk全自動咖啡機只能用於製作咖啡和特色咖啡、製作熱水和 加熱牛奶以及製作奶泡。 按規定使用包括: • 仔細閱讀、理解並遵守本操作說明。 • 尤其要重點注意安全提示。 • 嚴格按照本操作說明書所述操作條件來使用美樂家SOLO&milk全 自動咖啡機。 不當使用 不遵守本操作說明書所述內容而使用美樂家SOLO&milk全自動咖啡機的情 況,均視為不當使用。 警告! 您可能因不當使用而受傷或者被水或蒸汽燙傷。 提示 因不當使用而造成的損失,製造商概不承擔任何責任。... -
Page 44: 一般安全注意事項
一般安全注意事項 請仔細閱讀以下提示。如果您沒有遵守這些提示,可能會影響到您自身以及 咖啡機的安全。 警告! 務必將下列類似物品存放在兒童無法接觸到的地方:包裝材 – 料、小零件。 所有使用本機的人員都必須事先熟知操作規程並瞭解可能出現 – 的危險。 切勿讓兒童使用本咖啡機或在無人照看的情況下在咖啡機旁玩 – 耍。 本機不得由身體、感官或智力存在缺陷的人員、缺乏經驗和/或 – 缺少相關知識的人員(包括兒童)使用,除非是在其監護人的 看護下並指導其如何使用本機。 只能在機器完好的狀態下使用本機。 – 切勿擅自修理本機。如有維修需要,請撥打美樂家服務熱線。 – 請勿對本機及其組成部件和隨機配件進行任何改裝。 – 請勿將本機浸入水中。 – 手腳沾水或潮濕時,禁止接觸本機。 – 禁止接觸本機的熱表面! – 運行期間請勿將手伸入咖啡機內。 – 在運行期間禁止打開右蓋板,除非本操作說明書中有明確要 – 求。 還應注意遵守本操作說明書其他章節中所述的安全注意事項。 –... -
Page 45: 機器說明
機器說明 圖示A 圖中編號 說明 帶托杯板的接水盤和廢渣盒(內置)以及浮標(顯示接水 盤的積水情況) 可調節高度的咖啡出口 開/關鍵 咖啡杯量調節鈕 單/雙杯咖啡鍵 咖啡濃度鍵 水箱 豆槽 蒸汽操作鍵 顯示面板 用以釋放蒸汽及熱水的閥門 蒸汽管 右蓋板(可拆卸,內裝研磨度調節鈕、濾煮器和型號銘 牌)... -
Page 46: 顯示面板
顯示面板 圖示 含義 顯示 說明/提示 咖啡機正在預熱或處於製作咖啡 閃爍 過程中。 待機 常亮 咖啡機處於準備就緒狀態。 常亮 需更換美樂家Claris 濾水器 ® 美樂家Claris 濾 ® 水器 閃爍 正在更換濾水器 常亮 需向水箱加水 水箱 閃爍 需放入水箱 常亮 需清空接水盤和廢渣盒 接水盤和廢渣盒 閃爍 需裝入接水盤和廢渣盒 1咖啡豆:清淡 常亮 2咖啡豆:正常 3咖啡豆:濃烈 咖啡濃度 需裝填豆槽;將會在下次沖煮咖 閃爍 啡後停止閃爍。 常亮 需執行綜合清潔程式... -
Page 47: 啟動
啟動 首次啟動機器時,請認真執行以下幾項操作。 如果您已執行了這些操作,那麼咖啡機已準備就緒,接著您就可以製作咖啡 了。我們建議丟棄第一次開機運行後首次製作的兩杯咖啡。 安置 • 將咖啡機放在穩定、平整且乾燥的表面上。確保咖啡機與牆和其他 物品至少保持10釐米距離。 • SOLO&milk後邊緣上有兩隻滾輪,因此可以從前面抬起輕鬆自由 移動機器。 小心! 切勿將咖啡機放在熱表面或潮濕區域。 – 請勿在溫度較低的運輸工具中運輸咖啡機或存放在低溫房間 – 內,否則殘留的水可能結冰並損壞機器。請參見第67頁上的 提示。 • 廢渣盒已經放入接水盤中。注意將接水盤完全推入咖啡機,直至 停止。 提示 妥善保管好包裝材料,包括用於運輸和退貨的硬泡沫材料,以 – 方便運輸或者可能出現的退貨反運,從而避免在運輸過程中出 現損壞。 首次開機啟動前發現機器裏有咖啡和水的痕跡屬於正常情況, – 因為我們會在出廠前進行無故障功能測試。... -
Page 48: 連接
連接 • 將電源插頭與至少10A的接地電源插座相連接。 警告! 電源電壓不正確、連接不正確或電源線損壞,會引發火災或觸電 危險。 確保電源電壓與本機型號銘牌所規定的電壓一致。型號銘牌位 – 于咖啡機右側蓋板(圖A,編號13)的下方。 確保所用插座符合現行電氣安全標準。如有疑問,請諮詢專業 – 電氣技師。 嚴禁使用損壞的電源線(絕緣層受損、線芯裸露)。 – 損壞的電源線在保修期內只能由製造商負責更換,如果超出保 – 修期,則只能由有資質的專業人員更換。 裝填咖啡豆槽 • 打開豆槽蓋並裝入新鮮的咖啡豆。 小心! 豆槽中只能裝填咖啡豆。 – 禁止向豆槽內裝入研磨過的、凍幹的或經糖化處理的咖啡豆。 – • 蓋上豆槽蓋。... -
Page 49: 水箱加水
水箱加水 • 向上打開水箱蓋向上拉動並取出水箱(圖示A,編號7)。 • 向水箱注入新鮮水,直至達到最高水位標記,然後將其重新裝回 咖啡機中。 提示 如果在運行過程中(例如在咖啡流出過程)中水箱中的水流盡, 那麼水箱圖示就會點亮。必須在啟動下一操作前注滿水箱。 開機與排氣 咖啡機內的所有管路在出廠時已經進行過排水和排氣處理。因此首次開機 時,在預熱階段結束後閥門圖示 會點亮,此時機器必須通過蒸汽管排空咖啡 機內的空氣。排氣操作僅需要在首次開機時進行。 小心! 咖啡機只允許在未安裝美樂家Claris 濾水器且水箱注滿水的情況 ® 下進行排氣操作。 排氣結束後,才能將美樂家Claris 濾水器安裝到水箱內。 – ® 排氣之前向水箱注入新鮮水,直至達到最高水位標記處。 – • 按下開/關鍵 ,啟動咖啡機。 → 待機圖示 閃爍。咖啡機開始預熱。預熱結束後,閥門圖示 亮 起。 • 將一個較大容器放置在蒸汽管下。 • 順時針方向旋轉閥門(圖A,編號11)至終止位以打開閥門。 → 閥門圖示 閃爍。水流入蒸汽管下的容器中。 • 旦不再流水且閥門圖示... -
Page 50: 設置咖啡杯量
設置咖啡杯量 • 旋轉咖啡杯量調節鈕(圖A,編號4),設置杯量(調節鈕向左: 較少量的咖啡,調節鈕向右:較多量的咖啡)。 咖啡量調節鈕 調節鈕在中間 調節鈕完全 咖啡杯量 完全向左 向右 單杯 30 ml 125 ml 220 ml 雙杯 2 x 30 ml 2 x 125 ml 2 x 220 ml 設置咖啡濃度 • 反復按壓咖啡濃度鍵, 在三個濃度等級之間進行選擇。 → 您的選擇將以咖啡豆圖示 的形式顯示在顯示面板上。 顯示 咖啡濃度 清淡 正常(出廠設置)... -
Page 51: 安裝美樂家Claris 濾水器
安裝美樂家Claris 濾水器 ® 本機配有一個美樂家Claris 濾水器,用以濾除水中的雜質。請先進行首次開 ® 機運行,再將濾水器安裝到咖啡機中。在您使用濾水器時,無需頻繁對咖啡 機進行除垢,並且水硬度會自動設置為1級(請參見第55頁)。這種防水 垢安全措施可以延長咖啡機的使用壽命。定期(每2個月)更換濾水器,最 遲要在濾水器圖示 出現在顯示面板上時進行更換。 前提條件:咖啡機已關閉。 • 同時按住咖啡濃度鍵 和開/關鍵2秒鐘以上。 → 在整個更換過程中,濾水器圖示 一直閃爍。接水盤圖示 常 亮。 • 清空接水盤,然後重新裝回咖啡機中。 → 水箱圖示 亮起。 • 向上打開水箱蓋並向上拉動取出水箱。 • 清空水箱。 • 在使用濾水器前,需將其放入一個裝滿水的容器中浸泡一會兒。 • 將美樂家Claris 濾水器固定在水箱底部的螺紋支架上。 ® • 向水箱注入新鮮水,直至達到最高水位標記,然後將其重新裝回 咖啡機中。 → 閥門圖示 將亮起。... -
Page 52: 製作咖啡/意式特濃咖啡
提示 美樂家Claris 濾水器不應長期處於乾燥狀態之下。 – ® 安裝美樂家Claris 濾水器後,第一次沖洗時會從濾水器中沖出 – ® 多餘的活性炭。因此開始沖出來的水是淺灰色,隨後水會重新 變得清澈。 製作咖啡/意式特濃咖啡 前提條件:咖啡機處於準備就緒狀態。 • 在咖啡出口下方放置一個或並排放置兩個咖啡杯。 • 按下咖啡濃度鍵, 設置咖啡濃度。 • 旋轉咖啡杯量調節鈕(圖A,編號4),設置每杯的注入量。 • 如果您想沖一杯咖啡,只需按一下單/雙杯咖啡鍵 。 • 如果您想沖兩杯咖啡,則要按兩下單/雙杯咖啡鍵 。 → 在您按了兩下後,咖啡豆圖示會在沖煮期間快速短暫閃爍兩次,等待 確認。 → 咖啡機將啟動(兩次)研磨和出咖啡工序。待機圖示 閃爍。在達 到所設置的單杯杯量後,咖啡會自動停止流出。 • 如需提前中止出咖啡程式,請按下單/雙杯咖啡鍵 。如果 • 您已經啟動雙杯咖啡製作程式,在咖啡製作程式啟動三秒鐘後, 才能再按該鍵。 提示 首次開機啟動時,磨豆時間要比平時稍長一些。... -
Page 53: 製作奶泡
製作奶泡 前提條件:咖啡機處於準備就緒狀態。 • 注意,務必向下移動蒸汽管的鍍鉻外管(圖K,編號1)。 • 按下蒸汽操作鍵 。 → 待機圖示 閃爍。咖啡機開始預熱。隨後閥門圖示 將亮起。 • 最多向容器中注入三分之一的牛奶,因為打奶泡時牛奶的體積會 急劇膨脹。 • 將裝有牛奶的容器放置在蒸汽管下。注意將蒸汽管頂端浸入牛奶 中。 警告! 熱蒸汽和蒸汽管有造成燙傷的危險 切勿用手接觸噴出的熱蒸汽。 – 在使用過程中或剛剛使用後,請勿觸碰蒸汽管。 – • 順時針方向旋轉閥門(圖A,編號11)至終止位以打開閥門。 → 閥門圖示 閃爍。從蒸汽管中噴出的熱蒸汽會對牛奶進行加熱並使 其發泡。如需得到更好的奶泡效果,請在打奶泡時上下移動裝有牛奶 的容器。 • 沿逆時針方向旋轉閥門開關,關閉閥門並結束打奶泡操作。此時牛 奶的體積應幾乎膨脹了一倍並能明顯感覺到容器變熱。 • 每次使用完後,立即通過製作蒸汽或熱水的形式徹底沖洗蒸汽噴 嘴。 • 沖洗蒸汽管: 向容器中注入一半的清水並將其放置在蒸汽管下方。確保將蒸汽管 頂端浸入水中。將閥門打開大約5秒鐘,然後再關閉。 • 30秒鐘後咖啡機自動從蒸汽模式切換到正常運行模式。按下蒸汽... -
Page 54: 加熱牛奶
提示 我們建議使用高蛋白質含量的冰牛奶。對製作優質奶泡起決定 – 作用的是牛奶中的蛋白質含量,而非脂肪含量。 為確保蒸汽噴嘴能夠正常工作,應定期沖洗噴嘴,請參見第24 – 頁。 加熱牛奶 前提條件:咖啡機處於準備就緒狀態。 • 向上移動蒸汽管的鍍鉻外管(圖K,編號2)。 • 將裝有牛奶的容器放置在蒸汽管下。注意將蒸汽管頂端浸入牛奶 中。 • 按下蒸汽操作鍵 。 → 待機圖示 閃爍。咖啡機開始預熱。隨後閥門圖示 亮起。 警告! 熱蒸汽和蒸汽管有造成燙傷的危險 切勿用手接觸噴出的熱蒸汽。 – 在使用過程中或剛剛使用後,請勿觸碰蒸汽管。 – • 順時針方向旋轉閥門(圖A,編號11)至終止位以打開閥門。 → 閥門圖示 閃爍。從蒸汽管中噴出的熱蒸汽會對牛奶進行加熱。如 需得到更好的加熱效果,請在加熱時上下移動裝有牛奶的容器。 • 當牛奶達到想要的溫度時,逆時針方向旋轉閥門至終止位以關閉 閥門 • 沖洗蒸汽管: 向容器中注入一半的清水並將其放置在蒸汽管下方。確保將蒸汽管 頂端浸入水中。將閥門打開大約5秒鐘,然後再關閉。 • 30秒鐘後咖啡機自動從蒸汽模式切換到正常運行模式。按下蒸汽... -
Page 55: 製作熱水
提示 為確保蒸汽噴嘴能夠正常工作,應定期沖洗噴嘴,請參見第24 頁。 製作熱水 前提條件:咖啡機處於準備就緒狀態。 • 將蒸汽管的鍍鉻外管向上拉動。 • 將一個容器放置在蒸汽管下。 警告! 熱出水端和熱蒸汽管有造成燙傷的危險如果在製作蒸汽後直接製 作熱水,那麼首先會從蒸汽管中排出剩餘的熱蒸汽,而且有可能 從熱水的出水端逸出。 避免直接接觸到熱水和熱蒸汽管。 – • 順時針方向旋轉閥門(圖A,編號11)至終止位以打開閥門。 → 閥門圖示 亮起。熱水從蒸汽管流入容器中。 • 達到所需水量後,立即沿逆時針方向旋轉閥門開關,關閉閥門。 提示 當熱水釋放量達到大約150毫升時,會自動停止。如果你需要製 備更多熱水,請將閥門關閉後再打開。... -
Page 56: 關機和工作模式
關機和工作模式 關機 • 將容器放在咖啡出口下。 • 按下開/關鍵 ,關閉咖啡機。 → 如果之前製作過咖啡,那麼咖啡機會自動對咖啡管路進行沖洗。濾煮 器移到非工作位置上。待機圖示 熄滅。 工作模式 模式 識別方式 可執行的操作 待機圖示 和咖啡豆 準備就緒 飲品製作功能 圖示 常亮 顯示面板上圖示的亮度 按下咖啡濃度鍵 到 節能待機模式 變弱 正常模式 顯示面板無顯示,咖啡 通過按下開/關鍵 自動關機功能 機斷電 打開 節能待機模式 咖啡機在完成最後一項任務後會自動(根據設置)切換到節能待機模式(為 節省電能,加熱器溫度會隨之下降)。為此您可以用計時器設置不同時間段 或直接關閉該功能。請參見第56頁。 自動關機功能 咖啡機在完成最後一項任務後自動(根據設置)關閉。您可以用計時器設置 不同關機時間。請參見第57頁。... -
Page 57: 功能設置
功能設置 11.1 設置水硬度 請使用隨機附贈的測試條測出您所在區域的水硬度。請參見測試條包裝上的 說明。機器出廠時設置的默認水硬度為4級。如果您安裝了美樂家Claris 濾 ® 水器,水硬度會自動調成1級(請參見第49頁) 前提條件:咖啡機處於準備就緒狀態,待機圖示 常亮。 為確保咖啡機在良好工作狀態下運行,請如下設置水硬度: • 同時按住單/雙杯咖啡鍵 和咖啡濃度鍵 2秒鐘以上。 → 待機圖示 快速閃爍。 • 按一下單/雙杯咖啡鍵 ,調出水硬度設置菜單。 → 濾水器圖示 亮起。 • 反復按壓咖啡濃度鍵 ,在四個水硬度等級之間進行選擇。 → 您選擇的水硬度將根據下表以咖啡豆圖示 的形式顯示在顯示面 板。 水硬度範圍 特性 °dH °f 軟 0 - 7 .2 °dH 0 ... -
Page 58: 設置節能待機模式計時器
提示 如果在設置過程中60秒內未按下任何按鍵,咖啡機會自動切換回 到待機模式。 11.2 設置節能待機模式計時器 有關節能待機模式的更多資訊,請參見第54頁。計時器的出廠設置為1級 (5分鐘)。 前提條件:咖啡機處於準備就緒狀態,待機圖示 常亮。 請按下述操作設置計時器: • 同時按住單/雙杯咖啡鍵 和咖啡濃度鍵 2秒鐘以上。 → 待機圖示 快速閃爍。 • 按兩下單/雙杯咖啡鍵 調出節能待機模式功能表。 → 水箱圖示 亮起。 • 反復按下咖啡濃度鍵 ,在四個時間選項之間進行選擇。 顯示 時間 5分鐘 (出廠設置) 15分鐘 30分鐘 關閉 閃爍 • 按下開/關 ,確認選定的時間。 → 顯示面板上的所有圖示都快速閃爍,等待確認。咖啡機處於準備就緒 狀態,待機圖示 亮起。... -
Page 59: 設置自動關機功能計時器
提示 按下咖啡濃度鍵 可以將咖啡機從節能待機模式中喚醒。隨後 您就可以直接製作咖啡了。 11.3 設置自動關機功能計時器 有關自動關機功能的更多資訊,請參見第54頁。計時器的出廠設置為1級 (1小時)。 前提條件:咖啡機處於準備就緒狀態,待機圖示 常亮。 請按下述操作設置計時器: • 同時按住單/雙杯咖啡鍵 和咖啡濃度鍵 2秒鐘以上。 → 待機圖示 閃爍。 • 按三下單/雙杯咖啡鍵 ,調出自動關機功能功能表。 → 接水盤圖示 亮起。 • 反復按下咖啡濃度鍵 ,在四個時間選項之間進行選擇。 顯示 時間 1小時 (出廠設置) 2小時 4小時 8小時 閃爍 • 按下開/關鍵 ,確認選定的時間。 → 顯示面板上的所有圖示都快速閃爍,等待確認。咖啡機處於準備就緒 狀態,待機圖示... -
Page 60: 設置烹煮溫度
11.4 設置烹煮溫度 烹煮溫度的出廠設置為2級(中等)。 前提條件:咖啡機處於準備就緒狀態,待機圖示 亮起。 請按下述操作設置您需要的烹煮溫度: • 同時按住單/雙杯咖啡鍵 和咖啡濃度鍵 2秒鐘以上。 → 待機圖示 閃爍。 • 按四下單/雙杯咖啡鍵 ,調出烹煮溫度功能表。 → 清潔圖示 閃爍。 • 反復按壓咖啡濃度鍵 ,在三種烹煮溫度之間進行選擇。 顯示 烹煮溫度 低 中等(出廠設置) 高 • 按下開/關鍵 ,確認選定的烹煮溫度。 → 顯示面板上的所有圖示都快速閃爍,等待確認。咖啡機處於準備就緒 狀態,待機圖示 亮起。 11.5 恢復出廠設置 請按照下列操作,恢復咖啡機的出廠設置: 前提條件:咖啡機處於準備就緒狀態,待機圖示 常亮。 • 同時按住蒸汽操作鍵 和開/關鍵... -
Page 61: 設置研磨度
出廠設置一覽表: 功能設置 出廠設置 水硬度 水硬度4級 節能待機模式 1級(5分鐘) 自動關機功能 1級(1小時) 烹煮溫度 2級(中等) 11.6 設置研磨度 在出廠前,研磨度已設置為最佳狀態。因此我們建議您在沖煮大約1000杯咖 啡(大約1年)後,再調整研磨度。 您只能在咖啡研磨過程中設置研磨度。所以請在咖啡製作過程開始後立即設 置研磨度。 如果咖啡香氣不夠濃郁,那麼我們建議將研磨度調得更細一些。 • 拉住咖啡機右側(圖A,編號13)的凹槽並向右拉取下右蓋板。 • 正常啟動咖啡製作程式。 • 在研磨機運轉過程中:將調節杆設在三個位置之一(圖E)。 • 將右蓋板的四個卡子插入咖啡機後端並向左輕晃右蓋板,直至其 合上卡住。 調節杆位置 研磨度 左 較細 中 中等 右 較粗... -
Page 62: 維護與保養
維護與保養 12.1 一般清潔 • 用柔軟的濕布和普通餐具洗滌劑擦拭咖啡機外部。 • 定期清空並清潔接水盤(圖A,編號1),至少要在浮標超出托杯 板時進行清潔。 • 定期清潔廢渣盒。 清潔蒸汽管 • 在使用後,即加熱牛奶或製作奶泡後,一定立即清潔蒸汽管。 • 等到蒸汽管冷卻後,再用一塊濕布擦拭其外部。 • 為徹底進行日常清潔,可沿逆時針方向旋下(圖F)並拆開(圖 G)蒸汽管。 • 在流水中或洗碗機內沖洗所有部件。特別要使用尖頭物品或刷子 (圖H)清潔噴嘴。 • 清潔完成後,沿順時針方向將清潔乾淨的蒸汽管擰緊在固定座上。 小心! 為避免損傷咖啡機表面,請勿使用超細纖維布、砂布、海綿或 – 清潔劑。 請勿在洗碗機內清潔接水盤和濾煮器,否則可能導致部件變 – 形。 提示 廢渣盒(圖A,編號1)耐機洗,因此可以放在洗碗機內清潔。頻 繁在洗碗機內清洗可能會導致廢渣盒輕微褪色。... -
Page 63: 清潔濾煮器
12.2 清潔濾煮器 前提條件:咖啡機已關閉。 提示 為對咖啡機進行最佳保護,我們建議您每週清潔一次濾煮器。 • 拉住咖啡機右側(圖A,編號13)的凹槽並向右拉取下右蓋板。 • 按壓濾煮器把手上的紅色按鈕(圖B,編號1)並沿順時針方向旋 轉把手,直至無法繼續旋轉(大約75°)。 • 抓住把手從咖啡機中取出濾煮器。 • 將濾煮器維持原狀(請勿移動或轉動濾煮器上的部件)。 • 在流水下徹底沖洗整個濾煮器的各個面。尤其要注意圖D所示的表 面必須清潔無咖啡渣。切勿將濾煮器放入洗碗機內。 • 讓濾煮器滴幹。 • 如有必要,同樣也要清除咖啡機內部濾煮器安裝表面上的咖啡渣。 • 將濾煮器重新裝回咖啡機中,並沿逆時針方向旋轉濾煮器把手,直 至無法再轉,以鎖緊濾煮器。 • 將右蓋板的四個卡子插入咖啡機後端並向左輕晃右蓋板,直至其 合上卡住。... -
Page 64: 綜合清潔程式
12.3 綜合清潔程式 綜合清潔程式可以除去手動無法清除的咖啡殘渣和殘油。程式用時共 計15分鍾左右。 前提條件:咖啡機已關閉。 小心! 每2個月或大約沖煮200杯咖啡後,至少在顯示面板上的清潔圖 – 標 常亮時,執行一次綜合清潔程式。 只能使用美樂家全自動咖啡機專用清潔藥片。該清潔藥片專為 – 美樂家SOLO&milk全自動咖啡機設計。如果使用其他清潔用 具,可能損壞咖啡機。 請按下述操作執行綜合清潔程式: 第1階段 在第1階段中顯示面板上不顯示任何咖啡豆圖示。 1 向上拉動並取出水箱。向水箱注入新鮮冷水,直至達到最高水位標 記,並將其重新裝回咖啡機內 2 同時按住單/雙杯咖啡鍵 和開/關鍵 2秒鐘以上。 → 在整個過程中,清潔圖示 一直閃爍。 接水盤圖示 亮起。 3 清空接水盤和廢渣盒。 4 重新裝入接水盤而不裝上廢渣盒,並將廢渣盒放到出口下。 → 第1階段結束。 第2階段 在第2階段中顯示面板上會顯示一個咖啡豆 圖示。 → 首先執行兩個自動沖洗程式。然後待機圖示 亮起。... - Page 65 6 按壓濾煮器把手上的紅色按鈕(圖B,編號1)並沿順時間方向旋 轉把手,直至無法繼續旋轉(大約75°)。 7 抓住把手從咖啡機中取出濾煮器。 → 在濾煮器取出期間待機圖示 和清潔圖示 交替閃爍。 小心! 有損傷濾煮器的危險 在綜合清潔程式運行期間,只能在此處所述的時間點上取出濾 – 煮器。 8 將濾煮器維持原狀(請勿移動或轉動濾煮器上的部件)。 9 在流水下徹底沖洗整個濾煮器的各個面,並讓濾煮器滴幹。 10 將清潔藥片放入濾煮器內(圖C)。 11 將濾煮器重新裝回到咖啡機中,並沿逆順時針旋轉濾煮器把手,直 至無法再轉,以鎖緊濾煮器。 → 清潔圖示 繼續閃爍,待機圖示 熄滅。水箱圖示 亮起。 12 將右蓋板的四個卡子插入咖啡機後端並向左輕晃右蓋板,直至其合 上卡住。 → 第2階段結束。 第3階段 在第3階段中顯示面板上會顯示兩個咖啡豆 圖示。 13 向上拉動並取出水箱。向水箱注入新鮮冷水,直至達到最高水位元 標記,並將其重新裝回咖啡機內。 14 按下蒸汽操作鍵 ,以繼續運行綜合清潔程式。...
- Page 66 第4階段 在第4階段中顯示面板上會顯示三個咖啡豆 圖示。 → 綜合清潔程式繼續運行。該過程大約會持續5分鐘。水從咖啡出口流 出,同時咖啡機內部的水流入接水盤。隨後接水盤圖示 點亮。 15 向上拉動並取出水箱。向水箱注入新鮮冷水,直至達到最高水位元 標記,並將其重新裝回咖啡機內。 16 清空接水盤和廢渣盒。 17 重新裝入接水盤而不裝上廢渣盒,並將廢渣盒放到出口下。 → 第4階段結束。 第5階段 在第5階段中顯示面板上會顯示三個咖啡豆圖示 中間的咖啡豆閃 爍。 → 綜合清潔程式繼續運行。該過程大約會持續5分鐘。水從咖啡出口流 出,同時咖啡機內部的水流入接水盤。隨後接水盤圖示 點亮。 18 清空接水盤和廢渣盒。 19 重新裝入接水盤和廢渣盒。 → 綜合清潔程式結束。在短暫的預熱階段後,待機圖示 亮起。 咖啡機處於準備就緒狀態。...
-
Page 67: 綜合除垢程式
12.4 綜合除垢程式 綜合除垢程式可以清除咖啡機內的水垢。程式用時共計30分鐘左右。在整個 過程中,除垢圖示 一直閃爍。 前提條件:咖啡機已關閉。在除垢前要從水箱裏取出美樂家Claris®濾 水器(如已安裝)。 小心! 每3個月或當顯示面板上的除垢圖示 常亮時,需執行一次綜 – 合除垢程式。 只能使用美樂家全自動咖啡機專用除垢劑。該除垢劑專為美樂 – 家SOLO&milk全自動咖啡機設計。 請勿使用醋或其他除垢劑。 – 請按下述操作執行綜合除垢程式: 提示 為了避免在除垢過程中液體會從蒸汽管中濺出,我們建議使用附 配的管子(在配件包中)。因此,請將管子套在蒸汽管上大於 0.5-1釐米處如圖(J)所示,將廢渣盒放在咖啡機的右側近鄰咖 啡機處(以保護管子的旋轉度)。這樣除垢過程就可以毫無噴濺 的開始了。 第1階段 在第1階段中顯示面板上會顯示一個咖啡豆 圖示 。 1 同時按住蒸汽操作鍵 和開/關鍵 2秒鐘以上。 → 除垢圖示 閃爍且接水盤圖示 點亮。 2 清空接水盤並重新裝回咖啡機,但不裝上廢渣盒,而將廢渣盒放到 蒸汽管下。 → 水箱圖示 點亮。... - Page 68 4 將除垢劑倒入一個裝有0.5升溫水的獨立容器中。攪拌除垢粉(如 使用長勺子)。 警告! 除垢劑有刺激皮膚的危險 請按照除垢劑包裝上的安全注意事項和用量說明來操作。 5 當除垢粉完全溶解後,將除垢溶液倒入水箱中。 6 重新裝上水箱。 7 按下蒸汽操作鍵 ,啟動綜合除垢程式。 → 第1階段結束。 第2階段 在第2階段中顯示面板上會顯示兩個咖啡豆 圖示。 → 綜合除垢程式啟動。水流多次間斷地經咖啡機內部流到接水盤中。該 過程大約會持續15分鐘。隨後閥門圖示 亮起。 8 注意將廢渣盒放到蒸汽管下方。 9 順時針方向旋轉閥門(圖A,編號11)至終止位以打開閥門。 → 水流多次間斷地從蒸汽管中流到廢渣盒中,在此過程中閥門圖示 持續閃爍。隨後接水盤圖示 亮起。 10 保持打開閥門處於開啟狀態。 11 清空廢渣盒和接水盤並將接水盤重新裝回咖啡機內。再次將廢渣盒 放在蒸汽管下。 → 水箱圖示 亮起。 12 沖洗水箱並注入自來水,直至達到最高水位標記。 13 按下蒸汽操作鍵...
-
Page 69: 運輸和處置
第3階段 在第3階段中顯示面板上會顯示三個咖啡豆 圖示。 → 水從蒸汽管流入廢渣盒中,在此過程中閥門圖示 持續閃爍。隨後 閥門圖示 亮起。 14 逆時針方向旋轉閥門至終止位以關閉閥門。 → 水經咖啡機內部流入接水盤中。隨後接水盤圖示 亮起。 15 清空接水盤並將其與廢渣盒重新裝回咖啡機內。 → 綜合除垢程式結束。在短暫的預熱階段後,待機圖示 點亮。咖啡 機處於準備就緒狀態。 16 將美樂家Claris 濾水器重新裝入水箱中。 ® 運輸和處置 13.1 運輸準備、防凍保護和長期不使用時應採取的措施 排空咖啡機 我們建議在長期不用時排空咖啡機,以防止機器內部由於結凍而損壞。 前提條件:咖啡機處於準備就緒狀態。 • 從水箱中取出美樂家Claris 濾水器。 ® • 同時按住單/雙杯咖啡鍵 和開/關鍵 2秒鐘以上。 → 在快速預熱階段中待機圖示 一直閃爍。隨後水箱圖示 亮起。... - Page 70 警告! 熱蒸汽有造成燙傷的危險 注意切勿被排空期間蒸汽管內逸出的蒸汽燙傷。 • 當不再逸出蒸汽時,沿逆時針方向旋轉閥門開關,關閉閥門。 → 咖啡機已排空。 提示 美樂家Claris 濾水器不應長期處於乾燥狀態之下。 ® 運輸 • 排空咖啡機(請參見第67頁)。 • 清空並清潔接水盤和廢渣盒。 • 清空水箱和豆槽。吸出深陷在豆槽中的咖啡豆,必要時使用吸塵 器。 • 從水箱中取出美樂家Claris 濾水器。 ® • 清潔濾煮器(請參見第49頁)。 • 盡可能使用原裝包裝(包括硬泡沫材料)進行運輸,以避免運輸 損傷。 小心! 切勿在溫度較低的運輸工具中運輸咖啡機或放置在低溫房間內, 否則殘留的水可能結冰並造成咖啡機損壞。 報廢 • 請通過適合的收集系統,以環保方式處置咖啡機。...
-
Page 71: 故障排除
故障排除 故障現象 故障原因 處理措施 咖啡僅一滴一滴 研磨度過細 將研磨度設置得粗一些 流出 清潔濾煮器 必要時執行綜合除垢程式 必要時執行綜合清潔程式 流不出咖啡 水箱缺水或者未正確安 向水箱加水並檢查其是否正 裝水箱 確安裝 必要時打開閥門,直至水從 咖啡機中流出,再重新關閉 閥門 濾煮器堵塞 清潔濾煮器 研磨裝置不研磨咖 咖啡豆未落入研磨機中 輕輕敲擊豆槽 啡豆 (咖啡豆油份過大) 研磨機內有異物 請撥打服務熱線 研磨裝置噪音過大 研磨機內有異物 請撥打服務熱線 當豆槽已填滿,咖 烹煮腔內咖啡粉不足 按下單/雙杯咖啡鍵 啡豆圖示 仍一 或咖啡濃度鍵 直閃爍 咖啡機內部管路中有 打開閥門,直至水從咖啡機 閥門圖示... - Page 72 故障現象 故障原因 處理措施 未安裝或未正確安裝 正確安裝濾煮器 清潔圖示 和待 濾煮器 機圖示 交替 閃爍 沖煮腔內水過滿 按開/關鍵關閉,再打開咖啡 機(必要時重複此操作), 直至顯示準備就緒模式 所有操作鍵持續 系統故障 按開/關鍵關閉,再打開咖啡 閃爍 機,若此方法無效,請將咖 啡機送修。 如以上解決方案無法解決您的問題,請致電美樂家服務熱線。 (+86 800-999-5859)
- Page 73 이 커피 메이커에 관한 더 많은 정보가 필요하거나 의문이 있으시면 밀리타 서비스 센터*로 연락하시거나, 아래 인터넷 웹 사이트를 방문 ® 하여 주십시오. www.melittakorea.com 밀리타 카페오 솔로&밀크에 만족하시기를 바랍니다. ® ® 밀리타 솔로&밀크 팀 ® * 전화: 02 574 8740 ® Registered trademark of a company of the Melitta Group...
- Page 74 목차 1 이 사용 설명서에 대한 정보 ..............74 1.1 이 사용 설명서에 나와 있는 표시기호 ...........74 1.2 적절한 사용 ...................75 1.3 부적절한 사용 ................75 2 일반적 안전수칙 ..................76 3 제품 그림설명 ..................77 3.1 디스플레이 ...................78 4 시작하기....................79 4.1 설치하기 ..................79 4.2 연결하기...
- Page 75 11 기능 설정....................91 11.1 물경도 조정하기 ................91 11.2 절전 모드 설정하기 ...............92 11.3 자동꺼짐 기능 ................93 11.4 커피 추출온도 ................94 11.5 제품을 공장 설정치로 복구하기 ............95 11.6 커피 분쇄강도 조절하기 ..............96 12 유지 관리....................97 12.1 일반적인 청소 ................97 12.2 커피 추출 장치 청소 ..............98 12.3 자동...
-
Page 76: 이 사용 설명서에 대한 정보
이 사용 설명서에 대한 정보 • 사용방법을 잘 숙지할 수 있도록 이 사용 설명서 표지 앞뒤에 있는 접힌 페이지를 잘 펴서 보세요. 이 사용 설명서에 나와 있는 표시기호 이 사용 설명서에 사용된 표시기호는 밀리타 카페오 솔로&밀크 사용환경 ® ® 에서 발생할 수 있는 위험 또는 유익한 정보를 제시하고 있습니다. 경고! 경고표시는... -
Page 77: 적절한 사용
적절한 사용 밀리타 솔로&밀크는 일반 커피 및 에스프레소 커피를 제조하는데 사용 ® 하도록 특별히 제작된 제품입니다. 적절한 사용방법은 다음과 같습니다: • 사용 설명서를 잘 읽고, 숙지하고, 따를 것. • 특히 안전수칙을 잘 따를 것. • 사용 설명서에 기술되어있는 사용조건에 합당하게 사용할 것. 부적절한... -
Page 78: 일반적 안전수칙
일반적 안전수칙 다음 안전수칙을 주의깊게 읽어주세요. 이를 숙지하지 않을 경우 상해 또는 제품 손상을 초래할 수 있습니다. 경고! 다음과 같은 물품은 어린이의 손이 닿지 않는 곳에 두세요. – 포장재, 작은 부품류. 제품을 사용하는 모든 사람들은 사전에 사용 설명서는 물론 혹 –... -
Page 79: 제품 그림설명
제품 그림설명 그림 A 설명 드립 트레이. 커피 잔 받침대와 커피 찌꺼기통(내장) 및 수위표시기(드립 트레이 상태표시) 높이 조정가능 커피 배출구 켜짐/꺼짐 버튼 커피 배출량 조절기 커피 배출하기 버튼 커피강도 조정 버튼 물통 원두통 스팀 배출 버튼 디스플레이 스팀 및 온수 배출 밸브 스팀... -
Page 80: 디스플레이
디스플레이 기호 의미 디스플레 내용 설명/조치 이 표시 점멸함 제품 가열 중 혹은 커피 배출 중임 대기모드 켜짐 제품이 작동 준비상태에 있음 밀리타 클라리스 정수필터를 교 ® 켜짐 밀리타 클라 ® 환해 주세요 리스 정수필터 점멸함 정수필터 교환 중 켜짐 물통을... -
Page 81: 시작하기
시작하기 제품을 처음 사용하기 전에 다음과 같은 작업을 실행하여 주세요. 아래 모든 작업을 완료하면 제품은 작동 준비상태입니다. 따라서 커피를 추출 할 수 있습니다. 제품을 처음 사용할 경우 위생상 처음 두 번까지 추출된 커피는 버릴 것을 권장합니다. 설치하기 • 제품은 건조하고,평평하고 안정된 곳에 설치하세요. 벽이나 다른 물체... -
Page 82: 연결하기
연결하기 • 전원 케이블은 정격 전원소켓에 연결하여 주세요. 경고! 부적절한 전압, 부적절 혹은 손상된 소켓 및 전원 케이블을 사용하 여 전원을 연결하는 경우 화재 또는 감전사고 위험이 있습니다. 사용장소의 전압이 제품 정격표시판에 명시된 전압과 일치하는 – 지 확인하여 주세요. 정격표시판은 추출장치 커버 안쪽 하단에 부착... -
Page 83: 물통 채우기
물통 채우기 • 물통 커버를 완전히 열고(그림 A, 번호 7) 물통을 꺼내 주세요. • 물통을 깨끗한 물로 최대 표시까지 채우고 다시 제자리에 끼워 주 세요. 노트! 제품 가동 중 (예를 들어 커피 배출 중)에 물통이 비면 물통 표시 기호가 나타납니다. 현재 실행 중인 작업은 종료됩니다. 다음... -
Page 84: 커피 배출량 조정
커피 배출량 조정 • 커피 배출량 조절기(그림A, 번호 4)를 돌려서 배출되는 커피량을 조절할 수 있습니다 (조절기를 왼쪽으로 돌리면 커피량이 감소하 고, 오른쪽으로 돌리면 커피량이 증가합니다). 조절기를 조절기를 조절기를 커피 배출량 완전히 중간으로 완전히 왼쪽으로 오른쪽으로 한 잔 배출 경우 30 ml 125 ml 220 ml 두... -
Page 85: 전원 넣기와 끄기
전원 넣기와 끄기 제품 전원 넣기 노트 제품에 전원을 넣을 때마다 자동헹굼이 실행됩니다. • 커피 배출구 아래에 용기를 놓아 주세요. • 켜짐/꺼짐 버튼 을 눌러 제품 전원을 넣어 주세요. → 대기모드 표시기호 가 점멸합니다. 제품이 예열됩니다. 자동헹굼 이 실행되며 커피 배출구로 뜨거운 물이 나옵니다. 대기모드 표시기 호... -
Page 86: 밀리타 클라리스 정수필터 삽입
밀리타 클라리스 정수필터 삽입 ® ® 물속의 석회질과 오염물질을 여과해주는 밀리타 클라리스(Claris ) 정수필 ® ® 터가 제품과 함께 공급됩니다. 이것은 반드시 제품을 최초로 사용개시한 후 삽입하여 주세요. 정수필터를 사용하면 석회질 제거작업을 자주 해줄 필요 가 없으며,물의 경도는 레벨 1로 자동설정 됩니다. 정수필터를 사용하면 석 회질... - Page 87 → 밸브 표시기호 가 점멸합니다. 스팀 배출구 아래에 놓은 용기에 물 이 흘러 내립니다. • 물이 이상 더 흘러나오지 않으면 밸브 표시기호 가 켜집니다. 밸브 스위치를 반시계 방향으로 돌려 밸브를 닫아주세요 → 이어 대기모드 표시기호 와 원두 표시 가 켜집니다. 제품은 작 동...
-
Page 88: 에스프레소 혹은 카페 크레마 추출하기
에스프레소 혹은 카페 크레마 추출하기 선행 조건: 제품이 작동 준비상태에 있어야 합니다. • 커피 배출구 아래에 커피 잔 (하나 혹은 둘)을 놓아 주세요. • 커피강도 버튼 을 눌러 추출강도를 선택해 주세요. • 커피 배출량 조절기(그림 A, 번호 4)를 돌러 배출량을 조절하여 주 세요. -
Page 89: 밀크 거품 만들기
밀크 거품 만들기 선행 조건: 제품이 작동 준비상태에 있어야 합니다. (페이지 83 „전 원 넣기와 끄기“ 참조) • 크롬 도금한 스팀 파이프 바깥 커버가 아래쪽으로 밀어 내려져 있 는가 확인하여 주세요(그림 K. 번호 1) • 스팀 배출 버튼 을 눌러 주세요. →... -
Page 90: 밀크 데우기
• 스팀 파이프 헹구기 용기에 깨끗한 물을 반쯤 채우고 이것을 스팀 파이프 아래에 놓아 주세요. 스팀 파이프 끝이 물속에 잠겨 있는지 확인해 주세요. 밸브를 약 5 초 동안 열어 준 다음 다시 닫아 주세요. • 30 초 후에는 자동적으로 스팀 모드가 정상 모드로 바뀝니다. 미리 정상... - Page 91 • 밸브 스위치(그림 A, 번호 11)를 시계방향으로 끝까지 돌려 밸브를 열어 주세요. → 밸브 표시기호 가 점멸합니다. 스팀 파이프에서 나오는 뜨거운 스팀이 밀크를 데워 줍니다. 데우는 동안 밀크통을 아래 위로 움직여 주면 더 좋은 결과를 얻을 수 있습니다. • 원하는 밀크 온도에 도달하면 바로 밸브 스위치를 반시계방향으로 끝까지...
-
Page 92: 온수 배출하기
온수 배출하기 선행조건 : 제품은 작동 준비상태에 있어야 합니다. (페이지 83 „전 원 넣기와 끄기“ 참조) • 스팀 파이프의 크롬 도금 외부 커버를 위로 이동시키세요. • 스팀 파이프 아래에 용기를 놓아주세요 경고! 스팀 및 스팀 파이프에 화상을 입을 위험이 있습니다. 스팀... -
Page 93: 기능 설정
기능 설정 11.1 물경도 조정하기 제품과 함께 공급된 테스트용 스트립을 사용하여 거주지역의 물경도를 알아 볼 수 있습니다. 테스트용 스트립 포장지에 있는 설명에 따라 주세요. 공장 출하 시 제품은 경도 4로 조정되어 있습니다. 밀리타 클라리스 정수 ® 필터를 사용하면, 자동으로 물경도 1로 설정됩니다. 선행... -
Page 94: 절전 모드 설정하기
• 켜짐/꺼짐 버튼을 눌러 선택한 물경도를 확인하여 주세요. → 디스플레이 내에 있는 모든 표시기호가 잠깐 확인 점멸합니다. 제품은 작동 준비상태에 있으며, 대기모드 표시기호 가 켜집 니다. 노트! 조정 작업 중 60초 이내에 버튼을 누르지 않으면 제품은 자동으로 대기모드로 전환됩니다. 11.2 절전 모드 설정하기 공장... -
Page 95: 자동꺼짐 기능
• 켜짐/꺼짐 버튼 을 눌러 선택한 시간을 확인하여 주세요. → 디스플레이 내에 있는 모든 표시기호가 잠깐 확인 점멸합니다. 제품은 작동 준비상태에 있으며 대기모드 표시기호 가 켜집 니다. 노트! 추출강도 버튼 을 눌러 절전 모드를 취소하면 즉시 커피를 배출할 수 있습니다. 11.3 자동꺼짐... -
Page 96: 커피 추출온도
디스플레이 시간 1 시간 (공장 출하시) 2 시간 4 시간 8 시간 점멸 • 켜짐/꺼짐 버튼 을 눌러 선택한 시간을 확인하여 주세요. → 디스플레이 내에 있는 모든 표시기호가 잠깐 확인 점멸합니다. 제품은 작동 준비상태에 있으며 대기모드 표시기호 가 켜집 니다. 11.4 커피... -
Page 97: 제품을 공장 설정치로 복구하기
디스플레이 추출 온도 낮음 중간 (공장 출하시) 높음 • 켜짐/꺼짐 버튼 을 눌러 선택한 추출온도를 확인하여 주세요. → 디스플레이 내에 있는 모든 표시기호가 잠깐 확인 점멸합니다. 제품은 작동 준비상태에 있으며 대기모드 표시기호 가 켜집 니다. 11.5 제품을 공장 설정치로 복구하기 선행... -
Page 98: 커피 분쇄강도 조절하기
11.6 커피 분쇄강도 조절하기 공장 출하시 분쇄강도가 최적으로 설정되어 있습니다. 따라서 커피를 약 1,000잔 추출한 이후에만 분쇄강도를 재조정해 줄 것을 권장합니다. (약 1 년) 분쇄기가 돌아가고 있을 동안에만 분쇄강도를 조정할 수 있습니다. 따라서, 커피 배출을 시작한 후 바로 분쇄 강도를 조정하여 주세요. 커피... -
Page 99: 유지 관리
유지 관리 12.1 일반적인 청소 • 제품의 외관은 부드러운 천을 적셔 조심스럽게 닦아 주세요. • 드립 트레이는 정기적으로 비우고 청소해야 하며 최소한 수위 표 시기가 (그림A, 번호1) 그릴 위로 올라오면 반드시 비워 주어야 합 니다. • 커피 찌꺼기 수거통을 정기적으로 청소해 주세요. 스팀... -
Page 100: 커피 추출 장치 청소
노트! 커피 찌꺼기 수거통(그림 A, 번호 1)을 식기 세척기로 자주 세척하 면 색상이 변할 수 있습니다 12.2 커피 추출 장치 청소 선행 조건: 제품 스위치를 꺼 주세요. (페이지 83 „전원 넣기와 끄 기“ 참조) 노트! 제품의 최적 성능을 유지하기 위하여 커피 추출장치는 일주일에 한... -
Page 101: 자동 청소 프로그램
12.3 자동 청소 프로그램 자동 청소 프로그램은 손으로는 제거할 수 없는 커피 기름을 포함한 커피 찌꺼기를 제거해 줍니다. 이 프로그램은 약 15분이 소요됩니다. 청소 프로그 램 실행 중 청소 표시기호가 점멸합니다. 선행 조건: 제품 전원 스위치를 꺼주세요. (페이지 83 „전원 넣기와 끄기“... - Page 102 1 단계 1 단계 진행 중 원두 1 개 표시기호 가 디스플레이에 나타납니다. → 먼저, 두 번의 자동 헹굼이 실행됩니다. 그리고 나서 대기모드 표시기호 가 켜집니다. 5 제품 우측에 있는 손잡이(그림 A, 번호 13)를 잡고 커피 추출장치 커버를 열어 주세요. 6 커피...
- Page 103 13 커버 켓처를 제품 뒤쪽 해당 구멍에 잘 맞춰 끼우고 커버를 잘 닫 아 주세요. 14 물통 커버(그 림 A, 번호 6)를 열고 물통을 꺼내어 물을 최대 표시 까지 채우고 다시 끼워 주세요. 15 스팀 배출 버튼 을 눌러 자동 세척 프로그램을 계속하여 주세 요.
-
Page 104: 자동 석회질 제거 프로그램
12.4 자동 석회질 제거 프로그램 자동 석회질 제거 프로그램은 제품 내 축적된 석회물을 제거해 줍니다. 이 과정은 약 30 분이 소요됩니다. 프로그램 실행 중 내내 석회질 제거 표시기호 가 점멸합니다. 선행 조건: 전원 스위치를 꺼주세요 (페이지 83 „전원 넣기와 끄기“ 참조). - Page 105 4 물통 커버(그림 A, 번호 6)를 열 고 물통을 꺼내어 완전히 비워 주 세요. 5 물통에 밀리타 액상 석회질 제거제 (예. Melitta ANTICALC Es- ® presso Machines liquid descaling agent)를 제품포장의 사용방법 에따라 넣어주세요. 분말형 석회질 제거제인 경우에는 별도 용기...
- Page 106 → 물이 간헐적으로 스팀 파이프 밖으로 흘러나와 커피 찌꺼기 수거통 으로 들어갑니다. 전 과정 중 밸브 표시기호 가 점멸합니다. 이어서 드립 트레이 표시기호 가 켜집니다. 10 밸브를 열어 놓은 채 그대로 두세요. 11 커피 찌꺼기통과 드립 트레이를 비운 다음 다시 끼워 주세요. 커피...
-
Page 107: 운송과 폐기
운송과 폐기 13.1 운송, 동파방지 및 장기간 미사용에 따른 보호 조치 13.2 제품 물기 빼주기 제품을 장기간 사용하지 않을 때에는 제품 내부의 물기를 완전히 빼주세요. 이것은 또한 제품의 동파사고를 방지하기 위한 조치입니다. 선행 조건: 제품은 작동 준비상태에 있어야 합니다 (페이지 83 „전 원... -
Page 108: 운송
노트! 밀리타 클라리스 정수필터는 장기간 건조한 상태로 두면 안됩니 ® 다. 따라서 상당 기간 동안 제품을 사용하지않는 경우에는 정수필 터를 물컵에 담근 채 냉장고에 넣어 보관하는것이 좋습니다. 13.3 운송 • 제품내 물기를 완전히 빼주세요. • 드립 트레이와 커피 찌꺼기 수거통을 비우고 청소해 주세요. • 물통과... -
Page 109: 문제해결
문제해결 문제점 원인 해결 방법 커피가 방울 방울 분쇄기 조절 스위치가 분쇄강도를 더 거친 쪽으로 씩 나온다. 너무 미세하게 설정 설정한다. 추출장치를 청소 되어있다. 해 준다. 필요한 경우 석회질 제거 프로그램 혹은 자동청 소 프로그램을 실행해 준다 커피가 추출되지 물통에 물이 없거나, 물통을... - Page 110 문제점 원인 해결 방법 추출장치가 제자리 추출 장치가 바르게 잠금 장치가 잘 맞물려 있는 에 잘 끼워지지 맞 물리지 않았다. 지 점검한다. 않는다. 구동장치가 바른 제품의 전원 스위치를 껐다 위치에 있지 않다. 다시 켜준 다음 커피 배출하 기 버튼 과 스팀 배출 버튼...
- Page 111 Should you require more information or if you have any questions on this coffeemaker, please contact us directly or visit us on the Internet at www.melitta.de. We extend our best wishes for your satisfaction with the Melitta ® SOLO &milk.
- Page 112 4.6 Adjusting the dispensed quantity ..........121 4.7 Adjusting the coffee strength ............122 5 Switching on and off ................123 5.1 Switching on the appliance ............123 5.2 Switching off the appliance ............123 6 Inserting the Melitta Claris water filter ..........124 ® ®...
- Page 113 11 Function settings .................132 11.1 Water hardness ................132 11.2 Energy-saving mode ..............133 11.3 Auto-off function ................134 11.4 Brewing temperature ..............135 11.5 Resetting the appliance to the default settings ......136 11.6 Grinding fineness ................137 12 Care and maintenance................138 12.1 General cleaning .................138 12.2 Cleaning the brewing unit ............139 12.3 Integrated cleaning programme ..........140 12.4 Integrated descaling programme ..........144...
-
Page 114: Information About These Operating Instructions
For a clearer overview, unfold the fold-out pages on the front and back of these operating instructions. Symbols in the text of these operating instructions The symbols in these operating instructions indicate specific hazards asso- ciated with operating your Melitta CAFFEO SOLO &milk, or provide you ®... -
Page 115: Intended Use
SOLO &milk within the ope- ® ® ® rating conditions specified in these operating instructions. Non-intended use Non-intended use is defined as using the Melitta CAFFEO SOLO &milk ® ® ® in a manner that differs from the use described in these operating instruc- tions. -
Page 116: General Safety Instructions
Only use the appliance if it is in faultless condition. – Never attempt to repair the appliance yourself. If repairs are – necessary, contact the Melitta Service Hotline only. ® Do not make any alterations in or on the appliance, on its com- –... - Page 117 Warning! This appliance is intended for home use and in similar settings, – such as: employee kitchens in stores, offices and other com- mercial areas; in agricultural facilities; by customers at hotels, motels and other housing facilities; at bed and breakfasts. Comply also with the safety instructions in the other sections of –...
-
Page 118: Appliance Description
Appliance description Key for Figure A Fig. number Explanation Drip tray with cup plate and coffee grounds container (internal) and float (indicator for full drip tray) Height-adjustable outlet ON / OFF button Coffee quantity regulator Button for dispensing coffee Button for coffee strength Water tank Bean container Button for steam dispensing... -
Page 119: Display
Symbol Meaning Display Explanation/prompt Appliance is heating up or Flashing coffee dispensing process is running. Standby The appliance is ready for ope- Illuminated ration. Change the Melitta Claris ® ® Illuminated Melitta Claris ® ® water filter water filter Flashing Filter change in process. -
Page 120: Starting Up
We recommend pouring away the first two cups of coffee after the first start Placement • Place the appliance on a stable, level, and dry surface. Ensure that there is a distance of 10 cm to the wall and other objects. • The Melitta CAFFEO SOLO &milk has two rollers on the back ®... -
Page 121: Connecting
Note Keep the packaging material, including hard foam elements, – in order to avoid damage during transport or in case of return shipments. It is normal to find traces of coffee and water in the appliance – before it is started up for the first time. This is because the appliance has already been tested for faultless function at the factory. -
Page 122: Filling The Bean Container
The current operation will be stopped and the water tank must be filled before starting a new operation. Switching on for the first time Caution! The appliance may only be vented without the Melitta Claris ® ® water filter and with a full water tank. -
Page 123: Adjusting The Dispensed Quantity
→ The symbol (symbol of valve) will be illuminated on display. The system needs to be vented to free all water lines from air. • Place a large vessel under the steam pipe. • Turn the valve switch (Fig. A, no. 11) clockwise to the stop to open the valve. -
Page 124: Adjusting The Coffee Strength
Adjusting the coffee strength • Press the button for coffee strength several times to select among three possible coffee strengths. → Your selection will then be shown with the bean symbols on the display. Display Coffee strength Mild Normal (factory setting) Strong • You can also adjust the coffee flavour by changing the grinding fineness setting. -
Page 125: Switching On And Off
Switching on and off Switching on the appliance Note The appliance performs an automatic rinse every time it is swit- ched on. • Place a vessel below the outlet. • Press the ON/OFF button to switch the appliance on. → The standby symbol is flashing. -
Page 126: Inserting The Melitta ® Claris ® Water Filter
• Flip up the lid of the water tank (Fig. A, no. 7) and pull the water tank up and out of the appliance. • Empty the water tank. • Screw the Melitta Claris water filter carfully into the thread on ®... - Page 127 Melitta Claris water filter in the refrigerator in a glass of water ® ® when the appliance will not be in use for extended periods. After inserting the Melitta Claris water filter, excess active – ® ® charcoal will be washed out of the filter the first time the ap- pliance is rinsed out.
-
Page 128: Preparing Espresso Or Café Crème
Preparing espresso or café crème Prerequisite: The appliance must be ready for operation (see „Swit- ching on and off“ on page 123). • Place one or two cups beside each other under the outlet. • Press the button for coffee strength to adjust the coffee strength. -
Page 129: Preparing Milk Froth
Preparing milk froth Prerequisite: The appliance must be ready for operation (see „Swit- ching on and off“ on page 123). • Make sure that the chrome-plated outer casing of the steam pipe is pushed downwards (Fig. K, no. 1). • Press the button for steam dispensing →... - Page 130 • Immediately rinse the steam pipe after every use by dispensing steam or hot water. • Rinsing the steam pipe: Fill a vessel halfway with clean water and hold the vessel under the steam pipe. Ensure that the tip of the steam pipe is immersed in the water. Open the valve for about five seconds and then close it again.
-
Page 131: Heating Milk
Heating milk Prerequisite: The appliance must be ready for operation (see „Swit- ching on and off“ on page 123). • Push the chrome-plated outer casing of the steam pipe upwards (Fig. K, no. 2). • Hold the vessel containing the milk under the steam pipe. Ensure that the tip of the steam pipe is immersed in the milk. - Page 132 • Ensure that the tip of the steam pipe is immersed in the water. Open the valve for about five seconds and then close it again. • After 30 seconds, the appliance switches automatically from steam mode to normal operating mode. Press the button for steam dispensing to switch to the normal operating mode prematurely.
-
Page 133: Dispensing Hot Water
Dispensing hot water Prerequisite: The appliance must be ready for operation (see „Swit- ching on and off“ on page 123). • Push the chrome-plated outer casing of the steam pipe upwards (Fig. K, no. 2). • Hold a vessel under the steam pipe. Warning! There is a risk of burn injuries and scalding due to the hot water splashing and the hot steam pipe. -
Page 134: Function Settings
11.1 Water hardness Use the test strip provided to determine the water hardness in your area. Comply with the instructions on the test strip package. The appliance is factory-adjusted to water hardness 4. If you have inserted the Melitta Cla- ®... -
Page 135: Energy-Saving Mode
• Press the ON / OFF button to confirm the selected water hardness. → All symbols in the display flash briefly as confirmation. The appli- ance is ready for operation, the standby symbol is illuminated. Note During the adjusting process, if you do not press a button within 60 seconds the appliance automatically reverts to standby mode. -
Page 136: Auto-Off Function
Display Time 5 minutes (factory setting) 15 minutes 30 minutes flashing • Press the ON / OFF button to confirm the selected time. → All symbols in the display flash briefly as confirmation. The appli- ance is ready for operation, the standby symbol is illuminated. -
Page 137: Brewing Temperature
• Press the coffee strength button several times to select from four possible times for the timer. Display Time 1 hour (factory setting) 2 hours 4 hours 8 hours flashing • Press the ON / OFF button to confirm the selected time. →... -
Page 138: Resetting The Appliance To The Default Settings
• Press the button for coffee strength to select between the three possible brewing temperatures. Display Brewing temperature medium (factory setting) High • Press the ON / OFF button to confirm the selected brewing temperature. → All symbols in the display flash briefly as confirmation. The appli- ance is ready for operation, the standby symbol is illuminated. -
Page 139: Grinding Fineness
11.6 Grinding fineness The grinding fineness level was optimally adjusted prior to delivery. Con- sequently, we recommend that you only readjust grinding fineness after dispensing approximately 1,000 coffees (about 1 year). You can only set the grinding fineness while the mill is running. Thus, ad- just grinding fineness directly after coffee dispensing starts. -
Page 140: Care And Maintenance
Care and maintenance 12.1 General cleaning • Clean the outside of the appliance with a soft, damp cloth and ordinary dishwashing liquid. • Empty and clean the drip tray (Fig. A, no. 1) regularly; at the la- test, however, when the float projects out of the cup plate. • Clean the coffee grounds container regularly. -
Page 141: Cleaning The Brewing Unit
12.2 Cleaning the brewing unit Prerequisite: The appliance must be switched off (see „Switching on and off“ on page 123). Note For optimal protection of your appliance, we recommend that you clean the brewing unit under running tap water once a week. • Reach into the recess on the right side of the appliance (Fig. -
Page 142: Integrated Cleaning Programme
– after approximately 200 brewed cups of coffee; at the latest, however, run the programme when the symbol for cleaning lights up on the display. Only use Melitta cleaning tabs for fully automatic coffee ma- – ® kers. These cleaning tabs are specifically designed for the Me-... - Page 143 Phase 1 During Phase 1, one bean symbol is shown on the display. → First, two automatic rinsing processes are carried out.The standby symbol will then be illuminated. 5 Reach into the recess on the right side of the appliance (Fig. A, no.
- Page 144 Phase 2 During Phase 2, two bean symbols are shown on the display. → The symbol for cleaning will continue to flash; the standby sym- is not illuminated. The symbol for the water tank illumi- nates. 13 Insert the four catches of the cover in the back of the appliance and swing the cover to the left until it engages.
- Page 145 Phase 4 During Phase 4, three bean symbols are shown on the display. The middle bean will be flashing. → The integrated cleaning programme continues. This process lasts approximately 5 minutes. Water flows out of the outlet as well as in the interior of the appliance into the drip tray.
-
Page 146: Integrated Descaling Programme
Fig. J) and place the coffee grounds container right hand-side next to the machine (to prevent bending of tube). Now the descaling process can be started without spilling. Run the integrated descaling programme as follows: 1 Before descaling, remove – if used – the Melitta Claris water ®... - Page 147 4 Lift the lid of the water tank (Fig. A, no. 7) and pull the water tank up and out of the appliance and then empty it completely. 5 Add the descaling agent (e.g. Melitta ANTI CALC Espresso Ma- ®...
- Page 148 15 Empty the drip tray and the coffee grounds container and then reinsert them. → The standby symbol illuminates after a brief heat-up phase. The appliance is ready for operation. 16 Reinsert the Melitta Claris water filter into the water tank. ® ®...
-
Page 149: Transport And Disposal
This also protects the appliance against frost damage. Prerequisite: The appliance must be ready for operation (see „Swit- ching on and off“ on page 123). • Take the Melitta Claris water filter out of the water tank. ®... - Page 150 → The appliance has been vented. Note The Melitta Claris water filter should not remain dry over an ® ® extended period of time. We therefore recommend storing the Melitta Claris water filter in the refrigerator in a glass of water ®...
-
Page 151: Troubleshooting
Troubleshooting Fault Cause Measure Coffee only flows Grinding fineness is Set the grinding fineness drop by drop. too fine. coarser. Clean the brewing unit. Run the integrated desca- ling programme, if neces- sary. Run the integrated cleaning programme, if necessary. Coffee does not Water tank not filled or Fill the water tank and make... - Page 152 Fault Cause Measure Not enough milk The nozzle of the Adjust the nozzle to the froth is formed steam pipe is in the proper position. during the frothing wrong position. process. The steam pipe nozzle Clean the nozzle. is dirty. The brewing unit The brewing unit is not Check whether the handle...
- Page 153 Please contact the Melitta hotline, if the above mentioned solutions do not ® help to solve the problem: +49 571/ 86 1900.
Need help?
Do you have a question about the Caffeo Solo & MilkE 953-10x and is the answer not in the manual?
Questions and answers