Table of Contents
Advertisement
Available languages
Available languages
Portable Air Conditioner
Aire Acondicionado Portatil
Manual de Uso y Mantenimiento
Use and Care Manual
Thank you very much for purchasing a Wintair Air Conditioner,
please read this Use and Care Manual carefully before installing
and using this appliance and keep this manual for future reference.
Muchas gracias por comprar un Aire Acondicionado Wintair.
Lea este Manual de Uso y Mantenimiento detenidamente
antes de instalary usar este electrodom stico y conserve
este manual para consultarlo en el futuro.
For service, call 1 877 465 3566
Para obtener servicio t cnico, llame al 1 877 465 3566
Advertisement
Table of Contents

Subscribe to Our Youtube Channel
Related Manuals for WINTAIR AP-08CK1FDS


Summary of Contents for WINTAIR AP-08CK1FDS
-
Page 1: Use And Care Manual
Use and Care Manual Manual de Uso y Mantenimiento Thank you very much for purchasing a Wintair Air Conditioner, please read this Use and Care Manual carefully before installing and using this appliance and keep this manual for future reference. -
Page 2: Table Of Contents
CONTENTS Introduction Identification of parts Identification of parts Control panel Installation instructions Accessories and window kit installation Selecting the installation location Operation modes Protection Maintenance Troubleshooting Notes Warranty CONTENIDO I introduccion Identificacion de las piezas Identificacion de las piezas Panel de control Instrucciones de instalacion Instalacion de accesorios y juego de ventana Seleccion de la ubicacion para la instalacion... -
Page 3: Introduction
Introduction Thank you for choosing this portable air conditioner to provide you and your family with all of the Home Comfort requirements for your home, cottage or office. The appliance can be moved from room to room within your home and set-up in just minutes. It is a multi-functional room air exchanging, air-processing appliance, designed to offer you the functions of : Air Conditioning, Dehumidifying, Heating(for heating model only) and Independent Fan. -
Page 4: Identification Of Parts
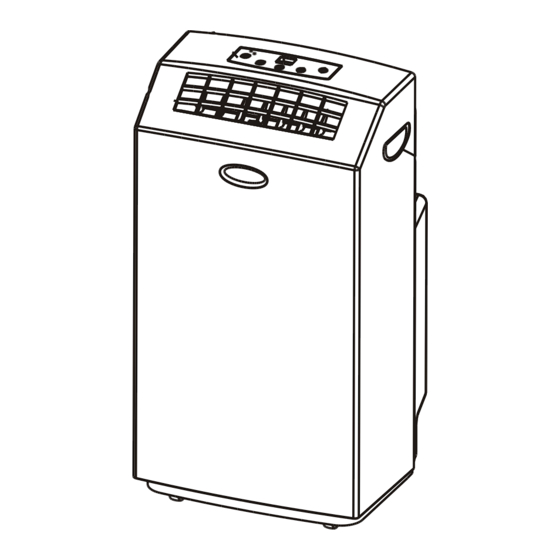
Identification of parts Identification of parts Front Control panel Cold air outlet Transport handle Air outlet hose Evaporator air intake Drain port Power supply Back The figures in this manual are based on the external view of a standard model. Consequently, the shape may differ from that of the air conditioner you have selected. - Page 5 Identification of parts Control panels Ò £ ¿ Ø Æ ÷ High High WATER FULL MODE TEMP . A DJ. button: to start or stop the appliance MODE button: to select the operation mode FAN button: to select fan speed TEMP.
-
Page 6: Installation Accessories
Installation Installation accessories Window/patio door slider kit Quantity Description Air outlet hose........1/set stretches from 17 3/4"(45cm) up to 70 5/8"(180cm) Air outlet hose 2/set Window exhaust adapter......Adapter............Window/patio door slider kit..... 3/set Window exhaust adapter from 28 3/8"(72cm) up to 55 5/8"(140cm) Adapter... -
Page 7: Operation Modes
Operation modes Operation modes Selecting mode Each time the MODE button is pressed, the operation mode is changed in sequence: smart cooling fan only FAN mode Each time the "FAN" button is pressed, the fan speed is changed in sequence: Auto High At "FAN ONLY"... -
Page 8: Installation Sequence
Installation instructions Installation sequence Before starting this unit 1. Select a suitable location, make sure you have easy access to an electrical outlet. 2. Install the flexible exhaust hose and adjustable window slider kit as depicted in FIGURE 3. Note: While running or installing, the hoses cannot be blocked by curtains or any obstacle. - Page 9 After selecting an installation location, operate as follows before utilization Despu s de la selecci n del lugar de instalaci n, opere con el debajo ante de la utilizaci n 1. Loosing connecting lid on the back board, see FIGURE 1. floje la tapa de conexi n de la tabla espalda.
-
Page 10: Protection
Protection Operating conditions The protective device may trip and stop the appliance in the cases listed below. Room temperature is below 18 (64 ) COOLING Room temperature is below 18 (64 ) If the air conditioner runs in COOLING or DRY mode with door or window opened for a long time when relative humidity is above 80%,dew may drip down from the outlet. -
Page 11: Maintenance
Maintenance Appliance maintenance Air filter maintenance Cut off the power supply It is necessary to clean the air filter after using it for about 100 hours. Turn off the appliance Clean it as follows: first before disconnecting from the power supply. Stop the appliance Wipe with a soft and remove the air... -
Page 12: Troubleshooting
Troubleshooting The following cases may not always be a malfunction, please check suggestions below before asking for service. Trouble Analysis The protector trip or fuse is blown. Wait for 3 minutes and start again, Does not run protector device may be preventing unit to work. The plug is not properly plugged in. -
Page 13: Notes
Notes Notes Please read this manual before installing and using the portable air conditioner. Do not let air enter the refrigeration system or discharge refrigerant when moving the air conditioner. Test run the air conditioner after finishing installation, and record details of operation. Type of fuse used on indoor unit controller is 50T, with a rating 3.15 A,T,250V. -
Page 14: Warranty
Warranty 5 YEAR FULL WARRANTY This product is warranted for 5 years from the date of original purchase. Any part which fails in materials or workmanship will be replaced within the warranty period. This warranty covers in home service. A copy of your proof of purchase, with date of purchase and product name included, is required to arrange this service repair. -
Page 15: I Introduccion
Introduccion Gracias por elegir este aire acondicionado portatil para cubrir sus necesidades de Comodidad para el Hogar y las de su familia, en su casa, su cabana o su oficina. La unidad se puede trasladar de una habitacion a otra e instalar en cuestion de minutos. Es un electrodomestico multifuncional, renovador y purificador de aire, disenado para o frecer las siguientes funciones: Aire Acondicionado, Deshumidificador, Calefactor (solo en el modelo con calefaccion) y Ventilador Independiente. -
Page 16: Identificacion De Las Piezas
Identificacion de las piezas Identificacion de las piezas Anverso Panel de control Salida de aire frio Mango de transporte Manguera para salida de aire Entrada de aire del evaporador Orificio de drenaje Suministro de energia Reverso Las imagenes de este manual estan basadas en la vista externa de un modelo estandar. En consecuencia, es probable que la forma sea diferente a la del aire acondicionado que usted selecciono. - Page 17 Identificacion de las piezas Paneles de control Ò £ ¿ Ø Æ ÷ High High WATER FULL MODE TEMP . A DJ. Boton (Encendido/Apagado): para encender o apagar la unidad Boton MODE (Modo): para seleccionar el modo de funcionamiento Boton FAN (Ventilador): para seleccionar la velocidad del ventilador Boton de programacion TEMP(Temp): para ajustar la hora real o programar la hora de encendido...
- Page 18 Instalacion Accesorios de instalacion Juego de guia de desplazamiento para ventana/puerta de patio Descripcion Cantidad Manguera de salida de aire....1/juego se estira desde 17 3/4" (45 cm) hasta 70 5/8" (180 cm) 2/juego Adaptador de escape para ventana..Manguera de salida de aire Adaptador........
-
Page 19: Instrucciones De Instalacion
Instrucciones de instalacion Secuencia de instalacion Antes de iniciar esta unidad 1. Seleccione una ubicacion adecuada y asegurese de que tenga acceso facil a un tomacorriente. 2. Instale la manguera de escape flexible y el juego de guia ajustable de desplazamiento para ventana como lo muestra la Fig. - Page 20 Mantenimiento Mantenimiento de la Unidad Mantenimiento del Filtro de Aire Corte el suministro Es necesario limpiar el filtro de aire de energia. despues de unas 100 horas de uso. Limpielo de la siguiente manera: Apague el aire acondicionado antes de desconectarlo del suministro de energia.
-
Page 21: Proteccion
Proteccion Condiciones de Funcionamiento El dispositivo protector puede detener el aire acondicionado en los casos que se enumeran a continuacion. ENFRIAMIENTO La temperatura ambiente es menor a 18 (64 ) La temperatura ambiente es menor a SECADO 18 (64 ) Si el aire acondicionado funciona en modo ENFRIAMIENTO o SECADO con una puerta o una ventana abierta durante mucho tiempo cuando la humedad relativa es superior al 80%, puede gotear agua por la salida. -
Page 22: Mantenimiento
Mantenimiento Mantenimiento de la Unidad Mantenimiento del Filtro de Aire Corte el suministro Es necesario limpiar el filtro de aire de energia. despues de unas 100 horas de uso. Limpielo de la siguiente manera: Apague el aire acondicionado antes de desconectarlo del suministro de energia. -
Page 23: Solucion De Problemas
Solucion de problemas Los siguientes casos no siempre se deben a mal funcionamiento. Revise las sugerencias que se encuentran a continuacion antes de solicitar servicio tecnico. Problema Analisis El interruptor o el fusible protector esta Espere 3 minutos e inicie nuevamente, el No funciona dispositivo protector puede estar mpidiendo que la unidad funcione. -
Page 24: Notas
Notas Notas Lea este manual antes de instalar y utilizar el aire acondicionado portatil. No permita que al trasladar el aire acondicionado se vierta refrigerante o se introduzca aire en el sistema de refrigeracion. Ponga a prueba el funcionamiento del aire acondicionado despues de terminar la instalacion y registre los detalles de su funcionamiento. -
Page 25: Garantia
GARANTIA GARANTIA COMPLETA DE 5 ANOS Este producto se garantiza por 5 anos a partir de la fecha de la compra original. Cualquier parte que falle en materiales o la ejecuci n ser substituida dentro del per odo de la garant a. La garantia includy servicio a domicilio. Una copia de su prueba de la compra, con la fecha de la compra del producto incluida, se requiere para acordar esta reparaci n del servicio. - Page 26 Kelon Air Conditioner Co. and Kelon USA, Inc. All rights reserved. 2002-2005 Version No. 819042128-01 Printed in China...
Need help?
Do you have a question about the AP-08CK1FDS and is the answer not in the manual?
Questions and answers
How can I set humidity level doesn't have a manual and is running too long.
Do you have to put water in the appliance in order for it to cool?