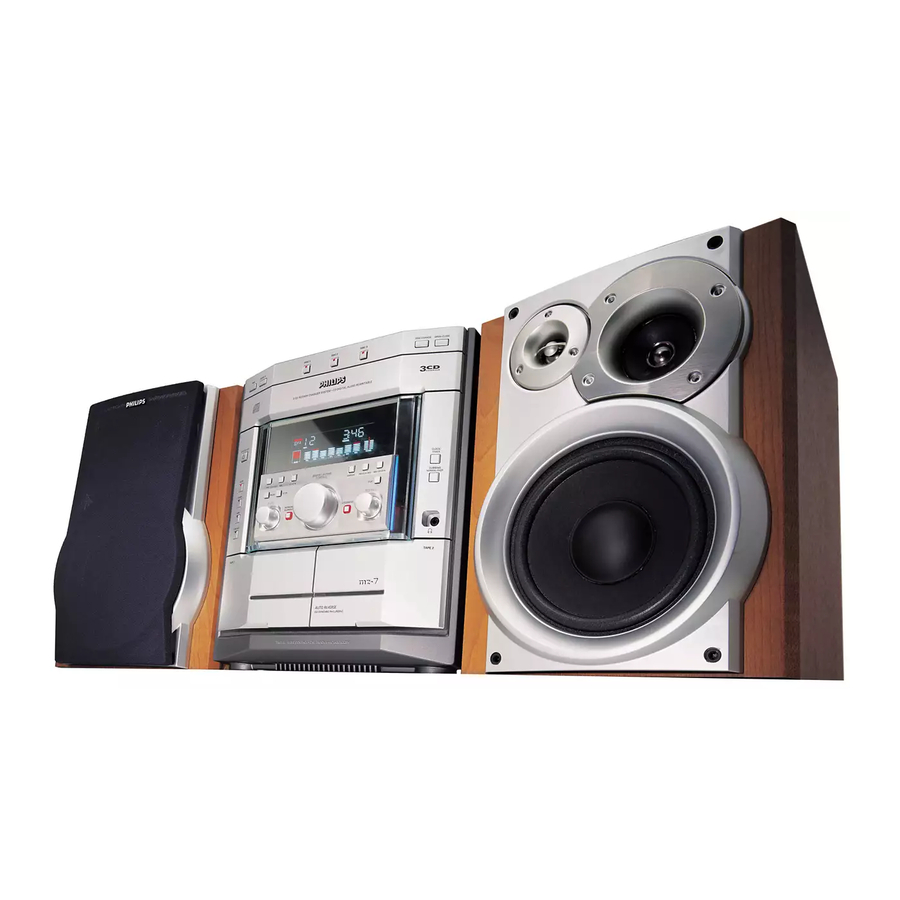
Philips MZ-7 User Manual
Magnavox home stereo system user manual
Hide thumbs
Also See for MZ-7:
- User manual (26 pages) ,
- Specifications (2 pages) ,
- Specifications (2 pages)

Subscribe to Our Youtube Channel
Related Manuals for Philips MZ-7


Summary of Contents for Philips MZ-7
- Page 1 Mini Hi-Fi System Toll Free Help Line Ligne d'assistance en service libre Linea de ayuda telefónica sin cargo 800-531-0039...
-
Page 2: Warranty
R e t u r n yo u r Wa r r a n t y R e g i s t r a t i o n c a r d t o d ay t o e n s u re yo u re c e i ve a l l t h e b e n e f i t s yo u ’re e n t i t l e d t o. •... - Page 3 Congratulations on your purchase, and welcome to the “family!” Dear Philips product owner: Thank you for your confidence in Philips.You’ve selected one of the best-built, best-backed products available today.And we’ll do everything in our power to keep you happy with your purchase for many years to come.
- Page 4 CAUTION RISK OF ELECTRIC SHOCK DO NOT OPEN CAUTION: TO REDUCE THE RISK OF ELECTRIC SHOCK, DO NOT REMOVE COVER (OR BACK). NO USER-SERVICEABLE PARTS INSIDE. REFER SERVICING TO QUALIFIED SERVICE PERSONNEL. This symbol warns the user that uninsulated voltage within the unit may have sufficient magnitude to cause electric shock.
-
Page 5: Class 1 Laser Product
INDEX English ...5 Français ...28 Español ...54 CLASS 1 LASER PRODUCT... -
Page 6: Safety Instructions
SAFETY INSTRUCTIONS – Read before operating equipment This product was designed and manufactured to meet strict quality and safety standards. There are, however, some installation and operation precautions which you should be particularly aware of. Read Instructions - All the safety and operating instructions should be read before the appliance is operated. - Page 7 Note to the Cable TV system installer This reminder is provided to call the Cable TV system installer's attention to Article 820-40 of the NEC that provides guidelines for proper grounding and, in particular, specifies that the cable ground shall be connected to the grounding system of the building, as close to the point of cable entry as practical. Example of Antenna Grounding as per NEC - National Electrical Code Electric Service Equipment...
-
Page 8: Limited Warranty
AUDIO SYSTEM One Year Free Labor One Year Free Service on Parts This product must be carried in for repair. WHO IS COVERED? You must have proof of purchase to receive warranty service. A sales receipt or other document showing that you purchased the product is considered proof of purchase. -
Page 9: Table Of Contents
CONTENTS GENERAL INFORMATION General Information General Information ... 9 • The typeplate (which contains the Safety Information ... 9 serial number) is located at the rear of the system. Preparation ... 10 - 11 • Recording is permissible if Controls ... 12 - 14 copyright or other rights of third parties are not infringed. -
Page 10: Preparation
PREPARATION Rear Connections STANDBY ON CUT OFF FREQUENCY HIGH POWER SUBWOOFER 60Hz 150Hz AUDIO OUT DIGITAL SUB- WOOFER AUX/CDR IN LINE OUT FM ANTENNA 300 AM ANTENNA MAINS FRONT – – AUDIO IN... - Page 11 A AM Loop Antenna D Subwoofer Out Connection Connection Connect the optional active subwoofer to the SUBWOOFER OUT terminal. The Connect the supplied loop antenna to the subwoofer reproduces just the low bass AM ANTENNA terminal. Place the AM loop effect (e.g.
-
Page 12: Controls
CONTROLS NEWS•TA 3 CDC TUNER TAPE CDR/AUX DISC 1 DISC 2 DISC 3 DISC CHANGE OPEN•CLOSE CD CHANGER NEWS FRONT BACK T.A. SLEEP TRACK PRESET REPEAT AM LW MW FM STEREO PROGRAM TIMER SHUFFLE INCREDIBLE SURROUND LOUDNESS FLAT SOUND 60Hz 250Hz 500Hz 1KHz... - Page 13 CDR / AUX Controls on the system and – to select sound from an external remote control source (e.g. TV, VCR, Laser Disc player, DVD player or CD Recorder). When in 1 STANDBY•ON Aux mode, press to select either – to switch the system on or to standby AUX/DVD or CDRW.
-
Page 14: Operating The System
CONTROLS ∞ TIMER – to switch on or off timer. § DISPLAY (not functional for this model) ≥ B – to switch the system to standby mode. Notes for remote control: – First select the source you wish to control by pressing one of the source select keys on the remote control (e.g. -
Page 15: Dim Mode
Easy Set Switching the system ON EASY SET allows you to store all available • Press STANDBY•ON (on the system radio stations automatically. only) , 3 CDC, TUNER, TAPE or CDR/ AUX. 1 Press and hold STANDBY•ON (on the system only) for five seconds ; when You can also switch on the system by the system is in standby or pressing any one of the CD DIRECT PLAY... - Page 16 OPERATING THE SYSTEM BASS/TREBLE Flat There are 7 different BASS/TREBLE levels This feature allows you to temporarily available for selection. switch off all the DIGITAL CONTROL setting • Rotate the BASS or TREBLE to select (e.g. Bass, Treble, Incredible Surround, the desired bass or treble level etc.).
- Page 17 Loading the CD Changer Playing a CD 1 Press 3 CDC to select CD mode. 1 Press PLAYÉ to start playback. 2 Press OPEN•CLOSE. ™ The disc tray, track number and ™ The CD carousel slides out. elapsed playing time of the current 3 Load a CD with the printed side up in track appear on the display.
- Page 18 – During programming, if no button is Notes: pressed within 20 seconds, the system – If you press any of the CD DIRECT PLAY will exit program mode automatically. Reviewing the program Reviewing of the program is possible only when playback is stopped. •...
-
Page 19: Tuner
CD CHANGER FRONT BACK TRACK PRESET REPEAT AM LW STEREO PROGRAM TIMER INCREDIBLE SURROUND LOUDNESS FLAT SOUND 60Hz 250Hz 500Hz 1KHz 2KHz 4KHz DIGITAL STEREO HIFI SYSTEM 3 CDC A•B PRESET DIGITAL CONTROL TUNER SEARCH/TUNE PLAY PRESET STOP TAPE BASS INCREDIBLE SURROUND CDR/AUX... -
Page 20: Tuner
TUNER – When in programming mode, the PRESET mode will automatically be activated. Tuning to Preset Radio Stations 1 Press PRESET to switch on the PRESET mode. ™ The flag will be displayed. PRESET 2 Press PRESET 4 or 3 (or í / ë on the remote control) to select the desired preset number. -
Page 21: Rewind/Fast Forward
Tape Playback Auto Reverse Playback tape deck 2) 1 Press TAPE to select TAPE mode. ™ “TAPE 1” or “TAPE 2” will be • Press A. REV to select the different displayed. playback modes. • Press TAPE again to select either tape å... -
Page 22: Cdr/Aux
CDR/AUX CD CHANGER FRONT BACK TRACK PRESET REPEAT AM LW MW FM STEREO INCREDIBLE SURROUND LOUDNESS FLAT SOUND 60Hz 250Hz 500Hz 1KHz DIGITAL STEREO HIFI SYSTEM 3 CDC A•B PRESET DIGITAL CONTROL TUNER SEARCH/TUNE PLAY PRESET STOP TAPE BASS INCREDIBLE SURROUND CDR/AUX Notes:... -
Page 23: Recording
Notes: Recording from other sources – For recording, use only tape of IEC type I (only on tape deck 2) (normal tape) or IEC type II (Cr0 2 ). 1 Press TAPE to select tape deck 2. – The tape is secured at both ends with 2 Load a blank tape into tape deck 2 with leader tape. -
Page 24: Clock
CLOCK CD CHANGER FRONT BACK TRACK PRESET REPEAT AM LW MW FM STEREO INCREDIBLE SURROUND LOUDNESS FLAT SOUND 60Hz 250Hz 500Hz 1KHz DIGITAL STEREO HIFI SYSTEM 3 CDC A•B PRESET DIGITAL CONTROL TUNER SEARCH/TUNE PLAY PRESET STOP BASS TAPE INCREDIBLE SURROUND CDR/AUX 1 Press CLOCK/TIMER to select clock... -
Page 25: Sleep
TIMER SLEEP To switch off the TIMER Sleep 1 Press CLOCK/TIMER for more than 2 This feature allows you to select a length seconds (or TIMER on the remote of time after which the system will switch control) . to the standby mode automatically. 2 Press STOP on the system to cancel the timer. -
Page 26: Specifications
SPECIFICATIONS Specifications AMPLIFIER Output power ... 2 x 50 W FTC Signal-to-noise ratio ... 75 dBA (IEC) Frequency response ... 40 – 20,000 Hz, ± 3 dB Input sensitivity AUX/CDR In ... 560 mV Output Speakers ... 6 Headphones ... 32 Subwoofer Out ... -
Page 27: Troubleshooting
• The TV or VCR is too close to the stereo repair. system. • Should any problems persist after you ™ Separate the stereo system from the TV have made these checks, consult your or VCR. nearest dealer or service center.
Need help?
Do you have a question about the MZ-7 and is the answer not in the manual?
Questions and answers