Table of Contents
Advertisement
Available languages
Available languages
Models / Modelos:
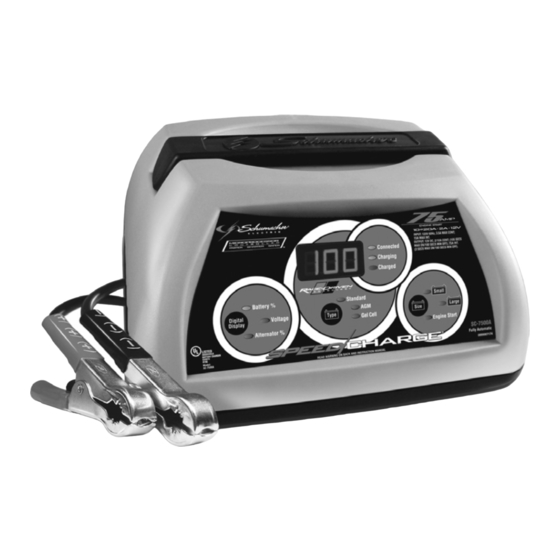
SC-7500A, SC-8020A, SC-10030A
Automatic Battery Charger
Cargador de baterías automático
PLEASE SAVE THIS OWNERS MANUAL AND READ BEFORE EACH USE. This manual
will explain how to use the battery charger safely and effectively. Please read and follow these
instructions and precautions carefully.
POR FAVOR CONSERVE ESTE MANUAL DEL USUARIO Y LEALO ANTES DE CADA
USO. En este manual le explica cómo utilizar el cargador de batería de manera segura
y confiable. Por favor, lea y siga las siguientes instrucciones y precauciones.
SC-8020A
OWNERS MANUAL
MANUAL DEL USUARIO
SC-7500A
SC-10030A
0099001428-01
Advertisement
Table of Contents

Related Manuals for Schumacher Electric SC-7500Al SC-8020A


Summary of Contents for Schumacher Electric SC-7500Al SC-8020A
- Page 1 OWNERS MANUAL MANUAL DEL USUARIO Models / Modelos: SC-7500A, SC-8020A, SC-10030A Automatic Battery Charger Cargador de baterías automático SC-7500A SC-8020A SC-10030A PLEASE SAVE THIS OWNERS MANUAL AND READ BEFORE EACH USE. This manual will explain how to use the battery charger safely and effectively. Please read and follow these instructions and precautions carefully.
-
Page 2: Table Of Contents
CONTENTS IMPORTANT SAFETY INSTRUCTIONS ..................3 PERSONAL SAFETY PRECAUTIONS ..................3 PREPARING TO CHARGE ......................4 CHARGER LOCATION ........................4 DC CONNECTION PRECAUTIONS ...................4 FOLLOW THESE STEPS WHEN BATTERY IS INSTALLED IN VEHICLE .......4 FOLLOW THESE STEPS WHEN BATTERY IS OUTSIDE VEHICLE ........5 GROUNDING AND AC POWER CORD CONNECTIONS ............5 ASSEMBLY INSTRUCTIONS ......................5 CONTROL PANEL ........................5 OPERATING INSTRUCTIONS ....................6... -
Page 3: Important Safety Instructions
1. IMPORTANT SAFETY INSTRUCTIONS SAVE THESE INSTRUCTIONS. 1.1 SAVE THESE INSTRUCTIONS – 1.8 Do not disassemble charger; take it to This manual contains important safety a qualified serviceman when service or and operating instructions. repair is required. Incorrect reassembly may result in a risk of electric shock or fire. 1.2 Do not expose the charger to rain or snow. -
Page 4: Preparing To Charge
3. PREPARING TO CHARGE 3.1 If necessary to remove battery from battery without removable cell caps, such vehicle to charge, always remove as valve regulated lead acid batteries, grounded terminal from battery first. Make carefully follow manufacturer’s recharging sure all accessories in the vehicle are off, instructions. -
Page 5: Follow These Steps When Battery Is Outside Vehicle
7. FOLLOW THESE STEPS WHEN BATTERY IS OUTSIDE VEHICLE A SPARK NEAR THE BATTERY MAY connect NEGATIVE (BLACK) charger clip CAUSE A BATTERY EXPLOSION. TO to free end of cable. REDUCE THE RISK OF A SPARK NEAR 7.5 Do not face battery when making final THE BATTERY: connection. -
Page 6: Operating Instructions
DIGITAL DISPLAY plate’s active material. In theory, this enhances both the discharge and recharge The Digital Display gives a digital indication efficiency. The AGM batteries are a variant of battery %, voltage or alternator %, of Sealed VRLA (valve regulated lead-acid) depending on the Display Mode chosen. - Page 7 BATTERY CONNECTION INDICATOR Maintain Mode. The voltage is maintained at a level determined by the selected If the charger does not detect a battery type. properly connected battery, the NOTE: For 12V AGM and Gel cell CONNECTED (yellow/orange) LED will not light.
- Page 8 1. With the charger unplugged from the It starts at 180 and counts down to 0. The AC outlet, connect the charger to the ENGINE START LED blinks once every battery, following the instructions given second. During the cool down period, no in Charging a Battery in the Vehicle.
- Page 9 TESTER WITHOUT TIME LIMIT USING THE ALTERNATOR PERFORMANCE TESTER If either the DISPLAY MODE or BATTERY 1. With the charger unplugged from the TYPE button is pressed within the first AC outlet, connect the charger to 10 minutes after the battery charger is the battery, following the instructions powered up, the unit will remain a tester given in previous sections.
-
Page 10: Calculating Charge Time
12. CALCULATING CHARGE TIME Use the following table to more accurately Find your battery’s rating on the chart determine the time it will take to bring a below, and note the charge time given battery to full charge. for each charger setting. The times given are for batteries with a 50% charge prior CCA = Cold Cranking Amps to recharging. - Page 11 Troubleshooting PROBLEM POSSIBLE CAUSE SOLUTION The battery is connected The charger is in tester mode, Press the BATTERY SIZE and the charger is on, but not charger mode. button to activate charging and isn’t charging. select a charge rate. Indicator lights are lit in You might have accidentally Make sure nothing is touching an erratic manner, not...
-
Page 12: Before Returning For Repairs
1-800-621-5485 Monday-Friday 7:00 to 5:00 For REPAIR OR RETURN, contact Customer Service at 1-800-621-5485. DO NOT SHIP UNIT until you receive a RETURN MERCHANDISE AUTHORIZATION (RMA) number from Customer Service at Schumacher Electric Corporation. • 12 •... -
Page 13: Specifications
Manufacturer does not provide any warranty for any accessories used with this product that are not manufactured by Schumacher Electric Corporation and approved for use with this product. This Limited Warranty is void if the product is misused, subjected to careless handling, repaired, or modified by anyone other than Manufacturer or if this unit is resold through an unauthorized retailer. -
Page 14: Instrucciones Importantes De Seguridad
1. INSTRUCCIONES IMPORTANTES DE SEGURIDAD GUARDE ESTAS INSTRUCCIONES. 1.1 GUARDE ESTAS INSTRUCCIONES – 1.8 No desarme el cargador; hágalo revisar Este manual contiene instrucciones por una persona capacitada que efectúe operativas y de seguridad de importancia. reparaciones cuando necesite servicio de mantenimiento o una reparación. -
Page 15: Preparación Para La Carga
2.8 Utilice este cargador solamente para provocar chispas o un cortocircuito en la batería o en cualquier otra pieza eléctrica cargar baterías de tipo PLOMO-ÁCIDO, que podría provocar una explosión. GEL o AGM-recargables. Este cargador no está destinado a suministrar energía 2.7 No utilice elementos personales de metal a sistemas eléctricos de baja tensión tales como anillos, pulseras, collares y... -
Page 16: Siga Estos Pasos Cuando La Batería Esté Colocada En El Vehículo
6. SIGA ESTOS PASOS CUANDO LA BATERÍA ESTÉ COLOCADA EN EL VEHÍCULO UNA CHISPA PROVOCADA CERCA POSITIVO (ROJO) del cargador de DE LA BATERÍA PUEDE CAUSAR LA batería al borne POSITIVO (POS, P, +) sin EXPLOSIÓN DE LA BATERÍA. PARA descarga a tierra de la batería. -
Page 17: Conexiones A Tierra Y Energía De Ca
8. CONEXIONES A TIERRA Y ENERGÍA DE CA Este cargador de batería está destinado a El uso de un enchufe como adaptador un uso en un circuito con tensión nominal no se recomienda y no debe ser utilizado de 120 V. El cargador debe poseer una Estados Unidos. -
Page 18: Instrucciones De Operación
BOTÓN DE TIPO DE BATERÍA este tipo de células son más bajos que los de los otros estilos de la batería de Utilice este botón para seleccionar el tipo plomo-ácido. Ésta es probablemente de batería. la célula más sensible en términos de • STANDARD (estándar) –... - Page 19 CARGA DE LA BATERÍA FUERA para esas baterías. La activación del DEL VEHÍCULO modo especial de desulfatación se indica al titilar el LED CHARGING (amarillo / 1. Coloque la batería un área bien naranja) Si es exitoso, la carga normal ventilada.
- Page 20 Reinicio NOTA: Si el motor gira, pero no enciende, no existe un problema con el sistema de Si se cambia el modo de carga después arranque, sino en cualquier otra parte de que la carga ha comenzado del vehículo. DEJE de darle arranque (presionando el botón BATTERY TYPE al motor hasta que el otro problema se (tipo de batería) o SIZE (tamaño), el...
- Page 21 UTILIZAR EL PROBADOR DE TENSIÓN cargador de batería se encendió, la unidad DE BATERÍA permanecerá como probador (no cargador) indefinidamente, a menos que se seleccione 1. Con el cargador desenchufado del un índice de carga. tomacorriente de CA, conecte el cargador a la batería siguiendo las PROBAR DESPUÉS DE CARGAR instrucciones que figuran en las...
-
Page 22: Cálculo De Tiempo De Carga
Compare la lectura de voltaje de la • Cuando la pantalla digital del probador tabla siguiente. se configura para VoltaJe, no se encenderán los LEDs CHARGED y Muestra de 12 Volts Condición CHARGING. del Alternador del Alternador NOTAS SOBRE LA PRUEBA 14,6 o más Pida que sea revisada DEL ALTERNADOR... -
Page 23: Localización Y Resolución De Problemas Y Codigos De Error
14. LOCALIZACIÓN Y RESOLUCIÓN DE PROBLEMAS Y CODIGOS DE ERROR Codigos de Error CÓDIGO DESCRIPCIÓN RAZÓN/SOLUCIÓN DE ERROR El voltaje de la batería todavía La batería podría estar en malas condiciones. está debajo de 10V (para una Verifíquela o reemplácela. batería 12V) o de 5V (para una batería 6V) después de 2 horas de carga. - Page 24 PROBLEMA CAUSA POSIBLE SOLUCIÓN La luz verde de La batería puede estar Si la batería está montada en CHARGED se enciende completamente cargada o el auto, encienda las luces de minutos después de pudo haber sido cargada enfrente por unos minutos para conectar la batería.
-
Page 25: Antes De Devolver A Reparaciones
PROBLEMA CAUSA POSIBLE SOLUCIÓN Ciclo corto o sin comenzar No hay potencia en el Vea si esta abierto el fusible al arrancar el motor. receptáculo. o disyuntor que provee al tomacorriente CA. El cordón CA y/o el cordón de Vea si en el cordón de potencia extensión están flojos. -
Page 26: Especificaciones
El Fabricante no presta garantía por lo accesorios utilizados con este producto que no sean los fabricados por Schumacher Electric Corporation y que no estén aprobados para su uso con este producto. La presente Garantía Limitada será nula si el producto se utiliza en forma errónea, se trata de manera inadecuada, es reparado o modificado... -
Page 27: Warranty Card
ORIGINAL receipt because it will be required for any warranty claims. This warranty is not transferable. Send warranty card only. DO NOT SEND UNIT TO THIS ADDRESS FOR REPAIR. Mail this card to: Schumacher Electric Corporation 801 Business Center Drive Mount Prospect, IL 60056-2179 Name ______________________________________________________________...
Need help?
Do you have a question about the SC-7500Al SC-8020A and is the answer not in the manual?
Questions and answers