
Related Manuals for Drive Medical Wallaby


Summary of Contents for Drive Medical Wallaby
- Page 1 Wallaby Wheelchair Item #s WB 1200, WB 1400 Accessories WB ELR - Elevating Leg Rests WB 8021 - Headrest Extension WB 8030 - Five-Point Harness STDS833N - Anti-Tippers www.drivemedical.com...
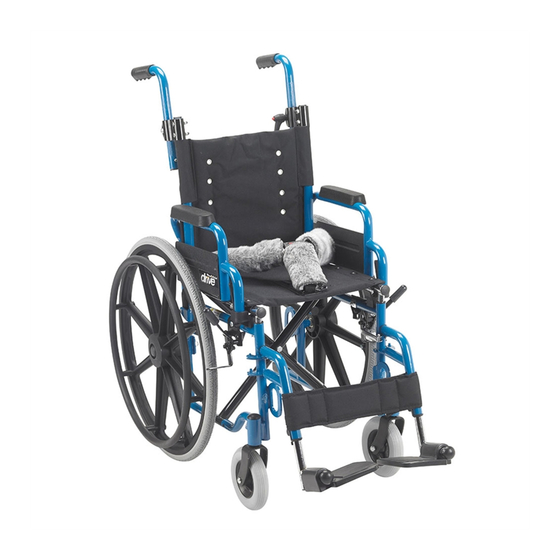
- Page 2 Introduction Hand Grip Back Upholstery Armrest Pad Armrest Rear Wheel Side Panel Seatbelt Seat Upholstery Cap Hub Rear Wheel Rigging Brakes Caster Fork Footplate Caster Front Congratulations on your purchase of a Drive wheelchair. Drive wheelchairs are a product of quality engineering and are manufactured to meet our own highly rigid specifications and will surpass all your expectations.
-
Page 3: Motor Vehicle Safety
Cautions STREET USE - In most states, it is illegal for use on public roads. Do not operate this wheelchair on roadways, streets or any surfaces with vehicular traffic. MOTOR VEHICLE SAFETY - Wheelchair conforms to the requirements of ANSI/RESNA WC/VoL.1-Section 19. The wheelchair has been dynamically tested in a forward facing mode and it must be forward facing during transport. - Page 4 Cautions (con’t) TRANSFER - Work with a qualified professional before you transfer on your own as it is dangerous. Engage rear wheel locks before you transfer and the chair should be on a smooth, stable and level area. Move your chair as close as you can to the seat you are transferring to, rotate the front casters until they are as far forward as possible, make sure armrests are out of the way and remove or swing footrests out of the way if you can.
-
Page 5: Wheel Locks
Use and Adjustments OPENING THE CHAIR - To open the chair, tilt it to one side and push down on seat rail until it is fully opened. CLOSING/FOLDING THE CHAIR - To close the chair, fold foot plates, grasp seat with both hands at front and back edge and lift. Or, you can tilt chair to one side and lift up on seat rail. - Page 6 Wheelchair Securement Points Securement Points...
- Page 7 Accessories Headrest Extension - Item # WB 8021 To install WB 8021 (headrest extension) remove end caps (B). (Fig 4) Adjust width of headrest extension by removing headrest cover by opening Velcro™ flap. (Fig 5) Separate the two sections and insert them individually into sockets on the back of the chair.
- Page 8 Five-Point Harness - Item # WB 8030 To install WB 8030 (Five-Point Harness) remove knob and insert screw into appropriate hole on back of wheelchair (C). (Fig 6) Snap hook onto lap belt (D). (Fig 7) Fig 6 Fig 7...
- Page 9 Anti tippers - Item # STDS833N To install STDS833N, remove rubber sleeve (circled in Fig. 8) off the back of the chair and install anti tippers making sure spring button pops into the hole on the bottom of the tube. Fig 8...
-
Page 10: Adjust Angle
Elevating Leg Rests – Item # WB ELR User should be sitting in wheelchair with feet on the foot plates when adjusting length &/or angle of leg rests. ADJUST LENGTH —Lift black tab (A) and depress both push pins (B) (Fig 9). Raise or lower foot plate to proper position for maximum support of thighs. -
Page 11: Lifetime Limited Warranty
Lifetime Limited Warranty Your Drive branded product is warrantied to be free of defects in materials and workmanship for the lifetime of the product for the original consumer purchaser. This device was built to exacting standards and carefully inspected prior to shipment. This Lifetime Limited Warranty is an expression of our confidence in the materials and workmanship of our products and our assurance to the consumer of years of dependable service. - Page 12 © 2015 Medical Depot, Inc. All rights reserved. Drive is a trademark of Medical Depot, Inc. Port Washington N.Y. 11050 USA Made in China...
Need help?
Do you have a question about the Wallaby and is the answer not in the manual?
Questions and answers