Table of Contents
Advertisement
RAD-050503
version:
Introduction . . . . . . . . . . . . . . . . . . . . . . . . . . . . . . . . . . . . . . . . . . . . .2
What's in the Box . . . . . . . . . . . . . . . . . . . . . . . . . . . . . . . . . . . . . . . . .2
Radium Features . . . . . . . . . . . . . . . . . . . . . . . . . . . . . . . . . . . . . . . . . .2
Radium keyboard Overview . . . . . . . . . . . . . . . . . . . . . . . . . . . . . . . . .3
A Guide to Getting Started . . . . . . . . . . . . . . . . . . . . . . . . . . . . . . . . .4
Hardware Installation . . . . . . . . . . . . . . . . . . . . . . . . . . . . . . . . . . . . . .4
Software Installation . . . . . . . . . . . . . . . . . . . . . . . . . . . . . . . . . . . . . . .4
Windows XP . . . . . . . . . . . . . . . . . . . . . . . . . . . . . . . . . . . . . . . . .5
Windows 2000 . . . . . . . . . . . . . . . . . . . . . . . . . . . . . . . . . . . . . . .7
Windows Me and Windows 98 Second Edition . . . . . . . . . . . . . .10
Mac OS X . . . . . . . . . . . . . . . . . . . . . . . . . . . . . . . . . . . . . . . . . .11
Setting Up Your MIDI Studio . . . . . . . . . . . . . . . . . . . . . . . . . . . . . . . .13
MIDI Functions . . . . . . . . . . . . . . . . . . . . . . . . . . . . . . . . . . . . . .14
Standalone Mode . . . . . . . . . . . . . . . . . . . . . . . . . . . . . . . . . . . . .15
Default Settings . . . . . . . . . . . . . . . . . . . . . . . . . . . . . . . . . . . . . .15
Top Panel Features . . . . . . . . . . . . . . . . . . . . . . . . . . . . . . . . . . . . . . .16
The Data Entry Slider . . . . . . . . . . . . . . . . . . . . . . . . . . . . . .17
Assignable Sliders and Knobs . . . . . . . . . . . . . . . . . . . . . . . .18
Other Buttons and Keys . . . . . . . . . . . . . . . . . . . . . . . . . . . .19
Rear Panel Features . . . . . . . . . . . . . . . . . . . . . . . . . . . . . . . . . . . . . .22
Technical Support & Contact Information . . . . . . . . . . . . . . . . . . . . . .23
Specifications . . . . . . . . . . . . . . . . . . . . . . . . . . . . . . . . . . . . . . . . . . .25
Appendix B - Radium MIDI Implementations . . . . . . . . . . . . . . . . . . .27
Radium Manual
User Guide
. . . . . . . . . . . . . . . . . . . . . . . . . . . . . . . . . . . . . . . . . .11
. . . . . . . . . . . . . . . . . . . . . . . . . . . . . .24
. . . . . . . . . . . . . . .14
. . . . . . . . . . . . . . . .17
. . . . . . . . . . . . . . . . . . . .26
Advertisement
Table of Contents

Related Manuals for M-Audio RAD-050503


Summary of Contents for M-Audio RAD-050503
-
Page 1: Table Of Contents
RAD-050503 version: Introduction ..........2 What’s in the Box . -
Page 2: Introduction
Introduction Congratulations on your purchase of the Radium, part of the USB Keystation series of MIDI controllers brought to you by M-Audio.You may use your Radium in conjunction with a USB equipped PC or Macintosh computer and appropriate music software to enter a full range of MIDI note and controller information. -
Page 3: Radium Keyboard Overview
When using an external power supply (optional), it is important to use only a supply with the proper 9vDC, 500ma rating. This may be purchased locally or through M-Audio. You must be running Windows 98 or higher to properly use the On a PC: Radium. -
Page 4: A Guide To Getting Started
Radium via software known as “drivers.” This software driver is a special, dedicated program that makes a MIDI interface accessible to an application. On the included driver disk, M-Audio supplies the drivers that enable you to use Radium with either Windows, Mac OS9 or Mac OSX. -
Page 5: Windows Xp
Windows XP 1. Insert the 'Radium' CD-ROM into your CD-ROM drive. 2. Open 'My Computer' or 'Windows Explorer' to locate your CD-ROM drive. Double-click the CD-ROM drive that contains the Radium CD-ROM. Double-click the 'Radium' folder. 3. Double-click the Radium driver icon to launch the installation procedure. 4. - Page 6 7. You will see a “New Hardware found” dialog. (If you don’t see this dialog at first, unplug your Radium and try again.) Click Next. 8. You will see another warning that the product has not passed Windows logo testing. Click "Continue anyway". 9.
-
Page 7: Windows 2000
This service pack is available from Microsoft Downloads at www.microsoft.com/downloads. 2. Insert the M-Audio Driver CD into your CD-ROM drive. Open 'My Computer' or 'Windows Explorer' to locate your CD-ROM drive. Double-click the CD-ROM drive that contains the Radium CD-ROM. - Page 8 The installer will scan your hard drive (this can take some time) and will then install the necessary files and perform setup actions on your system.A series of progress bars will show you how the process is going. 6. At the next prompt, the installer will warn you that this product does not have a Windows Digital Signature.
-
Page 9: Windows Me And Windows 98 Second Edition
Windows 2000 Installation is now complete. Windows Me and Windows 98 Second Edition 1. Insert the M-Audio Driver CD into your CD-ROM drive. Open 'My Computer' or 'Windows Explorer' to locate your CD-ROM drive. Double- click the CD-ROM drive that contains the Radium CD-ROM. -
Page 10: Mac Os X
The driver may be labeled “Keystation” or “M-Audio USB”.The OSX Installer Package icon looks like a cube of Jello rising out of a cardboard box and usually ends with the suffix “.pkg”. - Page 11 (the Extensions folder is inside your System folder).This file is named “M-Audio USB Support.” The installer will also place the file “M-Audio OMS Support” in the OMS folder, which also resides in your system folder. It is now time to configure OMS.
-
Page 12: Setting Up Your Midi Studio
4. The “OMS Driver Search” box asks you to choose the port on which you’ve attached the Radium (either Modem or Printer). DO NOT choose a port (since we’re using USB), just click “Search.” OMS begins Searching. IMPORTANT: If the USB cable is not correctly hooked up to the Radium, or the Radium is not switched on, setup will fail. - Page 13 3. The MIDI Output of the Radium is connected to the MIDI In of a sound module. The audio output of the sound module can be plugged directly into a sound system, or into a mixer, which is then connected to a sound system. In the setup pictured below, the Radium is being used as a MIDI controller as well as a MIDI interface, inputting MIDI data to the computer and its application software, and outputting MIDI to a sound module from which sounds will be...
-
Page 14: Using The Radium With Your Application Software
Using the Radium with Your Application Software Once the Radium driver has been installed, you will need to configure your MIDI application software to utilize the Radium. The manner in which this is done varies between applications, so we can just cover the basics here. Generally with both the Mac and PC, most MIDI applications have a MIDI port configuration or settings dialog box, sometimes called “MIDI Devices”... -
Page 15: Default Settings
1. Power up the Radium using a 9VDC adapter. Set the power switch to the the 9vDC setting. 2. Make sure that the MIDI port “transmit” channel within you music application matches the MIDI “receive” channel of the other instrument. 3. -
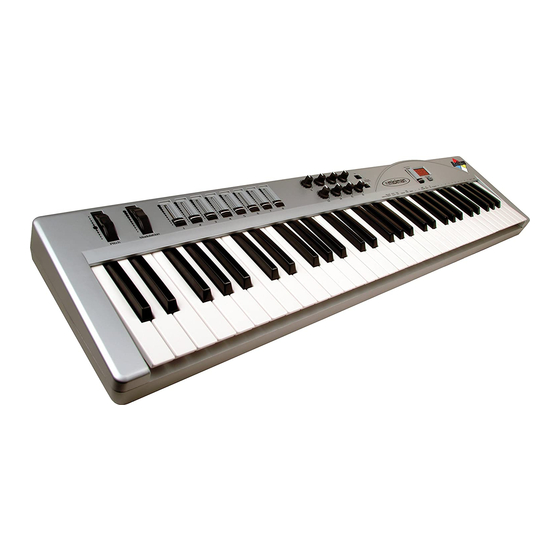
Page 16: Top Panel Features
Top Panel Features 1. Pitch Bend Wheel: The Pitch Bend wheel is used for raising or lowering the pitch of a voice during performance, starting from and always returning to a center “detent” point.The range of pitch values depends on the sound generator (sound card or module) being used. -
Page 17: Utilizing The Programming Assignment Keys
5. Octave Up & Octave Down Buttons: These buttons allow you to set the octave orientation of the Radium’s keyboard. 6. Data Entry Slider: This slide controller allows you to adjust the value of parameters such as Volume,Velocity, Aftertouch, and virtually any assignable MIDI control parameter directly from your keyboard. -
Page 18: Assignable Sliders And Knobs
represents the controller’s function or the Controller #, the DATA ENTRY slider will immediately function to select the transmitted value of that specific controller when the slider is moved.This can be very useful for manipulating various functions during actual performance, mixing or recording, etc.. Assignable Sliders and Knobs The Radium keyboard comes with 9 banks of factory presets. -
Page 19: Other Buttons And Keys
2. Choose the number of the desired controller slider or knob, using the number key group (1 - 16), then press the Enter key.The display will show a “P” in anticipation of the “parameter” number. 3. Assign the desired MIDI controller parameter number, using the number key group (1-127), then press Enter. - Page 20 The Radium allows you to use the numeric keys instead of the Number Keys: DATA ENTRY slider to specify the Control Change parameter data.This is done by pressing the MIDI/SELECT button, CC (No. or Data) key, required number key(s), and the Enter key.As an example, to assign a Control Change value of 7, and CC Data value of 123: 1.
- Page 21 MIDI Manufacturer’s Association standard referenced in this table. *All listed synthesizers and modules are trademarks of their respective owners, and are in no way associated or affiliated with M-Audio. These other manufacturer’s trademarks are used here for the sole purpose of describing the useful applications...
-
Page 22: Rear Panel Features
Rear Panel Features 1. Sustain Jack - This jack allows you to connect an optional footswitch to the keyboard. When the footswitch is depressed, notes played on the keyboard will continuously sound as long as the footswitch is held, while MIDI controller information is sent from the Radium. -
Page 23: Technical Support & Contact Information
Technical Support & Contact Information For additional technical assistance, contact M-Audio Technical Support by telephone (626-445-8495, 9-5 PST M-F), by fax (626-445-7564) or by e-mail (techsupt@m-audio.com). If you have questions, comments or suggestions about this product, or any M- Audio product, we invite you to contact us directly at: M-AUDIO U.S. -
Page 24: Radium Warranty Information
In the event that repair is required, a Return Authorization number must be obtained from M-Audio.After this number is obtained, the unit should be shipped back to M-Audio in a protective package with a description of the problem and the Return Authorization clearly written on the package. -
Page 25: Specifications
Specifications Tested to comply with FCC Standards For Home or Studio Use... -
Page 26: Appendix A - Midi Controller Information
Appendix A - MIDI Controller Information... -
Page 27: Appendix B - Radium Midi Implementations
Appendix B - Radium MIDI Implementations...
Need help?
Do you have a question about the RAD-050503 and is the answer not in the manual?
Questions and answers