Table of Contents
Advertisement
Table of Contents
Overview . . . . . . . . . . . . . . . . . . . . . . . . . . . . . . . . . . . . . . . . . . . . . . . . . . . . . . . . .3
Features . . . . . . . . . . . . . . . . . . . . . . . . . . . . . . . . . . . . . . . . . . . . . . . . . . . . . . . . . .4
D/A Converter . . . . . . . . . . . . . . . . . . . . . . . . . . . . . . . . . . . . . . . . . . . . . . . . .4
A/D Converter . . . . . . . . . . . . . . . . . . . . . . . . . . . . . . . . . . . . . . . . . . . . . . . . .4
Front Panel . . . . . . . . . . . . . . . . . . . . . . . . . . . . . . . . . . . . . . . . . . . . . . . . . . . .4
Panels - Fig. 1 . . . . . . . . . . . . . . . . . . . . . . . . . . . . . . . . . . . . . . . . . . . . . . . . . . . . .5
Panel Description . . . . . . . . . . . . . . . . . . . . . . . . . . . . . . . . . . . . . . . . . . . . . . . . . . .6
Front Panel . . . . . . . . . . . . . . . . . . . . . . . . . . . . . . . . . . . . . . . . . . . . . . . . . . . .6
Rear Panel . . . . . . . . . . . . . . . . . . . . . . . . . . . . . . . . . . . . . . . . . . . . . . . . . . . .7
Installation and Typical Setup . . . . . . . . . . . . . . . . . . . . . . . . . . . . . . . . . . . . . . . . . .8
Typical Setup - Fig. 2 . . . . . . . . . . . . . . . . . . . . . . . . . . . . . . . . . . . . . . . . . . . . . . . .9
Operation . . . . . . . . . . . . . . . . . . . . . . . . . . . . . . . . . . . . . . . . . . . . . . . . . . . . . . . .10
Selecting Modes . . . . . . . . . . . . . . . . . . . . . . . . . . . . . . . . . . . . . . . . . . . . . . .10
D/A Operation . . . . . . . . . . . . . . . . . . . . . . . . . . . . . . . . . . . . . . . . . . . . . . . .10
A/D Operation . . . . . . . . . . . . . . . . . . . . . . . . . . . . . . . . . . . . . . . . . . . . . . . .11
Troubleshooting . . . . . . . . . . . . . . . . . . . . . . . . . . . . . . . . . . . . . . . . . . . . . . . . . . .14
Appendix A - Specifications . . . . . . . . . . . . . . . . . . . . . . . . . . . . . . . . . . . . . . . . . .16
Appendix B - Diagnostic Tests . . . . . . . . . . . . . . . . . . . . . . . . . . . . . . . . . . . . . . . .17
S/PDIF Loopback Test . . . . . . . . . . . . . . . . . . . . . . . . . . . . . . . . . . . . . . . . . .17
AES/EBU Loopback Test . . . . . . . . . . . . . . . . . . . . . . . . . . . . . . . . . . . . . . . .17
Appendix C - Block Diagram . . . . . . . . . . . . . . . . . . . . . . . . . . . . . . . . . . . . . . . . .18
Appendix D - Grounding . . . . . . . . . . . . . . . . . . . . . . . . . . . . . . . . . . . . . . . . . . . . .19
Lifetime Limited Warranty . . . . . . . . . . . . . . . . . . . . . . . . . . . . . . . . . . . . . . . . . . .20
. . . . . . . . . . . . . . . . . . . . . . . . . . . . . . . . . . . . . .2
1
Advertisement
Table of Contents

Related Manuals for M-Audio Flying Cow


Summary of Contents for M-Audio Flying Cow
-
Page 1: Table Of Contents
Table of Contents FCC Class B and CE Compliance ........2 Overview . -
Page 2: Fcc Class B And Ce Compliance
FCC Class B and CE Compliance WARNING: This equipment has been tested and found to comply with the limits for a CLASS B digital device, pursuant to Part 15 of the FCC Rules. These limits are designed to provide reasonable protection against harmful interference in a residential installation. -
Page 3: Overview
Flying Cows may be mounted side by side in a single 19” rack space! The Flying Cow is a perfect companion for computer digital I/O cards, or any other digital audio device that requires high-quality A/D and/or D/A conversion. It can even be used as a replacement for lower performance DAT or DVD converters. -
Page 4: Features
Features • Pro quality, stereo A/D and D/A converters. • Simultaneous A/D and D/A conversion. • Standard single height, half-rack dimensions. • AES/EBU digital I/O on XLR connectors. • S/PDIF digital I/O on RCA connectors. • Balanced analog inputs on either XLR or 1/4” tip-ring-sleeve connectors. -
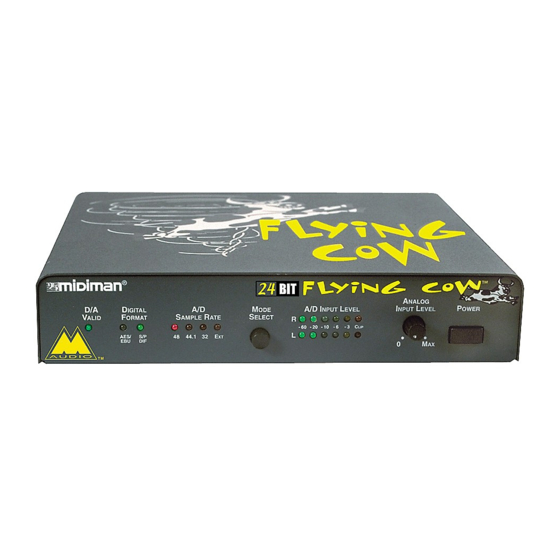
Page 5: Panels - Fig. 1
Panels - Fig. 1... -
Page 6: Panel Description
4. Mode Select: Repeatedly pressing this button will cycle through all of the available sample rates and digital formats. When powered up, the Flying Cow will restore the mode and sample rate that was set before the previous power-down. 5. A/D Input Level LED’s: These LED meters indicate the left and right analog audio levels entering the A/D converter. -
Page 7: Rear Panel
Rear Panel 8. Power connector: For connection to the unit’s external “wall- wart” power supply. The Flying Cow uses an external 8.5 or 9 volt A/C power supply with 1 amp or greater current capacity. 9. Analog Out (Right and Left): These are the analog audio outputs from the Flying Cow’s D/A converters. -
Page 8: Installation And Typical Setup
Please save all packing materials in case you should ever need to ship the unit. The Flying Cow may be operated on any flat surface or it may be installed in a standard 19” rack equipment tray. For installation in a 19”... -
Page 9: Typical Setup - Fig. 2
Typical Setup - Fig. 2 3 mon 5L mon 7L mon 9L mon OUT L OUT R MIC 1 MIC 2 SPEAKERS IN 1 IN 2 4 mon 6R str 8R str 10R str STR RET SEND LEFT RIGHT LEFT RIGHT TAPE IN TAPE OUT... -
Page 10: Operation
8 presses of the button to get to your desired setup. As they are changed, the Sample Rate and Digital Format settings are stored inside the Flying Cow. When the Flying Cow is turned off and then back on, these changed settings will be retained. D/A Operation The Flying Cow D/A converter is compatible with 24bit, 20bit, 18bit, and even 16bit digital data —... -
Page 11: A/D Operation
The A/D converter requires three parameters to be set up for proper operation: Digital Format, Input Level, and Sample Rate. From the front panel controls of the Flying Cow, set the Digital Format to match that of the digital output jack of the external equipment to which you are connecting the Flying Cow (see page 10–Selecting Modes). - Page 12 On the down side, the higher the sample rate, the more digital data has to be stored per second. Quite often, the sample rate you select for the Flying Cow will be dictated by the sample rates accepted by other components in the system such as sound cards, digital audio workstations, CD players, and DAT machines.
- Page 13 VERY IMPORTANT: In order to successfully use EXT mode, the following requirements must be met: 1.) the Flying Cow’s A/D Sample Rate must be set to EXT mode, 2.) the Flying Cow’s Digital Format setting must match the digital input jack that is to receive the “sync to”...
-
Page 14: Troubleshooting
Symptom: Using a tip-ring-sleeve 1/4” cable, I can’t seem to get balanced analog audio out of the Flying Cow. The analog outputs are balanced only on the XLR Solution: connections. The 1/4” analog output connections are unbalanced. - Page 15 Level knob set to “0” if possible. This will achieve optimum signal-to-noise performance. Symptom: With the A/D in EXT mode, the Flying Cow is outputting erroneous digital data even though I think there is a valid digital audio signal coming into the unit.
-
Page 16: Appendix A - Specifications
With the A/D in EXT mode, the Flying Cow is Symptom: outputting digital data even though there is no signal present at the AES/EBU In or S/PDIF In connectors . The “D/A Valid” LED does not light. Solution: Even without an external sync source present the Flying Cow will convert A/D data. -
Page 17: Appendix B - Diagnostic Tests
Appendix B - Diagnostic Tests The Flying Cow does not have built-in diagnostics but there are a few simple tests you can run to verify its operation. These tests involve connecting a digital output to a digital input and then playing analog audio through the unit. -
Page 18: Appendix C - Block Diagram
incoming signals with no discernible distortion. Appendix C - Block Diagram LEFT ANALOG INPUT ANALOG INPUT 1/4" LEVEL Digital Format (changed by Ladder AES/ Mode Select Switch) DIGITAL Mode Select Switch OUTPUTS RIGHT ANALOG INPUT AES/EBU CONVERTER CONVERTER S/PDIF ANALOG INPUT 1/4"... -
Page 19: Appendix D - Grounding
Generally, it is good practice to ground the shield to the chassis of the transmitting unit, and connect the shield through a capacitor to chassis ground at the receiver. This is how the Flying Cow is factory configured and should work fine with most systems. -
Page 20: Lifetime Limited Warranty
In the event that repair is required, a Return Authorization number must be obtained from MIDIMAN. After this number is obtained, the unit should be shipped back to MIDIMAN in a protective package with a description of the problem and the Return Authorization clearly written on the package.
Need help?
Do you have a question about the Flying Cow and is the answer not in the manual?
Questions and answers