Table of Contents
Advertisement
Quick Links
Thank you for purchasing the Victor All-In-One Monitor Riser™. Please read this
manual carefully. Should you have any questions, or need information about
your Victor product, please contact us by one of the methods below:
Customer Service:
1-800-628-2420
Website:
www.victortech.com
Email:
victor@victortech.com
Advertisement
Table of Contents

Summary of Contents for Victor MR500
- Page 1 Thank you for purchasing the Victor All-In-One Monitor Riser™. Please read this manual carefully. Should you have any questions, or need information about your Victor product, please contact us by one of the methods below: Customer Service: 1-800-628-2420 Website: www.victortech.com Email: victor@victortech.com...
-
Page 3: Table Of Contents
Contents Introduction…1 Contents…1 Maintenance and safety….1 Getting Started…2 Parts description…3 Connecting the power supply…5 Speakers…5 Using the speakers…5 Powering the speakers…6 Controlling the volume…6 Docking Station…7 Opening and closing…7 Connecting Apple® devices…7 USB Hub…7 Using the USB hub…7 SD Card Reader…8 Using the SD card reader…8 Headphone and Microphone Inputs…8 Using the headphone input…8... -
Page 4: Introduction
Introduction Contents The All-In-One Monitor Riser comes with the following items: o All-In-One Monitor Riser o Instruction Manual o 6 Foot USB Type-B Cable o 5V AC Power Adapter o 6 Foot Auxiliary Cable Maintenance and safety • Do not use paint thinner, benzene, alcohol or any other organic solvents to clean the unit. -
Page 5: Getting Started
Getting Started... -
Page 6: Parts Description
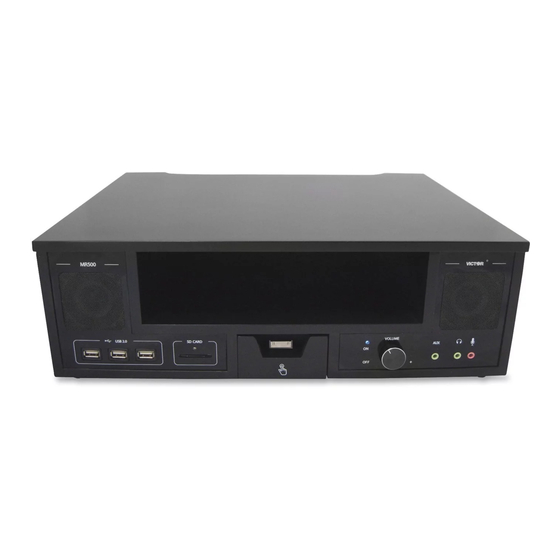
Parts Description ①Monitor Riser: Raises your computer monitor to a comfortable ergonomic level. ②Open Shelf: Perfect for storing papers or other documents. ③Speakers: Two speakers deliver high quality sound with input from computer, MP3 player, tablet, phone, or other devices. ④USB Hub: Three high-speed USB 2.0 ports on front and one on back easily connect USB devices to interact with your computer, power USB devices or charge mobile devices. - Page 7 ⑧Headphone Input: Plug your personal headphones into the input to listen. When headphones are plugged in, speakers will mute automatically. ⑨Microphone Inputs: One input in the front and one in the rear. Plug your microphone into the input to use with programs like Skype™, Sound Recorder and Windows Messenger™...
-
Page 8: Connecting The Power Supply
Connecting the power supply There are 2 ways to connect power to your All-In-One Monitor Riser: 1: USB Type-B Cable Plug the square end of the supplied 6 foot USB Type-B cable⑬ into the rear USB type-B input⑪ of the All-In-One Monitor Riser. Plug the flatter end of the USB cable into an open port on your computer/laptop. -
Page 9: Powering The Speakers
2: Playing music from an Apple® device To play music from your Apple® device, plug in either the USB type-B cable⑬ or the DC 5V Adapter⑫ to power the Monitor Riser. Then place the Apple® device on the docking station⑥ (Note: When powered by the DC 5V Power Adapter your Apple®... -
Page 10: Docking Station
increase the volume. Turning the knob counterclockwise (left) will decrease the volume. Docking Station Opening and closing To open the docking station⑥, push the TOUCH icon. The docking station will click inwards, and then a spring will pop the dock out. Pull the dock out completely until the internal magnetic locking pin engages. -
Page 11: Sd Card Reader
1: Powered by the USB type-B cable When the Monitor Riser is powered by the USB type-B cable⑬, the USB ports can supply power and communicate with the connected computer. There is no software to install, simply plug the USB device into an empty port and begin to use. -
Page 12: Auxiliary Inputs
from the external speakers and will only play into the headphones. This allows you to listen privately. Using the microphone inputs The Monitor Riser is supplied with two microphone inputs⑨, one in the front and one in the rear. The input located in the rear is designed for microphones that will be connected for a long period of time, which will reduce cord clutter on the desk. - Page 13 • Check that the speakers have power. To do this, turn the volume knob⑦ clockwise until the blue LED light appears. Then control the volume by rotating the knob left and right. • If headphones are connected, the speakers will be mute. Make sure there are no headphones connected.
- Page 14 If static is still audible, the cable may be defective. If you have a personal auxiliary cable, try using that before calling Victor support. • Make sure the device you are playing music from is not muted and the volume is turned up as loud as it will allow.
-
Page 15: Warranty
“this Product”). If you purchased a product from someone other than an authorized Victor reseller in the United States or Canada or if the product was used (including but not limited to floor models or refurbished product) prior to your purchase you are not the Original Purchaser and the product that you purchased is not covered under warranty. - Page 16 What to do if you think your Product is eligible for warranty service: Report your issue to Victor between the hours of 8am and 4pm Central Standard Time by calling 800-628-2420 within the applicable warranty period and provide a copy of your dated bill of Sale showing this Product was purchased within the U.S.
- Page 17 Your credit card will be charged up to the cost of a new Product only if: (i) you do not return your original Product to Victor within five (5) business days; (ii) the problems with your original Product are not covered by the limited warranty; (iii) the proper packaging instructions are not followed and has caused damage to the product;...
- Page 18 Limitations: Victor is not responsible for damage to or loss of any equipment, media, programs or data related to the use of this Product. Except for that repair or replacement as described above, Victor shall not be liable for any direct, indirect, incidental or consequential damages or specific relief.
Need help?
Do you have a question about the MR500 and is the answer not in the manual?
Questions and answers