Advertisement
Table of Contents
- 1 Table of Contents
- 2 Camera Diagram
- 3 Items Required for Startup
- 4 Battery Installation
- 5 Memory Card Installation
- 6 Quick Setup
- 7 Advanced Settings & Functions
- 8 Black Widow Mounting & Field Setup
- 9 Camera Care
- 10 Trouble Shooting
- 11 Warranty Information
- 12 Product Registration Card
- Download this manual
Advertisement
Table of Contents

Subscribe to Our Youtube Channel
Related Manuals for Eyecon BlackWidow TV1012


Summary of Contents for Eyecon BlackWidow TV1012
- Page 2 Model TV1012 User's Manual Second Edition, February 2013. Published by BGHA, Inc., Windom, MN. © 2013 BGHA, Inc. All rights reserved. PLEASE REGISTER TO ACTIVATE YOUR PRODUCT’S WARRANTY.
-
Page 3: Table Of Contents
CAMERA DIAGRAM ............4 ITEMS REQUIRED FOR STARTUP ........5 BATTERY INSTALLATION ..........6 MEMORY CARD INSTALLATION ........7 QUICK SETUP ..............8 ADVANCED SETTINGS & FUNCTIONS ......9 BLACK WIDOW MOUNTING & FIELD SETUP ....12 CAMERA CARE .............13 TROUBLE SHOOTING ...........14 WARRANTY INFORMATION ........16 PRODUCT REGISTRATION CARD ........17 WARNING! Prolonged exposure from looking directly into any infrared light could cause cataracts or permanent retinal damage. -
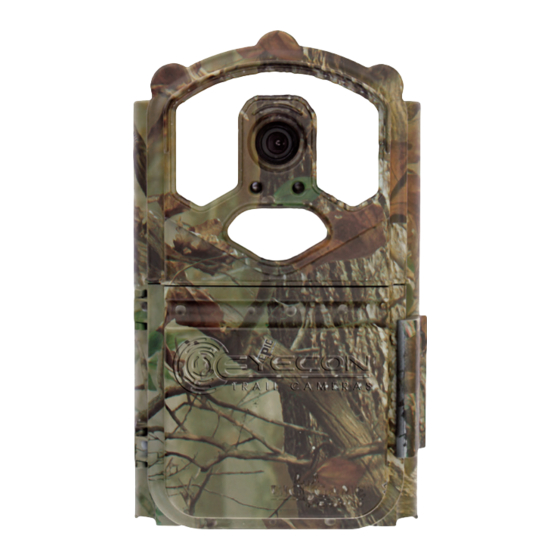
Page 4: Camera Diagram
Red Walk Ambient Test Light Sensor Camera Options SD Card Column Slot Case Door Case Door Latch (Open) Power On/Off Button Plus Arrow C-Cell Battery C-Cell Battery Set Button Minus Arrow Comparment Comparment PLEASE REGISTER TO ACTIVATE YOUR PRODUCT’S WARRANTY. -
Page 5: Items Required For Startup
(Sold separately) • 1 SDHC Storage Card (up to 32GB; 4GB or higher recommended) (Sold separately) NOTE: Eyecon™ Trail Cameras can accept SD cards up to 32GB, but testing shows that maximum performance is obtained at 16GB. • 1 External SD memory card reader for viewing photos/videos. -
Page 6: Battery Installation
2. Insert (3) C-cell batteries, negative (–) side inserted first into one side. 3. Close the battery door and position lock to locked position. 4. Repeat on opposite side. IF USING EYECON EXTENDA-LIFE BATTERY PACK ™ 1. Remove plastic plug on the back side of the camera. NOTE: Save this plug for future use. -
Page 7: Memory Card Installation
MEMORY CARD INSTALLATION: TO INSTALL THE SD CARD (Sold separately) 1. Open case door. 2. Insert the SD card face up into the SD Card Slot until you hear it click into place. Press it once to remove. NOTE: It is recommended not to use a card that has been previously used in different trail cameras or one that has previously been used in a Point &... -
Page 8: Quick Setup
QUICK SETUP: Your Black Widow Trail Camera will come with the following standard options already preset so that quality photos may be taken right out of the box without changing any settings. MODE: Photo BURST: 3 photo-burst RESOLUTION: 1.3mp DELAY: 10 sec If you wish to customize your own settings proceed to Advanced Settings &... -
Page 9: Advanced Settings & Functions
ADVANCED SETTINGS & FUNCTIONS: Press and quickly release the power button to activate the camera and view the user setup screen. Setting the functions is easy; simply use the + or – arrows to select the feature (blinking) you wish to change and then push the SET button. Each feature will blink and can be changed using the +/– arrows and then push SET to move to the next feature. - Page 10 Use the + or – arrows to change the Year setting. Press the set button again and this will bring you back to the camera options column and you will notice the “Date” is flashing again. PHOTO: This option will show you how many photos and/or videos the camera has taken.
- Page 11 of the Video settings. Use the + or – arrows to select the desired Video LG setting. Press the set button again to lock in that the setting and exit Video LG. You will see “Video LG” flashing in the camera options column. RES: This setting selects the resolution at which you would like the camera to take the pictures.
-
Page 12: Black Widow Mounting & Field Setup
BLACK WIDOW MOUNTING & FIELD SETUP The Black Widow comes with a 6 ft nylon mounting strap which allows for quick and easy mounting. The camera back is unique in that it has 12 vertical large bark biters and 5 different adjustment slots. This allows for several strap placement options or another strap can be added depending on your application. -
Page 13: Camera Care
MOISTURE: Although all Eyecon™ Trail Cameras have a very durable plastic composite case which also makes them water resistant even under the most extreme weather conditions, care must be taken to prevent water damage. -
Page 14: Trouble Shooting
VIBRATION: Like any electronic device your Eyecon™ Trail Camera is designed with many small electronic components that are very sensitive to vibration. Failure to follow careful handling & transport may cause extreme and irreparable damage to your camera. • NEVER drop the camera on a hard surface •... - Page 15 Over time a SDHC or any storage device could become corrupt. If your camera fails to acknowledge the SD card we recommend that you replace the card with a new SD card or one from a different EYECON™ Trail Camera that you know works. This will help determine whether the problem is the SD card or the camera.
-
Page 16: Warranty Information
WARRANTY AND REGISTRATION Eyecon Trail Camera's 1 Year Limited Warranty: For a period of 365 days after purchase, Big Game® Treestands will, at its discretion, repair or replace this product for any reason of any defect or malfunction. This warranty is only valid if the product is used for the purpose intended and has not been tampered with and/or physically damaged in any way. -
Page 17: Product Registration Card
To activate your product’s warranty, please mail in your registration card or submit it online at www.biggametreestands.com PRODUCT REGISTRATION Product Purchased Model Number Serial Number Owner’s Name Street Address City State Zip Code E-mail Address Phone Owners Age (optional) Sex (optional) Date Purchased Purchased From (Dealer Name) How did you hear about us:... - Page 18 Remember to activate your product’s warranty? See warranty information and registration instructions on page 16 and then complete and mail in the registration card on page 17 or submit it online at: www.biggametreestands.com PLEASE REGISTER TO ACTIVATE YOUR PRODUCT’S WARRANTY.
- Page 19 OWNER’S RECORD Product Name Model Number Serial Number Purchased From Purchased Date YOU MUST RETURN THE COMPLETED REGISTRATION CARD ABOVE WITHIN (30) DAYS OF THE PURCHASE IN ORDER TO ACTIVATE THE LIMITED WARRANTY COVERAGE. (Make sure to include date purchased on the card!) NOTES: PLEASE REGISTER TO ACTIVATE YOUR PRODUCT’S WARRANTY.
- Page 20 PO Box 382 • Windom, MN 56101 800-268-5077 • 507-831-4350...
Need help?
Do you have a question about the BlackWidow TV1012 and is the answer not in the manual?
Questions and answers