Manhattan Plaza HD T2 User Manual
Freeview hd receiver with apps
Hide thumbs
Also See for Plaza HD T2:
- User manual (42 pages) ,
- Quick start manual (2 pages) ,
- Quick start manual (8 pages)
Table of Contents
Advertisement
Quick Links
Advertisement
Table of Contents

Related Manuals for Manhattan Plaza HD T2


Summary of Contents for Manhattan Plaza HD T2
- Page 1 User Guide Plaza HD T2 Freeview HD Receiver with Apps...
- Page 2 WELCOME FURTHER INFORMATION Thanks for buying this Manhattan Plaza HD•T2 Freeview receiver, FREEVIEW designed to provide you with the best in digital TV, radio and apps. You can get more information and help Connect to a suitable HD-ready television using HDMI for from the Freeview website at: breathtaking high definition digital pictures and digital sound.
-
Page 3: Table Of Contents
CONTENTS In The Box Advanced Use Your receiver Using the favourites lists Remote control The lock PIN Display mode Changing the channel list Preparation Using the setup menus The aerial General menu section Connecting your receiver - Subtitles Switching on - Subtitle language Tuning in - Information... - Page 4 CONTENTS Connecting To Your Network Advanced Use (continued) Automatic (DHCP) Time menu section Manual (Static) - Auto standby - Sleep timer - Auto turn on - Auto turn off Appendix A Safety System menu section Appendix B Troubleshooting - Retune Appendix C Specifications - Manual scan Guarantee &...
-
Page 5: In The Box
In The Box 2nd Generation Remote Control File Version: v3 In your Plaza HD•T2 Freeview receiver pack you should Date: 8/5/15 Manhattan Plaza HD-T2 & HD-S2 Author: Alex Arbab-Zadeh fi nd the following items: Color Guide Plaza HD-T2 Plaza HD-S2... -
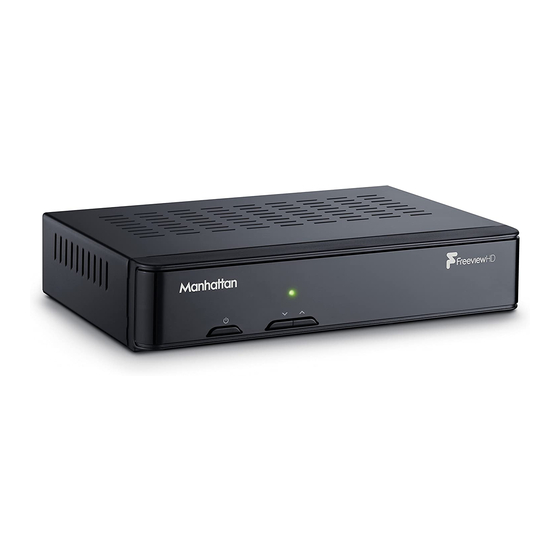
Page 6: Your Receiver
YOUR RECEIVER Manhattan Plaza HD•T2 Front POWER INDICATOR LIGHT (red for standby, blue for on) CHANNEL CHANGE UP/DOWN Change channels up and down STANDBY Switch the receiver on and off... - Page 7 Manhattan Plaza HD•T2 Rear ANTENNA IN AUDIO (L) & (R) VIDEO POWER CABLE Input for connection Analogue audio outputs for Composite video output for For connection to a to your aerial connection to a sound system connection to a non-HD television...
-
Page 8: Remote Control
Rear Layout Plaza HD-T2 Inverted Plaza HD-S2 Inverted REMOTE CONTROL Plaza HD•T2 Standby - switches the receiver on and off. Mute - silences the receiver’s sound. 0, 1 … 9 - buttons to directly select channels and enter numeric values in the set-up menus. Switches back to the last channel watched. - Page 9 Switches to the next or previous channel. Moves one Selects the option in a menu. page up or down in the channel list and programme guide. LIST Displays the channel list. Turns on or off audio description. GUIDE Displays the programme guide. MODE Switches between available screen display modes.
-
Page 10: Preparation
CONNECTING YOUR RECEIVER Preparation Place your Plaza HD•T2 receiver on a firm, level surface close to the This section explains how to set up your Plaza HD•T2 television, a mains electricity socket, and the cable from the aerial. to receive Freeview channels. (See Appendix A –... -
Page 11: Switching On
Ensure your television is turned off and connect the HDMI cable If your receiver is not located near your hub or router, you could use supplied between the HDMI socket at the back of your Plaza HD•T2 HomePlug powerline adapters to extend your home network using receiver and an HDMI socket on your television. -
Page 12: Tuning In
SWITCHING ON (continued) After a few seconds, the receiver’s first Freeview installation Turn on your TV set and choose the HDMI input (see your screen shown below will appear on the television screen: television’s manual for guidance). HINT: If you do not see this screen on your television, see ‘Troubleshooting’... - Page 13 HINT: You should set the HDMI resolution to the highest that your television can display (see your television’s manual). If in doubt, set the resolution to 720p. The setup completion screen confirms the lock PIN you have set. Press the OK button and your Plaza HD•T2 receiver is now ready for you to watch Freeview digital TV.
-
Page 14: Everyday Use
Everyday Use CHANGING CHANNELS or P Step through the channels by pressing the P This section describes the day-to-day use of your Plaza buttons on HD•T2 receiver – how to select the channels that you the remote control or the buttons on the front of the want to watch, view the programme schedules, and Plaza HD•T2 receiver. -
Page 15: Changing The Volume
There are other ways to change channel: • Use the browsing bar at the bottom of the screen (see below) • Use the on-screen channel list (see page 17) • Use the programme guide (see page 18) CHANGING THE VOLUME You can increase or decrease the volume by using the V and V buttons on the remote control. -
Page 16: Subtitles And Audio Description (Ad)
SUBTITLES AND AUDIO DESCRIPTION While the bar is displayed, press the button to see details of the next programme, and the button to go back again. To see what is Many Freeview programmes are broadcast with subtitles for on another channel, press the buttons. -
Page 17: Using The Channel List
USING THE CHANNEL LIST Display the on-screen channel list by pressing the LIST button on Use the buttons on the remote control to highlight a channel then press OK to view it in the preview window. Press OK the remote control. This lists the channels on the left-hand side of the screen, in number order, and displays a preview window of the again to exit the channel list and watch the channel full-screen. -
Page 18: Using The Programme Guide
USING THE PROGRAMME GUIDE The Plaza HD•T2 guide is used to display details of all programmes on in the week ahead and to open Apps such as BBC iPlayer or HINT: You can skip straight to the programme guide for all channels by pressing the GUIDE button a second time. - Page 19 You look through the scheduled programmes using the switches to the relevant channel. In the programme guide a buttons to move through the channels and the and buttons to shown next to a programme with a reminder set. highlight programmes showing at different times. HINT: You can jump through the list more quickly using the or P...
-
Page 20: Using Apps
TV by pressing TEXT again or the EXIT button. time of printing. For further assistance, please visit our website (www.manhattan-tv.com) or the provider of the App. A great feature of YouTube on the Plaza HD•T2 is that it can be controlled by the YouTube App on your smartphone or tablet. -
Page 21: Advanced Use
Advanced Use Highlight the channel that you want to include in a favourites list, and press the button to show the five lists available. Highlight the list that you want to include the channel in and press to add This section explains how to get the most out of your the channel to that list (a star will appear next to it). - Page 22 In the channel list, favourites lists can be selected in the same way as the Freeview TV, radio and data channel lists, by pressing buttons. Press OK to view a selected channel, change the favourites lists it is assigned to, or PIN lock it by pressing the yellow button.
-
Page 23: The Lock Pin
THE LOCK PIN Some of the Plaza HD•T2’s menu functions can be locked to If you have set up your receiver for a 16:9 Widescreen TV, the avoid accidental changes to the receiver’s setup, and you can lock options are: particular channels to prevent some family members, such as children, from watching them. -
Page 24: Using The Setup Menus
USING THE SETUP MENUS If you want to alter the channel list, first press the LIST button to You display the Plaza HD•T2’s setup menu by pressing the MENU display the channel list screen. To remove a channel, highlight it button on the remote control. -
Page 25: Subtitles
SUBTITLES INFORMATION Press OK to switch on subtitles for all programmes that provide Press OK to show technical information about your receiver, them. Switch subtitles off by pressing OK again. including the Helpline phone number, signal strength and quality readings. You can toggle this setting quickly by pressing AD whilst watching HINT: We recommend that you have this screen displayed... -
Page 26: Screen Type
This menu option has the same effect as the MODE HINT: button. HDMI RESOLUTION Press OK to show the HDMI resolution menu and use the buttons to choose the correct resolution for your TV. You should set the HDMI resolution to the highest that your television can display (see your television’s manual). -
Page 27: Sound Menu Section
SOUND MENU SECTION AUDIO DESCRIPTION Press OK to switch on audio description for all programmes that Highlight the option you want to alter using the buttons. provide it. Switch audio description off by pressing OK again. When you have fi nished making the changes you want, leave the menu system by pressing BACK or EXIT. -
Page 28: Lip Sync Delay
SOUND MENU SECTION (continued) TIME MENU SECTION Highlight the option you want to alter using the buttons. LIP-SYNC DELAY When you have finished making the changes you want, leave the menu system by pressing BACK or EXIT. If you are using the S/PDIF output with a sound system and find the sound and picture falling out of sync, you can delay the sound output by a small amount to compensate. -
Page 29: System Menu Section
SYSTEM MENU SECTION AUTO TURN ON You can set the Plaza HD•T2 to switch on automatically at a Highlight the option you want to alter using the buttons. particular time. Press OK to show the auto turn on menu and use When you have finished making the changes you want, leave the menu system by pressing BACK or EXIT. -
Page 30: Network Configuration
5V ANTENNA POWER SYSTEM MENU SECTION (continued) Some antennas that are installed with a signal amplifi er need a Press OK to display the Manual Scan menu. Enter the UHF channel power supply from the receiver because they do not have their own. (21 - 68), frequency (474Mhz - 850Mhz) and bandwidth (7MHz If you have connected such a signal amplifi er, the Plaza HD•T2 can supply it with a +5V DC supply. -
Page 31: Software Update Via Oad
SOFTWARE UPDATE VIA OAD Press OK to turn on or off the automatic software update. OAD SOFTWARE MANUAL SCAN Press OK to immediately search for new software to download. SOFTWARE UPDATE VIA USB Press OK to load new software for the receiver from a storage device connected to the USB socket on the back of the receiver. -
Page 32: Connecting To Your Network
Connecting To Your Network This section explains how to set up the Plaza HD•T2 to use Apps such as BBC iPlayer and YouTube. You must have a broadband Internet connection with a minimum sustained speed of 3Mbps for HD content. AUTOMATIC (DHCP) Ensure the ETHERNET socket at the back of the Plaza HD•T2 is connected to your router or hub. -
Page 33: Manual (Static)
MANUAL (STATIC) If your broadband modem/router is not compatible with DHCP (Dynamic Host Confi guration Protocol), or you wish to manually confi gure the Network Confi guration and IP address, press OK to select the Network Confi guration option. Use the or buttons to change the confi guration to “Static” and for each of the addresses in turn (IP Address, Subnet Mask, Router Address, and DNS Address) press to highlight the address and... -
Page 34: Appendix A Safety
Appendix A – Safety VENTILATION POWER Slots and openings in the receiver’s cover are for ventilation. Ensure Your receiver requires a 100V to 240V AC ~ 50Hz mains supply a minimum distance of 5cm around the apparatus for sufficient and is fitted with a moulded plug. The mains plug is used as the ventilation. - Page 35 ELECTRICAL SAFETY The wire which is coloured brown or red must be connected to the terminal which is marked with the letter L or coloured Red. No Your receiver requires a 100V to 240V AC ~ 50/60Hz mains supply and is fitted with a moulded plug. If the plug breaks or becomes connection is to be made to the Earth terminal of the plug as this damaged do not use it.
-
Page 36: Appendix B Troubleshooting
Appendix B – Troubleshooting PROBLEM POSSIBLE CAUSE WHAT TO DO Power light off Power supply cable disconnected. Check the power supply cable. Check the mains power cable is plugged in and mains Receiver not switched on. socket is turned on. Turn on receiver. Check HDMI/SCART cable connection to receiver No set up screen HDMI/SCART cable disconnected. - Page 37 PROBLEM POSSIBLE CAUSE WHAT TO DO Check HDMI/SCART cable connections at receiver HDMI/SCART cable disconnected. and television. No picture or sound Television not switched to HDMI/SCART input. Select television’s HDMI/SCART input. Selected an incompatible HDMI resolution – Whilst the receiver is on, press and hold the MODE button for 10 seconds and the No picture via HDMI many TVs don’t support 1080p or 1080i, but...
- Page 38 Appendix B – Troubleshooting (continued) PROBLEM POSSIBLE CAUSE WHAT TO DO Tuned to an SD channel. Tune to an HD channel. TV picture not HD TV not capable of HD. Connect the receiver to an HD-Ready TV. TV connected by SCART. Connect the TV with the HDMI lead.
-
Page 39: Appendix C Specifications
Appendix C – Specifications Standard DVB T / T2 Input frequency 474~858 MHz Tuner Signal input level -65dBm to -20 dBm Input connector IEC 169-2 Female (PAL) Loop out connector IEC 169-2 Male (PAL) HDMI output Resolution 576i / 576p / 720p / 1080i /1080p SCART output CVBS/RGB Video... -
Page 40: Guarantee & Legal
Appendix D - Guarantee & Legal As we have no control over these services nor your Internet access, we cannot guarantee the availability of such services nor that your access to, or use of, such services will be uninterrupted or problem- GUARANTEE free. - Page 41 What we do exclude: YOUR PRIVACY Except as set out in the preceding paragraph, we exclude all liability We do not collect or process any of your personal data using for any losses, whether in contract or tort, for any direct, indirect, this product nor do we store or access any ‘cookies’...
- Page 42 For assistance, please call the Manhattan helpline on 020 8450 0005 or visit our website at www.manhattan-tv.com...
Need help?
Do you have a question about the Plaza HD T2 and is the answer not in the manual?
Questions and answers