
Related Manuals for Oster 5104


Summary of Contents for Oster 5104
- Page 1 5104, 5105 & 5106 5104, 5105 & 5106 In st r u c t io n M a nu a l S te a m I r on P L E A S E RE AD ALL I NSTRU CTIO NS BEFOR E US ING T HIS APPLIA NCE...
-
Page 2: Important Safeguards
I M P ORTANT S AFE GUAR D S When using electrical appliances, basic safety instructions should always be followed, including the following: • READ ALL INSTRUCTIONS BEFORE USING THE STEAM IRON. • The Iron should always be turned to the "Off" position before plugging or unplugging from outlet. - Page 3 • Repairs to the appliance may only be carried out by trained personnel. As a result of incorrect repairs considerable dangers for the user may result. Please contact an Authorized Service Center in the event of repairs being necessary. • Always disconnect the Steam Iron from the wall socket when filling it with water or emptying it out.
-
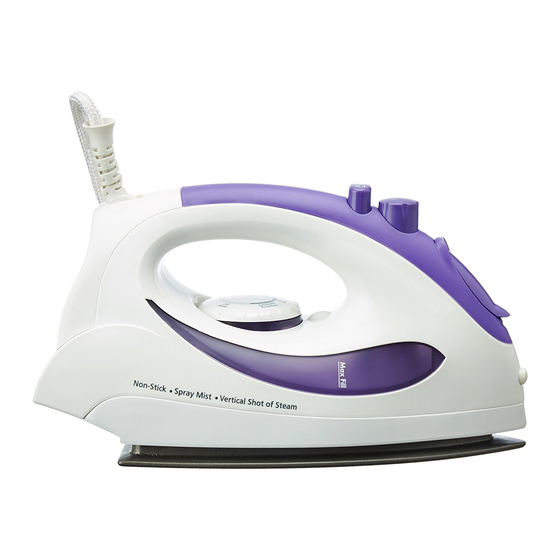
Page 4: Description Of The Appliance
DESCRIPTION OF THE APPLIANCE 1. Temperature Control Dial 2. Steam Select Dial 3. Water Reservoir Lid 4. See Through Water Window 5. Large Soleplate 6. Spray Mist Button 7. Shot of Steam Button (model 5105 & 5106 only)/ Vertical Shot of Steam Button (model 5106 only) 8. -
Page 5: Before First Use
Before First Use • When using the Iron for the first time, test it on a piece of old cloth to be sure that the Soleplate and the Water Reservoir are clean. • It is possible that the Iron will discharge some smoke or give off a slight odor during its first usage. -
Page 6: Filling With Water
Filling With Water • Turn off the Iron and disconnect the plug from the electrical wall outlet before filling the Iron with water. • Turn the Steam Select Dial to the off position • Set the Iron in the position indicated below (figure 2) and fill it with water, no higher than the Max fill level shown on the See Through Water Window. - Page 7 • Wait for a short while until the Indicator Light goes on and off again. • Set the Steam Select Dial in the desired steam level position (figure 3). You are now ready to start steam ironing. The steam will be released evenly through seventeen vents located in the soleplate for easier ironing.
-
Page 8: Ironing Temperature
Ironing Temperature • Check the ironing instructions on the label of the item that you wish to iron. Check the following table for further instructions. • Should the specific ironing instructions not appear on the label, follow instructions on the following table. This table is only valid for the fabrics indicated and does not apply to special textiles with a gloss finish, etc. -
Page 9: Setting The Temperature
Setting The Temperature • Set the Iron in an upright position. • Connect the Iron to an electrical wall socket. • Set the Temperature Control Dial (figure 4) to the correct ironing temperature as indicated in the label or the following table. (figure 4) Non-Stick Finish •... -
Page 10: Storing The Iron
If for any reason your Steam Iron should require repairs, do not try to fix it yourself. Send it to an Authorized Service Center. Storing The Iron • Your Oster Steam Iron includes a temperature indicator which changes from red to ®... -
Page 11: Warranty
WAR R A N T Y Sunbeam Products, Inc doing business as Jarden Consumer Solutions, its affiliates and subsidiaries (hereinafter collectively referred to as “SPI”) warrant that, for a period of two (2) years from the date of purchase, this product will be free from defects in material and workmanship (the “Warranty”). - Page 12 A U T HO R IZ E D S ERV IC E CEN T ERS Region Location Customer Service Center Address Area / Towns Covered S P Services Mumbai, Navi Mumbai & Thane Shop No. 10, Abdul Sattar Compound Near Railway Station Elphinston Mumbai Road (West) Mumbai –...
- Page 15 5105 5106 5106...
- Page 18 5105 5106 5106...
- Page 23 g[d© g g| Q a {ks = ‘kgj lfoZ l ls a V j ds uke doj fd, x, bykds es l lZ ,l- ih- lfoZ l s l eq a c bZ ] Bk.ks vkS j uoh eq a c bZ ‘kkW i ua - 10] vCnq y ‘kVj dEikma M ] fQVokyk jks M ] lrxq : n’kZ u fcfYMa x ds ihN] eq a c bZ js y os LVs ’...
- Page 24 WA RR AN TY C A R D © 2012 Sunbeam Products, Inc. doing business as Jarden Consumer Solutions. All rights reserved. Manufactured by Sunbeam Products, Inc. doing business as Jarden Consumer Solutions, 2381 Executive Center Drive, Boca Raton, Florida 33431 U.S.A. Distributed by Jarden Consumer Solutions of India Private Limited, Unit B-204, Universal Business Park, Off Saki Vihar Road, Chandivali Farm Road, Andheri (E) Mumbai 400 072, India.
Need help?
Do you have a question about the 5104 and is the answer not in the manual?
Questions and answers