Chapters
Table of Contents

Related Manuals for Ellison E2201-18

Summary of Contents for Ellison E2201-18
-
Page 1: User Guide
18 in. EVOLUTION Easy-Push Reel Mower with Adjustable Grass Management System Model Number: E2201-18 User Guide Save for future reference Para ver la versión en español, vaya a la página 21... -
Page 2: Warranty
FOUR YEAR LIMITED WARRANTY For four (4) years starting after the date of purchase, ELLISON warrants to the original purchaser that its Lawn Mower products are free from serious defects in materials and workmanship appearing under normal use. This warranty does not cover damage to the Lawn Mower caused by abuse, acts of God, failure to follow product instructions, mishandling or unauthorized repair by either the purchaser or an unauthorized third party. -
Page 3: Table Of Contents
Contents Warranty …………………………………………………......Getting Started…………………………………………………….…….…… Safety Information..…………………………….…………………….……… Product Features…….……………………...…………………….….……… Getting Started: Main Operating Parts….……………………………………………..……… Handle Assembly………….….…...………………………..….……..…….. 1. Read User Guide Attaching the Handle……………….…….……………………….………… Please carefully read the entire user guide and fully understand the safety Attaching the Grass Bag………………..……………………….………… information before assembling or using the mower. Use this guide to Grass Management System.…….………………………..……..…………... -
Page 4: Safety Information
Call our customer service at 1-800-918-8290 Do not operate around children, other people, or pets. Visit us at www.ellison-tools.com Walk slowly, never run while using your mower. Always be sure of your footing when using the reel mower, especially on damp grass or on uneven surfaces. -
Page 5: Product Features
Product Features Easy Push Cutting System Grass Management System 1) Much easier to use The oversized Grass Bag plus the Grass Deflector 2) Maintains higher blade speeds with less effort (Patents Pending) allow for the greatest control over 3) Blades stay sharp - no seasonal sharpening required grass clippings of any reel mower during both collecting and mulching modes. -
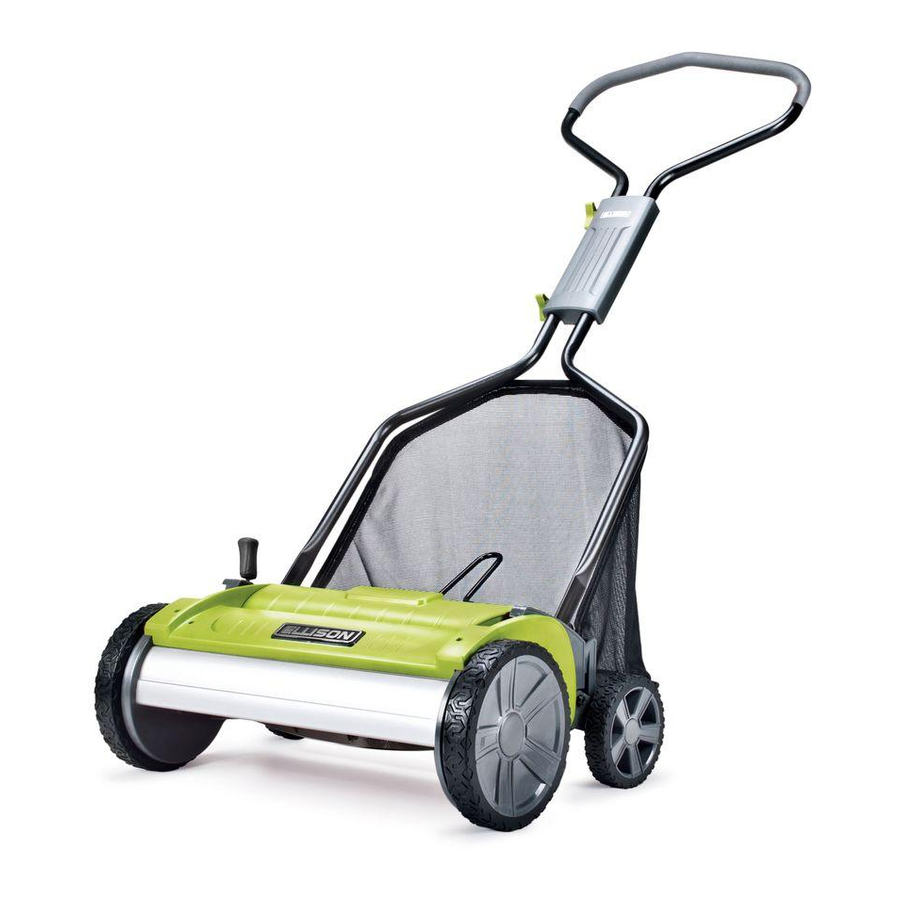
Page 6: Main Components
Main Components Handle Grip Height Adjustment Knob (1-in to 4-in cut height adjustment) Handle Cover Handle Knobs (2) Left Side Cover Handle Frame Grass Bag Mount Grass Right Deflector Grass Bag Handle Grass Bag Cutting Reel (with 5 helical cutting blades) Rear wheels (2) Stationary Blade Top Cover... -
Page 7: Handle Assembly
Handle Assembly (first time use) ① There are no tools required for assembly of the handle. Note: There are multiple positions for handle height. If uncertain, start in the lowest handle height position and adjust to a height that is the most ②... -
Page 8: Attaching The Handle
Attaching the Handle ① Once the handle components are fully assembled, the next step is to attach the handle to the mower. Do not install the Grass Bag yet. ② Note the attachment pegs on the inside facing surfaces of the main mower body. Shown in the inset as (I). These are easiest to see and connect to when the mower’s cutting height is set to the 4 in. -
Page 9: Attaching The Grass Bag
Attaching the Grass Bag ① Once the handle is attached to the mower, rotate it fully upward to its storage position. ② Position the Grass Bag as shown in the figure below. Handle in Storage Position ③ Note the attachment slots on the mower inside of the rear wheels on both ends (L). ④... -
Page 10: Grass Management System
Using the Grass Management System ① The Grass Management System consists of the Grass Deflector (Patents Pending), an oversized Grass Bag, and our One-Touch Height Adjustment from 1 to 4 inches. These provide the greatest control over grass clippings of Grass Collecting Mode Position the Grass Deflector as any reel mower. -
Page 11: One-Touch Height Adjust
One-Touch Height Adjustment ① Your mower has a One-Touch Height Adjustment for varying your grass cut height from 1 to 4 inches. ② To adjust the cutting height, face the mower from its right side and hold onto the Lower Handle bar with your left hand. With your right hand, grip the One-Touch Height Adjustment Knob. -
Page 12: Checking Cutting Blades
Call our customer service at 1-800-918-8290 Visit us at www.ellison-tools.com There should always be a very small gap between the helical cutting blades and the stationary blade. It is possible for slippage to occur during shipping, handling, or usage. -
Page 13: Adjusting The Blade
Adjusting the Blades 1/24 of a turn is a major If the blades are scraping: (from test on page 12) Adjustment adjustment, start with less bolt If the helical cutting blades are scraping the stationary blade, first check for any damage or dents on both the helical cutting blades and the stationary blade. -
Page 14: Checking Cutting Performance
You will need to check both the left side and the right side of the mower. Call our customer service at 1-800-918-8290 Visit us at www.ellison-tools.com WARNING: The mower blades are sharp! Wear gloves for this procedure, and keep fingers away from the interface between the helical cutting blades and stationary blade. -
Page 15: Tips For Mowing Correctly
Call our customer service at 1-800-918-8290 Visit us at www.ellison-tools.com ⑤ When mowing high grass, be sure to use the Grass Management System consisting of the oversized Grass Bag and Grass Deflector (Patents Pending) to contain the grass clippings. -
Page 16: Care And Maintenance
Care and Mainenance Minimal care is needed to maintain your EVOLUTION mower. However, The cutting blades should remain sharp for years due to the non-contact take these steps to ensure optimal mower performance. Cutting Reel technology, provided the mower and its components are maintained properly and not misused. - Page 17 Inspect your blades at least once a season and anytime your mower Repairing a small dent is possible. If minor damage such as a dent is hits a solid or stationary object. The cutting blades can become found on one of the five helical cutting blades, it is possible to file down damaged or the stationary blade can become out of alignment if the mower using a steel file.
-
Page 18: Troubleshooting
• Check the height setting for the mower. Be sure that you are not trying to cut more than 1/3 off the height of the grass. The mower may become Visit us at www.ellison-tools.com difficult to push if the height setting is too low. - Page 19 Make sure your mower is in safe operating condition by following the tips outlined in this user guide. Do not use this mower if it becomes damaged. Have it repaired first. Call 1-800-918-8290 or visit www.ellison-tools.com for troubleshooting, frequently asked questions, and for finding a qualified repair service.
- Page 20 159 N. Racine Ave. 3E Chicago, IL 60607 (800) 918-8290 www.ellison-tools.com...
- Page 21 18" EVOLUTION Podadora de césped de empuje fácil con sistema de manejo ajustable Número de modelo: E2201-18 Manual del usuario Conserve este manual para referencia ulterior...
- Page 22 GARANTÍA LIMITADA DE 4 AÑOS Ellison le garantiza al comprador original que esta podadorade césped está libre de defectos en materiales y mano de obra que se hagan aparentes en el uso normal dentro de cuatro (4) años después de la fecha de compra. Esta garantía no cubre los daños a la podadora de césped causados por abuso, actos de Dios, su falta en seguir las instrucciones del producto, el maltrato o la reparación no autorizada.
- Page 23 Contents Garantía…………………………………………………......Primeros pasos…………………………………………………………….… Información de seguridad…………………….………………………...…… Características del producto…….………...…………………………...…… Primeros pasos: Componentes principales….…………………………………………...…… Ensamblado del mango………….….…...…………………..…….…..….. 1. Lea el manual del usuario Fijación del mango …………………………..………………………...…..… Por favor, lea cuidadosamente el manual del usuario y entienda Fijación de la bolsa de césped....……………………...…..…… completamente la información de seguridad antes de ensamblar o usar la Sistema de direccion del césped.…….………………………....……...
-
Page 24: Información De Seguridad
No utilice la podadora de césped si está dañado. Llame al 1-800-918-8290 o visite nuestro sitio web en www.ellison-tools.com para la solución de problemas, preguntas frecuentes, y para servicio de reparación... -
Page 25: Características Del Producto
Características del producto Hojas de Empuje Fácil Sistema de Manejo de Césped 1) Mucho más fácil de empujar Bolsa de césped sobredimensionada. Deflector ajustable que 2) Mayor velocidad de hojas con menos esfuerzo dirige los recortes. La bolsa de césped recolecta cortes para 3) Nunca necesitan ser afiladas desechar rápida y fácilmente. -
Page 26: Componentes Principales
Componentes principales Mango recubierto de espuma Perilla del ajuste de altura (El rango de altura, 1" – 4") Recubrimiento del mango Perillas del Cubierta lateral mango (2) Izquierda Armazón del mango Apego derecho Deflector de la bolsa de ajustable césped Asa de la bolsa de césped Bolsa de césped... -
Page 27: Ensamblado Del Mango
Ensamblado del mango ① Herramientas no son necesarias para el montaje del mango. Nota: Hay varias posiciones para la altura del mango. Si no está seguro, comience en la posición más baja del mango y adapté una altura que sea ②... -
Page 28: Fijación Del Mango
Fijación del mango ① Después de que el mango este montado, coloque el mango de la podadora. No instale la bolsa de césped todavía. ② Nota las clavijas de montaje del mango (I). ③ Mientras se apoya en las secciones inferiores del mango (J) y (K), deslice los orificios del mango sobre las clavijas de montaje del mango (I). -
Page 29: Fijación De La Bolsa De Césped
Fijación de la bolsa de césped ① Una vez que el mango se uña a la podadora de césped, gire completamente hacia arriba a la posición de almacenamiento. Posición de almacenamiento ② Coloque la bolsa de césped, como se muestra en la siguiente figura. ③... - Page 30 Usando el sistema de manejo de césped ① El sistema de manejo de césped consiste de el deflector de césped (con patente Modo para recoger césped en trámite), una bolsa de césped sobredimensionada, y nuestra Ajuste de Altura Ajustar el posición del deflector de un Solo Toquefrom se ajusta de 1"...
- Page 31 Un toque de ajuste de altura ① Su podadora tiene un toque de ajuste de altura para variar la altura de corte del césped de 1“ a 4“ ② Para ajustar la altura de corte, vaya al lado derecho de la podadora de césped (N) y sujete la sección inferior del mango con la mano izquierda (O).
-
Page 32: Verificación Cuchillas De Corte
Llame a nuestro servicio al cliente al 1-800-918-8290 de afiladura para la temporada. Visite nuestro sitio web en www.ellison-tools.com Siempre debe haber un espacio muy pequeño entre las cuchillas de corte helicoidal y la cuchilla fija. Como pueden producirse deslizamientos durante el envio, la manipulacion y/o el uso del producto. -
Page 33: Ajuste De Las Cuchillas
Ajuste de las cuchillas 1/24 de una vez es Perno de ajuste importante ajuste Si las cuchillas están raspando : (de la prueba en la página 12) Si las cuchillas de corte helicoidal están raspando la cuchilla fija, en primer lugar, compruebe que no existen daños o abolladuras en las dos cuchillas de corte helicoidal y la cuchilla fija. -
Page 34: Verificación Del Rendimiento De Corte
Llame a nuestro servicio al cliente al 1-800-918-8290 Visite nuestro sitio web en www.ellison-tools.com ADVERTENCIA: Las cuchillas de la podadora de césped son filosas! Use guantes cuando realice este procedimiento y mantenga los dedos alejados de la superfice de contacto entre el carrete y la cuchilla fija. -
Page 35: Uso De La Podadora De Césped
Llame a nuestro servicio al cliente al 1-800-918-8290 Visite nuestro ④ When mowing high grass, be sure to use the Grass Management sitio web en www.ellison-tools.com System consisting of the oversized Grass Bag and Grass Deflector (Patents Pending) to contain the grass clippings. Leaving behind excess grass clippings that are too long can stress the lawn leaving it susceptible to weeds, disease, and poor appearance. -
Page 36: Cuidado Y Mantenimiento
Cuidado y mantenimiento La atención mínima que se necesita para mantener su podadora de césped Las cuchillas de corte se mantendrán filosas durante años debido a la EVOLUTION. Sin embargo, sigue estos pasos para garantizar un tecnología carrete de corte, siempre que la máquina y sus componentes se rendimiento óptimo de podadora. - Page 37 Reparación de una abolladura pequeña es posible. Si los daños Inspeccione las cuchillas por lo menos una vez por temporada y en menores, como una abolladura se encuentra en una de las cinco cuchillas cualquier momento que su podadora de césped realiza un objeto de corte helicoidal, es posible limar con una lima de acero.
-
Page 38: Resolución De Problemas
• Compruebe el ajuste de la altura de la podadora de césped. Asegúrese de que usted no está tratando de recortar más de 1/3 de la altura. La Visite nuestro sitio web en www.ellison-tools.com podadora puede ser difícil de empujar, si el valor de altura es demasiado baja. - Page 39 No utilice la podadora de césped si está dañado. Llame al 1-800-918-8290 o visite nuestro sitio web en www.ellison-tools.com para la solución de problemas, preguntas frecuentes, y para servicio de...
- Page 40 159 N. Racine Ave. 3E Chicago, IL 60607 (800) 918-8290 www.ellison-tools.com...
Need help?
Do you have a question about the E2201-18 and is the answer not in the manual?
Questions and answers