Table of Contents
Advertisement
Quick Links
Download this manual
See also:
User Manual
Advertisement
Table of Contents

Related Manuals for Ellison EVOLUTION E2201-18

Summary of Contents for Ellison EVOLUTION E2201-18
-
Page 1: User Guide
18 in. EVOLUTION Easy-Push Reel Mower with Adjustable Grass Management System Model Number: E2201-18 User Guide Save for future reference Para ver la versión en español, dé vuelta al guía de usuario... -
Page 2: Warranty
FOUR YEAR LIMITED WARRANTY For four (4) years starting after the date of purchase, ELLISON warrants to the original purchaser that its Lawn Mower products are free from serious defects in materials and workmanship appearing under normal use. This warranty does not cover damage to the Lawn Mower caused by abuse, acts of God, failure to follow product instructions, mishandling or unauthorized repair by either the purchaser or an unauthorized third party. -
Page 3: Table Of Contents
Contents Warranty …………………………………………………......Getting Started…………………………………………………….…….…… Safety Information..…………………………….…………………….……… Product Features…….……………………...…………………….….……… Getting Started: Main Operating Parts….……………………………………………..……… Handle Assembly………….….…...………………………..….……..…….. 1. Read User Guide Attaching the Handle……………….…….……………………….………… Please carefully read the entire user guide and fully understand the safety Attaching the Grass Bag………………..……………………….………… information before assembling or using the mower. Use this guide to Grass Management System.…….………………………..……..…………... -
Page 4: Safety Information
Call our customer service at 1-800-918-8290 Do not operate around children, other people, or pets. Visit us at www.ellison-tools.com Walk slowly, never run while using your mower. Always be sure of your footing when using the reel mower, especially on damp grass or on uneven surfaces. -
Page 5: Product Features
Product Features Easy Push Cutting System Grass Management System 1) Much easier to use The oversized Grass Bag plus the Grass Deflector 2) Maintains higher blade speeds with less effort (Patents Pending) allow for the greatest control over 3) Blades stay sharp - no seasonal sharpening required grass clippings of any reel mower during both collecting and mulching modes. -
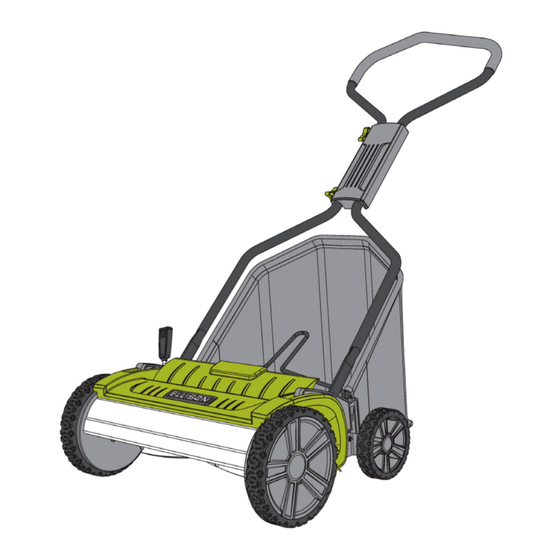
Page 6: Main Operating Parts
Main Components Handle Grip Height Adjustment Knob (1-in to 4-in cut height adjustment) Handle Cover Handle Knobs (2) Left Side Cover Handle Frame Grass Bag Mount Grass Right Deflector Grass Bag Handle Grass Bag Cutting Reel (with 5 helical cutting blades) Rear wheels (2) Stationary Blade Top Cover... -
Page 7: Handle Assembly
Handle Assembly (first time use) ① There are no tools required for assembly of the handle. Note: There are multiple positions for handle height. If uncertain, start in the lowest handle height position and adjust to a height that is the most ②... -
Page 8: Attaching The Handle
Attaching the Handle ① Once the handle components are fully assembled, the next step is to attach the handle to the mower. Do not install the Grass Bag yet. ② Note the attachment pegs on the inside facing surfaces of the main mower body. Shown in the inset as (I) ③... -
Page 9: Attaching The Grass Bag
Attaching the Grass Bag ① Once the handle is attached to the mower, rotate it fully upward to its storage position. ② Position the Grass Bag as shown in the figure below. Handle in Storage Position ③ Note the attachment slots on the mower inside of the rear wheels on both ends (L). ④... -
Page 10: Grass Management System
Using the Grass Management System ① The Grass Management System consists of the Grass Deflector (Patents Pending), an oversized Grass Bag, and our One-Touch Height Adjustment from 1 to 4 inches. These provide the greatest control over grass clippings of Grass Collecting Mode Position the Grass Deflector as any reel mower. -
Page 11: One-Touch Height Adjust
One-Touch Height Adjustment ① Your mower has a One-Touch Height Adjustment for varying your grass cut height from 1 to 4 inches. ② To adjust the cutting height, face the mower from its right side and hold onto the Lower Handle bar with your left hand. With your right hand, grip the One-Touch Height Adjustment Knob. -
Page 12: Checking Cutting Blades
Call our customer service at 1-800-918-8290 Visit us at www.ellison-tools.com There should always be a very small gap between the helical cutting blades and the stationary blade. It is possible for slippage to occur during shipping, handling, or usage. -
Page 13: Adjusting The Blade
Adjusting the Blades If the blades are touching: (from test on page 12) Adjustment 1/24 of a turn bolt If the helical cutting blades are touching the stationary blade, first check for any damage or dents on both the helical cutting blades and the stationary blade. If any dents are found, turn to page 16 for instructions on repairing dents. -
Page 14: Checking Cutting Performance
You will need to check both the left side and the right side of the mower. Call our customer service at 1-800-918-8290 Visit us at www.ellison-tools.com WARNING: The mower blades are sharp! Wear gloves for this procedure, and keep fingers away from the interface between the helical cutting blades and stationary blade. -
Page 15: Tips For Mowing Correctly
Call our customer service at 1-800-918-8290 Visit us at www.ellison-tools.com ④ When mowing high grass, be sure to use the Grass Management System consisting of the oversized Grass Bag and Grass Deflector (Patents Pending) to contain the grass clippings. -
Page 16: Care And Maintenance
Care and Mainenance Minimal care is needed to maintain your EVOLUTION mower. However, The cutting blades should remain sharp for years due to the non-contact take these steps to ensure optimal mower performance. Cutting Reel technology, provided the mower and its components are maintained properly and not misused. - Page 17 Inspect your blades at least once a season and anytime your mower Repairing a small dent is possible. If minor damage such as a dent is hits a solid or stationary object. The cutting blades can become found on one of the five helical cutting blades, it is possible to file down damaged or the stationary blade can become out of alignment if the mower using a steel file.
-
Page 18: Troubleshooting
• Check the height setting for the mower. Be sure that you are not trying to cut more than 1/3 off the height of the grass. The mower may become Visit us at www.ellison-tools.com difficult to push if the height setting is too low. - Page 19 Make sure your mower is in safe operating condition by following the tips outlined in this user guide. Do not use this mower if it becomes damaged. Have it repaired first. Call 1-800-918-8290 or visit www.ellison-tools.com for troubleshooting, frequently asked questions, and for finding a qualified repair service.
- Page 20 159 N. Racine Ave. 3E Chicago, IL 60607 (800) 918-8290 www.ellison-tools.com...
Need help?
Do you have a question about the EVOLUTION E2201-18 and is the answer not in the manual?
Questions and answers