Table of Contents
Advertisement
Available languages
Available languages
Advertisement
Chapters
Table of Contents

Subscribe to Our Youtube Channel
Related Manuals for Stokke PIPA


Summary of Contents for Stokke PIPA
- Page 1 Stokke PIPA by Nuna ® ™ ® Car Seat User Guide Manual del usuario...
- Page 2 Items included Stokke® PIPA™ by Nuna®...
-
Page 3: Table Of Contents
Warning .....................5 Parts list ....................12 Feature overview ..................14 Handle adjustment ..................16 Child requirements ..................16 Changing harness position ..............17 Securing child in carrier ................21 Installation instructions ................23 Cleaning and maintenance..............39 Warranty and service ................40 Spanish (ES) .....................41 Stokke® PIPA™ by Nuna®... -
Page 4: Information
When you contact us, please have your product’s model and serial numbers ready so that we may help you efficiently. These numbers can be found on a sticker on the underside of your infant restraint. USA: 1-855-NUNA-USA or nuna.eu/USA Stokke® PIPA™ by Nuna®... -
Page 5: Warning
• Top of child´s head is at least 1” below top of carrier. • Use infant insert only if it is necessary to achieve a snug fit. This child restraint can ONLY be used in a rear facing position when using in a vehicle. Stokke® PIPA™ by Nuna®... - Page 6 Do not use child restraint if any harness straps are cut, frayed or damaged. Do not use child restraint if base or carrier are damaged in Stokke® PIPA™ by Nuna®...
- Page 7 Never place carrier on beds, sofas, or other soft surfaces. Strangulation hazard: Children have STRANGLED in loose or partially buckled harness straps. Fully restrain the child even when carrier is used outside the vehicle. Stokke® PIPA™ by Nuna®...
- Page 8 Do not use the infant carrier if it is damaged or broken. Only use with Stokke® strollers. This child seat can be properly installed in most vehicles. However, there are some vehicle belts and vehicle seats that are not safe for use with this restraint.
- Page 9 Only install child restraint in a forward facing vehicle seat. Never install in a seat that faces the rear or the side of the vehicle. Refer to your vehicles owner’s manual for detailed information about vehicle belts, LATCH (lower anchors), and preferred restraint installation positions. Stokke® PIPA™ by Nuna®...
- Page 10 If in doubt, consult either the child restraint manufacturer or the retailer. • The Stokke® PIPA™ by Nuna® car seat is also compatible with the Nuna PIPA base for those who want the convenience of one base for each vehicle. For more information go to www.nuna.eu...
- Page 11 Stokke® PIPA™ by Nuna®...
-
Page 12: Parts List
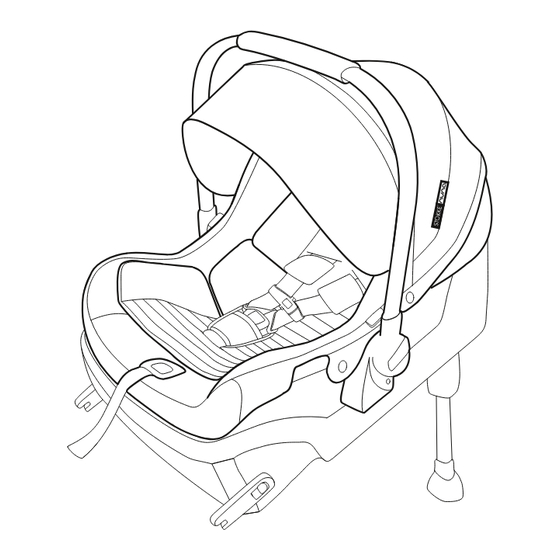
Parts list Lap Belt Guides Handle Button Canopy Stroller release buttons Infant Insert Shoulder Pads Chest Clip Seat Cover Buckle and Crotch Belt Handle Adjuster Button Shoulder belt Guide Adjuster Strap Harness cover (mesh) Stokke® PIPA™ by Nuna®... - Page 13 Base Attachment Bar Carrier Release Button Harness Straps Bubble Splitter Plate Instruction Manual Storage Base Attachment Bar Stability Leg Storage Lock off Recline Adjustment Rigid LATCH (lower attachments) Locking Clip Rigid LATCH Guides Stability Leg Stability Leg Indicator Stokke® PIPA™ by Nuna®...
-
Page 14: Feature Overview
• To remove the canopy, press the button in the canopy mount and pull the canopy bow out. Seat pad removal 1. Remove the harness from the splitter plate 2. Pull the fastening pieces underneath the edge of the seat out. Stokke® PIPA™ by Nuna®... - Page 15 3. Remove the seat pad from the adjustment button as shown. 4. Remove the seat pad from the stroller release buttons as shown. Shoulder pads • Shoulder pads are removable and are not necessary for safety. Stokke® PIPA™ by Nuna®...
-
Page 16: Handle Adjustment
Child requirements (25 mm) • Weight: 4 to 32 lbs (2 to 14.5 kg). • Height: less than 32 in ( 81 cm). • Top of child’s head is at least 1 in below top of carrier. Stokke® PIPA™ by Nuna®... -
Page 17: Changing Harness Position
2. With child removed, loosen harness. Turn carrier over and remove one harness loop from metal splitter plate. To remove the metal splitter plate the harness cover first has to be removed. Continues on next page. Stokke® PIPA™ by Nuna®... - Page 18 Re-attach to splitter plate and fasten the harness cover. STRANGULATION HAZARD: Child can strangle in loose harness straps. Always use this harness cover. Avoid improper attachment to base: ALWAYS secure harness cover between seat and attachment bars. Stokke® PIPA™ by Nuna®...
- Page 19 • Identify crotch belt slot that will achieve a snug fit. Change crotch belt slot if necessary. Three crotch belt positions are provided to achieve a snug fit as your baby grows. Choose a position that works best for your child. Stokke® PIPA™ by Nuna®...
- Page 20 2. This position provides a medium fit. Crotch belt is threaded into rear slot as shown. 3. This position provides the largest fit. Crotch belt is threaded through front slot as shown. Stokke® PIPA™ by Nuna®...
-
Page 21: Securing Child In Carrier
2. Press button to release the buckles. Separate chest clip and spread harness straps apart. 3. Place child in carrier in seated position, resting the child against both the back and bottom of the seat. Stokke® PIPA™ by Nuna®... - Page 22 9. Check that child is secure: a) Buckle is fastened. b) Harness straps are not twisted. c) Harness is snug – A snug harness cannot be pinched, and should not allow any slack. d) Chest clip is level with armpits. Stokke® PIPA™ by Nuna®...
-
Page 23: Installation Instructions
Base install - Rigid LATCH (Lower Attachments) • Place vehicle in park and on level ground. • Position base in a forward facing vehicle seat. Use recline adjustment to position bubble in indicator. Adjust base so bubble touches line. Stokke® PIPA™ by Nuna®... - Page 24 For instructions on using the stability leg when installing the base, see stability leg section. (Page 31) • If necessary, install plastic connector guides on vehicle LATCH lower anchor bars. Stokke® PIPA™ by Nuna®...
- Page 25 • Base should not move side to side or forward more than 1” at belt path. • Bubble must be touching line. Use recline adjustment, if needed, to position bubble. • It is acceptable to install with both LATCH (lower attachments) and the vehicle belt. Stokke® PIPA™ by Nuna®...
- Page 26 • It is acceptable to install with both LATCH (lower attachments) and the vehicle belt. • After child is properly secured in carrier, click press carrier on base and listen for a click. Pull on carrier to verify installation. Stokke® PIPA™ by Nuna®...
- Page 27 • To remove the base, first push the base toward the vehicle seat with a light force while squeezing the rigid latch release buttons and then pull the base out. Stokke® PIPA™ by Nuna®...
- Page 28 Base install - Lap & Lap/Shoulder • Place vehicle in park and on level ground. • Position base in a forward facing vehicle seat. Use recline adjustment to position bubble in indicator. Adjust base so bubble touches line. Stokke® PIPA™ by Nuna®...
- Page 29 2. Tighten belt while pressing base into vehicle seat. 3. While the shoulder belt is tight, hook the bottom of lock off and press to close the lock off on the shoulder and lap belt. click Stokke® PIPA™ by Nuna®...
- Page 30 • Pull on carrier to verify proper installation. check click click Your child may not be protected in the event of a crash or sudden stop if you do not check and verify that the seat is securely attached. Stokke® PIPA™ by Nuna®...
- Page 31 • After correctly installing the base on the vehicle seat, extend the stability leg to floor. • Stability leg should make firm contact with the vehicle floor, enough to remove looseness and for the indicators to show green. • The stability leg has 12 positions. Stokke® PIPA™ by Nuna®...
- Page 32 The stability leg indicator shows green when it is properly contacting the floor of the vehicle. • This seat is safe to use with stability leg in use or stored for both rigid LATCH or vehicle belt installation. Stokke® PIPA™ by Nuna®...
- Page 33 (Page 23). • Route the vehicle lap belt under both lap belt guides and buckle the vehicle belt. • Route the shoulder belt around the back of the carrier passing through the white shoulder belt guide. Stokke® PIPA™ by Nuna®...
- Page 34 • Adjust the angle of the carrier. A rolled up towel or foam pool noodle may be used to help adjust the amount of recline. Angle is correct when blue line on carrier is level with ground. Stokke® PIPA™ by Nuna®...
- Page 35 Unbuckle the belt without allowing it to slip. • Connect lap and shoulder belts with locking clip. • Rebuckle belt. Check that lap belt does not move by pulling and pushing hard on infant restraint. If belt loosens or lengthens, repeat procedure. Stokke® PIPA™ by Nuna®...
- Page 36 (Pages 28-30) This Child Restraint is certified for use in commercial aircraft with or without the base. Be sure to contact your airline prior to travel to discuss their Child Restraint policy. Stokke® PIPA™ by Nuna®...
- Page 37 Using the Stokke® pipa™ by Nuna® with a stroller from Stokke The Stokke® pipa™ by Nuna® can only be used on the following strollers: Stokke® Xplory®, Stokke® Crusi™, Stokke® Scoot™ (only from serial no 118AA0040583) and Stokke® Trailz™. Installation on a stroller •...
- Page 38 The car seat should always be facing the parent. Removing from a stroller • Move the carrying handle into carrying position. • Push the stroller release buttons down at both sides while lifting the seat vertically from the stroller. Stokke® PIPA™ by Nuna®...
-
Page 39: Cleaning And Maintenance
To clean the buckle: rinse using warm water. DO NOT use any soaps, solvents or lubricants. Using anything other than water can cause the buckle to malfunction. Air dry. Stokke® PIPA™ by Nuna®... -
Page 40: Warranty And Service
Nuna. Please have the proof of purchase, model number and serial number available when you contact us. To register your product, fill out and mail in the provided registration card or go to our website at http://nuna.eu/USA/product-registration-car-seat Stokke® PIPA™ by Nuna®... -
Page 41: Spanish (Es)
Stokke PIPA by Nuna ® ™ ® Silla de auto Manual del usuario Stokke® PIPA™ by Nuna®... - Page 42 Objetos incluidos Stokke® PIPA™ by Nuna®...
- Page 43 Parts list ....................52 Descripción de las funciones ..............54 Necesidades del niño ................56 Cambiar la posicióndel arnés ..............57 La seguridad del niño en un cargador .............61 Instrucciones sobre la instalación ............64 Limpieza y mantenimiento ..............81 Garantía y servicios ..................82 Stokke® PIPA™ by Nuna®...
-
Page 44: Informaciones
Al contactarnos, por favor tenga a mano sus números de serie y de modelo del producto, de manera que le podamos ayudar de una manera eficaz. Estos números se encuentran en la etiqueta adhesiva en la parte inferior del sistema de retención de su niño. EE.UU: 1-855-NUNA-USA or nuna.eu/USA Stokke® PIPA™ by Nuna®... -
Page 45: Advertencia
• La parte superior sobre la cabeza del niño es de por lo menos 1’’ bajo la parte superior del cargador. • Use la inserción para bebés solamente si es necesaria para obtener un mejor ajuste. Stokke® PIPA™ by Nuna®... - Page 46 Verifique siempre la hebilla y otras piezas si hay superficies calientes. Un cargador expuesto al sol sin cubierta podría ocasionar quemaduras al niño. Cubra con una manta si lo deja en el coche. Stokke® PIPA™ by Nuna®...
- Page 47 No use el sistema de retención del niño con niños de más de 7 años. Verifique la etiqueta del fabricante o el sello de fecha “no utilizar después de” que se encuentran en la parte inferior del cargador y la base. Stokke® PIPA™ by Nuna®...
- Page 48 No use el cargador si esta averiado o roto. Utilice sólo con carreolas Stokke® Este asiento del niño se puede instalar de manera adecuada en la mayoría de los vehículos. De todas maneras, hay algunos cinturo- nes de seguridad del vehículo y asientos de vehículo que no son...
- Page 49 Los cinturones de seguridad de 2 puntos en la parte inferior del asiento (justo en la intersección del cojín del asiento y el respaldo) no pueden usarse para instalar este asiento de seguridad para niño. Stokke® PIPA™ by Nuna®...
- Page 50 Instale este sistema de retención del niño solamente en asientos de vehículos orientados hacia adelante. Nunca instale en un asiento orientado hacia la parte trasera o hacia un lado del vehículo. Stokke® PIPA™ by Nuna®...
- Page 51 Ante cualquier duda, puede consultar tanto al fabricante como a su distribuidor. • La silla de coche Nuna® de Stokke® PIPA™ también es compatible con la base Nuna PIPA para aquellos que buscan la conveniencia de una base para cada vehículo. Para más información visita www.nuna.eu.
-
Page 52: Parts List
Botones de desbloqueo (blanco) Inserción para bebés Hombreras Broche de pecho Cubierta del asiento Hebilla y cinturón de seguridad de Mango entrepierna Guía para el cinturón para hombro Botón ajustador (Blanco) Correa ajustadora Cubierta del arnés (red) Stokke® PIPA™ by Nuna®... - Page 53 Almacenamiento del manual de Cerradura (Azul) instrucciones LATCH rígido (sistemas de anclaje Almacenamiento de la pierna de inferiores) estabilidad Guías del LATCH rígido Ajuste de la reclinación Pierna de estabilidad Broche de cierre Indicador de la pierna de estabilidad Stokke® PIPA™ by Nuna®...
-
Page 54: Descripción De Las Funciones
Retiro del cojín de asiento 1. Retire las piezas de sujeción bajo de la borde del asiento. 2. Retire los arneses desde la placa de separación. Stokke® PIPA™ by Nuna®... - Page 55 * Utilizado solo con adaptadores para sillas de coche para niños. Los adaptadores de las sillas de coche para niños se venden de manera separada. Las hombreras • Las hombreras se pueden retirar y no son necesarios para la seguridad. Stokke® PIPA™ by Nuna®...
-
Page 56: Necesidades Del Niño
• Peso: 4 hasta 32 libras (2 hasta 14,5 kg). • Altura: menos de 32 pulgadas (81 cm). • La parte superior sobre la cabeza del niño es de por lo menos 1’’ bajo la parte superior del cargador. Stokke® PIPA™ by Nuna®... -
Page 57: Cambiar La Posicióndel Arnés
2. Cuando se retira el niño, afloje el arnés. Vol- tee el cargador y retire la presilla del arnés desde la placa de separación de metal. Continúa en la siguiente página Stokke® PIPA™ by Nuna®... - Page 58 PELIGRO DE ESTRANGULACIÓN: El niño puede estrangularse con las correas sueltas del arnés. Utilice siempre esta cubierta de arnés. Evite sujetar mal a la base: Asegúrese que siempre esté la cubierta del arnés sujeta al asiento del bebé Stokke® PIPA™ by Nuna®...
- Page 59 4. Repita el proceso por la segunda correa del arnés para hombro. Cinturones de seguridad de entrepierna • Identifica a la ranura del cinturón de seguridad de entrepierna que permitirá una sujeción cómoda. Cambie la ranura del cinturón de seguridad de entrepierna si es necesario. Stokke® PIPA™ by Nuna®...
- Page 60 El cinturón de seguridad de entrepierna se pasa por la ranura trasera como se presenta. 3. Los bebés mas grandes usan esta posición. El cinturón de seguridad de entrepierna se para por la ranura delantera tal como se presenta. Stokke® PIPA™ by Nuna®...
-
Page 61: La Seguridad Del Niño En Un Cargador
Separe las brochas de pecho y las correas del arnés. 3. Ponga el niño en el cargador en la posición de sentado, descansando el niño en contra de la parte trasera y la parte inferior del asiento. Stokke® PIPA™ by Nuna®... - Page 62 Las correas del arnés no están retorcidas. c) El arnés es ajustado – Un arnés ajustado no se puede apretar, y no debería permitir ninguna distensión. d) Los broches de pechero están al nivel con las axilas. Stokke® PIPA™ by Nuna®...
- Page 63 Si el niño no usa en cinturón de seguridad de manera adecuada, el niño puede ser expulsado al frenar repentinamente o al chocar, causando heridas graves o el fallecimiento Stokke® PIPA™ by Nuna®...
-
Page 64: Instrucciones Sobre La Instalación
• Posicione la base en un asiento de vehículo orientado hacia adelante. Use el dispositivo de ajuste de la reclinación para posicionar la burbuja en el indicador. Ajuste la base de tal manera que la burbuja toque la línea. Stokke® PIPA™ by Nuna®... - Page 65 (Página 72). • Si es necesario, instales los dispositivos de guía con conectores de plástico en las barras de anclaje inferiores LATCH del vehículo. Stokke® PIPA™ by Nuna®...
- Page 66 Y también vea si está indicado el color verde sobre los conectores. The Rigid LATCH (lower attachments) must be attached and locked onto the vehicle vehicle anchor points. click Stokke® PIPA™ by Nuna®...
- Page 67 • Después de poner de manera adecuada el cinturón de seguridad en el niño dentro del click cargador, presione el cargador en la base y espere hasta que se oiga un clic. Tire del cargador para comprobar la instalación. Stokke® PIPA™ by Nuna®...
- Page 68 • Para retirar la base, presione primero la base contra el asiento del vehículo sin demasiada fuerza presionando al mismo tiempo los botones rígidos de desbloqueo del seguro y tirando a continuación de la base hacia afuera. Stokke® PIPA™ by Nuna®...
- Page 69 • Posicione la base en un asiento del vehículo orientado hacia adelante. Use el dispositivo de ajuste de la reclinación para posicionar la burbuja en el indicador. Ajuste la base de tal manera que la burbuja toque la línea. Stokke® PIPA™ by Nuna®...
- Page 70 1. Direccione el cinturón del vehículo a través de la apertura en la base etiquetada con “Guía del cinturón” y abroche el cinturón del vehículo. Los ambos cinturones para hombro Y deregazo deben ser bajo la cerradura azul. 2. Ajuste el cinturón mientras presionando la base en el asiento del vehículo. click Stokke® PIPA™ by Nuna®...
- Page 71 • Después de poner el cinturón de seguridad de manera adecuada al niño en el cargador, presione el cargador en la base y espere que se oiga un clic. • Tire del cargador para comprobar la instalación adecuada.. check click click Stokke® PIPA™ by Nuna®...
- Page 72 No use la pierna de estabilidad para la reclinación de la base. La función de ajuste de la reclinación es concebida para la reclinación de a base. • Siempre almacene la pierna de estabilidad cuando no se usa. Stokke® PIPA™ by Nuna®...
- Page 73 Asegúrese que la pierna de estabilidad esta fija al presionando sobre la parte frontal de la base. El indicador de la pierna de estabilidad es de color verde cuando se encuentra en una posición vertical y toca de manera adecuada el piso del vehículo. Stokke® PIPA™ by Nuna®...
- Page 74 • Estacione el vehículo en un aparcamiento y en un suelo nivelado. • Posicione el cargador de tal manera que el niño sea orientado hacia atrás del vehículo. Instale solamente en un asiento de vehículo orientado hacia adelante. (Página 64) Stokke® PIPA™ by Nuna®...
- Page 75 Permita que el cinturón para hombro se quede en contra el respaldo del asiento del vehículo tal como se presenta. • Si su vehículo tiene solamente un cinturón de regazo, el cinturón para hombro no se usará. Stokke® PIPA™ by Nuna®...
- Page 76 • Hale el cinturón de seguridad del vehículo todo lo posible, comprobando que no sea aflojado o retorcido. • Este cinturón DEBE ser bloqueado para prevenir el movimiento del área del regazo del cinturón. Revise los siguientes puntos para el uso del Broche de bloqueo (Página 77). Stokke® PIPA™ by Nuna®...
- Page 77 Si el cinturón se afloja o se alarga, repita el procedimiento. El broche de bloqueo debe ser a distancia de 1/2 pulgadas (12,5 mm) de la hebilla. 1/2 in. (12.5 mm) Stokke® PIPA™ by Nuna®...
- Page 78 Este sistema de retención del niño es certificado para el uso en los aviones comerciales. Ase- gúrese de contactar su línea aérea antes de viajar para hablar sobre su política con respeto al sistema de retención del niño. Stokke® PIPA™ by Nuna®...
- Page 79 Instalación en carritos de paseo • Alinee el enganche de la silla Stokke® PIPA™ by Nuna® con el del carrito de paseo y desplácelo en línea recta y hacia abajo hasta que haga “clic” dos veces. Los puntos verdes a ambos lados indican que el asiento ha sido correctamente colocado.
- Page 80 • La silla de auto debe estar siempre orientada hacia los padres. Extracción del carrito de paseo • Coloque el asa de transporte en la posición de transporte. • Pulse el botón de desbloqueo del carrito de paseo a ambos lados mientras levanta el asiento verticalmente.. Stokke® PIPA™ by Nuna®...
-
Page 81: Limpieza Y Mantenimiento
Para limpiar la hebilla: enjuague con agua tibia. NO use ningún tipo de jabón, solventes o lubrificantes. Al usar cualquier otra cosa que el agua puede causar el fallo de la hebilla. Secar al aire. Stokke® PIPA™ by Nuna®... -
Page 82: Garantía Y Servicios
Para registrar su producto, llene y mande por correo electrónico la tarjeta de registración prevista o vaya a nuestro sitio web a : http://nuna.eu/USA/product-registration-car-seat Stokke® PIPA™ by Nuna®... - Page 83 Stokke® PIPA™ by Nuna®...
- Page 84 STOKKE LLC 5 High Ridge Park, Suite #105 CT 06905 Stamford Customer Service Contact / Contacto para servicio al cliente: Nuna Baby Essentials Inc 70 Thousand Oaks Blvd. Morgantown, PA, 19543 Tel. 1-855-NUNA-USA (1-855-686-2872) stokke.com...
Need help?
Do you have a question about the PIPA and is the answer not in the manual?
Questions and answers