Table of Contents
Advertisement
Advertisement
Table of Contents

Related Manuals for Plantronics Savi W745-M


Summary of Contents for Plantronics Savi W745-M
- Page 1 Savi W745-M ® Multi Device Wireless Headset System User guide...
-
Page 2: Table Of Contents
Contents Welcome System requirements DECT Enhanced security DECT information What's in the box Base and headset basics Accessories (sold separately) Customise your headset Install the headset battery Use the fit kit to assemble your headset Right over-the-ear assembly Left over-the-ear assembly Position your headset Over-the-head assembly Behind-the-head assembly... - Page 3 Advanced use Install Plantronics Hub Start Hub Hub tabs Hub Settings Options Ring tones and Volumes Softphones and Media players Presence Wireless Advanced Additional device management tools Troubleshooting Headset Desk phone Mobile Softphone...
-
Page 4: Welcome
V10 or better must be on the user’s system (required) DECT Enhanced security Plantronics is a member of the DECT Forum and has fully adopted their recommendations for enhancements to security within all DECT products. Plantronics DECT-based products now fully incorporate the latest recommendations on Enhanced security from the DECT Forum and ETSI. -
Page 6: What's In The Box
What's in the box Headset and battery Base, deluxe charging cradle and spare battery Over-the-head headband Behind-the-head headband Headset fit kit with ear loops, ear tips and foam sleeve USB cable Telephone interface cable Power supply... -
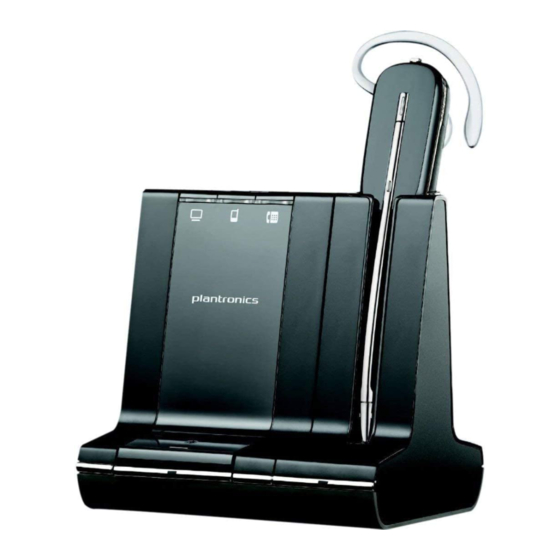
Page 7: Base And Headset Basics
Base and headset basics Base Power jack Computer button Handset Iifter jack Mobile phone button Telephone interface cable jack Desk phone button USB port Bluetooth pairing button/LED Desk phone speaking volume Subscription button/LED Desk phone configuration switch Charging LED Desk phone listening volume Headset Ear loop Battery... -
Page 8: Accessories (Sold Separately)
Accessories (sold separately) Deluxe USB charging cable Charges an extra battery while charging your headset via a USB port. Electronic hookswitch cable (EHS cable) Electronically and automatically takes your desk phone handset off the hook. Enables remote call control with your headset. ™... -
Page 9: Customise Your Headset
Position the battery as shown on the headset and slide into position until the battery snaps into battery place. NOTE This product has a replaceable battery. Only use the battery type supplied by Plantronics. Use the fit kit to Choose a headset wearing style and use the fit kit to assemble it over-the-ear, over-the-head or behind-the-head. -
Page 10: Position Your Headset
Choose the size and style of ear tip that fits most comfortably. Align the ear tip with the notch facing the microphone as shown. Press on to attach. NOTE Ensure the large end of the ear tip points to the microphone. To correctly position your headset, see Position your headset. -
Page 11: Over-The-Head Assembly
Over-the-head assembly Hold the headband so it is aligned to receive the headset as shown and insert the headset into the headband. Rotate the headset up. The headband can be worn on the right or left side. To optimise the position of the headset, push the headset in so the microphone is close to your mouth. - Page 12 NOTE Ensure the large end of the ear tip points to the microphone. To position your headset correctly, first slide the stem of the headband so the headset fits comfortably. With a finger on the headset indicator light, push in until the microphone rests as close to your cheek as possible without touching.
-
Page 13: Charge Your Headset And Spare Battery
Spare battery charging LED NOTE This product has a replaceable battery. Only use the battery type supplied by Plantronics. Charge Spare Battery The spare battery ships in the compartment on the side of the charge cradle. When the base is powered the battery charges. -
Page 14: Desk Phone: Connect And Call
Desk phone + HL10 lifter (sold separately) See the user guide at plantronics.com/accessories for details. Desk phone + EHS cable (sold separately) See the user guide at plantronics.com/accessories... -
Page 15: Make A Desk Phone Call
Make a desk phone call While wearing headset, short press base desk phone button. NOTE If you don't have remote call control through a lifter (HL10) or cable (EHS), manually remove desk phone handset before each call. If you do not hear a dial tone, open the side panel and adjust the middle configuration switch until you do. -
Page 16: Mobile: Connect And Call
Mobile: connect and call Your mobile phone can be paired to multiple headsets and hands-free devices, but it can only be connected to one device at a time. The following are instructions for pairing your mobile phone to the base. Press down and hold Bluetooth pairing button (4 seconds) on Savi base until indicator LED flashes red and blue. -
Page 17: Computer: Connect And Call
Computer: connect and call Connect your computer Connect the USB cable. Place a softphone call While wearing your headset, short press the base computer button. Dial a call from your computer softphone. End the call by pressing the headset call control button. Position your base The minimum recommended separation between your desk phone and the base is 6 inches. -
Page 18: Audio Streaming
Audio streaming Savi 700 series supports Bluetooth A2DP audio streaming and playback of media-based content for listening on all Savi 700 series headsets. To listen to streaming media, follow these steps: Assure your A2DP compatible mobile phone is paired to the Savi base per instructions above. Begin playing media from desired application on your mobile phone. -
Page 19: Headset Features
For your safety, do not use headset at high volumes for extended periods of time. Doing so can cause hearing loss. Always listen at moderate levels. For more information on headsets and hearing visit www.plantronics.com/health-safety/ Change volume orientation Savi 740/745 headsets ship by default in the right ear wearing configuration. If worn on the left ear, volume controls will be reversed. - Page 20 Battery storage time If you remove a fully charged battery from the headset, it will provide up to 75 days of battery storage time, stored under normal conditions. Talk time With a single full charge, the headset will provide up to 7 hours of continual talk time. Talk time will be reduced when operating in wideband mode and/or if the headset is used consistently at a long distance from the base.
-
Page 21: Headset Battery Level
There are two ways to determine your headset battery status. View system tray icon With Plantronics software installed, a headset icon will appear in your system tray, displaying battery status. A warning will be issued if your headset’s battery is critically low. -
Page 22: Turn On/Off Headset Led
(see below). Mobile phone volume can be adjusted on the mobile phone. NOTE You can quickly access your system’s control panel by using the link in the Plantronics Control Panel on the Preferences Tab. For Windows Vista and Windows 7 systems Adjust your overall volume by going to: Start Menu >... -
Page 23: Base Features
With the system idle, you can change your default outbound line by pressing the desired outbound base button until it flashes green four times. You can also change the default outbound line using the Plantronics Hub by going to Start > Programs > Plantronics > Plantronics Hub> Settings > General > Default Phone Line. - Page 24 PC phone button LED flashes. It will flash red for 4 seconds when over- the-air subscription has been disabled or green for 4 seconds when enabled. You can also enable/disable over-the-air subscription with the Plantronics Hub. Go to Start > Programs > Plantronics > Plantronics Hub > Settings > Wireless > Over-the-Air-Subscription.
-
Page 25: Bluetooth Pairing Button
Medium up to 150 ft. up to 50 ft. You can also set the range using the Plantronics Hub. Go to Start > Programs > Plantronics > Plantronics Hub> Settings > Wireless > Range. Bluetooth pairing button Auto connect feature Once you have paired and connected your mobile phone to the base, the base will automatically connect to it when you are in range of your base. -
Page 26: Daily Use
When the call is complete you many need to restart your media player application. If Plantronics Software is installed and running you may experience enhanced behaviour: When listening to music or audio on a supported media player and a call is received, the system can pause the music when you answer your call and resume the music when your call is over. - Page 27 End the call by pressing the headset call control button. Hands-free dialling To enable hands-free dialling, install the Plantronics software. Once installed, go to Start > Programs > Plantronics > Plantronics Hub > Settings > Wireless > Initiate Mobile voice commands.
-
Page 28: Multi-Phone Status
A single tone in the master headset will be heard as each guest leaves the call. View guest headsets As you add headsets to the base, an additional headset icon will appear in the Plantronics hub screen with a number from 1 to 3 indicating the number of additional headset subscribed to the... -
Page 29: Conferencing Additional Headsets And Security Levels
base. The first headset is the primary user’s headset and the number inside the next headset is the number of guest headsets subscribed to the base. The following example shows one primary headset with two guest headsets conferenced in. Conferencing additional Your Savi 700 Series headset system (v28 or later) supports DECT Forum recommendations headsets and Security for Enhanced security. -
Page 30: Advanced Use
To start Hub, click Start > Programs > Plantronics > Hub Hub tabs When you first start Plantronics Hub the About Tab will be displayed. If you have at least one Plantronics device connected to your computer using a USB connector you will see an image of your device along with some information about that device. -
Page 31: Hub Settings Options
Adjust the level of detail captured in log files. Metrics collection to help improve hub When selected, this will allow Plantronics to collect data on feature usage patterns. This information will only be used by Plantronics to improve the quality of our future software and hardware products. - Page 32 Communicator/Lync will sit idle. Audio sensing Audio Sensing is a special feature supported by Plantronics wireless devices that can detect an audio signal at the USB port and automatically establish the radio link between the base and the wireless headset without the user having to press the call control button. When the Configure lync dial tone parameter is set to On, every time the user presses the call control button, the Lync dial tone will be heard (assuming the user wants to make a softphone call).
-
Page 33: Ring Tones And Volumes
Ring tones and Volumes Feature Settings Default Desk phone ringtone Tone 1/Tone 2/Tone 3 Tone 1 Default/Low/Off Default volume Mobile phone ringtone Standard/Low/Off Tone 2 Tone 1/Tone 2/Tone 3 Default volume Default/Low/Off PC ringtone Tone 1/Tone 2/Tone 3 Tone 3 Default/Low/Off Default volume System tone... -
Page 34: Presence
Update your Microsoft Office Communicator / Lync and Skype presence status when you are on a phone call with your mobile phone, deskphone, or Plantronics supported softphone. Plantronics plugin for Lync must also be installed for this feature to work. -
Page 35: Advanced
Over the air subscription This feature allows a headset to be subscribed to the base without physically docking the headset. It is required when conferencing multiple models of Plantronics headsets. For more on subscription, see Base subscription buttons. For more on headset guest... -
Page 36: Additional Device Management Tools
Additional device Plantronics Manager Pro management tools Additional device management tools are available for IT Managers via Plantronics Manager Pro, which includes the following features: • Enable or disable device settings according to company policy or for regulatory compliance • Lock down settings so they cannot be changed by the user •... -
Page 37: Troubleshooting
See Position your headset. Talk time performance is Battery is wearing out. Contact us at plantronics.com/support significantly degraded even after a full recharge. I can’t hear a dial tone in the Make sure your headset is charged. -
Page 38: Desk Phone
For a list of compatible softphones, visit plantronics.com/ software. If the Plantronics software is not installed and you do not have a compatible softphone, you must first press the base computer call button and then use the softphone interface to place/ answer/end calls. - Page 39 I can no longer hear any audio For Windows XP systems through my PC Speakers. • Refer to the “Audio” tab of the “Sounds and Audio Devices” option in your PC Control Panel. • Under “Sound Playback”, change the default setting from Savi Office to your PC speakers.
-
Page 40: Need More Help
© 2015 Plantronics, Inc. Plantronics, HL10 and Savi are trademarks or registered trademarks of Plantronics, Inc. Internet Explorer, Lync, Windows, Windows XP and Windows Vista are registered trademarks of Microsoft Corporation in the US and other countries. Pentium is a trademark of Intel Corporation in the U.S.
Need help?
Do you have a question about the Savi W745-M and is the answer not in the manual?
Questions and answers