
Related Manuals for Gembird DCAM?GPS?01


Summary of Contents for Gembird DCAM?GPS?01
- Page 1 USER MANUAL DCAM‐GPS‐01 PLEASE READ THIS INSTRUCTION MANUAL CAREFULLY BEFORE USING THIS PRODUCT.
-
Page 2: Safety Instructions
IN TRODUCTION Thank you for choosing our dashboard camera with GPS tracker. This manual contains important safety and operation information. Please read the manual carefully before the first use and keep it for future reference. SAFETY IN STRUCTIONS Do not expose the camera to water or other liquids. Keep the camera clean. Do not store in hot, dirty, humid or wet environment. Press the buttons softly (do not press the screen). Do not disassemble this camera. To prevent the risk of electric shock, do not remove the cover. No user‐serviceable parts inside. Refer to qualified personnel ... - Page 3 the camera is not used for a long period of time. Do not drop the camera and prevent hard impact. This may result in damage to the product. Disconnect the camera from any power source before cleaning. Only use a dry soft cloth to clean the camera. W HA T IS IN BOX DCAM‐GPS‐01 1 piece User Manual 1 piece Suction mount with GPS unit 1 piece USB Cable 1 piece Car Charger 1 piece ...
-
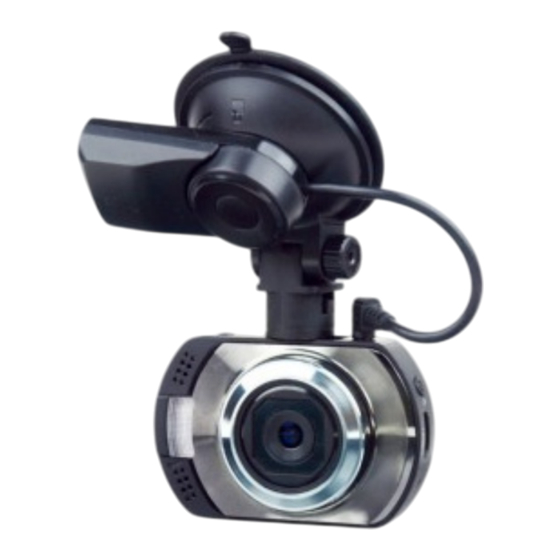
Page 4: Device Overview
1. GETTING TO KNOW YOUR DCA M‐GPS‐01 DEVI CE OVERVIEW ... - Page 5 1‐ Loudspeaker 13‐ LCD display 2‐ LED Light 14‐ USB Port 3‐ Microphone 15‐ Memory Card Slot 4‐ Lens 16‐ Bracket Socket 17‐ Power/LED Light Button 5‐ Photograph 18‐ HDMI Port 6‐ Record/Play/OK Button 19‐ Reset 7‐ Mic. on/off/SOS Button 8‐ Up Button ( ) 9‐ Menu/Back Button 10‐ Down Button ( ) 11‐ Work Status Light (Blue) 12‐ Power Indicator (RED) ...
-
Page 6: Battery Operation
2. USIN G THE DCAM‐GPS‐01 BATTERY OPERATI ON To recharge the internal battery, connect the camera to a computer via the included USB cable, or use a 5V/1A USB power adapter to recharge the unit. The battery will be fully recharged after 3‐4 hours. NOTE: Once fully charged, the recharging icon on screen will disappear. INSERTING A MEMORY CARD This car dashboard camera does not have internal memory. A Micro SD memory card must be inserted in the camera for further operation. If no memory card is inserted, the camera cannot record any video. To insert a memory card, follow the next steps: ... -
Page 7: Indicator Lights
1: Turn off the camera. 2: Insert the Micro SD card into the card slot. 3: Turn the camera on. If the memory card is installed correctly, you can start recording video. INDI CATOR LI GHTS The camera has two indicator lights. 1: When recharging, or when connected to a PC, the red indicator will be on. 2: When recording or photo, the blue light will be blinking. CA MERA OPERATION START ‐ UP/SHUTDOWN Press the Power button to turn the camera on, the screen will light up and the camera is on. Press the Power key again for about two seconds to shut down ... -
Page 8: Mode Selection
the camera. Note: The camera will shut down automatically when the battery is low. MODE SELECTION There are three different working modes available for this camera, Photo, video and playback. Display Title Description Photo mode Take still pictures Video mode Record videos Playback mode Recorded videos playback SETTI NGS Before taking photos or recording videos, press the power button to switch on the DCAM‐GPS‐01 first. Press the Menu button to enter Settings. Press up/down button to select the option and press OK button to confirm your setting. ... - Page 9 MENU FUNCTION Date/Time This function can be used to add a date to your pictures and video as you take them 【Set the date】 Auto power If the camera is not used for specific time, it off will automatically turn off. If "off " is selected, the camera will always stay on. 【1min】/【 3min 】/【off 】 Beep sound Turn On/Off beep button sounds: 【On 】/【off 】 Language Set the on‐screen language: English Frequency Set corresponding frequency according to your region:【50HZ】/ 【60HZ】 ...
- Page 10 Playback video to a TV set via HDMI cable TV mode (Not included). Choose TV format according to your region【NTSC】/【PAL】 Select to turn LCD on or off LCD off Format Format your SD card including protected files. NOTE: removing the SD card during formatting may damage the card. 【OK】/ 【Cancel】 Factory reset to default settings:【OK 】/ Default 【Cancel】 Setting Version Firmware version number ...
-
Page 11: Video Mode
VIDEO MODE For automatic start, connect the camera to the car charger. 5 seconds after the car engine is started, the camera will automatically start recording video. When the car engine is shut down, the camera will save the last file and automatically turns off after 15 seconds. To start recording manually, you can just press the Record button. Press the same button again to stop recording. Zoom in/out by pressing UP/Down buttons The recording time length will be shown on the screen Please use Class 10 or above memory card for recording HD videos When loop recording is disabled, the camera will automatically stop recording when the memory card is full. (When loop recording is enabled, the camera will always keep recording, but starts overwriting the oldest video files when the card is full.) ... - Page 12 MUTE & SOS FUNCTION During recording, press button, device will mute the microphone, press again to turn the microphone back on. Press button for 2 seconds to lock the current video segment from being overwritten by loop recordings. (The lock icon can be removed in playback mode.) ...
-
Page 13: Setti Ngs I N Video Mode
SETTI NGS I N VIDEO MODE While in video mode, press the Menu button to change your settings. MENU FUNCTION Choose the video resolution from 1080FHD 1920*1080 /1080P 1440*1080 /720P Resolution 1280*720(30fps). Loop When loop recording is enabled, the camera recording will always keep recording, but starts overwriting the oldest video files when the card is full. You can set the length of each video segment: Off / 1 min. / 2 mins / 3 mins / 5 mins /10 mins Exposure Select the exposure value from (EV) +2.0,+5/3,+4/3,+1.0,+2/3, +1/3, 0.0, ‐1/3,‐2/3, 1.0,‐4/3,‐5/3,‐2.0 ... - Page 14 When motion detection is on, the camera Motion will automatically start recording if any Detection movement is detected.【On 】/【Off 】 Record Enable/disable audio recording 【On 】/【Off 】 Audio Date Enable/disable time stamp on recorded videos/pictures: 【On 】/【Off 】 Stamp G‐Sensor Set the sensitivity of the vibration sensor so that it only gets triggered by actual impacts and collisions and not when you are just driving over unlevel roads. For example, on graveled roads it is better to select LOW. ...
-
Page 15: What's On Screen I N Video Mode
WHAT’S ON SCREEN I N VIDEO MODE When recording, following icons will be displayed on the camera screen. 1. Video recording 7. Memory card loaded 2. Loop Recording 8. Video resolution 3. Exposure 9. Time recorded 4. Date 10.Daytime/Nighttime 5. Time 11.MIC On/Off 6. Remaining battery capacity ... -
Page 16: Photo Mode
PHOTO MODE Turn on the camera and Press the button to enter photo mode. Take a picture by pressing the button. Press up and down buttons to zoom in or zoom out. A preview will be displayed on the screen for one second. SETTI NGS I N PHOTO MODE While in photo mode, enter setup menu to change your photo settings MENU FUNCTION Capture Select single/multi photo and time interval: 【Single】 / 【2s timer】 / 【5s timer 】 / 【10s Mode timer 】 Resolution Change the image resolution: ... - Page 17 【12M】 4000*3000【10M】 3648*2736 【8M】 3264*2448 【5M】 2592*1944 【3M】 2048*1536 【2M】 HD1920*1080 【1.3M】 1280*960 【VGA】 640*480 Sequence Automatically take 5 photos in a row. 【Off】/【On】 Quality Select a lower image quality to reduce the image size and save memory capacity. There are three options for choice:【Fine】/ 【Normal】/【 Economy】 Sharpness Adjust the Sharpness, three options available: Strong/Normal/Soft White Adjust the white balance settings depending balance on the surrounding environment light Settings: 【Auto】/【Daylight】/【Cloudy】 /【Tungsten】/【Fluorescent】 Color Set the color effect to add a color tone to the ...
-
Page 18: What On Screen In Photo Mode
video: 【Color】/【Black & white】/【Sepia】 ISO The ISO menu allows you to set the level of sensitivity that your camera has to light in the surrounding environment. 【Auto】/【100】/【200】/【400】 Exposure Set the exposure value: +2.0,+5/3,+4/3,+1.0,+2/3, +1/3, 0.0, ‐1/3,‐2/3, 1.0,‐4/3,‐5/3,‐2.0 Date Stamp date on videos or images recorded by the unit. There are three options: 【Off】/ Stamp 【Date】/【Date&Time】 WHAT ON SCREEN IN PHOTO MODE When in Photo mode, following will be shown on screen. ... - Page 19 Photo mode Memory card Exposure Image quality White balance Resolution ISO Remaining storage space Remaining capacity of battery Daytime/night time ...
-
Page 20: Playback Mode
PLAYBACK MODE 1: Turn on the DCAM‐GPS‐01, press and hold the icon and go into menu to set the camera in playback mode. 2: When the camera enters playback mode, the last recorded file will be displayed. Press the up/down button to browse the stored files. 3: Press the OK button to play the files. Meanwhile, press up/down to FORWARD / BACKWARD (1/2, 1/4, 1/8), press OK button to pause SETTI NGS I N PLAYBACK MODE ... -
Page 21: Connection With Tv
【Lock Current】 / 【 Unlock Current】 / 【 Lock All】/【Unlock All】 Display time per image during an Slide Show automatic slide show 【2seconds】/【5sesonds】/【8seconds】 Thumbnail When playback is stopped, an overview of all saved files with miniature images is displayed 【Off】 【On】 Turn up/down to increase or decrease Volume volume CONN ECTION W ITH TV To ... -
Page 22: Down Loading Files To Your Pc
DOWN LOADING FILES TO YOUR PC Connect the device to computer with the USB cable. Select Mass storage on screen after connection and press OK button for confirmation. You can find the camera in “My Computer” All files are stored in the DCIM folder, videos are stored in AVI format, and the pictures are stored in JPG format. You can now download the files to your PC. If you select PC camera on screen after initial USB connection and press OK button for confirmation, the dashcam can also be used as a PC webcam. ... -
Page 23: Troubleshooting
TROUBLESHOOTING Problem Solution Cannot download Check USB connection / cable images to the PC Choose Mass Storage on screen No action after 1. Wait untill the camera saved pressing Shutter the last image/video button 2. Memory capacity runs out. Delete some pictures or videos from the SD card. Camera has no Press the reset button with thin response needle and restart the unit. ... - Page 24 “Card error” Format your micro SD card, and message appear try again. Check SD card in PC for when Micro SD problems. card is loaded Class 6 or above memory card is required for use in this camera. NOTE: As continual improvements are made to the design and specifications of this product, slight differences may occur in the actual product. ...
-
Page 25: Declaration Of Conformity
This product is tested and complies with the essential requirements of the laws of member states concerning EMC(2004/108/EC). The CE declaration can be found under www.gembird.eu Dieses Produkt wurde getestet und stimmt mit den grundlegenden Anforderungen der Richtlinie EMC(2004/108/EC) überein. Die Konformitätserklärung kann auf unserer Webseite www.gembird.de...
Need help?
Do you have a question about the DCAM?GPS?01 and is the answer not in the manual?
Questions and answers