Table of Contents
Advertisement
Available languages
Available languages
Quick Links
Advertisement
Chapters
Table of Contents

Related Manuals for MAXDATA M-BOOK 4500 U G1


Summary of Contents for MAXDATA M-BOOK 4500 U G1
- Page 1 USER'S MANUAL E N G L I S H September 2013...
-
Page 2: Table Of Contents
CONTENTS BEFORE YOU START ................... 5 Make sure you have everything ..................5 Familiarize yourself with the computer ................ 6 OPENING THE DISPLAY PANEL ................6 FRONT OVERVIEW ....................7 LEFT SIDE OVERVIEW ..................... 9 RIGHT SIDE OVERVIEW ..................11 BACK OVERVIEW .................... -
Page 3: Taking Care Of Your Notebook Pc
TAKING CARE OF YOUR NOTEBOOK PC To prevent possible overheating of the computer's DO NOT press or touch the display panel. processor, make sure you don't block the openings provided for ventilation. DO NOT place on uneven or unstable work DO NOT use your notebook computer under surfaces. - Page 4 Avoid sudden changes in temperature or humidity DO NOT expose the computer to rain or by keeping it away fromA/C and heating vents. moisture. DO NOT place near fire or other sources of heat. DO NOT tamper with the batteries. Keep them away from children.
-
Page 5: Before You Start
BEFORE YOU START Make sure you have everything When you receive your notebook PC, unpack it carefully, and check to make sure you have all the items listed below. For a pre-configured model you should have the following: • Notebook Computer •... -
Page 6: Familiarize Yourself With The Computer
BEFORE YOU START Familiarize yourself with the computer OPENING THE DISPLAY PANEL To open the display panel, simply lift the lid up. When closing it, be sure not to slam it shut. -
Page 7: Front Overview
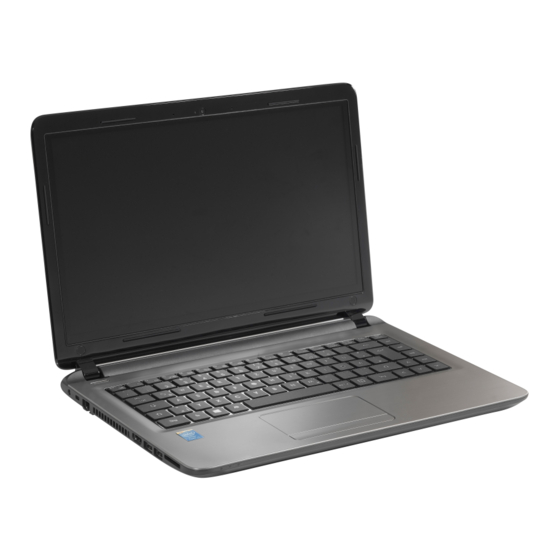
BEFORE YOU START FRONT OVERVIEW The following is an overview of the front of the notebook. Camera Microphone Display Panel Suspend/ Power On Button Keyboard TouchPad Pointing Device Status Indicator Lights Camera The built-in HD/VGA camera allows you to snap a photo or create a video chat or video conference with just a click. -
Page 8: Touchpad Pointing Device
BEFORE YOU START Keyboard A full-size keyboard with the numeric keys and the dedicated Windows keys. ® TouchPad Pointing Device The TouchPad pointing device is a mouse-like cursor control with a single rocker bar and a touch sensitive movement pad. Status Indicator Lights The Status indicator lights correspond to specific operating modes. -
Page 9: Left Side Overview
BEFORE YOU START LEFT SIDE OVERVIEW The following is a brief description of the left side of the notebook. Power Adapter Port USB Ports LAN (RJ-45) Port HDMI Port Memory Card Reader Kensington Lock Slot Power Adapter Port The power adapter port allows you to plug in the AC adapter to power your notebook and charge the internal Lithium-Ion battery. -
Page 10: Kensington Lock Slot
BEFORE YOU START Kensington Lock Slot The Kensington lock slot allows you to secure your notebook to an immovable object with an optional security cable. -
Page 11: Right Side Overview
BEFORE YOU START RIGHT SIDE OVERVIEW The following is a brief description of the right side of the notebook. Audio Combo Jack (Headphone & Microphone) Optical Drive Eject Button* Optical Drive* USB Port Emergency Tray Release* Audio Combo Jack (Headphone & Microphone) The audio combo jack allows you to connect headphones, external speakers, amplifiers or an external mono microphone. -
Page 12: Back Overview
BEFORE YOU START BACK OVERVIEW The following is an overview of the back of the notebook. -
Page 13: Bottom Overview
BEFORE YOU START BOTTOM OVERVIEW The following is an overview of the bottom of the notebook. Battery Lock Lithium-Ion Battery Compartment Battery Release Latch Rating Label Fan Outlets Compartment Covers Battery Lock The battery lock holds the battery in place. It can be unlocked to remove the battery. Lithium-Ion Battery Compartment The battery compartment contains the internal Lithium-Ion battery. -
Page 14: Getting Started
GETTING STARTED Power Sources Your computer has two types of power source: a Lithium-Ion battery or an AC adapter. CONNECTING THE POWER ADAPTERS The AC adapter provides power for operating your notebook PC and charging the battery. Connecting the AC Adapter 1. -
Page 15: Recharging The Battery
GETTING STARTED RECHARGING THE BATTERY The Lithium-Ion battery is recharged internally using the AC adapter. To recharge the battery, make sure the battery is installed and the computer is connected to the AC. There is no "memory effect" in Lithium-Ion batteries; therefore you do not need to discharge the battery completely before recharging. -
Page 16: Starting Your Notebook
GETTING STARTED Starting Your Notebook POWER ON Suspend/Power On Button The suspend/power on switch is used to turn on your notebook from its off state. Once you have connected your AC adapter or charged the internal Lithium-Ion battery, you can power on your notebook by pressing the suspend/power on button located above the keyboard. -
Page 17: Status Indicators
GETTING STARTED STATUS INDICATORS The status indicator lights correspond to specific operating modes. These modes are: Power on/Suspend status, Battery/AC Adapter status, and hard disk drive (HDD) activity. Power On/Suspend Status Indicator Power On/ Suspend Status Indicator Battery/AC Adapter Hard Disk Drive (HDD) Activity Indicator Status Indicator Power On Indicator This light on the power button and on the front of the system illuminates when the computer is... - Page 18 GETTING STARTED Battery/AC Adapter Status Indicator The Battery/AC Adapter status indicator tells you whether your notebook is operating from the AC Adapter or the Lithium-Ion battery, and whether the Lithium-Ion battery is charging or not. • The light illuminates when the computer is operating from the AC Adapter. •...
-
Page 19: Using Function Keys
GETTING STARTED USING FUNCTION KEYS Your computer has 12 function keys, F1 through F12. The functions assigned to these keys differ for each application. You should refer to your software documentation to find out how these keys are used. The [FN] key provides extended functions for the notebook and is always used in conjunction with another key. -
Page 20: Using The Touchpad
GETTING STARTED USING THE TOUCHPAD A TouchPad pointing device comes built into your computer. It is used to control the movement of the pointer to select items on your display panel. The TouchPad consists of a cursor control, a single rocker bar, and a scroll bar. The cursor control works the same way a mouse does, and moves the cursor around the display. -
Page 21: Memory Module Upgrade
GETTING STARTED MEMORY MODULE UPGRADE To increase your notebook's memory capacity (up to 8 GB maximum), additional memory modules may be installed. The memory upgrade must be a dual-in-line (DIMM) SDRAM module. Installing a Memory Module The following steps describe how to install a memory upgrade module. We do not recommend that you do this yourself. -
Page 22: Troubleshooting
TROUBLESHOOTING Your notebook PC is sturdy and subject to few problems in the field. However, you may encounter simple setup or operating problems that you can solve on the spot, or problems with peripheral devices, that you can solve by replacing the device. The information in this section helps you isolate and resolve some of these straightforward problems and identify failures that require service. - Page 23 MEMO Federal Communications Commission (FCC) Statement This device complies with Part 15 of the FCC Rules. Operation is subject to the following two conditions: (1) This device may not cause harmful interference. (2) This device must accept any interference received, including interference that maycause undesired operation.
- Page 24 MEMO...
- Page 25 2013...
- Page 26 ..............................................................................................................................................................................................................................................................................................................................................................................................................................................................................................
- Page 29 • • • • • • Dual DVD+/-RW • Super Multi DVD RW • Blu-ray/DVD RW...
- Page 31 HD/VGA...
- Page 32 Windows TouchPad (HDD)
- Page 33 LAN (RJ-45) HDMI Kensington LAN (RJ-45) 10/100/1000 Base-T RJ-45 HDMI HDMI USB v3.0 4.8 Gb/s USB 3.0 USB 2.0...
- Page 34 Kensington Kensington...
- Page 35 USB 2.0 480 Mb/s...
- Page 40 (POST) BIOS (POST) (POST)
- Page 41 (HDD) (HDD)
- Page 42 (HDD) (HDD)
- Page 43 F1~F12 [FN] [FN+F1] [FN+F2] [FN+F3] [FN+F4] [FN+F5] [FN+F6] [FN+F7] [FN+F8] [FN+F9] [FN+F10] [FN+F11] [FN+F12] [FN+Esc]...
- Page 45 8GB) (DIMM) SDRAM (ESD)
- Page 47 MEMO (FCC) (FCC) (RF) (RF)
- Page 48 MEMO...
- Page 49 MANUEL DE L’UTILISATEUR F R A N Ç A I S Septembre 2013...
- Page 50 TABLE DES MATIÈRES AVANT DE COMMENCER ..................5 Vérifiez que vous avez tout .................... 5 Familiarisez-vous avec l’ordinateur ................6 OUVRIR LE PANNEAU D’AFFICHAGE ..............6 PRÉSENTATION DE LA FACE AVANT ................. 7 PRÉSENTATION DU CÔTÉ GAUCHE ................ 9 PRÉSENTATION DU CÔTÉ DROIT ................11 PRÉSENTATION DE LA FACE ARRIÈRE ..............
- Page 51 PRENDRE SOIN DE VOTRE NOTEBOOK Pour éviter toute surchauffe du processeur de NE PAS toucher ni appuyer sur le panneau l’ordinateur, faites attention à ne pas boucher les d'affichage. ouvertures prévues pour la ventilation. NE PAS le placer sur une surface de travail NE PAS utiliser votre notebook dans des condi- instable.
- Page 52 Eviter les changements soudains de température NE PAS exposer l'ordinateur à la pluie ou à ou d’humidité en le maintenant à l’écart d’orifices l'humidité. d’A/C et de chauffage. NE PAS placer près d'un feu ou autre source de NE PAS agir à la légère avec les batteries. Rangez- chaleur.
-
Page 53: Avant De Commencer
AVANT DE COMMENCER Vérifiez que vous avez tout Quand vous recevez votre notebook, déballez-le avec précaution, et vérifiez que vous avez tous les éléments mentionnés ci-dessous. Pour un modèle pré-configuré vous devez avoir ce qui suit: • Ordinateur Notebook • Batterie Lithium Ion •... -
Page 54: Familiarisez-Vous Avec L'ordinateur
AVANT DE COMMENCER Familiarisez-vous avec l’ordinateur OUVRIR LE PANNEAU D’AFFICHAGE Pour ouvrir le panneau d’affichage, soulevez simplement le couvercle. Quand vous le fermez, prenez soin de ne pas le claquer. -
Page 55: Présentation De La Face Avant
AVANT DE COMMENCER PRÉSENTATION DE LA FACE AVANT Voici une présentation de la face avant du notebook. Appareil Photo Microphone Panneau d’affichage Bouton Suspension/ Marche Clavier Périphérique de pointage TouchPad Lampes témoin d’état Appareil Photo L’appareil photo HD/VGA intégré vous permet de prendre une photo ou de créer un chat vidéo ou une conférence vidéo en un clic. - Page 56 AVANT DE COMMENCER Clavier Un clavier pleine taille avec les touches numériques et les touches dédiées de Windows ® Périphérique de pointage TouchPad Le dispositif de pointage TouchPad est un contrôle du curseur similaire à une souris avec une biellette unique et un pavé tactile. Lampes témoin d’état Les voyants d’état correspondent à...
-
Page 57: Port Hdmi
AVANT DE COMMENCER PRÉSENTATION DU CÔTÉ GAUCHE Voici une brève description du côté gauche du notebook. Port d’adaptateur d’alimentation Ports USB Lecteur de carte Port LAN (RJ-45) Port HDMI mémoire Logement de verrouillage Kensington Port d’adaptateur d’alimentation Le port d’adaptateur d’alimentation vous permet de brancher un adaptateur d’alimentation CA pour alimenter votre notebook et charger la batterie Lithium Ion interne. - Page 58 AVANT DE COMMENCER Logement de verrouillage Kensington Le connecteur du verrouillage Kensington vous permet d’attacher votre notebook à un objet inamovible à l’aide du câble de sécurité optionnel.
-
Page 59: Lecteur Optique
AVANT DE COMMENCER PRÉSENTATION DU CÔTÉ DROIT Voici une brève description du côté droit du notebook. Prise combo audio (casque et microphone) Bouton d’éjection du lecteur Lecteur optique* optique* Port USB Ouverture de secours du tiroir* Prise combo audio (casque et microphone) La prise combo audio vous permet de connecter des écouteurs, des haut-parleurs externes, des amplificateurs ou un microphone mono externe. -
Page 60: Présentation De La Face Arrière
AVANT DE COMMENCER PRÉSENTATION DE LA FACE ARRIÈRE Vous trouverez ci-dessous une présentation de la face arrière du notebook. -
Page 61: Vue De Dessous
AVANT DE COMMENCER VUE DE DESSOUS Voici une présentation de la partie inférieure du notebook. Verrou de batterie Compartiment de batterie Lithium-Ion Loquet de libération de Label de la batterie contrôle Sorties de ventilation du ventilateur Couvercles des compartiments Verrou de batterie Le verrou de batterie maintient la batterie en place. -
Page 62: Mise En Route
MISE EN ROUTE Sources d’alimentation Votre ordinateur possède deux sources d’alimentation : une batterie Lithium-Ion et un adaptateur CONNECTER L’ADAPTATEUR D’ALIMENTATION L’adaptateur CA fournit l’alimentation pour faire fonctionner votre notebook et recharger la batterie. Connexion de l’adaptateur CA 1. Branchez le câble de sortie CC dans la prise d’alimentation CC de votre notebook. 2. -
Page 63: Remplacement De La Batterie
MISE EN ROUTE RECHARGER LA BATTERI La batterie Lithium-Ion est rechargée de façon interne à l’aide de l’adaptateur CA. Pour recharger la batterie, vérifiez que la batterie est installée et que l’ordinateur est connecté à l’alimentation Les batteries Lithium-Ion n’ont pas d’“effet mémoire”; vous n’avez donc pas à décharger entièrement la batterie avant de la recharger. -
Page 64: Démarrer Votre Notebook
MISE EN ROUTE Démarrer votre Notebook MISE EN MARCHE Bouton Suspension/Marche Le commutateur de suspension/marche est utilisé pour allumer votre notebook quand il est éteint. Une fois que vous avez connecté votre adaptateur CA ou rechargé la batterie Lithium-Ion interne, vous pouvez allumer votre notebook en appuyant sur le bouton suspension/marche situé... -
Page 65: Témoins D'état
MISE EN ROUTE TÉMOINS D’ÉTAT Les lampes témoin d’état correspondent à des modes de traitement spécifiques. Ces modes sont les suivants : État de Marche/Veille, état batterie/adaptateur CA, et activité du disque dur (HDD). Ce voyant sur le bouton d’alimentation et à l’avant du système s’illumine lorsque l’ordinateur est mis sous tension.. - Page 66 MISE EN ROUTE Indicateur d’état Batterie/Adaptateur CA La lampe témoin de Batterie vous indique si la batterie Lithium Ion est en train de se charger ou si elle est déjà entièrement rechargée. • Le voyant s’illumine lorsque l’ordinateur fonctionne sur l’adaptateur secteur. •...
-
Page 67: Utilisation Des Touches De Fonction
MISE EN ROUTE UTILISATION DES TOUCHES DE FONCTION Votre ordinateur possède 12 touches de fonction, F1 à F12. Les fonctions attribuées à ces touches diffèrent pour chaque application. Vous devez vous reporter à la documentation de votre logiciel pour découvrir comment ces touches sont utilisées. La touche [FN] offre des fonctions étendues pour le notebook et est toujours utilisée conjointement avec une autre touche. -
Page 68: Utilisation Du Touchpad
MISE EN ROUTE UTILISATION DU TOUCHPAD Un dispositif de pointage TouchPad est intégré à votre ordinateur. Il est utilisé pour contrôler le mouvement du pointeur pour sélectionner les éléments sur votre panneau d’affichage. Le TouchPad est composé d’un contrôle du curseur, un bouton gauche et droit, et une barre de défilement. -
Page 69: Mise À Niveau Du Module Mémoire
MISE EN ROUTE MISE À NIVEAU DU MODULE MÉMOIRE Pour augmenter la capacité de la mémoire de votre notebook (jusqu’à 8 Go maximum), des modules mémoire supplémentaires peuvent être installés. L’extension de la mémoire doit être un module SDRAM dual-in-line (DIMM). Installer un module mémoire Les étapes suivantes décrivent comment installer un module de mise à... -
Page 70: Dépannage
DÉPANNAGE Votre notebook est robuste et présente rarement de problèmes dans ce domaine. Cependant, vous pouvez rencontrer de simples problèmes de configuration ou d’utilisation que vous pouvez résoudre sur place, ou des problèmes avec des périphériques, que vous pouvez résoudre en remplaçant le périphérique. - Page 71 MEMO Déclaration de Conformité de la Commission Fédérale des Communications (FCC) Ce matériel est conforme à l’Article 15 des Règlements FCC. L’utilisation de cet appareil est soumise aux deux conditions suivantes : (1) Cet appareil ne doit pas générer d’interférences nuisibles. (2) Cet appareil doit accepter toutes les interférences reçues, y compris celles pouvant provoquer un fonctionnement indésirable.
- Page 72 MEMO...
- Page 73 BENUTZERHANDBUCH D E U T S C H September 2013...
- Page 74 INHALT ZUM BEGINN ......................5 Überprüfen der Lieferung auf Vollständigkeit .............. 5 Lernen Sie das Notebook kennen ................. 6 ÖFFNEN DES BILDSCHIRMS ..................6 VORDERSEITE ......................7 LINKE SEITE ......................9 RECHTE SEITE ......................11 RÜCKSEITE ......................12 UNTERSEITE ......................13 ERSTE SCHRITTE ....................
- Page 75 PFLEGE DES NOTEBOOKS Achten Sie darauf, dass die Lüftungsöffnungen Drücken Sie NICHT auf den Bildschirm. nicht verdeckt werden, um eine Überhitzung des Prozessors zu vermeiden. Legen Sie das Notebook NICHT auf unebene oder Verwenden Sie das Notebook NICHT bei wacklige Unterlagen. extremen Umgebungsbedingungen.
- Page 76 Vermeiden Sie plötzliche Veränderungen von Setzen Sie das Notebook NICHT Regen und Temperatur und Luftfeuchtigkeit, und stellen Sie Feuchtigkeit aus. das Notebook nicht in die Nähe von Adaptern und Lüftungsöffnungen anderer Geräte. Stellen Sie das Notebook NICHT in der Nähe Versuchen Sie NICHT, den Akku zu manipulieren.
-
Page 77: Zum Beginn
ZUM BEGINN Überprüfen der Lieferung auf Vollständigkeit Wenn Sie das Notebook erhalten haben, packen Sie es vorsichtig aus, und überprüfen Sie, ob alle nachfolgend aufgeführten Teile enthalten sind. Bei einem vorkonfigurierten Modell sollten die folgenden Teile dabei sein: • Notebook •... -
Page 78: Lernen Sie Das Notebook Kennen
ZUM BEGINN Lernen Sie das Notebook kennen ÖFFNEN DES BILDSCHIRMS Um mit dem Gerät zu arbeiten, klappen Sie einfach den Deckel hoch. Achten Sie beim Schließen darauf, dass der Deckel nicht zugeknallt wird. -
Page 79: Vorderseite
ZUM BEGINN VORDERSEITE Hier sehen Sie eine Ansicht des Notebooks von vorne. Kamera Mikrofon Bildschirm Taste Suspend/ Wiederaufnahme Tastatur TouchPad- Zeigegerät Statusanzeigelampen Kamera Mit der integrierten HD/VGA-Kamera können Sie mit nur einem Klick fotografieren, ein Video- Chat oder eine Videokonferenz aufbauen. Mikrofon Alle eingehenden Sprach- und/oder sonstige Audiodaten können hier über ein entsprechendes Programm aufgenommen werden. - Page 80 ZUM BEGINN Tastatur Eine Volltastatur mit Zifferntasten und speziellen Windows -Tasten. ® TouchPad-Zeigegerät Das TouchPad-Zeigegerät ist eine Cursorsteuerung wie eine Maus mit einer Tippleiste sowie einem berührungsempfindlichen Bewegungspad. Statusanzeigelampen Die Statusanzeigelampen entsprechen den jeweiligen Betriebsmodi. Betriebsmodi: Suspend-/Power- On-Status, Akku-/Netzbetrieb und Festplattenaktivität (HDD). Taste Suspend/Wiederaufnahme Mit dieser Taste schalten Sie das Notebook ein, aus und in den Ruhezustand.
-
Page 81: Linke Seite
ZUM BEGINN LINKE SEITE Hier folgt eine kurze Beschreibung der linken Seite des Notebooks. Netzadapteranschluss USB-Anschlüsse LAN-Port (RJ-45) HDMI-Anschluss Speicherkartenleser Öffnung für Kensington-Schloss Netzadapteranschluss Hier wird der AC-Netzadapter für die Stromversorgung des Notebooks und das Aufladen des eingesetzten Lithium-Ionen-Akkus angeschlossen. LAN-Port (RJ-45) Der LAN-Port ist für einen RJ-45-Stecker für den Standard 10/100/1000 Base-T vorgesehen. - Page 82 ZUM BEGINN Öffnung für Kensington-Schloss Mit Hilfe des Stahlkabels des Kensington-Schlosses können Sie das Notebook an einem festen Gegenstand befestigen und sichern.
-
Page 83: Rechte Seite
ZUM BEGINN RECHTE SEITE Hier folgt eine kurze Beschreibung der rechten Seite des Notebooks. Kombinierter Audioanschluss (Kopfhörer und Mikrofon) Auswurftaste des optischen Optisches Laufwerk* Laufwerks* USB- Anschluss Notauswurföffnung* Kombinierter Audioanschluss (Kopfhörer und Mikrofon) An den kombinierten Audioanschluss können Kopfhörer, externe Lautsprecher, Verstärker oder ein externes Mono-Mikrofon angeschlossen werden. -
Page 84: Rückseite
ZUM BEGINN RÜCKSEITE Hier sehen Sie eine Ansicht des Notebooks von hinten. -
Page 85: Unterseite
ZUM BEGINN UNTERSEITE Hier sehen Sie eine Ansicht des Notebooks von unten. Akkusicherung Akkusicherungsriegel Fach für Lithium-Ionen-Akku Lüftungsöffnungen Konfigurationsetikett Abgedeckte Kartensteckpläte Akkusicherung Die Akkusicherung sichert den Akku vor dem Herausfallen. Es kann geöffnet werden, um den Akku herauszunehmen. Fach für Lithium-Ionen-Akku In das Akkufach wird der Lithium-Ionen-Akku eingelegt. -
Page 86: Erste Schritte
ERSTE SCHRITTE Stromversorgung Das Notebook kann auf zwei Arten mit Strom versorgt werden: mit einem Lithium-Ionen-Akku oder einem AC-Netzadapter, der an das Stromnetz angeschlossen wird. ANSCHLIESSEN DES NETZADAPTER Der AC-Netzadapter versorgt das Notebook mit Strom und lädt gleichzeitig den Akku, wenn dieser sich im Notebook befindet. -
Page 87: Auswechseln Des Akkus
ERSTE SCHRITTE WIEDERAUFLADEN DES AKKUS Der Lithium-Ionen-Akku wird im Gerät aufgeladen, wenn das Notebook an eine Netzsteckdose angeschlossen ist. Wenn Sie also den Akku aufladen möchten, muss sich dieser im Notebook befinden, und das Notebook muss an das Stromnetz angeschlossen sein. Bei Lithium-Ionen-Akkus tritt kein “Memory-Effekt”... -
Page 88: Einschalten Des Notebooks
ERSTE SCHRITTE Einschalten des Notebooks EINSCHALTEN Taste Suspend/Wiederaufnahme Ist das Notebook ausgeschaltet, müssen Sie auf die Taste Suspend/Wiederaufnahme drücken, um es einzuschalten. Das Notebook kann eingeschaltet werden, wenn es mit dem AC-Netzadapter an das Stromnetz angeschlossen oder über den internen Lithium-Ionen-Akku mit Strom versorgt wird. -
Page 89: Statusanzeigen
ERSTE SCHRITTE STATUSANZEIGEN Die Statusanzeigelampen entsprechen den spezifischen Betriebsmodi. Betriebsmodi: Suspend-/Power- On-Status, Akku-/Netzbetrieb und Festplattenaktivität (HDD). Einschaltanzeige/ Suspendstatus-Anzeige Einschaltanzeige/ Suspendstatus-Anzeige Akku-/ Anzeige für Festplattenaktivität (HDD) Netzbetriebsanzeige Einschaltanzeige Diese Lampe an der Ein/Aus-Taste und an der Vorderseite des Systems leuchtet, wenn das Notebook eingeschaltet ist. - Page 90 ERSTE SCHRITTE Akku-/Netzbetriebsanzeige Die Akku-/Netzbetriebsanzeige zeigt an, ob das Notebook über das Stromnetz oder den Lithium- Ionen-Akku mit Strom versorgt wird, bzw. ob der Lithium-Ionen-Akku gerade aufgeladen wird. • Die Lampe leuchtet, wenn das Notebook über den Netzadapter versorgt wird. •...
-
Page 91: Die Funktionstasten
ERSTE SCHRITTE DIE FUNKTIONSTASTEN Das Notebook verfügt über 12 Funktionstasten, Taste F1 bis F12. Je nach Programm sind die Funktionen, die diesen Tasten zugewiesen sind, unterschiedlich. In der Software-Dokumentation finden Sie die Funktionen der jeweiligen Tasten. Die Taste [FN] bietet dem Notebook zusätzliche Funktionen und wird immer zusammen mit einer anderen Taste gedrückt. -
Page 92: Benutzen Des Touchpads
ERSTE SCHRITTE BENUTZEN DES TOUCHPADS Das TouchPad ist ein Zeigegerät, das in das Notebook integriert ist. Es kann zur Steuerung der Cursorbewegungen auf dem Bildschirm verwendet. Das TouchPad bestetht aus der Cursorsteuerung, einer linken und einer rechten Taste sowie einer Scroll-Leiste. -
Page 93: Aufrüsten Des Speichermoduls
ERSTE SCHRITTE AUFRÜSTEN DES SPEICHERMODULS Um die Speicherkapazität des Notebooks zu erhöhen (bis maximal 8 GB), können zusätzliche Speichermodule installiert werden. Zum Aufrüsten des Speichermoduls müssen Sie ein DIMM- SDRAM-Modul verwenden. Installieren eines Speichermoduls Nachfolgend wird Schritt für Schritt beschrieben, wie Sie das Notebook mit einem Speichermodul aufrüsten. -
Page 94: Fehlerbehebung
FEHLERBEHEBUNG Das Notebook ist sehr robust und sollte in dieser Hinsicht keinen Anlass zu Beschwerden geben. Es ist jedoch möglich, dass einfache Installations- und Betriebsprobleme auftreten, die Sie auf der Stelle beheben können. Es kann auch Probleme mit Peripheriegeräten geben, die behoben werden können, indem Sie das entsprechende Gerät austauschen. - Page 95 MEMO FCC-Erklärung Dieses Gerät entspricht Abschnitt 15 der FCC-Vorschriften. Der Betrieb unterliegt den folgenden zwei Bedingungen: (1) Dieses Gerät darf keine Störungen verursachen. (2) Das Gerät muss alle Störungen aufnehmen können, auch solche, die einen unerwünschten Betrieb zur Folge haben können. Alle Änderungen am Gerät (einschließlich an den Antennen), die nicht ausdrücklich vom Hersteller genehmigt wurden, können zum Entzug der Betriebserlaubnis führen.
- Page 96 MEMO...
- Page 97 MANUAL DEL USUARIO E S P A Ñ O L Septiembre de 2013...
- Page 98 CONTENIDO ANTES DE COMENZAR ..................5 Asegúrese de tenerlo todo .................... 5 Familiarícese con el ordenador ..................6 ABRIR LA PANTALLA ....................6 VISTA PREVIA FRONTAL .................... 7 VISTA PREVIA DEL LATERAL IZQUIERDO ..............9 VISTA PREVIA DEL LATERAL DERECHO ..............11 VISTA PREVIA POSTERIOR ..................
- Page 99 CUIDADOS DE SU PC PORTÁTIL Para evitar el posible calentamiento del procesador NO presione ni toque la pantalla. del ordenador, asegúrese de no bloquear las aperturas de ventilación. NO lo coloque en superficies desiguales o NO utilice su ordenador portátil en condiciones inestables.
- Page 100 Evite cambios bruscos de temperatura o humedad NO exponga el ordenador a la lluvia o a la manteniéndolo alejado del aire acondicionado y humedad. calefactores. NO lo coloque cerca del fuego u otras fuentes de NO manipule las baterías. Manténgalas fuera del calor.
-
Page 101: Antes De Comenzar
ANTES DE COMENZAR Asegúrese de tenerlo todo Cuando reciba su PC portátil, retire el embalaje con cuidado y compruebe si tiene todos los artículos listados a continuación. Para un modelo preconfigurado debería tener lo siguiente: • Ordenador portátil • Batería de litio •... -
Page 102: Familiarícese Con El Ordenador
ANTES DE COMENZAR Familiarícese con el ordenador ABRIR LA PANTALLA Para abrir la pantalla, simplemente levante la tapa. Cuando la cierre, asegúrese de no golpearla bruscamente. -
Page 103: Vista Previa Frontal
ANTES DE COMENZAR VISTA PREVIA FRONTAL Esta es una vista previa de la parte frontal del portátil. Cámara Micrófono Pantalla Botón suspender/ encender Teclado Dispositivo puntero TouchPad Luces indicadoras de estado Cámara La cámara HD/VGA incorporada le permite tomar una foto o realizar video chat o videoconferencia con un sólo clic. - Page 104 ANTES DE COMENZAR Teclado Un teclado a tamaño completo con teclas numéricas y teclas para funciones de Windows ® Dispositivo puntero TouchPad El dispositivo puntero TouchPad es un cursor tipo ratón con un mecanismo de barra únicá y una plataforma táctil plataforma sensible al movimiento. Luces indicadoras de estado Las luces indicadoras de estado corresponden a modos de operación específicos.
-
Page 105: Vista Previa Del Lateral Izquierdo
ANTES DE COMENZAR VISTA PREVIA DEL LATERAL IZQUIERDO A continuación se presenta una breve descripción del lateral izquierdo del portátil. Puerto del adaptador de alimentacion Puertos USB Lector de tarjetas de Puerto LAN (RJ-45) Puerto HDMI memoria Ranura de bloqueo Kensington Puerto del adaptador de alimentacion El puerto del adaptador de alimentacion le permite conectar un adaptador CA para alimentar su portatil y cargar la bateria interna de litio. - Page 106 ANTES DE COMENZAR Ranura de bloqueo Kensington La ranura de bloqueo Kensington le permite fijar su portatil a un objeto fijo a traves de un cable de seguridad opcional.
-
Page 107: Vista Previa Del Lateral Derecho
ANTES DE COMENZAR VISTA PREVIA DEL LATERAL DERECHO A continuación se presenta una breve descripción del lateral derecho del portátil. Jack Combo de Audio (auriculares y micrófono) Boton de expulsion de la Unidad optica* unidad optica* Puerto USB Expulsion de emergencia de la bandeja* Jack Combo de Audio (auriculares y micrófono) La clavija jack combo de audio le permite conectar auriculares, altavoces externos, amplificadores o un micrófono mono externo. -
Page 108: Vista Previa Posterior
ANTES DE COMENZAR VISTA PREVIA POSTERIOR Esta es una vista previa de la parte posterior del portátil. -
Page 109: Vista Previa Inferior
ANTES DE COMENZAR VISTA PREVIA INFERIOR Esta es una vista previa de la parte inferior del portátil. Bloqueo de batería Compartimiento de la batería de litio Pestillo de apertura de la batería Salidas del ventilador Etiqueta de clasificacion Tapa del compartimiento Bloqueo de batería El bloqueo de la batería sostiene la batería en su lugar. -
Page 110: Primeros Pasos
PRIMEROS PASOS Fuentes de alimentación Su ordenador tiene dos tipos de fuente de alimentación: una batería de litio o un adaptador de CA. CONECTAR LOS ADAPTADORES DE ALIMENTACIÓN El adaptador de CA suministra alimentación para el funcionamiento de su PC portátil y para cargar la batería. -
Page 111: Cargar La Batería
PRIMEROS PASOS CARGAR LA BATERÍA La batería de litio se recarga internamente con el adaptador de CA. Para recargar la batería, asegúrese de tenerla instalada y que el ordenador esté conectado a la CA. Las baterías de litio no tienen “efecto de memoria”; por lo tanto no necesitará descargar la batería por completo antes de volver a cargarla. -
Page 112: Iniciar Su Portátil
PRIMEROS PASOS Iniciar su portátil ENCENDER Botón suspender/encender El interruptor para suspender/encender se utiliza para encender el portátil cuando está apagado. Cuando haya conectado su adaptador de CA o cargado la batería de litio interna, podrá encender su portátil pulsando el botón suspender/encender situado sobre el teclado. Si necesita tomar un descanso largo, pulse el botón de nuevo para apagarlo. -
Page 113: Indicadores De Estado
PRIMEROS PASOS INDICADORES DE ESTADO Las luces indicadoras de estado corresponden a modos de operación específicos. Estos modos son: estado encendido / suspendido, estado baterría / adaptador AC, y actividad del disco duro (HDD). Indicador de encendido/ Indicador del estado de suspensión Indicador de encendido/ Indicador del estado de suspensión... - Page 114 PRIMEROS PASOS Indicador de estado de la batería/adaptador AC El indicador de estado de batería / adaptador AC informa si el portátil está funcionando a través del adaptador AC o de la batería de litio y si la batería de litio está cargando o no. •...
-
Page 115: Usar Las Teclas De Función
PRIMEROS PASOS USAR LAS TECLAS DE FUNCIÓN Su ordenador tiene 12 teclas de función, F1 a F12. Las funciones asignadas a las teclas difieren dependiendo de cada aplicación. Deberá consultar la documentación de su software para averiguar cómo se usan estas teclas. La tecla [FN] ofrece funciones extendidas para el portátil y siempre se utiliza junto con otra tecla. -
Page 116: Usar El Touchpad
PRIMEROS PASOS USAR EL TOUCHPAD Su ordenador lleva incorporado un dispositivo puntero TouchPad. Se utiliza para controlar el movimiento del puntero para seleccionar elementos en la pantalla. El TouchPad consiste en un control de cursor, un botón izquierdo y derecho, y una barra de desplazamiento. -
Page 117: Ampliación Del Módulo De Memoria
PRIMEROS PASOS AMPLIACIÓN DEL MÓDULO DE MEMORIA Para aumentar la capacidad de memoria de su portátil (hasta 8 GB máximo), puede instalar más módulos de memoria. La ampliación de memoria debe ser un módulo SDRAM (DIMM) dual en línea. Instalar un módulo de memoria Los pasos siguientes describen cómo instalar un módulo de actualización de memoria. -
Page 118: Solución De Problemas
SOLUCIÓN DE PROBLEMAS Su PC portátil es robusto y puede presentar pocos problemas. Sin embargo, puede encontrar problemas simples de configuración u operación que podrá resolver sobre la marcha o problemas con dispositivos periféricos que podrá resolver cambiando el dispositivo. La información en esta sección le ayuda a aislar y resolver algunos de estos sencillos problemas e identificar los fallos que necesitan reparación. - Page 119 MEMO Comunicado de la Comisión Federal de Comunicaciones (FCC) Este dispositivo cumple con el Párrafo 15 de las Normativas FCC. Su utilización está sujeta a estas dos condiciones: (1) Este dispositivo no puede causar interferencias dañinas. (2) Este dispositivo debe aceptar cualquier interferencia recibida, incluyendo interferencias que puedan causar un funcionamiento no deseado.
- Page 120 MEMO...
- Page 121 MANUALE DELL’UTENTE I T A L I A N O Settembre 2013...
- Page 122 INDICE OPERAZIONI PRELIMINAR ..................5 Verificare la presenza di tutti gli elementi ..............5 Familiarizzare con il computer ..................6 APERTURA DEL PANNELLO DELLO SCHERMO ............. 6 PANORAMICA FRONTALE ..................7 PANORAMICA LATO SINISTRO .................. 9 PANORAMICA DEL LATO DESTRO ................11 PANORAMICA POSTERIORE ...................
-
Page 123: Cura Del Notebook Pc
CURA DEL NOTEBOOK PC Per evitare un surriscaldamento possibile del NON premere sul o toccare il pannello del display. processore nel computer, assicurarsi che le aper- ture per la ventilazione non siano mai bloccati. NON posare sulle superficie irregolari o instabili. NON usare il notebook computer in condizioni rigide. - Page 124 Sempre evitare cambi bruschi della temperatura NON esporre il computer alla pioggia o o dell’umidità tenendolo lontano dal A/C e dai all’umidità. fonti di calore. NON posizionare vicino al fuoco o altri fonti di NON manomettere la batteria. Tenerla fuori dalla calore.
-
Page 125: Operazioni Preliminar
OPERAZIONI PRELIMINAR Verificare la presenza di tutti gli elementi Una volta ricevuto il computer portatile, estrarlo con cura dalla confezione e verificare che in essa siano contenuti tutti gli elementi sotto elencati. Nel caso di un modello preconfigurato, la confezione dovrebbe contenere quanto segue: •... -
Page 126: Familiarizzare Con Il Computer
OPERAZIONI PRELIMINAR Familiarizzare con il computer APERTURA DEL PANNELLO DELLO SCHERMO Per aprire il pannello display basta sollevare il coperchio. Al momento della chiusura, assicurarsi di non esercitare troppa forza. -
Page 127: Panoramica Frontale
OPERAZIONI PRELIMINAR PANORAMICA FRONTALE Quanto segue rappresenta una panoramica della parte anteriore del computer portatile. Camera Microfono Pannello dello schermo Pulsante di accensione/ sospensione Tastiera Dispositivo di puntamento TouchPad LED indicatori di stato Camera La fotocamera HD/VGA integrata permette di scattare foto o creare un video chat o video conferenza con un semplice clic. - Page 128 OPERAZIONI PRELIMINAR Tastiera Tastiera di formato completo con tasti numerici e tasti Windows dedicati. ® Dispositivo di puntamento TouchPad Il dispositivo di puntamento touchpad è un sistema di controllo del cursore simile al mouse, dotato di una singola barra pulsante e di una finestra sensibile a tocco e movimento. LED indicatori di stato I LED indicatori di stato corrispondono a modalità...
-
Page 129: Panoramica Lato Sinistro
OPERAZIONI PRELIMINAR PANORAMICA LATO SINISTRO Quanto segue rappresenta una breve descrizione del lato sinistro del computer portatile. Porta trasformatore alimentazione Porte USB Porta LAN (RJ-45) Porta HDMI Lettore di Memory Card Slot bloccaggio Kensington Porta trasformatore alimentazione La porta del trasformatore consente di inserire il trasformatore c.a. per alimentare il computer e per caricare la batteria interna agli ioni di litio. - Page 130 OPERAZIONI PRELIMINAR Slot bloccaggio Kensington Lo slot per il sistema di bloccaggio Kensington consente di assicurare il computer portatile ad un oggetto inamovibile per mezzo di un cavo di sicurezza opzionale.
-
Page 131: Panoramica Del Lato Destro
OPERAZIONI PRELIMINAR PANORAMICA DEL LATO DESTRO Quanto segue rappresenta una breve descrizione del lato destro del computer portatile. Jack audio combinato (auricolari e microfono) Pulsante Eject dell’unità ottica* Unità ottica* Porta USB Sistema di sblocco del vassoio* Jack audio combinato (auricolari e microfono) Il jack audio combinato consente di collegare auricolari, altoparlanti esterni, amplificatori o un microfono mono esterno. -
Page 132: Panoramica Posteriore
OPERAZIONI PRELIMINAR PANORAMICA POSTERIORE Quanto segue rappresenta una panoramica della parte posteriore del computer portatile. -
Page 133: Panoramica Inferiore
OPERAZIONI PRELIMINAR PANORAMICA INFERIORE Quanto segue rappresenta una panoramica della parte inferiore del computer portatile. Blocco batteria Vano batteria agli Ioni di Litio Fermo di rilascio della batteria Fessure di ventilazione Etichetta di configurazione Coperchi compartimento Blocco batteria Il blocco batteria mantiene la batteria in posizione. Può essere sbloccato per rimuovere la batteria. Vano batteria agli Ioni di Litio Il vano batteria accoglie la batteria interna agli Ioni di Litio. -
Page 134: Guida Introduttiva
GUIDA INTRODUTTIVA Sorgenti di alimentazione Il computer è dotato di due tipi di sorgenti di alimentazione. La batteria agli ioni di litio e il trasformatore c.a. COLLEGAMENTO DEI TRASFORMATORI Il trasformatore c.a. fornisce alimentazione per il funzionamento del PC portatile e per la carica della batteria. -
Page 135: Ricarica Della Batteria
GUIDA INTRODUTTIVA RICARICA DELLA BATTERIA La batteria agli ioni di litio viene ricaricata internamente per mezzo del trasformatore c.a. Per ricaricare la batteria, assicurarsi che la batteria sia installata e il computer sia collegato al trasformatore. Non vi è alcun “effetto memoria” nelle batterie agli ioni di litio, di conseguenza non è necessrio scaricare completamente la batteria prima di eseguire la ricarica. -
Page 136: Avvio Del Computer
GUIDA INTRODUTTIVA Avvio del computer ACCENSIONE Pulsante di accensione/sospensione L’interruttore di accensione/sospensione viene utilizzato per accendere il computer portatile. Una volta collegato il trasformatore c.a. o dopo aver caricato la batteria interna agli ioni di litio, è possibile accendere il computer premendo il pulsante di accensione/sospensione situato sopra la tastiera. -
Page 137: Indicatori Di Stato
GUIDA INTRODUTTIVA INDICATORI DI STATO I LED indicatori di stato corrispondono a modalità specifiche di funzionamento. Queste modalità sono: stato Acceso/Sospensione, stato Batteria/Alimentatore e attività del disco rigido (HDD). Indicatore di accensione/ Indicatore stato di sospensione Indicatore di accensione/ Indicatore stato di sospensione Indicatore di stato Indicatore attività... - Page 138 GUIDA INTRODUTTIVA Indicatore di stato Batteria/Alimentatore L’indicatore di stato Batteria/Alimentatore rivela se il notebook è alimentato dalla batteria agli Ioni di Litio o dall’alimentatore, e se la batteria agli Ioni di Litio si sta caricando o meno. • La luce si illumina quando il computer è in funzione mediante l’alimentatore. •...
-
Page 139: Uso Dei Tasti Funzione
GUIDA INTRODUTTIVA USO DEI TASTI FUNZIONE Il computer dispone di 12 tasti funzione, da F1 a F12. Le funzioni assegnate a tali tasti differiscono a seconda dell’applicazione. Fare riferimento alla documentazione del software per informazioni sull’uso di tali tasti. Il tasto [FN] offre funzioni estese per il computer portatile e viene sempre utilizzato insieme a un altro tasto. -
Page 140: Uso Del Dispositivo Touchpad
GUIDA INTRODUTTIVA USO DEL DISPOSITIVO TOUCHPAD Il computer è dotato di un dispositivo di puntamento TouchPad incorporato. Viene utilizzato per controllare il movimento del puntatore per selezionare gli elementi sul pannello di visualizzazione. Il TouchPad consiste di un controllo cursore, un pulsante sinistro e destro e una barra di scorrimento. Il controllo del cursore funziona in modo analogo a un mouse e consente di spostare il cursore sullo schermo. -
Page 141: Installazione Di Un Modulo Di Memoria
GUIDA INTRODUTTIVA AGGIUNTA DI MODULI DI MEMORIA Per aumentare la capacità di memoria del notebook (fino a un Massimo di 8 GB), è possibile installare moduli aggiuntivi di memoria. L’aggiornamento della memoria deve essere effettuato con un modulo dual-in-line (DIMM) SDRAM. Installazione di un modulo di memoria I passi che seguono descrivono come installare un modulo di aggiornamento della memoria Si sconsiglia di effettuare l’operazione da soli. -
Page 142: Risoluzione Dei Problemi
RISOLUZIONE DEI PROBLEMI Il PC portatile è robusto e non dovrebbe essere soggetto a particolari problemi. Tuttavia, è possibile che vengano sperimentati dei semplici problemi di impostazione o funzionamento che è possibile risolvere facilmentem oppure problemi alle periferiche che è possibile risolvere sostituendo tali periferiche. - Page 143 MEMO Informativa FCC (Federal Communications Commission) Il dispositivo è conforme alla parte 15 delle normative FCC. Il funzionamento è soggetto alle seguenti due condizioni: (1) Il dispositivo non deve causare interferenze dannose. (2) Il dispositivo deve accettare qualsiasi interferenza ricevuta, incluse le interferenze che possono causare un funzionamento indesiderato.
- Page 144 MEMO...
- Page 152 ®...
- Page 159 • •...
- Page 162 • • • •...
- Page 163 • • • • • • • • • • • • •...
- Page 166 • • • • • • • •...
- Page 167 • • • •...
- Page 168 MEMO...
- Page 173 • • • • • • • • •...
- Page 183 • •...
- Page 186 • • • •...
- Page 187 • • • • • • • • • • • • •...
- Page 190 • • • • • • • •...
- Page 191 • • • •...
- Page 200 ®...
- Page 215 MEMO...
- Page 216 MEMO...
Need help?
Do you have a question about the M-BOOK 4500 U G1 and is the answer not in the manual?
Questions and answers