Ariens SNO-THRO 938017 - SS522EC Owner's/Operator's Manual
Ariens snow blower user manual
Hide thumbs
Also See for SNO-THRO 938017 - SS522EC:
- Owner's/operator's manual (24 pages) ,
- Owner's/operator's manual (22 pages)

Related Manuals for Ariens SNO-THRO 938017 - SS522EC


Summary of Contents for Ariens SNO-THRO 938017 - SS522EC
- Page 1 Sno-Thro Owner/Operator Manual Models 938017 - SS522EC 938018 - SS722EC ® ENGLISH U.S. Patents 5758436 and 5966846 03392200 5/08 Printed in USA...
-
Page 2: Table Of Contents
NON-ENGLISH MANUALS Manuals in languages other than English may be obtained from your Dealer. Visit your dealer or www.ariens.com for a list of languages available for your equipment. Manuals printed in languages other than English are also available as a free download on our website: http://www.ariens.com... -
Page 3: Unauthorized Replacement Parts
4. Review recommended lubrication, maintenance and adjustments. 5. Review Limited Warranty Policy. 6. Fill out a Product Registration Card and return the card to the Ariens Company or go to www.ariens.com. GB - 3... -
Page 4: Safety Alerts
WARNING: To avoid injury to hands and feet, always disengage clutches, shut off engine, and wait for all movement to stop before unclogging or working on snow thrower. Keep hands and feet away from auger. SAFETY ALERTS Look for these symbols to point out important safety precautions. -
Page 5: Safety Decals And Locations
SAFETY DECALS AND LOCATIONS ALWAYS replace missing or damaged Safety Decals. Refer to figure 2 below for Safety Decal locations. 1. DANGER! • Read operator’s manual. • Allow operation only by properly trained adults, never children. • Stop engine and remove ignition key prior to leaving operator’s position for any reason. -
Page 6: Safety Rules
Stop engine, remove ignition key, read manual before making any repairs, adjustments. OL4010 SAFETY RULES Read, understand, and follow all safety practices in Owner/Operator Manual before beginning assembly or operating. Failure to follow instructions could result in personal injury and/or damage to unit. ALWAYS remove key and/or wire from spark plug before assembly, maintenance or service. - Page 7 Understand: • How to operate all controls. • The functions of all controls. • How to STOP in an emergency. Before starting engine, disengage control(s). Use only approved extension cords and receptacles when starting units equipped with electric starter. DO NOT connect electric starter cord to any wiring system that is not a three-wire grounded system.
-
Page 8: Tools Required
If fuel is spilled on clothing, change clothing immediately. Before tipping unit up onto housing, remove fuel so no spills will occur. Ensure unit is secure and will not tip over during maintenance. ALWAYS keep protective structures, guards, and panels in good repair, in place and securely fastened. -
Page 9: Discharge Chute Assembly
Discharge Chute Assembly 1. Remove bolt and nut from rear of discharge chute (figure 4). 2. Tip discharge chute up and install hardware just removed. Tighten hardware at rear of discharge chute first, then sides. 1. Discharge Chute 2. Rear Bolt and Nut 3. -
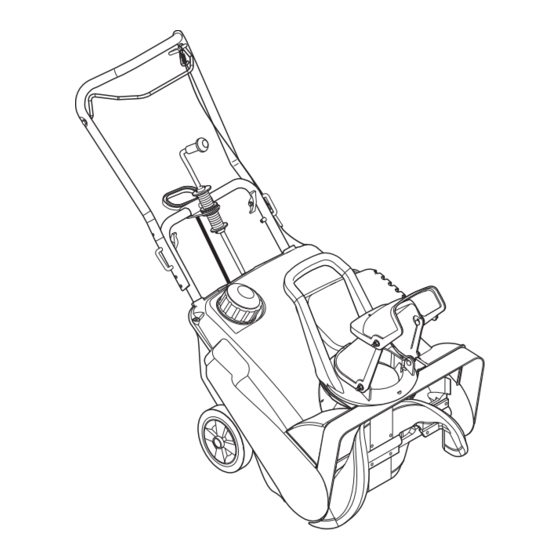
Page 10: Controls & Features
CONTROLS & FEATURES Figure 6 1. Auger Clutch Bail 2. Handlebar 3. Discharge Chute Crank 4. Handlebar Wing Knob 5. Spark Plug Access Cover 6. Discharge Chute Handle 7. Exhaust 8. Discharge Chute Deflector 9. Auger Housing 10. Auger 11. Ignition Switch 12. -
Page 11: Operation
WARNING: AVOID INJURY. Read and understand the entire Safety section before proceeding. WARNING: To avoid injury to hands and feet, always disengage clutches, shut off engine, and wait for all movement to stop before unclogging or working on snow thrower. Keep hands and feet away from auger. -
Page 12: Filling Fuel Tank
Discharge Chute Crank Handlebar Height Adjustment Holes Figure 7 Discharge Chute Deflector ALWAYS position discharge chute deflector at a safe angle before starting engine. DO NOT throw snow any higher than necessary. Pull chute deflector handle upward to throw snow lower. Push chute deflector handle downward to throw snow higher. -
Page 13: Starting And Shutting Off
STOPPING IN AN EMERGENCY Immediately release auger clutch bail to stop unit in an emergency. Stop engine, remove key and wait for all rotating parts to stop before leaving operator’s position. STARTING AND SHUTTING OFF WARNING: FAILURE TO FOLLOW INSTRUCTIONS could result in personal injury and/or damage to unit. -
Page 14: Tips For Operation
NEVER secure by rods or linkages that could be damaged. DO NOT transport machine while engine is running. Ariens Dealers will provide any service or adjustments which may be required to keep your unit operating at peak efficiency. Should engine service be required, contact an Ariens dealer or an authorized engine manufacturer's service center. -
Page 15: Drive Belt Replacement
SERVICE AND ADJUSTMENTS WARNING: AVOID INJURY. Read and understand the entire Safety section before proceeding. SERVICE POSITION Place unit on a flat level surface. DRIVE BELT REPLACEMENT Remove (Figure 8) 1. Remove cowl. 2. Disconnect extension spring on idler arm/brake. DISCHARGE CHUTE ADJUSTMENT If discharge chute rotates while throwing... -
Page 16: Discharge Chute Deflector Adjustment
DISCHARGE CHUTE DEFLECTOR ADJUSTMENT If discharge chute deflector does not stay in position while throwing snow, adjust chute by tightening fasteners (figure 10). Figure 10 DRIVE BELT ADJUSTMENT WARNING: Improper adjustment could result in death or serious injury. Auger brake MUST DISENGAGE when clutch is engaged. - Page 17 3. Loosen belt finger and rotate until there is 1/32 – 1/16 in. (0.8 – 1.6 mm) gap between belt finger and drive belt. 4. Tighten belt finger. 5. Recheck gap between belt finger and drive belt. Adjust belt finger until there is 1/32 –...
-
Page 18: Short Term
To treat the fuel system for storage: 1. Add fuel stabilizer (Ariens p/n 00592900) according to manufacturer’s instructions. 2. Run engine for at least 10 minutes after adding stabilizer to allow it to reach the carburetor. -
Page 19: Troubleshooting
3. Auger control cable out of adjustment. 4. Drive belt slipping. ACCESSORIES See your authorized Ariens dealer to add the additional accessories available to your Sno-Thro. 73800300 Discharge Chute Crank Kit 73800100 Electric Starter Kit... -
Page 20: Specifications
Model Number Description Engine - Tecumseh (Two-Cycle) Engine Power – hp (kW) at Maximum RPM Fast Idle Speed – RPM (min Displacement – in. (cc) Fuel Fuel to Oil Mix Fuel Tank Capacity – qt. (L) Electric Start Snow Clearing Width – in. (cm) Chute Chute Rotation Angle Discharge Chute Crank... -
Page 22: Warranty
Genuine Ariens or Gravely brand service parts and accessories are warranted to be free from defects in material and workmanship for a period of 90 days after the date of purchase. An authorized Ariens dealer will repair or replace any such part or accessory free of charge, except for labor, during that period. -
Page 23: Exclusions - Items Not Covered By This Warranty
Canada. In all other countries, contact place of purchase for warranty information. Disclaimer Ariens may from time to time change the design of its products. Nothing contained in this warranty shall be construed as obligating Ariens to incorporate such design changes into previously manufactured products, nor shall such changes be construed as an admission that previous designs were defective. - Page 24 Ariens Company 655 West Ryan Street Brillion, WI 54110-1072 920-756-2141 Fax 920-756-2407 www.ariens.com...
Need help?
Do you have a question about the SNO-THRO 938017 - SS522EC and is the answer not in the manual?
Questions and answers