Nokia E66 E series User Manual
Hide thumbs
Also See for E66 E series:
- User manual (161 pages) ,
- Service manual (21 pages) ,
- Quick start manual (11 pages)
Table of Contents
Advertisement
Quick Links
Advertisement
Table of Contents

Related Manuals for Nokia E66 E series


Summary of Contents for Nokia E66 E series
- Page 1 E66 User Guide Issue 1.0...
- Page 2 Corporation. Nokia tune is a sound mark of Nokia Corporation. Other product and company names mentioned herein may be trademarks or tradenames of their respective owners. Reproduction, transfer, distribution, or storage of part or all of the contents in this document in any form without the prior written permission of Nokia is prohibited.
- Page 3 WITHOUT PRIOR NOTICE. Reverse engineering of any software in the Nokia device is prohibited to the extent permitted by applicable law. Insofar as this user guide contains any limitations on Nokia's representations, warranties, damages and liabilities, such limitations shall likewise limit any representations, warranties, damages and liabilities of Nokia's licensors.
-
Page 4: Table Of Contents
Contents Safety............10 Home screen..............23 Menu................24 About your device............10 Switch................25 Network services............11 Transfer content between devices......25 Battery removing............12 View transfer log............25 E66 in brief..........13 Synchronise, retrieve, and send data.......26 Common actions in several applications....26 Key features..............13 Display indicators............27 Keys and parts...............14 Volume control..............28 Key moves..............15 Memory................29... - Page 5 Capture images in a sequence........45 Contacts key..............35 View captured image..........45 Calendar key..............35 Record videos.............45 E-mail key..............35 Play a video clip............46 Nokia Calendar for Eseries..........35 Image settings............46 Calendar views............35 Video settings.............46 View calendar information........36 Nokia Podcasting............47 Create calendar entries..........36 Play and manage podcasts........47 Calendar settings............37...
- Page 6 Contents View information about a media clip......54 Set up an access point for WLAN manually....63 RealPlayer settings.............55 Advanced access point settings for WLAN....64 Flash player..............55 Connect PC to web............64 Manage flash files............55 Messaging..........65 Radio................55 Listen to the radio............55 Messaging folders............65 View visual content............56 Organise messages............66 Saved stations.............56...
- Page 7 Contents Sending options for multimedia messages.....74 Share a video..............86 Instant messaging............75 Receive a video sharing invitation......87 Define IM settings............75 Net calls................87 Start a conversation...........76 Create a net call profile..........87 IM groups..............76 Connect to the net call service........88 Block users..............77 Make net calls.............88 IM application settings..........77 Net call service settings..........89 Special message types..........78...
- Page 8 Walk to your destination.........101 World clock...............111 Drive to your destination........101 Clock settings............111 Traffic information...........102 Notes................111 Travel guides............102 Write and send notes..........111 GPS data...............102 Nokia Wireless Keyboard...........112 Use GPS data.............103 Connectivity..........113 Landmarks..............103 Create a landmark............103 Fast downloading............113 Edit landmarks............104 Nokia PC Suite..............113 Landmark categories..........104 Data cable..............113...
- Page 9 Contents WLAN wizard............119 Manage VPN..............133 Modem.................120 Create VPN access points.........133 Connection manager..........121 Use a VPN connection in an application....133 View and end active connections......121 Barcode reader............134 Search for WLAN............121 Settings............135 Security and data management....122 General settings............135 Lock the device............122 Personalisation settings..........135 Memory card security..........122 Display settings.............135 Encryption..............123...
- Page 10 Restrict packet data..........146 Application settings............146 Warranty period............166 How to get warranty service........167 Shortcuts..........147 What is not covered?..........167 General shortcuts............147 Other important notices..........168 Limitation of Nokia's liability........169 Glossary............149 Statutory obligations..........169 Nokia original enhancements....153 Index............171 Battery................153 Troubleshooting........154 Battery and charger information.....157 Battery and charger information......157 Nokia battery authentication guidelines....158...
-
Page 11: Safety
Safety Read these simple guidelines. Not following them may ENHANCEMENTS AND BATTERIES be dangerous or illegal. Read the complete user guide Use only approved enhancements and for further information. batteries. Do not connect incompatible SWITCH ON SAFELY products. Do not switch the device on when wireless WATER-RESISTANCE phone use is prohibited or when it may Your device is not water-resistant. -
Page 12: Network Services
Third-party sites make specific arrangements with your service provider are not affiliated with Nokia, and Nokia does not before you can use the network services. Your service endorse or assume liability for them. If you choose to... -
Page 13: Battery Removing
Safety messaging (MMS), require network support for these technologies. Battery removing Always switch the device off and disconnect the charger before removing the battery. -
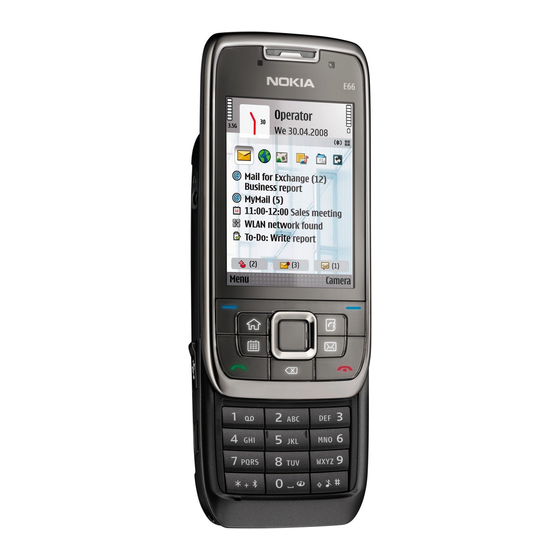
Page 14: E66 In Brief
E66 in brief Model number: Nokia E66-1 (RM-343). Find points of interest with Maps. Hereinafter referred to as Nokia E66. Key features Access your e-mail while on the move. Your new Eseries device helps you manage your Stay up-to-date and plan your meetings with business and personal information in and out of office. -
Page 15: Keys And Parts
E66 in brief Keys and parts — Press the key for a few seconds to switch on Bluetooth connectivity. When writing text, press the key and select More symbols to access special characters. — Microphone — Camera (video calls only) —... -
Page 16: Key Moves
E66 in brief — Home key — Contacts key — Calendar key — E-mail key Key moves — Volume up key — Voice key. Press the voice key to mute and unmute Your device rotates the display automatically when you the active call. -
Page 17: Silence The Device
E66 in brief Scroll key lights When you receive a message or miss a call, the scroll key starts blinking to indicate the event. When the display light turns off, the scroll key starts blinking slowly. To set the length of time for blinking for missed events or to select of which events you want to be notified, select Menu... - Page 18 E66 in brief To open or close the full-size keypad, push the slide up or down. To lock the keypad, close the slide. To unlock the keypad, open the slide. Tip: To unlock the keypad without opening the slide, press the left and then the right selection key.
-
Page 19: Set Up Your Device
Set up your device Set up your E66 following these instructions. Insert the SIM card and battery 1. With the back of the device facing you, press the release buttons (1) and slide the back cover off (2). 3. Insert the SIM card. Make sure that the contact area on the card is facing the connectors on the device and that the bevelled corner is facing the top of the device. -
Page 20: Charge The Battery
Tip: If you have old compatible Nokia chargers, you can use them with the Nokia E66 by attaching the CA-44 charger adapter to the old charger. The adapter is available as a separate Charge the battery enhancement. -
Page 21: Eject The Memory Card
Set up your device Eject the memory card Memory card may already be inserted in your device. Memory cards are also available as separate enhancements. 1. With the back of the device facing you, press the Important: Do not remove the memory card in release buttons (1) and slide the back cover off (2). -
Page 22: Attach The Wrist Strap
Set up your device Attach the wrist strap Thread the wrist strap as shown, and tighten it. Antennas Your device may have internal and external antennas. As with any radio transmitting device, avoid touching the antenna area unnecessarily while the antenna is transmitting or receiving. -
Page 23: Get Started
• on a different time zone. The contacts and calendar entries, from a compatible Welcome application opens. Nokia device. See "Transfer content between 4. Select from the various options, or devices", p. 25. Exit... -
Page 24: Settings Wizard
To use If you are not able to use Settings wizard, visit the these services, you may have to contact your service Nokia phone settings web site. provider to activate a data connection or other services. -
Page 25: Menu
Get started The menu is a starting point from which you can open all applications in the device or on a memory card. The menu contains applications and folders, which are groups of similar applications. All applications you install in the device yourself are by default saved in the Installations... -
Page 26: Switch
Eseries device, select the content you want to copy from the other device. You can transfer content, such as contacts, from a compatible Nokia device to your new Eseries device After the data transfer, you can save the shortcut with using Bluetooth connectivity or infrared. The type of... -
Page 27: Synchronise, Retrieve, And Send Data
Get started Any unresolved transfer conflicts are also displayed in If an application consists of the log view. To start solving conflicts, select several tabs (see figure), Options Solve conflicts. open a tab by scrolling right > or left. Synchronise, retrieve, and To save the settings that you have configured in an send data... -
Page 28: Display Indicators
Get started select the items you do not want, and Options > An alarm is active. Mark/Unmark > Unmark. To select an object (for example, an attachment in a You have selected the Silent profile, and the document) scroll to the object so that square markers device does not ring for an incoming call or appear on each side of the object. -
Page 29: Volume Control
Get started A UMTS packet data connection is available A headset is connected to the device. (network service). If the icon is , the connection is active. If the icon is , the The connection to a headset with Bluetooth connection is on hold. -
Page 30: Memory
To maintain Use a memory card sufficient memory, use Nokia PC Suite to back up installation files to a compatible PC, then use the file To format a memory card for your device, select... -
Page 31: Write Text
Get started You can protect a memory card with a password to written in lowercase. indicates the number prevent unauthorised access. To set a password, select mode. Options password. The password can be up to > To write text with the keypad, press a number key eight characters long and is case-sensitive. -
Page 32: Predictive Text Input
Get started Predictive text input Change the writing language 1. To activate predictive text input, press # twice quickly. This activates predictive text input for all When you are writing text, you can change the writing editors in the device. The indicator is shown language. - Page 33 Get started To switch between the application and help, press and hold the home key. Tutorial The tutorial provides you information about your device and shows you how to use it. Select Menu > Help > Tutorial.
-
Page 34: New From Eseries
New from Eseries Home screen Your new Eseries device contains new versions of the Calendar and Contacts applications, as well as a new home screen. From the home screen you can quickly access features that you use the most, and see at a glance any missed Access tasks quickly calls or new messages. -
Page 35: Work On The Home Screen
New from Eseries a box. Each box is only visible if there are items in it. Your operator may have set you a third home screen To hide the boxes, press the backspace key. with operator-specific items. To change from one home screen mode to another, Work on the home screen scroll to and press the scroll key. -
Page 36: Home Key
To open the selected application, press the home key for a few seconds, or Nokia Calendar for press the scroll key. To close the selected application, press the backspace key. -
Page 37: View Calendar Information
New from Eseries Create calendar entries • Agenda view shows the events for the selected day in a list. You can create the following types of calendar entries: To change the view, select Options Change view > • Meeting entries remind you of events that have a and the desired view. -
Page 38: Calendar Settings
New from Eseries Nokia Contacts for 5. For meeting, anniversary, and to-do entries, you can set an alarm. Eseries 6. For recurring meeting entries, set the recurrence time. 7. For to-do entries, set the priority. To set the priority Select Menu Communic. -
Page 39: Search For Contacts
New from Eseries Add ringing tones for Conf. service number — Enter the conference call • service number. contacts Conf. service ID — Enter the conference call ID • number. You can set a ringing tone for a contact or contact Conf. - Page 40 New from Eseries hold the home key, scroll to an application, and press the scroll key. To close the selected application, press the backspace key. Example: When you have an active phone call and want to check your calendar, press the home key to access the menu, and open the Calendar application.
-
Page 41: Personalisation
Personalisation You can personalise your device by adjusting the be in operation when the profile is selected. The Offline various tones, background images, and screen savers, profile does not prevent you from establishing a for example. wireless LAN or Bluetooth connection at a later time, or from restarting the GPS or FM radio, so comply with any applicable safety requirements when establishing Profiles... -
Page 42: Customise Profiles
Personalisation To change the message tone, select Options Breathing light — Select whether you want the • > Personalise Message alert tone. scroll key to start blinking slowly when the display > light turns off. Keypad tones — Set the volume level of the device Customise profiles •... -
Page 43: Change The Display Theme
Personalisation To change the background image of the home screen want to download your theme. Once the theme is currently in use, select Wallpaper. downloaded, you can preview, activate, or edit it. To change from one home screen to another, select To preview a theme, select Options >... - Page 44 Personalisation To adjust the volume of the ringing tone, select Menu Tools Profiles Options > > > > Personalise Ringing volume. >...
-
Page 45: Media
Media Your device contains a variety of media applications for Switch between the video mode and the image both business and leisure time use. mode. Select the scene. Camera Select the flash mode (images only). Activate the self-timer (images only). Select Menu Media... -
Page 46: Capture Images In A Sequence
Media View captured image To change the scene, select Scene modes in the toolbar. The image you captured is automatically saved in To make your own scene, scroll to User defined, and Gallery. If you do not want to keep the image, select select Options >... -
Page 47: Play A Video Clip
Media Play a video clip continuous between the digital and extended digital zoom, and allows a limited amount of To play a recorded video clip, select Play from the zoom while retaining the image resolution. toolbar. Capture tone — Set the tone that sounds when you •... -
Page 48: Nokia Podcasting
Podcasting delivers audio or video content over the internet for playback on mobile devices and PCs. Select Directories. With the Nokia Podcasting application, you can search, Directories help you find new podcast episodes to discover, subscribe, and download podcasts over the which to subscribe. -
Page 49: Search Podcasts
Media Podcasting settings To import an .opml file stored on your device, select Options Import OPML file. > To edit the connection settings, select Options > To save a received .opml file, open the file to save the Settings > Connection. file into the Received folder in Directories. -
Page 50: Play A Song Or A Podcast Episode
> > To fast forward or rewind, press and hold the scroll key In the Nokia Music Store (network service) you can to the right or left. search, browse, and purchase music to download to To go to the next item, scroll right. To return to the your device. -
Page 51: Transfer Music From Pc
1. To activate the automatic synchronisation function in Windows Media Player, click the Sync tab, select Transfer with Windows Nokia Handset > Set Up Sync..., and check the Sync this device automatically check box. Media Player 2. Select the playlists you want to synchronise... -
Page 52: Preset Frequency Settings
To stop automatic synchronisation, click the Sync tab, view the content of the albums. The supported content and select Stop Sync to 'Nokia Handset'. types may vary depending on the service provider. To share files online, you must have an account with Preset frequency settings an online image sharing service. -
Page 53: Record A Sound Clip
Media Record a sound clip you select compatible, the sound clip you record is in adaptive multirate file format (.amr), and the To record a sound clip, select Options Record maximum length for the clip is one minute. > sound clip. -
Page 54: View Images
Media Manage image files To download files into Gallery using the browser, select Downl. graphics, Downld. videos, Downld. tracks, Downld. sounds. The browser opens, and you can To view detailed information about the image, select Options View details. choose a bookmark or enter the address for the >... -
Page 55: Play Video Clips And Stream Links
Media Play video clips and stream To download video clips from the web, select Options Download videos. > links To view the video clip in full-screen size, select Options Play in full screen. Full screen increases > the size of the video to cover the maximum video area Warning: Do not hold the device near your ear possible while the aspect ratio is maintained. -
Page 56: Realplayer Settings
Media Change. File protection prevents others from changing To change the flash file quality, select Options > a file. Quality when you are playing the flash file. If you select High, the playback of some flash files may appear uneven and slow due to their original settings. Change RealPlayer settings the quality setting of such files to Normal... -
Page 57: View Visual Content
Media To search for a station, select . To set the enter it, or select Retrieve to search for it in the station directory (network service). frequency manually, select Options Manual > tuning. 2. Select the location nearest to you from the station directory. - Page 58 Media Access point — Select the access point used for the • data connection. You do not need an access point to use the application as an ordinary FM radio. Current region — Select the region you are • currently located in. This setting is displayed only if there was no network coverage when the application was started.
-
Page 59: Internet
Internet With your new Eseries device you can browse both the If the web page is unreadable or not supported and internet and your company's intranet, and download garbage code is found while browsing, you can try to and install new applications to your device. You can select Menu Options... -
Page 60: Browse The Web
Internet Browse the web To add a bookmark, select Options Bookmark > manager bookmark. > To browse the web, select a bookmark or enter the web To organise your bookmarks, select Options > address manually, and select to. Use only services Bookmark manager in the Web main view. -
Page 61: End A Connection
The items are categorised under catalogs and folders Web feeds contains settings related to web feeds • provided by Nokia or independent service providers. and blogs. Some items may be chargeable, but you can usually preview them free of charge. -
Page 62: Manage Items
Internet Manage items Purchase history To open an item or view the content of a folder or To open the selected item with the corresponding catalogue, scroll to it, and press the scroll key. application, select Options > Open. To buy the selected item, select Options >... -
Page 63: Internet Access Points
Internet Internet access points User name — Enter your user name if required • by the service provider. User names are often case-sensitive and provided by your service An internet access point is a collection of settings, provider. which define how the device creates a data connection Prompt password —... -
Page 64: Set Up An Access Point For Wlan Manually
Internet After setting up a basic internet access point for packet from the list and then Options Duplicate access > data (GPRS), select Options Advanced settings, point to use the access point as a basis for the new > and define the following advanced settings: one. -
Page 65: Advanced Access Point Settings For Wlan
Internet Connect PC to web Homepage — Enter the web address of the page • you want to display as the home page when you use this access point. You can use your device to connect your PC to the web. To set up a WLAN access point automatically, use the 1. -
Page 66: Messaging
Messaging Select Menu Communic. > Messaging. • Define the multimedia message settings on the > device. See "Multimedia message In Messaging (network service), you can send and settings", p. 80. receive text messages, multimedia messages, audio messages, and e-mail messages. You can also receive The device may recognise the SIM card provider and web service messages, cell broadcast messages, and automatically configure some of the message settings. -
Page 67: Organise Messages
To set the language for the message reader, select Subject, or Message type. Language. To download additional languages to your To view the properties of a message, select the device, visit the Nokia web site or use the Download! message and Options Message details. >... -
Page 68: E-Mail Messages
Messaging To set the speaking voice, select Voice. The voice is • Set up an e-mail account, and define the e-mail language-dependent. settings correctly. To do this, use the mailbox guide, or define the account manually. See "E-mail account To set the speaking rate, select Voice settings >... -
Page 69: Connect To A Remote Mailbox
Messaging • Outgoing mail server port you make in the remote mailbox folders while offline, take effect in your remote mailbox the next • Password time you go online and synchronise. • Access point If you are setting up your business e-mail, ask your Read and reply to e-mail company IT department for details. -
Page 70: Write And Send E-Mail
Messaging Delete messages To delete an attachment from an e-mail that you are sending, select the attachment and Options > Remove. To free up memory space on your device, regularly delete messages from the Inbox and Sent folders, and To set the message priority, select Options Sending >... -
Page 71: Text Messages
Messaging Sending options for text To update the list of folders, select a folder and Options Update folder list. > messages Text messages To select a message centre to send the message, select Options Sending options Message centre in > >... -
Page 72: View Picture Messages
Messaging Forward picture messages Text messages may be stored on your SIM card. Before you can view SIM messages, you must copy the messages to a folder in the device. After copying the 1. To forward the message, open the message from the Inbox folder and select Options >... -
Page 73: Create And Send Multimedia Messages
Messaging wizard, or contact your service provider for the correct message, select Options Insert new > Slide. > settings. See "Multimedia message settings", p. 80. To change the order of slides in your message, select Options > Move. Create and send multimedia 6. -
Page 74: Create Presentations
Messaging reply with an audio message, or Via e-mail to reply 5. To insert images, sound, video, or notes in your with an e-mail message. presentation, scroll to the corresponding object area, and select Options > Insert. Tip: To add recipients to your reply, select Options Add recipient to select the... -
Page 75: View And Save Multimedia Attachments
Messaging these numbers and addresses to make calls, send from Contacts. If you enter more than one number messages, or create bookmarks, for example. or e-mail address, separate them with a semicolon. 2. Edit the message, if desired, and select Options >... -
Page 76: Instant Messaging
Messaging Receive report — Select if you want to receive information on IM settings, contact your service • provider. a notification when the message has been successfully delivered to the recipient. Receiving a You may receive the settings in a special text message delivery report of a multimedia message that has from the service provider that offers the IM service. -
Page 77: Start A Conversation
Messaging name, password, and other settings to log in from your To save a conversation, while in the conversation view, service provider when you register for the service. select Options Record chat. The conversation is > saved as a text file that can be opened and viewed in the Notes application. -
Page 78: Block Users
Messaging IM application settings To provide members with editing rights to the group, select Options editor. Select a user from your > IM contacts or enter the ID of the user. IM users with Select Options Settings IM settings and define >... -
Page 79: Special Message Types
Messaging Show date/ time info — Select to view the before downloading it, select Options Message • > details. receiving or sending time of each message in an IM conversation. IM alert tone — Select the tone that is played when •... -
Page 80: Messaging Settings
Messaging Text message settings To receive cell broadcast messages, you may need to set the cell broadcast reception on. Select Options > Settings Reception > On. Select Menu Communic. Messaging > > > > Options Settings Text message. > > To view messages related to a topic, select the topic. -
Page 81: Multimedia Message Settings
Messaging Multimedia message messages from the message centre manually, or to prevent receipt of any multimedia messages. settings Allow anon. msgs. — Select whether you want to • receive messages from unknown senders. Select Menu Communic. Messaging > > > Receive adverts —... -
Page 82: Connection Settings
Messaging If you have defined a mailbox, scroll to it, and press the Send copy to self — Select whether you want to • scroll key to edit the settings. save a copy of the e-mail to your remote mailbox and to the address defined in My e-mail address The settings available for editing may vary. -
Page 83: Automatic Retrieval Settings
Messaging Automatic retrieval settings Automatically or Manually. If you select Automatically, you may still need to confirm some To define the automatic retrieval settings for an e-mail downloads since not all services can be downloaded account, select the account, select Options Edit >... - Page 84 Messaging Folder view — Define how you want the messages • in Inbox to be shown.
-
Page 85: Phone
Phone To make and receive calls, the device must be switched To mute the ringing tone instead of answering a call, on, the device must have a valid SIM card installed, and select Silence. you must be located in the service area of a cellular When you have an active call and the call waiting network. -
Page 86: Make A Conference Call
Enter the first letters of the name, scroll Drop participant. to the name, and press the call key. See "Nokia Contacts To discuss privately with a conference call participant, for Eseries", p. 37. scroll to the participant, and select Options >... -
Page 87: Video Calls
Phone Video calls To disable the sending of audio, video, or video and audio, select Options Disable Sending audio, > > Sending video, or Sending aud. & video. To be able to make a video call, you need to be in the To use the loudspeaker for receiving audio, select coverage of a UMTS network. -
Page 88: Receive A Video Sharing Invitation
Phone 3. Select the recipient from Contacts, or enter the emergency calls, if possible. If you have cellular recipient's SIP address manually to send an network coverage available, make sure that your invitation to the recipient. Sharing begins cellular phone is switched on and ready to make calls automatically when the recipient accepts the video before you attempt an emergency call. -
Page 89: Connect To The Net Call Service
Phone 2. Select Back until you return to the Connection Refresh. Use this option if your WLAN is not shown on settings main view. the list. 3. Select Internet tel. Options profile. To select a net call service for outgoing calls if the >... -
Page 90: Net Call Service Settings
Phone call. When your device is connected to a net call service, To assign a number key to a phone number, select all calls are made as net calls. Menu Communic. Speed dial. Scroll to the > > number key (2 - 9) on the display, and select Options >... -
Page 91: Call Barring
Phone If out of reach — Divert calls when the device is When calls are barred, calls may be possible to certain • official emergency numbers. switched off or out of network coverage. If not available — Activate the last three settings •... -
Page 92: Send Dtmf Tones
Phone Voice mail To reject net calls from anonymous callers, select Anonymous call barring > On. Select Menu Communic. Call mailbox. > > Send DTMF tones When you open the Voice mail application for the first time, you are asked to enter the number of your voice mailbox. -
Page 93: Voice Commands
Phone To hear the entries in your contacts list, select The device creates a voice tag for the entries in Contacts Contacts. Do not use this option if you have more than and for the functions designated in the Voice 500 contacts. -
Page 94: Launch An Application
Phone view a list of other matches or Quit to cancel To change the voice command, select Profiles > dialling. Options Change command. > If several numbers are saved under the contact, the Voice command settings device selects the default number, if it has been set. Otherwise, the device selects the first available number of the following fields: Mobile, Mobile... -
Page 95: Ptt Settings
Phone Make a PTT call duration for your network, contact your service provider. PTT settings Warning: Do not hold the device near your ear when the loudspeaker is in use, because the volume may be extremely loud. Select Options Settings and select User settings >... -
Page 96: Manage Ptt Contacts
Phone Manage PTT contacts When you log in to PTT, you are automatically connected to the channels that were active when the To view, add, modify, delete, or call contacts, select application was last closed. Options > Contacts. A list of names from the Contacts application is displayed with information about their Exit PTT login status. -
Page 97: Monitor All Communications
Phone Call and send messages from To view the amount of data transferred during packet data connections, select Packet data. Monitor all communications To call back a caller, select Recent calls and open Missed calls, Received calls, or Dialled numbers. To monitor all voice calls, text messages, or data Select the caller, and Options... -
Page 98: Travelling
Travelling Need directions? Looking for a restaurant? Your Eseries adjustments to GPS satellites made by the United States device has the tools to get you where you want to be. government and is subject to change with the United States Department of Defense civil GPS policy and the Federal Radionavigation Plan. -
Page 99: Positioning Settings
Some maps may be available in your device or memory However, the accuracy is generally better when more card. You can also use the Nokia Map Loader PC satellites are found. software to download maps. To install Nokia Map... -
Page 100: About Maps
Travelling Loader to a compatible PC, go to online). For details and roaming costs, contact your www.maps.nokia.com. service provider. Downloading maps may involve the transmission of Tip: To avoid data transfer costs, you can also large amounts of data through your service provider's use Maps without an internet connection, and network. -
Page 101: Display Indicators
Travelling These maps are free of charge, but downloading may the search field, and press the scroll key. To find a involve the transmission of large amounts of data location in another city, enter the city and the full or through your service provider's network. -
Page 102: Walk To Your Destination
Travelling To show the route on the map, select Options Show Tip: To try out navigation for three days with a > route. free licence, press the scroll key and select Walk to. Maps checks if a free licence is available for To navigate to the destination by car or on foot, if you your device. -
Page 103: Traffic Information
Travelling Settings Navigation Voice guidance. Voice To update the traffic information, select Update traffic > > guidance is not available for pedestrian navigation. info. To switch between different views during the Travel guides navigation, press the scroll key, and select Manoeuvre view, Bird's-eye... -
Page 104: Use Gps Data
Travelling With GPS data, you can view your current location, find To save your current position as a landmark, select your way to a desired location, and track distance. Navigation or Position, and Options Save > position. Select Navigation to view navigating information to your trip destination, Position to view positioning... -
Page 105: Edit Landmarks
Travelling Landmark categories request for the latitude and longitude coordinates of your current location, Use map to select the location from a map, or Enter manually to fill in necessary You can see the landmark categories in two views: one lists categories that already contain landmarks, and location information such as a name, category, the other lists all the categories your device has. - Page 106 Travelling To find out how to navigate to the received landmark, select Options Show route. >...
-
Page 107: Nokia Office Tools
Nokia Office Tools Nokia Office Tools support mobile business and enable To add new items to the note, select Options Insert > effective communication with work teams. new. You can record sound and video clips, and capture images. Active notes... -
Page 108: Calculator
Nokia Office Tools To change the layout of active notes, select Change recall the last saved result the next time you open the view > Grid. To view the notes as a list, select Change Calculator application, select Options Last result. -
Page 109: Quickoffice
Nokia Office Tools Converter To view information about the selected file, select Options > Details. To view additional information about the file online, select Options Additional > Select Menu Office > Converter. > details. The converter has limited accuracy, and rounding errors may occur. -
Page 110: Zip Manager
Nokia Office Tools PDF reader determines the conversion rates of the other currencies. 1. To set the rate of exchange for the unit of currency, Select Menu Office Adobe Reader. > > scroll to the Type field, and select Options >... -
Page 111: Printing Options
Nokia Office Tools To print to a file, select Options Printing The available options may vary. > options Print Print to file, and determine the > > location for the file. Printer settings To change the printing options, select Options >... -
Page 112: Alarm Clock
Nokia Office Tools Alarm clock time in your device is changed according to the city selected. Check that the time is correct and matches Open the alarm clock tab. your time zone. To set an alarm, select Options alarm. When >... -
Page 113: Nokia Wireless Keyboard
Keyboard Wireless keyboards are available as separate enhancements. To set up the Nokia Wireless Keyboard or other compatible wireless keyboard supporting the Bluetooth Human Interface Devices (HID) profile for use with your device, use the Wireless keyboard application. -
Page 114: Connectivity
Fast downloading Nokia PC Suite High-speed downlink packet access (HSDPA, also called You can install Nokia PC Suite from the CD-ROM or from the web. Nokia PC Suite can be used with Windows 3.5G, indicated by ) is a network service in UMTS 2000, Windows XP, and Windows Vista. -
Page 115: Infrared
1. Ensure that the infrared ports of the devices face each other. The positioning of the devices is more To use Nokia PC Suite with your device, install Nokia PC important than the angle or distance. Suite on your PC, connect the data cable, and select Suite. -
Page 116: Bluetooth
Connectivity Bluetooth Send and receive data with Bluetooth Select Menu Connectivity > Bluetooth. > 1. When you activate Bluetooth for the first time, you are asked to give a name to your device. Give your About Bluetooth device a unique name to make it easy to recognise if there are several Bluetooth devices in the vicinity. -
Page 117: Pair Devices
A Bluetooth connection is disconnected automatically confirm the connection manually every time a after sending or receiving data. Only Nokia PC Suite and connection attempt is made. After pairing, the some enhancements such as headsets may maintain a device is saved to the paired devices page. -
Page 118: Security Tips
For more information about car kit devices and Security tips compatibility with your device, see the Nokia web site and your car kit user guide. When you are not using Bluetooth connectivity, select... -
Page 119: Wireless Lan
Connectivity Wireless LAN 4. Select your device from the list of compatible devices. 5. To pair the devices, enter the Bluetooth passcode Your device can detect and connect to a wireless local shown on the display of the car kit to your device. area network (WLAN). -
Page 120: See Wlan Availability
Connectivity applicable safety requirements when establishing and The WLAN wizard helps you find and connect to a using a WLAN connection. wireless LAN. When you open the application, your device starts to scan for available WLANs and lists them. If you move the device to another location within the WLAN and out of range of a WLAN access point, the To update the list of available WLANs, select Options... -
Page 121: Modem
WLAN. To set • You need an appropriate data communications WLAN scanning off, scroll to software on your computer, such as Nokia PC Suite. the row showing the status, For more information, see the Nokia PC Suite guide. press the scroll key, and •... -
Page 122: Connection Manager
Connectivity You may not be able to use some of the other hoc), signal strength, and network encryption communication features when the device is used as a indicators, and whether your device has an active modem. connection with the network. To view the details of a network, scroll to it, and press Connection manager the scroll key. -
Page 123: Security And Data Management
Security and data management Manage the data and software on your device, and take To prevent access to the contents of your device, lock care of the security of the device and its contents. the device when in home screen. Press the power key, select Lock phone, and enter your lock code. -
Page 124: Encryption
Security and data management Encrypt device memory or You can protect a memory card with a password to prevent unauthorised access. To set a password, select memory card Options password. The password can be up to > 8 characters long and is case-sensitive. The password To encrypt the device memory, select Phone is stored in your device. -
Page 125: Fixed Dialling
Security and data management To decrypt the device memory, select Phone 2. Select Options Activate fixed dialling. You > memory. need your PIN2 code to activate and deactivate fixed dialling or edit your fixed dialling contacts. To decrypt the memory card without destroying the Contact your service provider if you do not have the encryption key, select Memory card... -
Page 126: View Certificate Details
Security and data management online bank or a remote server to transfer confidential and other data. Only trusted certificates can be used to information. They should also be used if you want to verify services and software. reduce the risk of viruses or other malicious software, and to check the authenticity of software when you Important: Even if the use of certificates makes download and install software to your device. -
Page 127: Security Modules
> modules You can also connect your device to a compatible computer and use Nokia PC Suite to back up data. To view or edit a security module, scroll to it, and press the scroll key. Remote configuration To view detailed information about a security module,... -
Page 128: Application Manager
Security and data management The remote configuration connection is usually started Auto-accept all requests — Select if you do • by the server when the device settings need to be not want the server to ask for your confirmation updated. when it initiates a configuration session. -
Page 129: Install Applications
Security and data management • Java ME™ applications compatible with the Symbian To download and install software from the web, select operating system. The Java application installation Download applications. Select the application and file extensions are .jad or .jar. Options >... -
Page 130: Java Security Settings
Security and data management Delete — The software package installation file is Network access — Allow the application to create • • deleted from the device after the installation. If you a data connection to the network. download software packages using the Web Messaging —... -
Page 131: Activation Keys
Not allowed means up both the activation keys and the content, use the that you cannot send the file to another device. backup feature of Nokia PC Suite. Other transfer Content in phone — means that the file is in •... -
Page 132: Data Synchronisation
The group key view displays all of the files related to a group right. If you have downloaded multiple media There is a Nokia PC Suite synchronisation profile files with the same rights, they are all displayed in this available in your device. You do not need to edit it if view. -
Page 133: Synchronisation Connection Settings
VPN. Data bearer — Select the data bearer to connect to • The Nokia mobile virtual private network (VPN) client the remote server during synchronisation. creates a secure connection to compatible corporate Access point — Select the access point to use for •... -
Page 134: Manage Vpn
— Select the VPN policy to combine with • of VPN policy servers from which you can install and the internet access point. update VPN policies. A policy server refers to a Nokia Internet access point — Select the internet access •... -
Page 135: Barcode Reader
Security and data management Tip: You can configure the application's To view previously saved, decoded information in the connection setting to Always ask, in which case main view, select Saved data. you select the VPN access point from a list of connections when a connection is established. -
Page 136: Settings
Settings Select Menu Tools > Settings. Slide handling — Change the slide settings. • > Enhancement — Define the settings for your • You can define and modify various settings of your enhancements. device. Modifying these settings affects the operation Security —... -
Page 137: Standby Mode Settings
Settings To change the text size, select Display Font size. To select a ringing tone for video calls, select Tones > > Video call tone. To adjust the length of time the display can be left idle before the screen saver is activated, select Display To set the ringing type, select Tones... -
Page 138: Language Settings
Settings Date and time settings Language settings To set the language used on the device display, select Select Menu Tools Settings General Date > > > > Language Phone language. > time. To select the language in which you write notes and To set the current date and time, select Date messages, select... -
Page 139: Enhancement Settings
Settings E-mail key settings To select whether you want to answer a call by opening the slide, select Opening the slide. To select which mailbox to open with the e-mail key, To select whether you want to end a call by closing the select E-mail key settings E-mail... -
Page 140: Restore Original Settings
Settings Telephone settings To set the keypad to lock automatically after a defined period, select Phone and SIM card Keypad > autolock period. Select Menu Tools Settings > Phone. > > To set a time-out after which the device is Select from the following: automatically locked and can be used only if the correct Call... -
Page 141: Network Settings
Settings To set the default call type, select Call Default call To set the device to indicate when it is used in Micro > type and select Voice call if you make a GSM calls, or Cellular Network (MCN), select Cell info display >... -
Page 142: Access Points
Settings Access points To define the packet data settings, select Packet data connection and select When available to register the Select Menu Tools Settings Connection device to the packet data network when you switch the > > > > Access points. -
Page 143: Advanced Wlan Settings
Settings Advanced WLAN settings WLAN security settings Select Options Advanced settings. The advanced Select Menu Tools Settings Connection > > > > > WLAN settings are normally defined automatically, and Access points Options New access point, or > > changing them is not recommended. select an access point and Options >... -
Page 144: 802.1X Security Settings
Settings WPA security settings Select WLAN security settings WEP key settings > and from the following: Select WPA/WPA2 as the WLAN security mode. WEP encryption — Select the desired WEP • Select WLAN security settings and from the following: encryption key length. WEP key format —... -
Page 145: Eap Plug-Ins
Profile name — Enter a name for the SIP profile. See the device help for more information on EAP • Service profile — Select IETF Nokia 3GPP. plugins. • Default access point — Select the access point to • use for the internet connection. -
Page 146: Edit Sip Proxy Servers
Settings Edit registration servers Registration — Select the registration mode. • Use security — Select if security negotiation is • Select Options New SIP profile Edit Registrar used. > > server. Proxy server — Enter the proxy server settings for •... -
Page 147: Restrict Packet Data
Settings settings are automatically saved in Configurations. To remove access points from the list, select Options > You may receive configuration settings for access Remove. points, multimedia, or e-mail services, and IM or synchronisation settings from trusted servers. Application settings To delete configurations for a trusted server, select Options >... -
Page 148: Shortcuts
Shortcuts Here are some of the available keyboard shortcuts in Press and hold to call your voice your device. Shortcuts can make the use of the mailbox. applications more efficient. Number key (2– Call a phone number using speed dialling. You must first activate General shortcuts speed dialling at Menu... - Page 149 Shortcuts Image viewer Call key Send the image. Zoom out. Zoom in. Zoom in. Press twice for the full screen size. Scroll left in the zoomed image. Scroll right in the zoomed image. Scroll up in the zoomed image. Scroll down in the zoomed image. Rotate clockwise.
-
Page 150: Glossary
For more information on the Domain name service. An internet availability of EGPRS and data transfer service that translates domain names speed, contact your service provider. such as www.nokia.com into IP... - Page 151 Glossary previously unavailable because of GPRS General packet radio service. GPRS limitations in the radio access network. enables wireless access for mobile phones to data networks (network HTTP Hypertext transfer protocol. A service). GPRS uses packet data document transfer protocol used in the technology where information is sent web.
- Page 152 Glossary and data, UMTS enables audio and PIN2 The PIN2 code is supplied with some video delivery to wireless devices. SIM cards. The PIN2 code is required to access certain functions supported by When you use your device in GSM and the SIM card.
- Page 153 Glossary Virtual private network. VPN creates a secure connection to compatible corporate intranet and services, such as e-mail. Wireless application protocol. WAP is an international standard for wireless communication. Wired equivalent privacy. WEP is an encryption method that encrypts data before it is transmitted in WLAN.
-
Page 154: Nokia Original Enhancements
Nokia original enhancements Battery Warning: Use only batteries, chargers, and enhancements approved by Nokia for use with this particular model. The use of any other types may Battery model Talk time Standby invalidate any approval or warranty, and may be BL-4U Up to 7.5/3.4... -
Page 155: Troubleshooting
Troubleshooting Q: Why can’t I find my friend’s device while To see frequently asked questions about your device, visit the product support pages at the Nokia web site. using Bluetooth connectivity? Q: What is my lock, PIN, or PUK code? - Page 156 Q: How do I check the signal quality of my Check that the WLAN access point is not on channels 12-13, as they cannot be associated with. WLAN connection? Q: How do I switch WLAN off on my Nokia Select Menu Connectivity Conn.
- Page 157 Troubleshooting Q: How do I save battery power? note is shown if you have selected Menu > Communic. Messaging Options Settings > > > > A: Many features in your device increase the demand Multimedia message Multimedia retrieval > > on battery power and reduce the battery life time.
-
Page 158: Battery And Charger Information
When the talk and standby times are noticeably shorter than normal, replace the Always try to keep the battery between 15°C and 25°C battery. Use only Nokia approved batteries, and (59°F and 77°F). Extreme temperatures reduce the recharge your battery only with Nokia approved capacity and lifetime of the battery. -
Page 159: Nokia Battery Authentication Guidelines
Dispose of batteries according to local regulations. Please recycle when possible. Do not dispose as household waste. Always use original Nokia batteries for your safety. To Do not dismantle, cut, open, crush, bend, deform, check that you are getting an original Nokia battery, puncture, or shred cells or batteries. -
Page 160: Authenticate Hologram
What if your battery is not authentic? If you cannot confirm that your Nokia battery with the hologram on the label is an authentic Nokia battery, please do not use the battery. Take it to the nearest authorised Nokia service point or dealer for assistance. -
Page 161: Care And Maintenance
Care and maintenance Your device is a product of superior design and • Do not drop, knock, or shake the device. Rough craftsmanship and should be treated with care. The handling can break internal circuit boards and fine following suggestions will help you protect your mechanics. - Page 162 Care and maintenance not working properly, take it to the nearest authorised service facility for service.
-
Page 163: Additional Safety Information
Additional safety information Small children Parts of the device are magnetic. Metallic materials may be attracted to the device. Do not place credit cards or other magnetic storage media near the device, Your device and its enhancements may contain small because information stored on them may be erased. -
Page 164: Hearing Aids
Additional safety information Vehicles should be maintained between a wireless device and an implanted medical device, such as a pacemaker or implanted cardioverter defibrillator, to avoid potential RF signals may affect improperly installed or interference with the medical device. Persons who inadequately shielded electronic systems in motor have such devices should: vehicles such as electronic fuel injection systems,... -
Page 165: Potentially Explosive Environments
Additional safety information Potentially explosive Emergency calls environments Important: This device operates using radio Switch off your device when in any area with a signals, wireless networks, landline networks, and potentially explosive atmosphere, and obey all signs user-programmed functions. If your device supports and instructions. -
Page 166: Certification Information (Sar)
Additional SAR INFORMATION (SAR) information may be provided under product information at www.nokia.com. This mobile device meets guidelines for exposure to radio waves. Your mobile device is a radio transmitter and receiver. -
Page 167: Manufacturer's Limited Warranty
(b) and (c) Nokia warrants to you that during the warranty period below; Nokia or a Nokia authorised service company will in a commercially reasonable time remedy defects in b) six (6) months for the following consumable parts... -
Page 168: How To Get Warranty Service
You must return your Product or the affected part (if it software are correctable or will be corrected. is not the entire Product) to a Nokia care centre or 2. This Limited Warranty does not cover a) normal wear Nokia designated service location before the expiry of and tear (including, without limitation, wear and tear the Warranty Period. -
Page 169: Other Important Notices
Product’s serial the inability of Nokia to complete warranty repairs that number, the mobile accessory date code or the IMEI are caused by the operator's delay or failure to unlock number has been removed, erased, defaced, altered or any SIM-lock or other lock. -
Page 170: Limitation Of Nokia's Liability
MANUFACTURER’S LIMITED WARRANTY All parts of the Product or other equipment that Nokia applicable law, any implied conditions, warranties or has replaced shall become the property of Nokia. If the other terms as to satisfactory quality or fitness for returned Product is found not to be covered by the purpose. - Page 171 Note: Your Product is a sophisticated electronic device. Nokia strongly encourages you to familiarise yourself with the user guide and instructions provided with and for the Product. Please also note that the...
-
Page 172: Index
Index Symbols/Numerics audio files details 3-D ringing tones cable sending 802.1x cache autolock period security settings emptying Calculator Calendar background image settings access points backing up data calendar entries creating barcodes creating battery viewing activation keys charge level calendar key Active notes charging calendar views... - Page 173 Index Clock currency conversions making a net call muting the ringing tone alarms net call alert settings world clock date conference calls rejecting settings rejecting with text configuration messages decrypting message connection methods device memory and memory selecting type Bluetooth card settings data cable...
- Page 174 Index files connection settings settings creating folders downloading starting a conversation deleting flash files images replying sending adding to contacts fixed dialling retrieval settings display background sending free memory rotating user settings sending writing sharing online e-mail key zooming Gallery e-mail key settings indicators Genuine enhancements...
- Page 175 Index keyguard settings setting password 29, 107 keypad transfer log unlocking lock settings logos menu message reader locking operator logo tones welcome logo selecting voice keys messages activation keys call rejection messages shortcuts cell broadcast settings mailboxes WEP keys configuration messages connecting other settings making a call...
- Page 176 87, 145 display logging in settings home screen making a call network tones settings settings picture messages Nokia PC Suite forwarding Notes viewing notification light Quickoffice PIN code changing playing One-touch keys radio messages operator listening to...
- Page 177 Index settings memory card GPRS 62, 141 recording security module home screen sound clips sending remote configuration files 26, 107 Java application security remote lock using Bluetooth keypad lock remote synchronisation videos language restoring original service commands settings service messages multimedia messages ringing tones settings...
- Page 178 Index shortcuts switching device on and toolbar keys camera signal strength Symbian applications traditional text input silencing synchronisation Transfer alarms and incoming settings calls 16, 136 synchronisation profiles transferring data SIM access profile synchronising trip destination SIM card trip meter applications troubleshooting inserting...
- Page 179 Index Voice aid access points voice commands advanced access point changing profiles settings launching an application advanced settings settings availability voice mail MAC address 118, 141 calling searching for networks changing number security settings voice over IP settings VoIP WEP keys volume WPA security settings WLAN wizard...
Need help?
Do you have a question about the E66 E series and is the answer not in the manual?
Questions and answers