Table of Contents
Advertisement
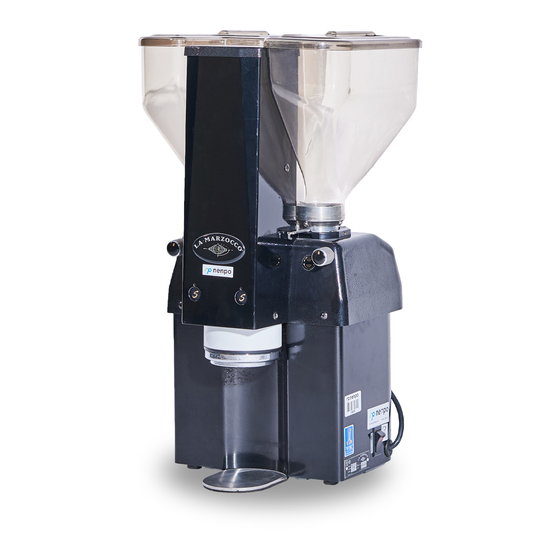
manual
swift eps
b
The Swift grinder is the only grinder that grinds and tamps on demand, with no
waste and no mess, to an accurate volumetric dose.
Swift's clever engineering and design guarantee level and consistent coffee beds,
time after time. Flat ceramic burrs ensure minimal heat buildup during the
grinding process. Compatible with all La Marzocco espresso machines. Swift is
ideal for high volume locations where consistency is key. Swift technology
maintains quality in the cup, shot after shot, no matter who is using it.
Advertisement
Table of Contents
Troubleshooting

Related Manuals for La Marzocco swift epsb


Summary of Contents for La Marzocco swift epsb
- Page 1 Swift’s clever engineering and design guarantee level and consistent coffee beds, time after time. Flat ceramic burrs ensure minimal heat buildup during the grinding process. Compatible with all La Marzocco espresso machines. Swift is ideal for high volume locations where consistency is key. Swift technology...
-
Page 2: Table Of Contents
Operating Manual V2.1 - 11/2014 Chapters 1. Introduction page 3 2. Components page 3 La Marzocco S.r.l. 3. Specifications page 4 4. Installation page 5 Via La Torre 14/H 5. Engaging the Portafilter page 6 Località La Torre 6. Operating the Swift epS b... -
Page 3: Introduction
1. Introduction Espresso Preparation System Quality, Consistency, time, so waste and product your SWIFT EPS b for optimal Conservation, and Speed. inconsistency are reduced. At performance. Congratulations on choosing the same time, the SWIFT EPS b the Swift epS b from La Your new SWIFT EPS b grinds, Please review it carefully. enhances coffee freshness by Marzocco. Your application doses and tamps coffee... -
Page 4: Specifications
3. Specifications Height 65.5 cm/25.8 in. width 35 cm/13.8 in. Depth 36 cm/14 in. Shipping Weight 31 kg/68 lbs. Voltage Single phase 220 VAC or Single phase 110 VAC Amperage 7.5 amps, 220 VAC or 15 amps, 110 VAC Bean Hopper Capacity 1.8 kg/4 lbs. each Watts 780 W 350 mm 360 mm 13,8 in... -
Page 5: Installation
4. Installation the Swift epS b is easy to epS b requires a grounded space on the counter. Since allow the easy removal of the install. 110v, 15 amp (or 220v, 7.5 the unit is 26” (660 mm) in bean hoppers and lids. the However, there are several amp) power supply. It also height,allow at least 30”... -
Page 6: Engaging The Portafilter
(5) Turn on the grinder by engaging the main power switch. the red light will come on. 5. Engaging the Portafilter The portafilter engages not necessary to force the grinder shifts on the counter directly to the SWIFT EPS b . portafilter into place. Engage top, you are using too much Since the Swift epS b has... -
Page 7: Operating The Swift Eps B
6. Operating the SWIFT EPS B be ground, dosed, and tamped the red light corresponding the volume of ground coffee 6.1 Swift EPS B from one of these locations, to the button selected is no in the portafilter reaches Once the portafilter depending on which button... - Page 8 To dose and press coffee when standard filters that flashing indicator lights using a double filter, there are normally supplied with the red indicator lights will is a cushioning cylindrical espresso coffee machines or flash for a number of reasons. ring next to the external with standard Swift models These are summarized below: circumference of the impeller (double only).
-
Page 9: Adjusting Coffee Grind
7. Adjusting Coffee Grind To achieve your desired brew (2) Grinding the coffee more (3) Grinding the coffee more Note: There are many time and coffee consistency, finely will result in a coarsely will result in a variables that can affect a manual adjustment can slower pour. to achieve faster pour. to achieve coffee, including temperature, be made to the grinder to a slower pour, adjust the... -
Page 10: Adjusting Dose Quantity
8. Adjusting Dose Quantity 8.1 Swift EPS B provided with the grinder. Swift epS b is able to dose WARNING it is possible to change the different quantities using the Swift epS b is set to dose HAZARDOUS VOLTAGE dosage quantity by raising other baskets, available... -
Page 11: Swift S/D
(4) to increase the dosage clockwise, as viewed from 8.2 Swift S/D amount, turn the impeller below. Key to performance: clockwise, as viewed Note: One 360° turn is equal from below. to decrease The 3 figures here show how to approximately 1 gram of the dosage amount, turn Single/Double Swift coffee. - Page 12 Double filter: the cushioning cylindrical determined by the volume of and tamper through a switch ring, whose springs push ground coffee that pushes the connected to an electronic The coffee is deposited and downwards with the same shaft upwards, which, at the board. then tamped in a uniform force as the impeller.
- Page 13 Setting up the Swift adjust the grind to extract The cylindrical ring is held Remove the two screws and Grinder S/D 60ml in 25 seconds. in place by two brass screws manually rotate the part, (see image b) so that the grasping it from the bottom.
- Page 14 Single dose: turning them counter 1) Before setting up, test the clockwise, the time single dose: The quantity of coffee for the decreases,decreasing single dose is regulated by a) if extraction timing of 30 dose. time. ml of espresso is less than this model of the grinder 25 seconds, increase gram By turning the screw at the supplies a double dose that dose by rotating trimmer...
-
Page 15: Daily Cleaning
9. Daily Cleaning Daily cleaning the cleaning instructions are mechanical operation of your WARNING Swift epS b is important carried out each day, there machine. there are three HAZARDOUS VOLTAGE to the quality of your will be little chance of old areas that must be cleaned: DISCONNECT FROM POWER SUPPLY BEFORE SERVICING coffee beverages and to... - Page 16 (4) the bean hoppers are (6) with a small brush, clean locked into position by the burr chamber. safety screw. Loosen the safety screw and lift the bean hopper from its mount. Loosen safety screw (5) L ift the bean hopper (7) Vacuum coffee fragments from its position. (Hold and loose grounds from the bean gate closed the burr chamber.
- Page 17 (8) wipe the inside of the (9) Repeat for both right WARNING bean hopper with a soft and left bean hoppers. DO NOT OPERATE WITHOUT cloth to remove coffee BEAN HOPPERS IN PLACE AND (10) Reassemble unit. SAFETY SCREWS TIGHTENED oils. Do not operate without bean hoppers in place and safety screws...
-
Page 18: Impeller
10. impeller WARNING (3) P ress and hold the shaft lock to prevent the shaft HAZARDOUS VOLTAGE DISCONNECT FROM POWER from turning. SUPPLY BEFORE SERVICING (1) Disconnnect the Swift epS b from its power sup- ply. Hold shaft lock firmly (4) W ith your thumb and forefinger, press against the impeller flats. Turn the impeller clockwise,... - Page 19 (5) with impeller out, clean around the bayonet ring with the brush and wipe loose grounds from this area. insert the cleaning brush into the coffee collection area above the impeller and again wipe loose grounds away. Clean the impeller with a soft, dry Clean portafilter Clean impeller cloth.
-
Page 20: Burr Change-Out
11. Burr Change-Out periodic burr replacement is steel burrs, it is still necessary times, and the absence of WARNING required. while the ceramic to watch your coffee for noticeablechange in your HAZARDOUS VOLTAGE burrs used in the Swift the tell-tale signs of burr espresso when adjustments DISCONNECT FROM POWER SUPPLY BEFORE SERVICING epS b have a much longer... - Page 21 (5) Remove four (6) Remove adjustor clamp perimeter grinder cover from grinder head screws. Lift off cover. and remove adjusting mechanism. Remove screws Loosen adjustor clamp Remove adjusting Lift off cover mechanism...
- Page 22 (7) Rotate burr collar (8) Remove the three burr several revolutions mounting screws from counterclockwise, until both upper and lower free. burrs. Rotate Remove lower screws Lift off Remove upper screws...
- Page 23 (9) Clean burr engagement (11) install new burrs. Do not surface with a towel or over-tighten screws, and brush. be sure no debris is left under the burrs. Position burr wipe clean (12) Reassemble. Use a small (10) Vacuum the burr amount of food grade chamber.
-
Page 24: Chute Clean-Out Tool
12. Chute Clean-Out tool Occasionally the chute to replacing or resetting this tool is used to loosen WARNING between the grinders and the fuse, it is important to compacted grounds HAZARDOUS VOLTAGE tamping chamber may remove the clogged grounds. alleviate clogging. DISCONNECT FROM POWER SUPPLY BEFORE SERVICING become... -
Page 25: Fuse Replacement And Reset Switches
13. fuse Replacement and Reset Switches The Swift EPSbhas four be sure to use only correctly replaced with reset switches WARNING fuses located at the rear rated replacement fuses. on the exteror of the grinder. HAZARDOUS VOLTAGE of the machine behind the electronics = 1 ea. @ 125m the head of the switch will DISCONNECT FROM POWER SUPPLY BEFORE removable... - Page 26 (4) Remove the fuse using (6) Replace cover andscrews. the tool provided. Note: A damaged fuse is identifia- ble by a broken filament and discoloration of the fuse glass. Replace cover (5) Replace damaged fuse with the correctly rated fuse. (See electrical schematic, page 31-32) (7) Reconnect power. turn on and resume use.
-
Page 27: Tips And Troubleshooting
14. Tips and Troubleshooting What is the ideal shot time? consistent pour times. The vessel may temporarily lower However, ultimately the look Shot time varies with all roasts water temperature below the and taste of the espresso portafilter mounting area is and brew temperatures used desired level. Since rinsing is is the final arbiter of a a source of heat which can to brew espresso. Most likely,... -
Page 28: Troubleshooting Guide
tROUBLESHOOtiNG GUiDE (* items are for techs) Message Message Solution Push start buttons and NOTHING happens. - Check that the electrical plug is fully inserted - Switch the on/off switch to the on position (the light should be lit) *Check fuses. Push the start button and the LIGHTS FLASH - The portafilter is not fully engaged- The portafilter is already full - The tamper is stuck in the full or up position (see tamper cleaning instructions) - The safety timer has run out due to and empty bean hopper, closed bean gate, or a plugged bean hopper chute. *Safety micro-switch faulty *Safety micro-switch rod is not contacting the switch properly. Grind TIME OUT is reached before basket is full. - Check that the bean hopper gate is fully open - Grind coarseness may be too fine - Check passage below bean hopper for obstructions *Adjust grind time reostat. One GRINDING MOTOR does not run - Check for blown fuse (see manual under fuse replacement) (serial numbers 0-655) - If a grinder motor fuse is blown replace it with a 10 amp GDC fuse - Before starting the grinder motor remove the bean hopper (see manual) and ensure that the motor spins freely. If it does not spin freely follow the burr chamber cleaning instructions and look for foreign... -
Page 29: Electrical Diagrams
15. Electrical Diagrams Serial numbers up to 655 TIME-OUT TIME DELAY OFF GRINDER TAMPER FULL LIMIT SWITCH WHITE LEFT RIGHT WHITE PORTA-FILTER IN LIMIT SWITCH 115 VAC 230 VAC ON/OFF 115/230 VAC SWITCH BLACK WHITE BLACK BLACK WHITE WHITE WHITE WHITE CAP. - Page 30 Serial numbers 655 and above TIME-OUT TIME DELAY OFF GRINDER TAMPER FULL LIMIT SWITCH WHITE LEFT RIGHT WHITE PORTA-FILTER IN LIMIT SWITCH 115 VAC 230 VAC ON/OFF 115/230 VAC SWITCH BLACK WHITE 10 AMP 10 AMP MANUAL MANUAL RESET RESET BLACK BLACK WHITE...
-
Page 31: Cleaning Procedure
16. Cleaning Procedure Change of grinding discs rotary disc flange [4a] with a plastic tool. 1. D isconnect power supply from the coffee machine, Cleaning stop bean flowing into the Use a brush to clean the grinder and if necessary surfaces of the flanges. dismantle the grinder. Remove all coffee particles or 2. -
Page 32: Recycling
17. Recycling 1) De-commissioning and demolition the machine is made out of various Recycling notice: Warning for the materials and therefore, if you do not protection of the environment. Start by setting the main switch to the intend to put it back in service, it must Used electrical and electronic waste “0” or OFF position.
Need help?
Do you have a question about the swift epsb and is the answer not in the manual?
Questions and answers