
Related Manuals for Honda ANF125


Summary of Contents for Honda ANF125
- Page 1 Honda ANF125 OWNER’S MANUAL USO E MANUTENZIONE MANUAL DEL PROPIETARIO ΕΓ ΕΙΡΙ∆Ι ΚΑΤ Υ Honda Motor Co., Ltd. 2009 http://mototh.com...
-
Page 2: Important Information
IMPORTANT INFORMATION OPERATOR AND PASSENGER This motorcycle is designed to carry the operator and one passenger. Never exceed the maximum weight capacity as shown on the accessories and loading label. ON-ROAD USE This motorcycle is designed to be used only on the road. READ THIS OWNER’S MANUAL CAREFULLY Pay special attention to the safety messages that appear throughout the manual. - Page 3 OWNER’S MANUAL All information in this publication is based on the latest production information available at the time of approval for printing. Honda Motor Co.,Ltd. reserves the right to make changes at any time without notice and without incurring any obligation.
- Page 4 When service is required, remember that your Honda dealer knows your motorcycle best. If you have the required mechanical ‘‘know-how’’ and tools, your dealer can supply you with an official Honda Shop Manual to help you perform many maintenance and repair tasks.
- Page 5 The following codes in this manual indicate each country. The illustrations herein are based on the type. France European direct sales Israel Greece The specifications may vary with each locale. http://mototh.com...
- Page 6 A FEW WORDS ABOUT SAFETY Your safety, and the safety of others, is very important. And operating this motorcycle safely is an important responsibility. To help you make informed decisions about safety, we have provided operating procedures and other information on labels and in this manual. This information alerts you to potential hazards that could hurt you or others.
- Page 7 You WILL be KILLED or SERIOUSLY HURT if you don’t follow instructions. You CAN be KILLED or SERIOUSLY HURT if you don’t follow instructions. You CAN be HURT if you don’t follow instructions. Safety Headings –– such as Important Safety Reminders or Important Safety Precautions. Safety Section ––...
- Page 8 OPERATION page page MOTORCYCLE SAFETY ESSENTIAL INDIVIDUAL IMPORTANT SAFETY COMPONENTS INFORMATION IGNITION SWITCH PROTECTIVE APPAREL KEYS LOAD LIMITS AND GUIDELINES RIGHT HANDLEBAR CONTROL IMAGE LABELS LEFT HANDLEBAR CONTROLS PARTS LOCATION INSTRUMENTS AND INDICATORS MAJOR COMPONENTS (Information you need to operate this motorcycle) BRAKES CLUTCH...
-
Page 9: Table Of Contents
page page FEATURES OPERATION (Not required for operation) PRE-RIDE INSPECTION STEERING LOCK STARTING THE ENGINE SEAT LOCK RUNNING-IN HELMET HOLDERS RIDING CENTER COMPARTMENT SHIFTING DOCUMENT BAG BRAKING FRONT TOP COVER PARKING LEG SHIELD ANTI-THEFT TIPS FRONT HANDLE COVER HEADLIGHT AIM VERTICAL ADJUSTMENT http://mototh.com... - Page 10 MAINTENANCE page page MAINTENANCE BRAKE SHOE WEAR THE IMPORTANCE OF BATTERY MAINTENANCE FUSE REPLACEMENT MAINTENANCE SAFETY BRAKELIGHT SWITCH SAFETY PRECAUTIONS ADJUSTMENT MAINTENANCE SCHEDULE BULB REPLACEMENT TOOL KIT SERIAL NUMBERS CLEANING COLOUR LABEL AIR CLEANER STORAGE GUIDE CRANKCASE BREATHER STORAGE ENGINE OIL REMOVAL FROM STORAGE SPARK PLUG VALVE CLEARANCE...
-
Page 11: Motorcycle Safety
MOTORCYCLE SAFETY IMPORTANT SAFETY INFORMATION Make Yourself Easy to See Your motorcycle can provide many years of Some drivers do not see motorcycles service and pleasure if you take because they are not looking for them. To responsibility for your own safety and make yourself more visible, wear bright understand the challenges that you can reflective clothing, position yourself so... - Page 12 Never exceed load limits, and only use accessories that have been approved by Honda for this motorcycle. See page more details. Not wearing a helmet increases the chance of serious injury or death in a crash.
- Page 13 Helmets and Eye Protection Additional Riding Gear Your helmet is your most important piece of In addition to a helmet and eye protection, riding gear because it offers the best we also recommend: protection against head injuries. A helmet Sturdy boots with non-slip soles to help should fit your head comfortably and protect your feet and ankles.
- Page 14 Non-Honda accessories, im p r o p e r m od i f i c a t i on s , a n d p o or Follow all load limits and other loading maintenance can also reduce your safety guidelines in this manual.
- Page 15 If you wish to carry more cargo, check with your Honda dealer for advice, and be sure to read the inf ormat ion regarding accessories on page http://mototh.com...
- Page 16 Modifying your motorcycle or using non- We strongly recommend that you use only Honda accessories can make your Honda Genuine Accessories that have been motorcycle unsafe. Before you consider specifically designed and tested for your making any modifications or adding an motorcycle.
- Page 17 Do not pull a trailer or sidecar with your Modifications motorcycle. This motorcycle was not We strongly advise you not to remove any designed for these attachments, and their original equipment or modif y your use can seriously impair your motorcycle’s motorcycle in any way that would change its handling.
- Page 18 IMAGE LABELS There is a specific symbol on each label. The following pages describe the label The meanings of each symbol and label are meanings. Some labels warn you of as follows. potential hazards that could cause serious injury. Others provide important safety information.
- Page 19 Read instructions contained in Owner’s Manual carefully. Read instructions contained in Shop Manual carefully. In the interest of safety, take the motorcycle to be serviced only by a Honda dealer. DANGER (with RED background) You WILL be KILLED or SERIOUSLY HURT if you don’t follow instructions.
- Page 20 ACCESSORIES AND LOADING WARNING LABEL WARNING ACCESSORIES AND LOADING The safety stability and handling of this motorcycle may be affected by the addition of accessories and luggage. Read carefully the instructions contained in user’s manual and installation guide before installing any accessory.
- Page 21 (GR type) TYRE INFORMATION & DRIVE CHAIN LABEL Cold tyre pressure: [Driver and passenger] Front 200 kPa (2.00 kgf/cm , 29 psi) Rear 250 kPa (2.50 kgf/cm , 36 psi) [Driver only] Front 200 kPa (2.00 kgf/cm , 29 psi) Rear 200 kPa (2.00 kgf/cm , 29 psi) Tyre size:...
- Page 22 (Except GR type) TYRE INFORMATION LABEL Cold tyre pressure: [Driver and passenger] Front 200 kPa (2.00 kgf/cm , 29 psi) Rear 250 kPa (2.50 kgf/cm , 36 psi) [Driver only] Front 200 kPa (2.00 kgf/cm , 29 psi) Rear 200 kPa (2.00 kgf/cm , 29 psi) Tyre size: Front 70/100 17M/C 40P...
- Page 23 SAFETY REMINDER LABEL For your protection, always wear your helmet while riding. FUEL LABEL UNLEAD FUEL ONLY CARGO LIMIT LABEL Do not exceed 5.0 kg (11.0 lb) http://mototh.com...
-
Page 24: Parts Location
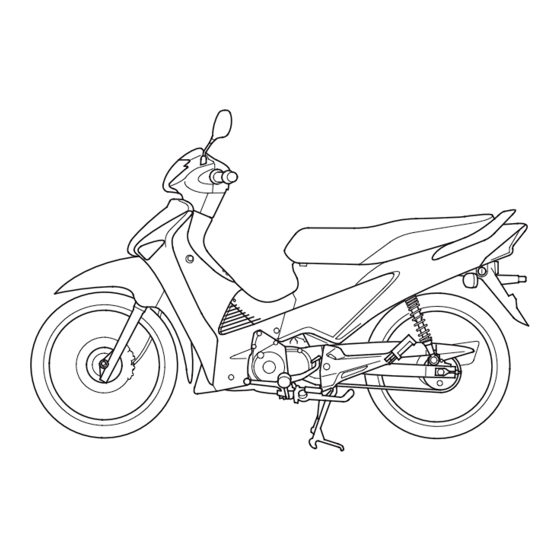
PARTS LOCATION Front brake fluid reservoir Headlight dimmer switch Rearview mirror Instruments and Indicators Rearview mirror Front brake lever Throttle grip Turn signal switch Start button Horn button Ignition switch http://mototh.com... - Page 25 Helmet holder Battery Document compartment Tool kit Main fuse Fuse box Oil filler cap/dipstick Passenger footpeg Kickstarter Footpeg Rear brake pedal http://mototh.com...
- Page 26 Center compartment Helmet holder Fuel fill cap Seat lock Passenger footpeg Shift lever Footpeg Side stand Center stand http://mototh.com...
- Page 27 INSTRUMENTS AND INDICATORS The indicators are contained in the instrument panel. Their functions are described in the tables on the following (1) (2) pages. (1) Gear position indicator (2) Left turn signal indicator (3) Neutral indicator (4) PGM-FI malfunction indicator lamp (MIL) (5) Speedometer (6) High beam indicator...
- Page 28 (red) light for a few seconds and then go off when the ignition switch is turned ON. If it comes on at any other time, reduce speed and take the motorcycle to your Honda dealer as soon as possible. http://mototh.com...
- Page 29 (Ref.No.) Description Function Speedometer Shows riding speed. T his shows your speed in kilometers per hour (km/h) or miles per hour (mph) and kilometers per hour (km/h) depending on the type. T his shows your speed in kilometers per hour (km/h) and/or miles per hour (mph) depending on the type.
- Page 30 When segment E ( ) flashes, fuel will be Odometer/Fuel Gauge Display When the ignition switch is turned ON, the low and you should refill the tank as soon odometer (1) and fuel gauge (2) will as possible. temporally show all the digital segments. The amount of fuel left in the tank with the vehicle set upright is approximately: Odometer...
-
Page 31: Major Components
(page there is probably air in the brake system and it must be bled. See your Honda dealer for this service. Brake Fluid Level: With the motorcycle in an upright position, (1) LOWER level mark check the fluid level. - Page 32 Rear Brake Brake Adjustment: Place the motorcycle on its center stand. Measure the distance the rear brake pedal ( ) moves before the brake starts to take hold. Freeplay should be: 20 30 mm (0.8 1.2 in) If adjustment is necessary, turn the rear brake adjusting nut ( ).
- Page 33 If proper adjustment cannot be obtained by this method, see your Honda dealer. After adjustment, push the brake arm ( ) (2) Rear brake adjusting nut to confirm that there is a gap between the...
- Page 34 Loosen the adjuster lock nut ( ). the clutch does not work correctly, see your Turn the clutch adjuster ( ) clockwise Honda dealer. one turn; do not turn excessively. Slowly turn the adjuster counterclockwise until a slight resistance is felt.
- Page 35 FUEL Fuel Tank The fuel tank is located under the seat. Fuel Do not remove the fuel pump cover. tank capacity is: 3.7 (0.98 US gal , 0.81 Imp gal) Open the seat (page ). Remove the fuel fill cap ( ) by turning it counterclockwise. Do not overfill the tank.
- Page 36 If spark knock or pinking persists, consult your Honda dealer. Failure to do so is considered misuse, and damage caused by misuse is not covered by Honda’s Limited Warranty.
- Page 37 Damage the painting of the fuel tank. is at least as high as that recommended by Damage the rubber tubes of the fuel line. Honda. There are two types of ‘‘gasohol’’: Cause corrosion of the fuel tank. one containing ethanol, and the other Cause poor drivability.
- Page 38 ENGINE OIL Reinstall the oil filler cap/dipstick. Check Engine Oil Level Check for oil leaks. Check the engine oil level each day before riding the motorcycle. The level must be maintained between the upper ( ) and lower ( ) level marks on the Running the engine with insufficient oil oil filler cap/dipstick ( ).
- Page 39 TYRES Air Pressure To safely operate your motorcycle, the tyres Properly inflated tyres provide the best must be the proper type and size, in good combination of handling, tread life, and condition with adequate tread, and correctly riding comfort. Generally, underinflated inflated.
- Page 40 Always check air pressure when your tyres Inspection are ‘‘cold’’ when the motorcycle has been Whenever you check the tyre pressures, parked for at least three hours. If you check you should also examine the tyre treads and air pressure when your tyres are ‘‘warm’’ sidewalls for wear, damage, and foreign when the motorcycle has been ridden for objects:...
- Page 41 Tread Wear Replace tyres immediately when the wear indicator appears at on the tyre. (1) Wear indicator (2) Wear indicator location mark http://mototh.com...
- Page 42 Tube Repair and Replacement If a tube is punctured or damaged, you should replace it as soon as possible. A tube that is repaired may not have the same reliability as a new one, and it may fail while you are riding. If you need to make a temporary repair by patching a tube or using an aerosol sealant, ride cautiously at reduced speed and have...
- Page 43 T he r ecomme nded t yres f or y our Tyre Replacement The tyres that came on your motorcycle motorcycle are: Front: were designed to match the performance 70/100 17M/C 40P capabilities of your motorcycle and provide DUNLOP the best combination of handling, braking, TT900F durability and comfort.
- Page 44 ESSENTIAL INDIVIDUAL COMPONENTS IGNITION SWITCH The ignition switch ( ) is on the right side below the steering stem. LOCK (1) Ignition switch Key Position Function Key Removal LOCK Steering is locked. Engine and lights cannot Key can be (steering lock) be operated.
- Page 45 Store the plate in a and a key number plate ( ). safe place. To reproduce keys, bring all keys, key number plate and motorcycle to your Honda dealer. (1) Ignition keys (2) Key number plate...
- Page 46 RIGHT HANDLEBAR CONTROL Start Button The start button is next to the throttle grip. When the start button is pressed, the starter motor cranks the engine. See page for the starting procedure. If the side stand is down, the starter motor will not operate.
- Page 47 LEFT HANDLEBAR CONTROLS Headlight Dimmer Switch ( ) Push the dimmer switch to (HI) to select high beam or to (LO) to select low beam. Turn Signal Switch ( ) Move to to signal a left turn, signal a right turn. Press to turn signal off. Horn Button ( ) Press the button to sound the horn.
-
Page 48: Features
FEATURES (Not required for operation) STEERING LOCK The steering can be locked when the To lock ignition switch ( ) is in the ‘‘LOCK’’ position. To lock the steering, turn the handlebars all the way to the left or right, turn the ignition key ( ) to LOCK while pushing in. -
Page 49: Seat Lock
SEAT LOCK The seat lock ( ) is on the left side below the seat. To open the seat, insert the ignition key ( ) and turn it clockwise to unlock. Pull the seat up. To lock the seat, lower and push down on it until it locks. -
Page 50: Helmet Holders
HELMET HOLDERS Open the seat (page Hang your helmet ( ) on the hooks ( ) at the seat hinge and lower the seat to lock. To remove a helmet, unlock the seat. Lift the helmet off the holder and lower the seat, making sure it securely locked before riding. -
Page 51: Center Compartment
CENTER COMPARTMENT The center compartment ( ) is below the seat. Opening and closing: See ‘‘SEAT LOCK’’ (page MAXIMUM WEIGHT LIMIT: 5.0 kg (11.0 lb) Never exceed the maximum weight limit; handling and stability may be severely affected. The center compartment may become heated by the engine. -
Page 52: Document Bag
DOCUMENT BAG The document bag ( ) is in the document c o m p a r t m e n t ( ) i n t h e c e n t e r compartment ( ). Open the seat (page Open the cover ( ) by releasing the tabs ( ). -
Page 53: Front Top Cover
FRONT TOP COVER The front top cover must be removed to remove the right leg shield and front handle cover. Removal: Remove the front top cover ( ) by removing the screws A ( ) and screws B ( ). Installation: Installation can be done in the reverse order of removal. - Page 54 LEG SHIELD The right leg shield must be removed for air cleaner, spark plug and valve clearance maintenance. Removal: Remove the front top cover (page Remove the upper cover ( ) by removing the screw A ( ). Remove the center cover ( ) by removing the screw B ( ) and screws C ( ).
- Page 55 Remove the screws D ( ) and collars ( ). Remove the screw E ( ) and screws F (10) (11) ( ). Disconnect the connector ( Remove the right leg shield ( ) with carefully release tabs. Installation: Installation can be done in the reverse order of removal.
- Page 56 FRONT HANDLE COVER L oosen t he rea rview mirrors The front handle cover must be removed approximately 2 turns. for headlight and position light bulb Adjust the rearview mirrors. replacement. Tighten the lock nuts and install the dust covers. Removal: Pull up the dust covers ( ).
- Page 57 HEADLIGHT AIM VERTICAL ADJUSTMENT Vertical adjustment can be made by moving the headlight ( ) as necessary. To move the headlight, loosen the bolt ( ). Tighten the bolt after adjustment. Obey local laws and regulations. (1) Headlight (A) Up (2) Bolt (B) Down http://mototh.com...
- Page 58 If you detect any problem, be Brakes check operation; sure you take care of it, or have it corrected Front: Make sure there is no brake fluid by your Honda dealer. leakage (page Rear: Adjust freeplay if necessary (pages Tyres check condition and pressure...
- Page 59 STARTING THE ENGINE Always follow the proper starting procedure Y our motorcycle’s exhaust contains described below. poisonous carbon monoxide gas. High levels of carbon monoxide can collect This motorcycle is equipped with a side rapidly in enclosed areas such as a garage. stand ignition cut-off system.
- Page 60 Preparation Before starting, insert the key, turn the Do not operate the kickstarter while the ignition switch ON and confirm the engine is running as engine damage could following: result. Do not apply excessive force on the The transmission is in neutral kickstarter.
- Page 61 Starting Procedure This motorcycle has a fuel-injected engine The engine will not start if the throttle is with an automatic choke. Follow the fully open (because the electronic control procedure indicated below. module cuts off the fuel supply). Any Air Temperature: 1.
- Page 62 Flooded Engine Ignition Cut Off If the engine fails to start after repeated Y o u r m o t o r c y c l e i s d e s i g n e d t o attempts, it may be flooded. automatically stop the engine and fuel pump Use the start button if the motorcycle is over-turned (a banking...
- Page 63 RUNNING-IN Help assure your motorcycle’s future reliability and performance by paying extra attention to how you ride during the first 500 km (300 miles). During this period, avoid full-throttle starts and rapid acceleration. http://mototh.com...
- Page 64 T h i s s e q u e n c e i s r e p e a t e d t o RIDING Review Motorcycle Safety (pages progressively shift into the next higher before you ride. gear. Shif ting down is accomplished by Make sure you understand the function of depressing the heel end of the shift lever.
- Page 65 SHIFTING The gearshift operation differs when stopping and when moving. Forward When stopping, change can be made from 4th to neutral directly with the 4-step rotary system. Stopping (N) Neutral (2) Second (1) First (3) Third (4) 4th (Top) http://mototh.com...
- Page 66 When moving, the forward 4-step return system is used. Forward Change cannot be made from 4th to neutral directly. Always return the throttle grip first before changing gear. Operate lightly with the tips of your toes until the shift lever is pushed down. Avoid changing gear needlessly and riding with your foot on the shift lever since this may damage the gear change...
- Page 67 Proper shifting can prevent damaging the Downshifting engine and transmission. Downshifting at speeds higher than those in the table below may overrev the engine and Upshifting can cause damage to the engine and The upper limit speed of each gear is shown transmission.
- Page 68 When riding in wet or rainy conditions, or BRAKING For normal braking, gradually apply both on loose surfaces, the ability to maneuver t h e f r o n t a n d r e a r b r a k e s w h i l e and stop will be reduced.
- Page 69 The exhaust pipe and muffler become very PARKING After stopping the motorcycle, shift the hot during operation and remain sufficiently transmission into neutral, turn the hot to inflict burns if touched even after handlebar fully to the left, turn the shutting off the engine.
- Page 70 ANTI-THEFT TIPS Always lock the steering and never leave the key in the ignition switch. This sounds simple but people do forget. Be sure the registration information for your motorcycle is accurate and current. Park your motorcycle in a locked garage whenever possible.
- Page 71 MAINTENANCE If your motorcycle overturns or becomes THE IMPORTANCE OF MAINTENANCE involved in a crash, be sure your Honda A well-maintained motorcycle is essential dealer inspects all major parts, even if you for safe, economical and trouble-free riding. are able to make some repairs.
- Page 72 Wheel removal should normally be handled only by a Honda technician or other qualified mechanic; instructions are included in this manual only to assist in emergency service.
- Page 73 Injury from moving parts. To ensure the best quality and reliability, Do not run the engine unless instructed use only new Honda Genuine Parts or their to do so. equivalents for repair and replacement. Read the instructions before you begin, and make sure you have the tools and skills required.
-
Page 74: Maintenance Schedule
) may require more technical information and tools. Consult your Honda dealer. Should be serviced by your Honda dealer, unless the owner has proper tools and service data and is mechanically qualified. Refer to the Official Honda Shop Manual. In the interest of safety, we recommend these items be serviced only by your Honda dealer. - Page 75 FREQUENCY WHICHEVER ODOMETER READING [NOTE (1)] COMES FIRST 1,000 km Refer 1,000 mi MONTH ITEMS NOTE pages FUEL LINE THROTTLE OPERATION AIR CLEANER NOTE CRANKCASE BREATHER NOTE SPARK PLUG VALVE CLEARANCE ENGINE OIL ENGINE OIL STRAINER SCREEN ENGINE OIL CENTRIFUGAL FILTER http://mototh.com...
- Page 76 FREQUENCY WHICHEVER ODOMETER READING [NOTE (1)] COMES FIRST 1,000 km Refer 1,000 mi NOTE ITEMS MONTH pages DRIVE CHAIN EVERY 1,000 km (600 mi) I, L BRAKE FLUID NOTE (4) BRAKE SHOES/PADS WEAR 94, 95 BRAKE SYSTEM 21 23, 94, 95 BRAKELIGHT SWITCH HEADLIGHT AIM CLUTCH SYSTEM...
- Page 77 TOOL KIT The tool kit ( ) is in the document c o m p a r t m e n t ( ) i n t h e c e n t e r compartment ( ). Open the seat (page Open the cover ( ) by releasing the tabs ( ).
- Page 78 SERIAL NUMBERS The frame and engine serial numbers are The frame number ( ) is stamped behind required when registering your motorcycle. the right leg shield. They may also be required by your dealer when ordering replacement parts. The engine number ( ) is stamped on the Record the numbers here f or your lower left side of the crankcase.
- Page 79 COLOUR LABEL The colour label ( ) is attached to the battery cover in the center compartment (page It is helpful when ordering replacement parts. Record the colour and code here for your reference. COLOUR CODE (1) Colour label http://mototh.com...
-
Page 80: Refer To The Safety Precautions On
AIR CLEANER Refer to the Safety Precautions on page The air cleaner should be serviced at regular intervals (page ). Service more frequently when riding in unusually wet or dusty areas. Remove the front top cover (page ) and right leg shield (page Remove the air cleaner case cover ( ) by removing the screws ( ). - Page 81 CRANKCASE BREATHER Refer to the Safety Precautions on page Remove the drain tube ( ). Drain deposits into a suitable container. Reinstall the drain tube. Service more frequently when riding in rain, at full throttle, or after the motorcycle is washed or overturned.
- Page 82 They may affect circular API service lubrication and clutch performance. label Viscosity SAE 10W-30 JASO T 903 standard Suggested Oil NOT RECOMMENDED Honda ‘‘4-STROKE MOTORCYCLE Do not use non-detergent, vegetable, or OIL’’ or equivalent. castor based racing oils. http://mototh.com...
- Page 83 JASO T 903 standard Viscosity: Viscosity grade of engine oil should be The JASO T 903 standard is an index for based on average atmospheric temperature engine oils for 4-stroke motorcycle engines. in your riding area. The following provides a There are two classes: MA and MB.
- Page 84 Engine oil quality is the chief factor If you do not have it and the necessary skill, affecting engine service life. Change the we recommend that you have your Honda engine oil as specified in the maintenance dealer perform this service.
- Page 85 Place a drain pan under the crankcase. To drain the oil, remove the oil filler cap/ dipstick, oil drain bolt ( ), and sealing washer ( ). Operate the kickstarter several times to aid in complete draining of the remaining oil.
- Page 86 Remove the front top cover (page ) and SPARK PLUG Refer to the Safety Precautions on page right leg shield (page Disconnect the spark plug cap ( ) from Recommended plugs: the spark plug. Standard: Clean any dirt from around the spark plug base.
- Page 87 Inspect the electrodes and center Make sure the plug washer is in good porcelain for deposits, erosion or carbon condition. fouling. If the erosion or deposit is heavy, With the plug washer attached, thread replace the plug. Clean a carbon or wet- the spark plug in by hand to prevent fouled plug with a plug cleaner, otherwise cross-threading.
- Page 88 The checking or adjusting of the clearance VALVE CLEARANCE Refer to the Safety Precautions on page should be performed while the engine is cold. The clearance will change as the Excessive valve clearance will cause noise engine temperature rises. and eventual engine damage. Little or no Remove the front top cover (page ) and clearance will prevent the valve from...
- Page 89 Remove the tappet adjusting hole cap ( ) Tighten the bolts. and O-ring ( ) by removing the bolts ( ). Bolt torque: Check the clearance of both valves by 10 N·m (1.0 kgf·m , 7 lbf·ft) inserting a feeler gauge ( ) between the Installation the removed parts in the adjusting screw ( ) and the valve stem.
- Page 90 Except GR type DRIVE CHAIN Refer to the Safety Precautions on page Remove the inspection cap ( ). Move the drive chain up and down with your finger. The service life of the drive chain ( ) is Drive chain slack should be adjusted dependent upon proper lubrication and approximately to allow the following adjustment.
- Page 91 Rotate the rear wheel. Stop. Check the 4. Except GR type drive chain slack. Repeat this procedure Remove the chain covers ( ) by several times. Drive chain slack should removing the bolts A ( ) and bolt B ( ). remain constant.
- Page 92 Inspect the sprocket teeth for possible 7. Except GR type wear or damage. Replace if necessary. Install the chain covers and tighten the bolts A and bolt B to the specified torque. Damaged Sprocket Worn Sprocket Bolts A and bolt B torque: Teeth Teeth 6 N·m (0.6 kgf·m , 4.4 lbf·ft)
- Page 93 Adjustment: GR type Except GR type If the drive chain requires adjustment, the (5) (3) (2) procedure is as follows: Place the motorcycle on its center stand with the transmission in neutral and the ignition switch off. Loosen the rear axle nut ( ). Loosen the drive chain lock nuts ( ) on both sides of the drive chain adjusters ( ).
- Page 94 If the drive chain slack is excessive when Lubrication: the rear axle is moved to the furthest limit Lubricate every 1,000 km (600 miles) or of adjustment, the drive chain is worn and sooner if chain appears dry. must be replaced. Tighten the rear axle nut to the specified Use SAE 80 or 90 gear oil or a commercially torque.
- Page 95 Removal and Cleaning: Inspect the sprocket teeth for possible When the drive chain becomes dirty, it wear or damage. Replace if necessary. should be removed and cleaned prior to Never use a new drive chain on badly lubrication. worn sprockets. Both chain and sprockets Place the motorcycle on its center stand must be in good condition, or the new with the transmission in neutral and the...
- Page 96 Pass the chain over the sprockets and join the ends of the chain with the master link. For ease of assembly, hold the chain ends against adjacent rear sprocket teeth while inserting the master link. The master link is the most critical part affecting the security of the drive chain.
- Page 97 FRONT AND REAR SUSPENSION INSPECTION Refer to the Safety Precautions on page Check the fork assembly by locking the front brake and pumping the fork up and down vigorously. Suspension action should be smooth and there must be no oil leakage. Swingarm bushings should be checked by pushing hard against the side of the rear wheel while the motorcycle is on the...
- Page 98 Start the engine and shif t the transmission into gear. Lower the side stand. The engine should stop as you put the side stand down. If the side stand system does not operate as (1) Side stand spring described, see your Honda dealer for service. http://mototh.com...
- Page 99 If this occurs, servicing of the brake system will be necessary. See your Honda dealer for this service. (1) Front axle nut cap (2) Front axle nut (3) Front axle shaft http://mototh.com...
- Page 100 Front Wheel Installation If a torque wrench was not used for Install the side collars into the left and installation, see your Honda dealer as soon right side wheel hub. as possible to verify proper assembly. Position the front wheel between the fork...
- Page 101 Disconnect the brake stopper arm ( ) Rear Wheel Removal Refer to the Safety Precautions on page from the brake panel by removing the cotter pin ( ), stopper arm nut ( ), Place the motorcycle on its center stand. washer and rubber grommet.
- Page 102 Remove the rear axle shaft ( ), drive chain adjusters ( ) and side collars, then remove the drive chain ( ) from the driven sprocket by pushing the rear wheel forward. Remove the rear wheel f rom the motorcycle. http://mototh.com...
- Page 103 If a torque wrench was not used for Rear Wheel Installation To install the rear wheel, reverse the installation, see your Honda dealer as soon removal procedure. as possible to verify proper assembly. Install the side collars into the left and Improper assembly may lead to loss of right side wheel hub.
- Page 104 Front Brake Check the wear indicator marks ( ) on each pad. If either pad is worn to the wear indicator mark, replace both pads as a set. See your Honda dealer for this service. (1) Wear indicator marks http://mototh.com...
- Page 105 ( ). If the arrow aligns with the reference mark on full application of the brake, the brake shoes must be replaced. See your Honda dealer for this service. When the brake service is necessary, see your Honda dealer. Use only Honda Genuine Parts or its equivalent.
- Page 106 If your battery seems weak and/or is disposal. leaking electrolyte (causing hard starting or other electrical troubles), contact your Honda dealer. The battery gives off explosive hydrogen gas during normal operation. Your battery is a maintenance-free type and can be permanently damaged if the cap strip A spark or flame can cause the battery is removed.
- Page 107 Removal: Pull out the battery ( ) from the battery Make sure the ignition switch is OFF. box. Open the seat (page Open the battery cover (page Remove the battery cover ( ) and starter magnetic switch cover ( ) by removing the screws ( ).
- Page 108 When frequent fuse failure occurs, it usually indicates a short circuit or an overload in the electrical system. See your Honda dealer for repair. Never use a fuse with a different rating from that specified. Serious damage to the electrical system or a fire may result, causing a dangerous loss of lights or engine power.
- Page 109 Fuse Box: The fuse box ( ) is located near the battery. The specified fuse is: Open the seat (page Remove the battery cover and starter magnetic switch cover (page Open the fuse box cover ( ). Pull out the fuse ( ). If the fuse is blown, install a new fuse.
- Page 110 Main Fuse: The main fuse ( ) is located near the battery. The specified fuse is: Open the seat (page Remove the battery cover and starter magnetic switch cover (page Disconnect the wire connector ( ) of the starter magnetic switch ( ). Pull the fuse out.
- Page 111 BRAKELIGHT SWITCH ADJUSTMENT Refer to the Safety Precautions on page Check the operation of the brakelight switch ( ) at the right side behind the engine from time to time. Adjustment is done by turning the adjusting nut ( ). Turn the nut in the direction ( ) if the switch operates too late and in direction ( ) if the switch operates too soon.
- Page 112 BULB REPLACEMENT Refer to the Safety Precautions on page Be sure to turn the ignition switch OFF when replacing the bulb. The light bulb becomes very hot while the Do not use bulbs other than those light is ON, and remains hot for a while specified.
- Page 113 Headlight Bulb Remove the f ront handle cover (page Remove the seat rubber ( ). Remove the headlight bulb ( ) while pressing down on the pin ( ). Install a new bulb in the reverse order of removal. Install the seat rubber with its ‘‘TOP’’ mark ( ) facing up.
- Page 114 Position Light Bulb Remove the f ront handle cover (page Pull out the socket ( ). Pull out the bulb ( ) without turning. Install a new bulb in the reverse order of removal. (1) Socket (2) Bulb http://mototh.com...
- Page 115 Brake/Tail Light Bulb Remove the taillight lens ( ) by removing the screws ( ). Slightly press the bulb ( ) and turn it counterclockwise. Install a new bulb in the reverse order of removal. (1) Taillight lens (3) Bulb (2) Screws http://mototh.com...
- Page 116 Front Turn Signal Bulb Remove the front turn signal lens ( ) by removing the screw ( ). Slightly press the bulb ( ) and turn it counterclockwise. Install a new bulb and check that the light operates properly. (1) Front turn signal lens (2) Screw (3) Bulb http://mototh.com...
- Page 117 Rear Turn Signal Bulb Remove the rear turn signal lens ( ) and the lens packing ( ) by removing the screw ( ). Remove the bulb ( ) by pressing in and turning counterclockwise. Install a new bulb and check that the light operates properly.
- Page 118 License Light Bulb Remove the license light lens ( ) by removing the screws ( ). Pull out the bulb ( ) without turning. Install a new bulb in the reverse order of removal. (1) License light lens (3) Bulb (2) Screws http://mototh.com...
- Page 119 CLEANING Clean your motorcycle regularly to protect Washing the Motorcycle the surface finishes and inspect for damage, Rinse the motorcycle thoroughly with wear, and oil or brake fluid leakage. cool water to remove loose dirt. Clean the motorcycle with a sponge or Avoid cleaning products that are not soft cloth using cool water.
- Page 120 After cleaning, rinse the motorcycle Finishing Touches thoroughly with plenty of clean water. After washing your motorcycle, consider Strong detergent residue can corrode using a comme r cia lly-a v a ilable spr a y alloy parts. cleaner/polish or quality liquid or paste wax Dry the motorcycle, start the engine, and to finish the job.
- Page 121 Removing Road Salt Road Salt used on roads during winter and salt from seawater causes rust. Wash your motorcycle as follows after it has run through salty water or on roads treated with Road Salt. Clean the motorcycle using cool water (page Do not use warm water.
-
Page 122: Storage Guide
STORAGE GUIDE Extended storage, such as for winter, requires that you take certain steps to reduce the effects of deterioration from non-use of the motorcycle. In addition, Petrol is highly flammable and necessary repairs should be made BEFORE explosive. You can be burned or storing the motorcycle;... - Page 123 To prevent rusting in the cylinder, Remove the battery. Store in an area perform the following: protected from freezing temperatures Remove the spark plug cap from the and direct sunlight. spark plug. Using tape or string, secure Slow charge the battery once a month. the cap to any convenient plastic body Wash and dry the motorcycle.
- Page 124 REMOVAL FROM STORAGE Uncover and clean the motorcycle. Change the engine oil if more than 4 months have passed since the start of storage. Charge the battery as required. Install the battery. Drain any excess aerosol rust-inhibiting oil from the fuel tank. Fill the fuel tank with fresh petrol.
-
Page 125: Taking Care Of The Unexpected
Also follow applicable soon as possible. Also, be sure to have your laws and regulations if another person or Honda dealer check the f rame and vehicle is involved in the crash. suspension after any serious crash. -
Page 126: Specifications
SPECIFICATIONS DIMENSIONS Overall length 1,896 mm (74.6 in) Overall width 727 mm (28.6 in) Overall height 1,079 mm (42.5 in) Wheelbase 1,240 mm (48.8 in) CAPACITIES Engine oil (After draining) 0.7 (0.7 US qt , 0.6 Imp qt) (After disassembly) 0.9 (1.0 US qt , 0.8 Imp qt) Fuel tank 3.7 (0.98 US gal , 0.81 Imp gal) - Page 127 ENGINE Bore and stroke 52.4 57.9 mm (2.06 2.28 in) Compression ratio 9.3 : 1 Displacement 124.8 cm (7.61 cu-in) Spark plug Standard CPR6EA 9 (NGK) U20EPR9 (DENSO) For extended CPR7EA 9 (NGK) high speed riding U22EPR9 (DENSO) Spark plug gap 0.80 0.90 mm (0.031 0.035 in) Idle speed 1,400...
- Page 128 CHASSIS AND SUSPENSION Caster 26°36’ Trail 73.6 mm (2.90 in) Tyre size, Front 70/100 17M/C 40P DUNLOP TT900F Tyre size, Rear 80/90 17M/C 50P DUNLOP TT900AG Tyre type bias-ply, tube POWER TRANSMISSION Primary reduction 3.350 Gear ratio, 1st 2.500 1.550 1.150 0.923 Final reduction...
- Page 129 ELECTRICAL Battery 12V 5Ah Generator 0.15 kW/5,000 min (rpm) LIGHTS Headlight (High/Low) 12V 35/35W Brake/Tail light 12V 21/5W Turn signal light Front 12V 21W Rear 12V 21W Position light bulb 12V 5W License light bulb 12V 5W Speedometer light Neutral indicator Turn signal indicator High beam indicator Gear position indicator...
-
Page 130: Catalytic Converter
NOx. A replacement unit must be an amount of leaded petrol can contaminate the catalyst metals, making the catalytic original Honda part or its equivalent. converter ineffective. The catalytic converter must operate at a high temperature for the chemical reactions Keep the engine in good running to take place. - Page 131 Honda ANF125 USO E MANUTENZIONE Honda Motor Co., Ltd. 2009 http://mototh.com...
- Page 132 INFORMAZIONI IMPORTANTI GUIDATORE E PASSEGGERO Questa motocicletta è stata realizzata per portare il guidatore e un passeggero. Non eccedere mai la capacità di peso massimo come indicato sugli accessori e sull’etichetta di carico. USO SU STRADA Questa motocicletta è stata progettata per l’uso esclusivo su strada. LEGGERE CON ATTENZIONE QUESTO MANUALE DI ISTRUZIONI Fare particolare attenzione ai messaggi sulla sicurezza che appaiono nel manuale.
- Page 133 Tutte le informazioni di questa pubblicazione si basano su quelle più recenti relative al prodotto disponibili al momento dell’approvazione alla stampa. La Honda Motor Co., Ltd. si riserva il diritto di apportare cambiamenti in qualunque momento senza preavviso e senza alcun obbligo da parte sua.
- Page 134 Per qualsiasi intervento, ricordarsi che il concessionario Honda conosce la motocicletta meglio di chiunque altro. Se si possiedono le conoscenze meccaniche e l’attrezzatura necessarie, il concessionario può fornire un Manuale di Servizio Honda ufficiale, che può aiutare ad effettuare i vari interventi di manutenzione e di riparazione.
- Page 135 I codici seguenti, utilizzati nel corso del manuale, indicano i rispettivi paesi. Le illustrazioni qui riportate si basano sul tipo Inghilterra Francia Vendite dirette in Europa Israele Grecia Le caratteristiche del veicolo possono variare a seconda delle zone o dei paesi. http://mototh.com...
- Page 136 BREVI NOTE SULLA SICUREZZA La vostra sicurezza, e la sicurezza di altri, è molto importante. Quindi utilizzare questa motocicletta in modo sicuro è una responsabilità importante. Per aiutare a prendere decisioni avvedute in materia di sicurezza, abbiamo fornito istruzioni per l’uso e altre informazioni su etichette e in questo manuale.
- Page 137 Sarete UCCISI o SERIAMENTE FERITI se non seguite le istruzioni. Potete essere UCCISI o SERIAMENTE FERITI se non seguite le istruzioni. Potete essere FERITI se non seguite le istruzioni. Titoli di sicurezza –– Come Promemoria di sicurezza importanti e Precauzioni di sicurezza importanti.
- Page 138 GUIDA DELLA MOTOCICLETTA pag. pag. SICUREZZA DI GUIDA COMPONENTI SINGOLI ESSENZIALI INFORMAZIONI DI SICUREZZA INTERRUTTORE D’ACCENSIONE IMPORTANTI CHIAVI ABBIGLIAMENTO PROTETTIVO COMANDO DI DESTRA DEL LIMITI E CONSIGLI PER IL CARICO MANUBRIO ETICHETTE GRAFICHE CONTROLLI SUL MANUBRIO SINISTRO UBICAZIONE DELLE PARTI STRUMENTI E INDICATORI COMPONENTI PRINCIPALI (Informazioni necessarie alla guida della...
- Page 139 pag. pag. CARATTERISTICHE GUIDA DELLA MOTOCICLETTA (Non necessarie per la guida) CONTROLLI PRECEDENTI LA MESSA BLOCCAGGIO DELLO STERZO IN MOTO SERRATURA DELLA SELLA AVVIAMENTO DEL MOTORE BLOCCO DELLO STERZO RODAGGIO COMPARTO CENTRALE GUIDA BORSA DOCUMENTI CAMBIAMENTO DI MARCIA COPERCHIO ANTERIORE SUPERIORE FRENATA PROTEGGIGAMBA PARCHEGGIO...
- Page 140 MANUTENZIONE pag. pag. MANUTENZIONE USURA DELLE GANASCE DEL FRENO IMPORTANZA DELLA BATTERIA MANUTENZIONE SOSTITUZIONE DEI FUSIBILI SICUREZZA PER LA MANUTENZIONE REGOLAZIONE DELL’INTERRUTTORE PRECAUZIONI DI SICUREZZA DELLA LUCE DI ARRESTO PROGRAMMA DI MANUTENZIONE SOSTITUZIONE LAMPADINA KIT ATTREZZI NUMERI DI SERIE PULITURA ETICHETTA DI IDENTIFICAZIONE DEL COLORE GUIDA PER L’IMMAGAZZINAMENTO...
-
Page 141: Sicurezza Di Guida
SICUREZZA DI GUIDA INFORMAZIONI DI SICUREZZA IMPORTANTI Farsi vedere dal traffico La motocicletta vi darà numerosi anni di Alcuni guidatori non notano le motociclette servizio e di piacere, se vi assumete la perché non vi fanno attenzione. Per farsi responsabilità della vostra sicurezza e notare meglio, indossare abiti vivaci riflettenti, comprendete i pericoli che incontrate sulla posizionarsi in modo da essere visibili dal... - Page 142 Non eccedere mai i limiti di carico e usare solo accessori approvati da Honda per qusta motocicletta. Vedere pag. Non indossare un casco aumenta il rischio maggiori dettagli.
- Page 143 Caschi e protezione degli occhi Altri accessori per la guida Il casco è l’elemento più importante perché Oltre al casco ed alla protezione per gli occhi, offre protezione da ferite alla testa. Il casco consigliamo anche: deve adattarsi alla testa in modo confortevole Stivali robusti con suole antiscivolo per e sicuro.
- Page 144 Honda, Seguire tutti i limiti di carico e altre modifiche inappropriate e una manutenzione indicazioni di carico in questo manuale.
- Page 145 Se si desidera trasportare carichi più grandi, consultare il proprio concessionario Honda e assicurarsi di leggere le informazioni sugli accessori a pag. http://mototh.com...
- Page 146 Dato che la Honda non può collaudare tutti gli motocicletta. altri accessori in circolazione, ciascuno è personalmente responsabile della scelta, installazione e uso degli accessori non originali Honda.
- Page 147 Non trainare rimorchi o sidecar con la Modifiche motocicletta. Questa motocicletta non è Consigliamo con forza di non rimuovere stata progettata per tali attacchi e il loro alcun apparato originale o modificare la uso può ostacolare grandemente il motocicletta in qualsiasi modo che potrebbe maneggio della motocicletta.
- Page 148 . L e g g e r e attentamente queste informazioni e non togliere le etichette. Se un’etichetta si stacca o diventa illeggibile, rivolgersi al concessionario Honda per la sua sostituzione. http://mototh.com...
- Page 149 Leggere attentamente le istruzioni contenute nel Manuale d’uso. Leggere attentamente le istruzioni contenute nel Manuale d’officina. Nell’interesse della sicurezza, affidare la manutenzione della motocicletta soltanto a un concessionario Honda. PERICOLO (su sfondo ROSSO) Il mancato rispetto delle istruzioni PROVOCHERÀ la MORTE o GRAVI LESIONI PERSONALI.
- Page 150 ADESIVO SUGLI ACCESSORI E SUI BAGAGLI AVVERTENZA ACCESSORI E CARICO L’aggiunta di accessori e bagagli può compromettere la stabilità e la manovrabilità di questa motocicletta. Prima di installare eventuali accessori leggere attentamente le istruzioni contenute nel manuale d’uso e nella guida di installazione. Il peso totale degli accessori e del bagaglio aggiunti al peso del pilota e del passeggero non deve superare i 170 kg (375 lb)
- Page 151 (Tipo GR) ETICHETTA DELLE INFORMAZIONI SUI PNEUMATICI E DELLA CATENA DI TRASMISSIONE Pressione dei pneumatici a freddo: [Pilota e passeggero] Anteriore 200 kPa (2,00 kgf/cm ) Posteriore 250 kPa (2,50 kgf/cm ) [Solo pilota] Anteriore 200 kPa (2,00 kgf/cm ) 200 kPa (2,00 kgf/cm ) Posteriore Misura dei pneumatici:...
- Page 152 (Eccetto tipo GR) ADESIVI SUI PNEUMATICI Pressione dei pneumatici a freddo: [Pilota e passeggero] Anteriore 200 kPa (2,00 kgf/cm ) Posteriore 250 kPa (2,50 kgf/cm ) [Solo pilota] Anteriore 200 kPa (2,00 kgf/cm ) Posteriore 200 kPa (2,00 kgf/cm ) Misura dei pneumatici: Anteriore 70/100 17M/C 40P...
- Page 153 ADESIVO RIGUARDANTE LA SICUREZZA Per la propria protezione, indossare sempre il casco durante la guida. ETICHETTA DEL CARBURANTE SOLO CARBURANTE SENZA PIOMBO ETICHETTA DEL LIMITE DI CARICO Non superare 5.0 kg (11.0 lb) http://mototh.com...
- Page 154 UBICAZIONE DELLE PARTI Serbatoio di riserva del fluido del freno anteriore Commutatore del faro anteriore Specchietto retrovisore Strumenti e indicatori Specchietto retrovisore Leva freno anteriore Manopola acceleratore Pulsante di avviamento Clacson Interruttore del segnale di svolta Interruttore di accensione http://mototh.com...
- Page 155 Portacasco Batteria Scompartimento di documenti Kit degli attrezzi Fusibile principale Scatola dei fusibili Tappo/astina foro immissione olio Poggiapiedi per Avviamento a pedale Poggiapiedi Pedale freno posteriore il passeggero http://mototh.com...
- Page 156 Scomparto centrale Portacasco Tappo del bocchettone di rabbocco Serratura sella Poggiapiedi per il passeggero Leva del cambio Poggiapiedi Cavalletto laterale Cavalletto centrale http://mototh.com...
- Page 157 STRUMENTI E INDICATORI Gli indicatori sono contenuti nel pannello strumenti. Le loro funzioni sono descritte nelle tabelle alle pagine che seguono. (1) (2) (1) Indicatore della marcia (2) Indicatore direzione sinistra (3) Indicatore folle (4) Spia di malfunzionamento del PGM-FI (MIL) (5) Tachimetro (6) Indicatore di faro abbagliante (7) Indicatore direzione destra...
- Page 158 (PGM-FI). Deve inoltre accendersi per alcuni secondi e quindi spegnersi quando si porta l’interruttore di accensione su ON. Se si accende in qualsiasi altro momento, ridurre la velocità e portare al più presto la motocicletta dal concessionario Honda. http://mototh.com...
- Page 159 (No. rif) Descrizione Funzione Tachimetro Indica la velocità di corsa. Indica la velocità in chilometri orari (km/h) o in miglia orarie (mph) e chilometri orari (km/h) in base al tipo. Indica la velocità in chilometri orari (km/h) e/o in miglia orarie (mph) a seconda del modello.
- Page 160 Display contachilometri/indicatore carburante Quando il segmento E ( ) lampeggia, il Quando l’interruttore di accensione viene carburante è scarso ed occorre eseguire un portato su ON, il contachilometri (1) e rifornimento appena possibile. l’indicatore del carburante (2) visualizzano La quantità di carburante rimasta nel temporaneamente tutti i segmenti digitali.
- Page 161 Non sono necessarie regolazioni, ma si Il fluido freni consigliato è fluido per freni devono controllare periodicamente il livello Honda DOT 3 o DOT 4 da un contenitore del liquido e l’usura delle pastiglie. Il circuito sigillato, o uno equivalente.
- Page 162 Freno posteriore Regolazione del freno: Sistemare la motocicletta sul cavalleto centrale. Misurare la distanza di spostamento del pedale del freno posteriore ( ) prima che il freno entri in azione. La corsa a vuoto deve essere di: 20 30 mm Se è...
- Page 163 Se non si riesce ad ottenere la regolazione corretta con questo procedimento, rivolgersi ad un concessionario Honda. (2) Dado di regolazione del freno posteriore Dopo la regolazione, premere il braccio del (3) Perno della biella del freno freno ( ) per confermare l’esistenza di uno...
- Page 164 Girare il registro della frizione ( ) di un giro normalmente, rivolgersi ad un concessionario in senso orario; non girarlo troppo. Honda. Girare lentamente il registro in senso antiorario finché non si avverte una certa resistenza.
- Page 165 CARBURANTE Serbatoio del carburante Il serbatoio del carburante si trova sotto la La benzina è molto infiammabile e sella. La capienza del serbatoio del esplosiva. Si può essere seriamente carburante è: ustionati o feriti quando si maneggia carburante. Aprire la sella (pag. ).
- Page 166 ‘‘batte in testa’’ o ‘‘picchietta’’, cambiare marca di benzina. Se il battito in testa o il picchiettio persistono, consultare il proprio concessionario Honda. L’inadempienza viene considerata un uso improprio e gli eventuali danni da esso derivanti non sono coperti dalla garanzia limitata Honda.
- Page 167 (gasolina), sceglierne una con un Danneggiare la vernice del serbatoio del numero di ottano almeno pari a quello carburante. raccomandato dalla Honda. Ci sono due tipi di Danneggiare i tubi di gomma della ‘‘gasolina’’: uno contenente alcool etilico e tubazione di alimentazione.
- Page 168 OLIO MOTORE Reinstallare il tappo/astina dell’olio. Controllo del livello dell’olio motore Controllare se vi sono perdite di olio. Controllare il livello dell’olio motore ogni giorno prima di guidare la motocicletta. Il livello deve essere mantenuto tra i segni di livello superiore ( ) e inferiore ( ) sul tappo Se si fa girare il motore con pressione d’olio di riempimento olio/astina ( ).
- Page 169 PNEUMATICI Pressione dell’aria Per usare la motocicletta in condizioni di Pneumatici gonfiati correttamente offrono la sicurezza, i pneumatici devono essere del tipo migliore combinazione di manovrabilità, e delle dimensioni corrette, in buone durata del battistrada e confort di guida. In condizioni, con un battistrada adeguato e generale, pneumatici gonfiati poco si gonfiati correttamente.
- Page 170 Controllare sempre la pressione dell’aria a Controllo pneumatici ‘‘freddi’’, cioè quando la Quando si controlla la pressione dei motocicletta è rimasta parcheggiata per pneumatici, ispezionare anche il battistrada e almeno tre ore. Se si controlla la pressione le pareti laterali per usura, danni e oggetti dell’aria a pneumatici ‘‘caldi’’, cioè...
- Page 171 Usura del battistrada Sostituire immediatamente i pneumatici quando l’indicatore di usura appare sul pneumatico. (1) Indicazione di usura (2) Segno di ubicazione dell’indicazione di usura http://mototh.com...
- Page 172 Riparazione e sostituzione della camera d’aria Se una camera d’aria è forata o danenggiata, va sostituita il prima possibile. Una camera d’aria riparata può non essere affidabile quanto una nuova e può fallire durante la guida. Se è necessario eseguire una riparazione temporanea rattoppando la camera d’aria o usando un sigillante spray, guidare con cautela a velocità...
- Page 173 Sostituzione dei pneumatici I pneumatici consigliati per la motocicletta I pneumatici in dotazione alla motocicletta sono: Anteriore: 70/100 17M/C 40P sono stati progettati in base alle prestazioni DUNLOP della motocicletta e forniscono la migliore TT900F combinazione di maneggio, f renata, Posteriore: 80/90 17M/C 50P durevolezza e confort.
- Page 174 COMPONENTI SINGOLI ESSENZIALI INTERRUTTORE D’ACCENSIONE L’interruttore di ignizione ( ) si trova sul lato destro sotto il gambo dello sterzo. (1) Interruttore di accensione LOCK Posizione chiave Funzione Rimozione chiave LOCK Lo sterzo è bloccato. Non è possibile far La chiave può (bloccaggio funzionare motore e luci.
- Page 175 ( ). posto sicuro. Per avere una copia delle chiavi, portare tutte le chiavi, la targhetta con il numero delle chiavi e la motocicletta al rivenditore Honda. (1) Chiavi di accensione (2) Piastrina con il numero della chiavetta http://mototh.com...
- Page 176 COMANDO DI DESTRA DEL MANUBRIO Pulsante di avviamento Il pulsante di avviamento è accanto alla manopola del gas. Quando si preme il pulsante di avviamento, il motorino di avviamento fa girare il motore. Vedere la procedura di avviamento a pagina Se il cavalletto laterale si trova posizione abbassata, il motorino di avviamento non funziona.
- Page 177 CONTROLLI SUL MANUBRIO SINISTRO Commutatore delle luci del faro ( ) Spingere il commutatore sulla posizione (HI) per selezionare gli abbaglianti e quella (LO) per selezionare gli anabba- glianti. Interruttore del segnale di direzione ( ) Spostare l’interruttore sulla posizione per segnalare la svolta a sinistra e sulla posizione per segnalare la svolta a destra.
- Page 178 CARATTERISTICHE (Non necessarie per la guida) BLOCCAGGIO DELLO STERZO Lo sterzo può essere bloccato quando Per fissare l’interruttore di ignizione ( ) è sulla posizione ‘‘LOCK’’. Per bloccare lo sterzo, girare il manubrio tutto a sinistra o a destra, premere la chiave di accensione ( ) e girarla su LOCK, quindi estrarre la chiave.
- Page 179 SERRATURA DELLA SELLA La serratura della sella ( ) si trova sul lato sinistro sotto la sella. Per aprire la sella, inserire la chiave di accensione ( ) e girarla in senso orario per sbloccare. Sollevare la sella. Per bloccare la sella, abbassarla e spingerla in giù...
- Page 180 BLOCCO DELLO STERZO Aprire la sella (pag. Appendere il casco ( ) ai ganci ( ) all’altezza della cerniera della sella e abbassare la sella per bloccarla. Per togliere un casco, sbloccare la sella. Togliere il caso dal portacasco e abbassare la sella, accertandosi di bloccarla saldamente prima di usare la motocicletta.
- Page 181 COMPARTO CENTRALE Il comparto centrale ( ) si trova sotto la sella. Apertura e chiusura: Vedere ‘‘SERRATURA DELLA SELLA’’ (pag. LIMITE DI PESO MASSIMO: 5,0 kg Mai superare il limite massimo di peso, p e r c h é a l t r i m e n t i s i p o t r e b b e r o compromettere la manovrabilità...
- Page 182 BORSA DOCUMENTI La borsa documenti ( ) si trova nel comparto documenti ( ) nel comparto centrale ( ). Aprire la sella (pag. Aprire il coperchio ( ) liberando le linguette ( ). Sia questo manuale dell’utente che altri documenti possono essere contenuti nello scompartimento.
- Page 183 COPERCHIO ANTERIORE SUPERIORE Per rimuovere la protezione della canna di destra e il coperchio anteriore del manubrio occorre togliere il coperchio anteriore superiore. Rimozione: Rimuovere il coperchio anteriore superiore ( ) togliendo le viti A ( ) e le viti B ( ). Installazione: L’installazione può...
- Page 184 PROTEGGIGAMBA Per la manutenzione del filtro dell’aria, della candela e del gioco valvole occorre rimuovere il paragambe destro. Rimozione: Asportare il coperchio anteriore superiore (pag. Rimuovere il coperchio superiore ( ) rimuovendo la vite A ( ). Rimuovere il coperchio centrale ( ) rimuovendo la vite B ( ) e le viti C ( ).
- Page 185 Rimuovere le viti D ( ) e i collari ( ). (10) (11) Rimuovere la vite E ( ) e le viti F ( ). Scollegare il connettore ( Rimuovere il paragambe destro ( sganciando le linguette con cautela. Installazione: L’installazione è...
- Page 186 Allentare gli specchietti retrovisori di COPERCHIO ANTERIORE DELLA MANOPOLA circa 2 giri. Per sostituire la lampadina del faro anteriore Regolare gli specchietti retrovisori. e della luce di posizione occorre rimuovere il Serrare i controdadi e installare i coperchio anteriore del manubrio. parapolvere.
- Page 187 REGOLAZIONE VERTICALE DEL FASCIO DEL FARO È possibile regolare verticalmente il faro ( ) spostandolo quanto necessario. Per spostare il faro, allentare il bullone ( ). Serrare il bullone dopo la regolazione. Osservare le leggi e la normativa locale. (1) Faro (A) Alto (2) Bullone (B) Basso...
- Page 188 Se si nota alcun problema, ci siano perdite. porvi rimedio o rivolgersi al proprio Freni controllare il funzionamento; concessionario Honda. Anteriore: Accertarsi che non ci siano perdite di liquido dei freni (pag. Posteriori: se necessario, registrare la corsa a vuoto (pag.
- Page 189 AVVIAMENTO DEL MOTORE Seguire sempre la procedura di avviamento I gas di scarico della motocicletta contengono appropriata indicata in basso. velenoso monossido di carbonio. Livelli elevati di monossido di carbonio possono Questa motocicletta è dotata di un sistema di accumularsi rapidamente in luoghi chiusi blocco accensione collegato al cavalletto come un garage.
- Page 190 Preparativi Prima di avviare il motore, infilare la chiave, Non azionare il pedale di avviamento mentre girare l’interruttore d’accensione sulla il motore è in funzione, perché il motore posizione ON e controllare che: potrebbe subire danni. Non applicare forza Il cambio è in folle eccessiva al pedale di avviamento.
- Page 191 Procedura d’avviamento Questa motocicletta ha un motore a iniezione Il motore non parte se l’acceleratore è comple- con comando automatico dell’aria. Seguire la tamente aperto (perché il modulo di controllo procedura indicata sotto. elettronico interrompe l’alimentazione del carburante). A qualsiasi temperatura dell’aria: 1.
- Page 192 Motore ingolfato Esclusione ignizione La motocicletta è stata progettata in modo da Se il motore non si avvia dopo diversi tentativi, può essersi ingolfato. ferma automaticamente il motore e la pom- Usare il pulsante di avviamento pa carburante se la motocicletta si capovolge Aprire al massimo il comando del gas.
- Page 193 RODAGGIO Per garantire l’affidabilità e le prestazioni future della motocicletta, fare molta attenzione a come si guida durante i primi 500 km. In questo periodo, evitare partenze a tutto gas e accelerazioni rapide. http://mototh.com...
- Page 194 per ingranare la seconda. GUIDA Questa sequenza va ripetuta per salire Rileggersi il paragrafo ‘‘Sicurezza di guida’’ progressivamente di marcia. (pags. ) prima della partenza. Per scalare di marcia premere col tacco l’estremità posteriore della leva del cambio. Controllare il funzionamento del meccanismo del cavalletto laterale.
- Page 195 CAMBIAMENTO DI MARCIA Il funzionamento del cambio è diverso da Avanti fermi e durante la corsa. Quando si è f ermi, si può passare direttamente dalla 4a al folle con il sistema rotante a 4 scatti. Arresto (N) Folle (2) Seconda (1) Prima (3) Terza (4) 4a (massima)
- Page 196 Per il cambio marcia in movimento viene Avanti utilizzato il sistema di ritorno a 4 passi in avanti. Il cambio marcia non può essere eseguito direttamente dalla quarta al folle. C h i u d e r e s e m p r e l a m a n o p o l a dell’acceleratore prima di cambiare marcia.
- Page 197 Un cambiamento di marcia corretto può Cambiamento di marcia a scendere p r e v e n i r e d a n n i a l m o t o r e e d a l l a Il passaggio a marce più bassa a velocità trasmissione.
- Page 198 FRENATA Quando si guida sul bagnato o sotto la P e r l a f r e n a t a n o r m a l e , a z i o n a r e pioggia, o superfici sciolte, la capacità di gradualmente entrambi i freni anteriore e manovra e frenata è...
- Page 199 PARCHEGGIO La tubazione di scarico e la marmitta Dopo aver fermato la motocicletta, mettere d i v e n t a n o m o l t o c a l d e d u r a n t e i l il cambio in folle, girare il manubrio funzionamento e rimangono a lungo tali completamente verso sinistra, regolare...
- Page 200 SUGGERIMENTI CONTRO I FURTI Bloccare sempre il manubrio e non lasciare NOME: mai la chiave nell’interruttore d’accensione. Ciò può sembrare elementare, ma la gente INDIRIZZO: ha la tendenza a dimenticare. Le informazioni sulla registrazione della motocicletta devono essere sempre accurate e aggiornate. Parcheggiare sempre la motocicletta in un garage chiuso, se possibile.
- Page 201 Una motocicletta mantenuta bene è in un incidente, far ispezioare tutte le parti essenziale per un guida sicura, economica e principali da un concessionario Honda, anche senza problemi. Aiuta anche a riidurre se si poss ono riparare alcune cose l’inquinamento.
- Page 202 La rimozione delle ruote deve normalmente essere eseguita solo da un concessionario Honda o da un altro meccanico qualificaato; le istruzioni fornite in questo manuale servono solo per casi di emergenza.
- Page 203 Non accendere il motore a meno che ciò in occasione di riparazioni e sostituzioni usare sia indicato nelle istruzioni. soltanto pezzi originali Honda nuovi o i loro Leggere le istruzioni prima di cominciare e equivalenti. assicurarsi di avere gli attrezzi e le capacità...
- Page 204 Vedere il Manuale d’officina Honda. Per motivi di sicurezza si raccomanda di fare eseguire questi interventi esclusivamente da un concessionario Honda. La Honda consiglia di richiedere al rivenditore Honda di provare la motocicletta su strada dopo ogni periodica revisione per manutenzione.
- Page 205 INTERVALLO CONDIZIONI CHE SI LE DEL CONTACHILOMETRI [NOTA (1)] VERIFICA PER PRIMA 1.000 km Vedi 1.000 mi VOCE MESI pag. NOTA TUBAZIONE CARBURANTE FUNZIONAMENTO ACCELERATORE FILTRO ARIA NOTA (2) SFIATO BASAMENTO NOTA (3) CANDELA GIOCO VALVOLE OLIO MOTORE RETINA DEL FILTRO DELL’OLIO MOTORE FILTRO CENTRIFUGO DELL’OLIO MOTORE http://mototh.com...
- Page 206 INTERVALLO CONDIZIONI CHE SI LE DEL CONTACHILOMETRI [NOTA (1)] VERIFICA PER PRIMA 1.000 km Vedi 1.000 mi VOCE NOTA MESI pag. CATENA TRASMISSIONE Ogni 1.000 km I, L FLUIDO FRENI NOTA (4) USURA PASTIGLIE/GANASCE DEI FRENI 94, 95 SISTEMA FRENANTE 21 23, 94, 95 INTERRUTTORE LUCI FRENI...
- Page 207 KIT ATTREZZI Il corredo degli attrezzi ( ) si trova nello scomparto portadocumenti ( ) nel vano centrale ( ). Aprire la sella (pag. Aprire il coperchio ( ) liberando le linguette ( ). Con gli attrezzi del kit si possono eseguire alcune riparazioni d’emergenza, o comunque di minore importanza, e determinate sostituzioni sul bordo della strada.
- Page 208 NUMERI DI SERIE I numeri di serie del telaio e del motore sono Il numero del telaio ( ) è stampigliato dietro nec es sari per la registrazione della la protezione della canna destra. motocicletta. Essi possono anche essere richiesti dal concessionario per l’ordinazione Il numero di motore ( ) è...
- Page 209 ETICHETTA DI IDENTIFICAZIONE DEL COLORE L’etichetta del colore ( ) è fissata al coperchio della batteria nel vano centrale (pag. Essa serve all’ordinazione dei ricambi. Scrivere qui il colore e il codice per un comodo riferimento. COLORE CODICE (1) Etichetta colore http://mototh.com...
- Page 210 FILTRO DELL’ARIA Fare riferimento alle Precauzioni di sicurezza a pag. La manutenzione del filtro dell’aria deve essere effettuata a intervalli regolari (pag. ), e più frequentemente se si guida in luoghi eccessivamente bagnati o polverosi. Rimuovere il coperchio anteriore superiore (pagina ) e la protezione della canna di destra (pagina...
- Page 211 SFIATO DEL BASAMENTO Fare riferimento alle Precauzioni di sicurezza a pag. Rimuovere il tubo di scarico ( ). Scaricare i depositi in un apposito recipiente. Reinstallare il tubo di scarico. Eseguire la manutenzione più spesso quando si guida sotto la pioggia, a tutto gas o dopo che la motocicletta è...
- Page 212 API Viscosità SAE 10W-30 Standard JASO T 903 SCONSIGLIATO Olio consigliato Honda ‘‘4-STROKE MOTORCYCLE OIL’’ Non usare oli da corsa non detergenti, (olio per motore motociclistico a 4 tempi) vegetali o a base di olio di ricino. o equivalente. http://mototh.com...
- Page 213 Viscosità: Standard JASO T 903 Il grado di viscosità dell’olio motore deve Lo standard JASO T 903 è un indice per gli oli basarsi sulla media delle condizioni per motori motociclistici a 4 tempi. atmosferiche prevalenti nell’area d’uso della Esistono due classi: MA e MB. motocicletta.
- Page 214 Se non si utilizza una chiave torsiometrica per frequentemente di quanto indicato nel questa installazione, contattare al più presto il calendario di manutenzione. proprio concessionario Honda per controllare che il montaggio sia stato eseguito in modo Gettare via l’olio motore usato tenendo conto corretto.
- Page 215 Collocare un recipiente sotto il basamento cavalletto centrale su un terreno livellato. Accertarsi che non ci siano perdite di olio. del motore. Per scaricare l’olio, togliere il tappo di rifornimento/astina di livello dell’olio, il bullone di scarico dell’olio ( ) e la rondella di tenuta ( ).
- Page 216 CANDELA Rimuovere il coperchio anteriore superiore Fare riferimento alle Precauzioni di sicurezza (pagina ) e la protezione della canna di a pag. destra (pagina Staccare il cappuccio ( ) dalla candela. Candele raccomandate: Pulire la sporcizia intorno alla base della Normali: candela.
- Page 217 Controllare che sugli elettrodi e la Con la rondella applicata, avvitare a mano la candela per evitare che si incastri di porcellana centrale non ci siano depositi o incrostazioni carboniose e segni di traverso. Serrare la candela: corrosione. Sostituire la candela se i depositi o la corrosione sono eccessivi.
- Page 218 GIOCO DELLE VALVOLE Il controllo e la regolazione del gioco delle valvole devono essere effettuati col motore Fare riferimento alle Precauzioni di sicurezza a pag. freddo. Il gioco cambia con l’aumentare della temperatura del motore. Il gioco eccessivo delle valvole causa rumore Rimuovere il coperchio anteriore superiore e puo danneggiare il motore.
- Page 219 R i m u o v e r e i l t a p p o d e l f o r o d i Serrare i bulloni. Coppia di serraggio del bullone: registrazione delle punterie ( ) e l’anello ad O ( ) togliendo i bulloni ( ).
- Page 220 CATENA DELLA TRASMISSIONE Eccetto tipo GR Rimuovere il tappo d’ispezione ( ). Fare riferimento alle Precauzioni di sicurezza a pag. Spostare la catena di trasmissione in alto e in basso con il dito. Regolare la tensione La durata della catena di trasmissione ( ) della catena di trasmissione in modo da permettere approssimativamente il dipende dalla sua corretta lubrificazione e...
- Page 221 Girare la ruota posteriore. Fermarla. Eccetto tipo GR Controllare il lasco della catena di Rimuovere i copricatena ( ) rimuovendo i t r a s m i s s i o n e . R i p e t e r e q u e s t o bulloni A ( ) e il bullone B ( ).
- Page 222 Controllare che i denti del pignone non 7. Eccetto tipo GR siano danneggiati o usurati. Sostituire il Installare i copricatena e serrare i bulloni A pignone se necessario. e il bullone B alla coppia specificata. Coppia di serraggio dei bulloni A e del Dente danneggiato Dente usurato bullone B:...
- Page 223 Eccetto tipo GR Regolazione: Tipo GR Per la regolazione della catena procedere nel (5) (3) modo seguente: Sollevare la motocicletta sul cavalletto centrale con la marcia in folle e l’interruttore d’accensione sulla posizione ‘‘OFF’’. Allentare il dado dell’assale posteriore ( ). Allentare i controdadi della catena di trasmissione ( ) su entrambi i lati dei registri della catena di trasmissione ( ).
- Page 224 Se il gioco della catena è eccessivo quando si Lubrificazione: sposta il perno ruota posteriore al limite Lubrificare la catena dopo ogni 1.000 km, massimo di regolazione, vuol dire che la oppure quando sembra secca. catena è usurata e che deve essere sostituita. Serrare il dado dell’asse posteriore alla Utilizzare olio per ingranaggi SAE 80 o 90 coppia...
- Page 225 Rimozione e pulitura: Controllare che i denti del pignone non Quando la catena della trasmissione diventa siano danneggiati o usurati. Sostituire il sporca, bisogna rimuoverla e pulirla prima di pignone se necessario. lubrificarla. Non usare una catena nuova su pignoni Sollevare la motocicletta sul cavalletto usurati.
- Page 226 Far passare la catena sulle ruote dentate e collegare le estremità della catena con la maglia princ ipale. Per f acilitare il montaggio, tenere le estremità della catena su due denti adiacenti della ruota dentata mentre si inserisce la maglia principale. La maglia principale è...
- Page 227 ISPEZIONE DELLE SOSPENSIONI ANTERIORE E POSTERIORE Fare riferimento alle Precauzioni di sicurezza a pag. Controllare il gruppo della forcella bloccando il freno anteriore e pompando su e giù energicamente la forcella. La forcella deve rispondere dolcemente e non ci devono essere perdite d’olio. Le boccole del forcellone devono essere controllate prendo con forza contro il lato d e l l a r u o t a p o s t e r i o r e m e n t r e l a...
- Page 228 Avviare il motore e ingranare una marcia. Abbassare il cavalletto laterale. Il motore dovrebbe spegnersi non appena il (1) Molla del cavalletto cavalletto laterale viene abbassato. Se il sistema del cavalletto laterale non funzione come previsto, rivolgersi ad un concessionario Honda per una revisione. http://mototh.com...
- Page 229 Se (1) Cappuccio del dado dell’asse anteriore questo dovesse accadere, è necessario far (2) Dado dell’assale anteriore riparare il sistema freni. Rivolgersi al (3) Perno dell’asse anteriore concessionario Honda per questo intervento. http://mototh.com...
- Page 230 Montare i collari laterali sui mozzi destro e per l’installazione, rivolgersi al più presto ad sinistro della ruota. un concessionario Honda per fare verificare Collocare la ruota anteriore fra gli steli che il montaggio sia corretto. Se l’installazio- della forcella e inserire l’asse anteriore dal ne non è...
- Page 231 Rimozione della ruota posteriore Scollegare il braccio di fermo del freno ( ) dal pannello del freno rimuovendo la coppi- Fare riferimento alle Precauzioni di sicurezza a pag. glia ( ), il dado del braccio di fermo ( ) e la rosetta di gomma.
- Page 232 Rimuovere il perno dell’asse posteriore ), i registri della catena di trasmissione ) e i collari laterali, quindi rimuovere la catena ( ) dalla corona dentata posteriore spingendo in avanti la ruota posteriore. Rimuovere la ruota posteriore dalla motocicletta. http://mototh.com...
- Page 233 Per installare la ruota posteriore, invertire per l’installazione, rivolgersi al più presto ad le procedure di rimozione. un concessionario Honda per fare verificare Montare i collari laterali sui mozzi destro e che il montaggio sia corretto. Se l’installazio- sinistro della ruota.
- Page 234 (pag. Freno anteriore Controllare gli indicatori di usura ( ) su ogni pastiglia. Se una delle pastiglie è consumata fino all’indicatore di usura, sostituire la coppia di (1) Indicatori di usura pastiglie. Per questo intervento rivolgersi al concessionario Honda. http://mototh.com...
- Page 235 Rivolgersi al proprio concessionario Honda per questo intervento. Qualora sia necessario effettuare interventi ai freni, rivolgersi al concessionario Honda. Usare soltanto ricambi originali Honda o pezzi equivalenti. (1) Freccia (2) Braccetto azionamento freno (3) Contrassegno di riferimento (4) Piatto pòrtaceppi...
- Page 236 (sigillata). Se la batteria se sembra debole e/o perde elettrolito (causando un avviamento difficoltoso od altri problemi elettrici), rivolgersi ad un concessionario Honda. La batteria produce gas di idrogeno esplosivo durante il funzionamento normale. Una scintilla o fiamma può causare La batteria è...
- Page 237 Rimozione: Togliere la batteria ( ) dalla sua scatola. Assicurarsi che la chiavetta di accensione sia sulla posizione OFF. Aprire la sella (pag. Aprire il coperchio della batteria (pag. Rimuovere il coperchio della batteria ( ) e il coperchio del teleruttore di avviamento ( ) togliendo le viti ( ).
- Page 238 Se i fusibili saltano frequentemente, vuol dire in genere che c’è un cortocircuito o un sovraccarico dell’impianto elettrico. Per la riparazione rivolgersi ad un concessionario Honda. Mai usare un fusibile con una taratura diversa da quella prescritta. In caso contrario si può danneggiare seriamente l’impianto elettrico, con pericolo d’incendio, e causare una...
- Page 239 Scatola fusibili: Il portafusibili ( ) si trova vicino alla batteria. Il fusibile specificato è: Aprire la sella (pag. Rimuovere il coperchio della batteria e il coperchio del teleruttore di avviamento (pag. Aprire il coperchio della scatola fusibili ( ). Tirare fuori il fusibile ( ).
- Page 240 Fusibile principale: Il fusibile principale ( ) si trova vicino alla batteria. Il fusibile specificato è: Aprire la sella (pag. Rimuovere il coperchio della batteria e il coperchio del teleruttore di avviamento (pag. Scollegare il connettore del filo ( ) del teleruttore di avviamento ( ).
- Page 241 REGOLAZIONE DELL’INTERRUTTORE DELLA LUCE DI ARRESTO Fare riferimento alle Precauzioni di sicurezza a pag. Controllare il funzionamento dell’interruttore della luce di arresto ( ), sul lato destro dietro il motore, di tanto in tanto. Per effettuare la regolazione ruotare il dado di registro ( ).
- Page 242 SOSTITUZIONE LAMPADINA Fare riferimento alle Precauzioni di sicurezza Prima di sostituire la lampadina, portare a pag. l’interruttore di accensione su OFF. Non usare lampadine diverse da quelle La lampadina accesa si surriscalda e rimane indicate. calda per qualche tempo dopo esser stata Installata una lampadina nuova, controllare spenta.
- Page 243 Lampadina faro Togliere il coperchio anteriore della manopola (pag. Rimuovere il gommino della sede ( ). Rimuovere la lampadina del faro ( ) premendo sulla molla ( ). Installare una nuova lampadina invertendo l’ordine di rimozione. Installare la gomma della sede con il segno ‘‘TOP’’...
- Page 244 Lampadina luci posizione Togliere il coperchio anteriore della manopola (pag. Estrarre il connettore ( ). Estrarre la lampadina ( ) senza girarla. Installare una nuova lampadina invertendo l’ordine di rimozione. (1) Presa (2) Lampadina http://mototh.com...
- Page 245 Lampadina della luce di arresto/posteriore Togliere il trasparente della luce posteriore ( ) togliendo le viti ( ). Premere leggermente la lampadina ( ) e girarla in senso antiorario. Installare una nuova lampadina invertendo l’ordine di rimozione. (1) Lenti luci di coda (3) Lampadina (2) Viti http://mototh.com...
- Page 246 Lampadina frecce anteriori Rimuovere il trasparente dell’indicatore di direzione anteriore ( ) estraendo la vite ( ). Premere leggermente la lampadina ( ) e girarla in senso antiorario. Ins tallare una nuova lampadina e c o n t r o l l a r e c h e l a l u c e f u n z i o n i correttamente.
- Page 247 Lampadina frecce posteriori Rimuovere la lente della freccia posteriore ( ) e l’imballaggio della lente ( ) togliendo la vite ( ). Rimuovere la lampadina ( ) premendo e ruotando in senso antiorario. Ins tallare una nuova lampadina e c o n t r o l l a r e c h e l a l u c e f u n z i o n i correttamente.
- Page 248 Luce della targa Rimuovere la lente della luce della targa ( ) rimuovendo le viti ( ). Estrarre la lampadina ( ) senza girarla. Installare una nuova lampadina invertendo l’ordine di rimozione. (1) Lente della targa stessa (3) Lampadina (2) Viti http://mototh.com...
- Page 249 PULITURA Pulire regolarmente la motocicletta per pro- Lavaggio della motocicletta teggere la rifinitura delle sue superfici e con- Risciacquare bene la motocicletta con trollare che non ci siano danni, usura o acqua fredda per rimuovere lo sporco perdite di olio o liquido dei freni. leggero.
- Page 250 Dopo la pulitura, risciacquare completa- Tocchi finali mente la motocicletta con abbondante Dopo aver lavato la motocicletta, è acqua pulita. Non usare forti detersivi, consigliabile usare un detergente/lucido perché possono corrodere le parti in lega. spray o cera liquida o in pasta di buona Asciugare la motocicletta, avviare il motore qualità...
- Page 251 Rimozione del sale di strada Il sale sparso sulle strade in inverno e quello contenuto nell’acqua marina possono causare la formazione di ruggine. Dopo aver guidato in una zona caratterizzata dalla presenza di acqua marina o su strade cosparse di sale lavare la motocicletta come indicato.
- Page 252 GUIDA PER L’IMMAGAZZINAMENTO Il lungo immagazzinamento, come durante l’inverno, richiede alcune operazioni volte a ridurre gli effetti di deterioramento causati dal non uso della motocicletta. Le eventuali La benzina è molto infiammabile e riparazioni devono inoltre essere effettuate esplosiva. Si può essere seriamente PRIMA dell’immagazzinamento, perchè...
- Page 253 Per evitare la formazione di ruggine nel Rimuovere la batteria. Conservarla in un cilindro, fare quanto segue: luogo protetto dalle temperature sotto zero Togliere il cappuccio candela dalla e dalla luce diretta del sole. candela. Usando nastro adesivo o un Effettuare la carica lenta della batteria una cordino, fiassare il cappuccio a qualsiasi volta al mese.
- Page 254 RIMOZIONE DALL’IMMAGAZZINAMENTO Scoprire e pulire la motocicletta. Cambiare l’olio motore se sono trascorsi più di 4 mesi dalla data dell’immagazzina- mento. Ricaricare la batteria se necessario. Installare la batteria. Scaricare dal serbatoio del carburante l’olio inibitore della corrosione spruzzato in eccesso.
- Page 255 Inoltre, dopo un incidente veicoli, osservare tutte le leggi e normative grave rivolgersi a un concessionario Honda applicabili. per il controllo del telaio e delle sospensioni. Se si ritiene di essere in grado di guidare senza pericoli, in primo luogo valutare lo stato della motocicletta.
- Page 256 DATI TECNICI DIMENSIONI Lunghezza totale 1.896 mm Larghezza totale 727 mm Altezza totale 1.079 mm Passo 1.240 mm CAPACITA Olio motore (Dopo lo svuotamento) (Dopo lo smontaggio) Serbatoio del carburante Numero passeggeri Pilota e un passeggero Capacità massima di carico 170 kg http://mototh.com...
- Page 257 MOTORE Alesaggio e corsa 52,4 57,9 mm Rapporto di compressione 9,3 : 1 Cilindrata 124,8 cm Candela Standard CPR6EA 9 (NGK) U20EPR9 (DENSO) Per marcia prolungata CPR7EA 9 (NGK) ad alta velocità U22EPR9 (DENSO) Distanza tra gli elettrodi della candela 0,80 0,90 mm Regime minimo 1.400...
- Page 258 TELAIO E SOSPENSIONI Angolo di inclinazione dello sterzo 26°36’ Avancorsa 73,6 mm Misura pneumatico anteriore 70/100 17M/C 40P DUNLOP TT900F Misura pneumatico posteriore 80/90 17M/C 50P DUNLOP TT900AG Tipo di pneumatico pneumatico a carcassa diagonale, con camera d’aria TRASMISSIONE Rapporto di riduzione primario 3,350 Rapporto di riduzione, 1ª...
- Page 259 IMPIANTO ELETTRICO Batteria 12V 5Ah Alternatore 0,15 kW/5.000 min (giri/min) LUCI Faro anteriore (abbagliante/anabbagliante) 12V 35/35W Luce di arresto/posteriore 12V 21/5W Indicatori di direzione Anteriori 12V 21W Posteriori 12V 21W Lampadina della luce di posizione 12V 5W Lampadina della luce della targa 12V 5W Luce del tachimetro Spia del folle...
- Page 260 Il convertitore catalitico agisce su HC, CO e NOx. Il ricambio deve essere un pezzo Anche una piccola quantità di benzina con piombo può contaminare i metalli originale Honda o il suo equivalente. catalizzatori, rendendo inefficace il convertitore catalitico. Il convertitore catalitico deve funzionare a temperature elevate perché...
- Page 261 Honda ANF125 MANUAL DEL PROPIETARIO Honda Motor Co., Ltd. 2009 http://mototh.com...
- Page 262 INFORMACIÓN IMPORTANTE CONDUCTOR Y PASAJERO Esta motocicleta se ha concebido para llevar al conductor y un pasajero. Nunca exceda la capacidad de carga máxima que se indica en la etiqueta sobre accesorios y carga. UTILIZACIÓN EN CARRETERA Esta motocicleta ha sido diseñada para ser utilizada solamente en carretera. LEA ATENTAMENTE ESTE MANUAL DEL USUARIO Preste especial atención a los mensajes de seguridad que aparecen a lo largo del manual.
- Page 263 Toda la información de esta publicación se basa en la información más reciente del producto disponible en el momento de aprobarse la impresión. Honda Motor Co., Ltd. se reserva el derecho de hacer cambios en cualquier momento sin previo aviso y sin incurrir en ninguna obligación.
- Page 264 Cuando el servicio sea necesario, recuerde que su concesionario Honda es el que mejor conoce su motocicleta. Si usted posee los ‘‘conocimientos’’ mecánicos necesarios y dispone de las herramientas, podrá obtener un Manual de taller oficial de Honda en su concesionario para ayudarle a realizar muchas tareas de mantenimiento y de reparaciones.
- Page 265 En este manual los códigos siguientes indican cada país. Las ilustraciones se basan en el modelo Reino Unido Francia Ventas directas a Europa Israel Grecia Las especificaciones pueden cambiar con cada lugar. http://mototh.com...
- Page 266 UNAS PALABRAS ACERCA DE LA SEGURIDAD Su seguridad, y la de otras personas, es muy importante. Y la conducción de esta motocicleta es una responsabilidad importante. Para ayudarle a tomar decisiones acertadas sobre seguridad, hemos provisto una serie de procedimientos de operación y otra información en etiquetas y en este manual. Esta información le alerta sobre peligros potenciales que podrían herirle a usted o a otras personas.
- Page 267 Si no respeta las instrucciones PERDERÁ LA VIDA o SUFRIRÁ LESIONES GRAVES. Si no respeta las instrucciones PUEDE PERDER LA VIDA o SUFRIR LESIONES GRAVES. PUEDE SUFRIR LESIONES si no sigue las instrucciones. –– tales como Notas importantes de seguridad o Precauciones Encabezamientos de seguridad importantes de seguridad.
- Page 268 OPERACIÓN Página Página SEGURIDAD DE LA MOTOCICLETA COMPONENTES INDIVIDUALES INFORMACIÓN IMPORTANTE DE ESENCIALES SEGURIDAD INTERRUPTOR DE ENCENDIDO EQUIPO DE PROTECCIÓN LLAVES LÍMITES Y DIRECTRICES DE CARGA MANDO DEL MANILLAR DERECHO ETIQUETAS GRÁFICAS MANDOS DEL MANILLAR IZQUIERDO UBICACIÓN DE LAS PIEZAS INSTRUMENTOS E INDICADORES COMPONENTES PRINCIPALES (Información que usted necesita para...
- Page 269 Página Página CARACTERÍSTICAS OPERACIÓN (No son necesarias para el INSPECCIÓN ANTES DE CONDUCIR funcionamiento) PUESTA EN MARCHA DEL MOTOR BLOQUEO DE LA DIRECCIÓN RODAJE CERRADURA DEL ASIENTO CONDUCCIÓN PORTACASCOS CAMBIO DE MARCHA COMPARTIMIENTO CENTRAL FRENADO BOLSA DE DOCUMENTOS ESTACIONAMIENTO CUBIERTA FRONTAL SUPERIOR SUGERENCIAS PARA EVITAR ROBOS PROTECTOR PARA LAS PIERNAS CUBIERTA FRONTAL DEL MANILLAR...
- Page 270 MANTENIMIENTO Página Página MANTENIMIENTO DESGASTE DE ZAPATAS DE FRENO LA IMPORTANCIA DEL BATERÍA MANTENIMIENTO CAMBIO DE FUSIBLE SEGURIDAD EN EL AJUSTE DEL INTERRUPTOR DE LA MANTENIMIENTO LUZ DEL FRENO PRECAUCIONES DE SEGURIDAD REEMPLAZO DE LA BOMBILLA PROGRAMA DE MANTENIMIENTO JUEGO DE HERRAMIENTAS LIMPIEZA NÚMEROS DE SERIE ETIQUETA DE COLOR...
- Page 271 SEGURIDAD DE LA MOTOCICLETA INFORMACIÓN IMPORTANTE DE SEGURIDAD Hágase fácil de ver en carretera Su motocicleta puede ofrecerle muchos años de Algunos conductores no se percatan de las servicio y placer si se responsabiliza de su motocicletas porque no esperan encontrarlas. propia seguridad y entiende los retos con los que Para hacerse visible, póngase ropa brillante se puede encontrar en la carretera.
- Page 272 No exceda nunca los límites de carga, y utilice solamente los accesorios que hayan sido homologados por Honda para esta motocicleta. Consulte la página para más detalles. La no utilización del casco aumenta la posibilidad de sufrir lesiones de gravedad o incluso de perder la vida en caso de colisión.
- Page 273 Cascos y protección de los ojos Vestimenta adicional para conducción El casco es la pieza más importante durante la Además del casco y de la protección para los ojos, conducción porque le ofrece la mejor protección también le recomendamos usar: posible contra las lesiones en la cabeza.
- Page 274 Los accesorios que no sean de Honda, las Observe siempre los límites de carga y modificaciones no apropiadas, y la falta de otros consejos sobre la carga ofrecidos en mantenimiento también podrán reducir su...
- Page 275 Si desea llevar más carga, pida consejo a su distribuidor Honda, y no se olvide de leer la información relacionada con los accesorios en la página http://mototh.com...
- Page 276 Honda. Solicit e a sist encia a su concesionario y siga siempre estas directrices: Asegúrese de que el accesorio no interfiera Los accesorios o modificaciones no...
- Page 277 No enganche un remolque ni sidecar a la Modificaciones motocicleta. Esta motocicleta no ha sido Le recomendamos encarecidamente que no quite diseñada para llevar estos accesorios, y su uso nada del equipo original ni modifique la puede perjudicar seriamente la conducción de motocicleta de forma alguna que pueda cambiar la misma.
- Page 278 Otras ofrecen información importante sobre la seguridad. Lea atentamente esta información y no quite las etiquetas. Si una de estas etiquetas se despega o si resulta difícil de leer, solicite su reemplazo a su concesionario Honda. http://mototh.com...
- Page 279 Lea con atención las instrucciones contenidas en el Manual de taller. Por razones de seguridad, encomiende el servicio de la motocicleta sólo a un concesionario Honda. PELIGRO (sobre fondo ROJO) Correrá el peligro de MUERTE o de HERIDAS GRAVES si no sigue las instrucciones.
- Page 280 ETIQUETA DE ADVERTENCIA DE ACCESORIOS Y CARGA ADVERTENCIA ACCESORIOS Y CARGA La estabilidad y el manejo de esta motocicleta pueden verse afectados por el añadido de accesorios y equipaje. Leer con atención las instrucciones contenidas en el manual del usuario y en la guía de instalación antes de instalar cualquier accesorio.
- Page 281 (Tipo GR) ETIQUETA DE INFORMACIÓN DE LOS NEUMÁTICOS Y DE LA CADENA DE TRANSMISIÓN Presión de los neumáticos en frío: [El conductor y un pasajero] Delantero 200 kPa (2,00 kgf/cm ) Trasero 250 kPa (2,50 kgf/cm ) [Sólo el conductor] Delantero 200 kPa (2,00 kgf/cm ) Trasero...
- Page 282 (Excepto tipo GR) ETIQUETA DE INFORMACIÓN DE LOS NEUMÁTICOS Presión de los neumáticos en frío: [El conductor y un pasajero] Delantero 200 kPa (2,00 kgf/cm ) Trasero 250 kPa (2,50 kgf/cm ) [Sólo el conductor] Delantero 200 kPa (2,00 kgf/cm ) Trasero 200 kPa (2,00 kgf/cm ) Tamaño de los neumáticos:...
- Page 283 ETIQUETA RECORDATORIA DE SEGURIDAD Para su propia protección, lleve siempre el casco puesto mientras esté conduciendo. ETIQUETA DEL COMBUSTIBLE SÓLO COMBUSTIBLE SIN PLOMO ETIQUETA DEL LÍMITE DE CARGA No exceda 5.0 kg (11.0 lb) http://mototh.com...
- Page 284 UBICACIÓN DE LAS PIEZAS Depósito del líquido de freno delantero Interruptor de intensidad del faro Retrovisor Instrumentos e indicadores Retrovisor Maneta del freno delantero Puño acelerador Interruptor de señales Botón de arranque de dirección Botón de la bocina Interruptor de encendido http://mototh.com...
- Page 285 Portacascos Batería Compartimiento de documentos Fusible principal Juego de herramientas Caja de fusibles Tapa del orificio de llenado de aceite/ vorilla de nivel de aceite Pedal de arranque Estribera Pedal del freno trasero Estribera para el acompañante http://mototh.com...
- Page 286 Compartimiento central Portacascos Tapa del depósito de combustible Cerradura del asiento Estribera para el acompañante Pedal de cambio Estribera Caballete lateral Soporte central http://mototh.com...
- Page 287 INSTRUMENTOS E INDICADORES Los indicadores están incluidos en el tablero de instrumentos. Sus funciones se describen en las tablas de las páginas siguientes. (1) (2) (1) Indicador de la posición de las marchas (2) Indicador de intermitente izquierdo (3) Indicador de punto muerto (4) Lámpara indicadora de mal funcionamiento de PGM-FI (MIL) (5) Velocímetro...
- Page 288 ON. Si se enciende en cualquier otro momento, reduzca la velocidad y lleve la motocicleta a su concesionario Honda tan pronto como sea posible. http://mototh.com...
- Page 289 (N.° de ref.) Descripción Función Velocímetro Muestra la velocidad de conducción. Indica la velocidad en kilómetros por hora (km/h) o en millas por hora (mph) y en kilómetros por hora (km/h) dependiendo del tipo. La velocidad se indica en kilómetros por hora (km/h) y/o millas por hora (mph), dependiendo del modelo.
- Page 290 Cuando el segmento E ( ) parpadea, la gasolina Visualización del cuentakilómetros/ medidor de combustible estará baja y usted deberá llenar el depósito tan Cuando se pone el interruptor de encendido en pronto como sea posible. la posición ON, el cuentakilómetros (1) y el La cantidad aproximada de gasolina que queda medidor de combustible (2) mostrarán en el depósito con el automóvil en posición...
- Page 291 Usted no tiene que realizar ajuste alguno, sin embargo, el nivel del líquido y el desgaste de las El líquido de f renos recomendado es Honda pastillas debe inspeccionarse periódicamente. El DOT 3 o DOT 4 de un recipiente precintado, o sistema debe inspeccionarse frecuentemente uno equivalente.
- Page 292 Freno trasero Ajuste de los frenos: Apoye la motocicleta en su soporte central. Mida la distancia recorrida por el pedal del freno trasero ( ) antes de que el freno empiece a frenar. El juego libre deberá ser: 20 30 mm Si fuese necesario realizar ajustes, gire la tuerca de ajuste del freno trasero ( ).
- Page 293 Si no pudiese lograr los ajustes apropiados siguiendo este método, póngase en contacto con su concesionario Honda. (2) Tuerca de ajuste del freno trasero (3) Posador del brazo del freno Después del ajuste, empuje el brazo del freno ( )
- Page 294 Afloje la contratuerca del ajustador ( ). embrague no funciona correctamente, póngase Gire el ajustador del embrague ( ) hacia la en contacto con su concesionario Honda. derecha una vuelta; no lo gire excesivamente. Gire lentamente el ajustador hacia la izquierda hasta que note un poco de resistencia.
- Page 295 COMBUSTIBLE Depósito de combustible El depósito de combustible está situado debajo del asiento. La capacidad del depósito de La gasolina es muy inflamable y explosiva. combustible es: Manejando el combustible se podrá quemar o lesionar gravemente. Abra el asiento (página ).
- Page 296 Si las detonaciones o el golpeteo persisten, consulte a su concesionario Honda. Si no lo hace así, se considerará como utilización incorrecta, y los daños causados por la utilización incorrecta no quedan cubiertos por la garantía limitada de...
- Page 297 Dañar la pintura del depósito de combustible. como el recomendado por Honda. Existen dos Dañar los tubos de goma de la línea de tipos de ‘‘gasohol’’: uno que contiene etanol y otro combustible.
- Page 298 ACEITE DEL MOTOR Vuelva a instalar el tapón del orificio de Comprobación del nivel de aceite del motor llenado de aceite/varilla de nivel. Compruebe Compruebe diariamente el nivel de aceite del si hay fugas de aceite. motor antes de conducir la motocicleta. El nivel debe ser mantenido entre las marcas de nivel superior ( ) e inferior ( ) en la tapa/varilla El funcionamiento del motor sin suficiente...
- Page 299 NEUMÁTICOS Presión de los neumáticos Para utilizar la motocicleta de forma segura, los Unos neumáticos correctamente inf lados neumáticos deberán ser del tipo y tamaño proporcionan la mejor combinación de manejo, apropiados, estar en buenas condiciones con las duración de la parte de rodadura, y confort de estrías adecuadas, y correctamente inflados.
- Page 300 Compruebe siempre la presión de los neumáticos Inspección en ‘‘frío’’ cuando la motocicleta haya estado Cada vez que compruebe la presión de los aparcada durante tres horas por lo menos. Si neumáticos, deberá examinar también el dibujo y comprueba la presión en ‘‘caliente’’ después de perfiles para ver si están desgastados, dañados, o haber conducido la motocicleta aunque sólo...
- Page 301 Desgaste del dibujo de los neumáticos Reemplace los neumáticos inmediatamente cuando aparezca el indicador de desgaste en el neumático. (1) Indicador de desgaste (2) Marca de ubicación de la banda de rodadura http://mototh.com...
- Page 302 Reparación y sustitución de la cámara Si se pincha o daña una cámara, deberá sustituirla lo antes posibles. Una cámara reparada podrá no proporcionar la misma fiabilidad que una nueva, y podrá fallarle cuando esté conduciendo. Si necesita hacer una reparación temporal poniendo un parche a la cámara o utilizando un aerosol de sellado, conduzca con mucha precaución a velocidad reducida y sustituya la...
- Page 303 L os neumáticos recomendados para su Cambio de la rueda Los neumáticos con los que salió de fábrica su motocicleta son: Delantero: 70/100 17M/C 40P motocicleta han sido diseñados según el rendimiento y capacidades de su motocicleta y le DUNLOP TT900F ofrecen la mejor combinación de conducción, Trasero:...
- Page 304 COMPONENTES INDIVIDUALES ESENCIALES INTERRUPTOR DE ENCENDIDO El interruptor de encendido ( ) está en el lado derecho debajo de la pipa de la dirección. LOCK (1) Interruptor de encendido Posición de la llave Función Extracción de la llave LOCK La dirección está bloqueada. No pueden La llave puede (Bloqueo de la dirección) operarse el motor ni las luces.
- Page 305 ( ) y una placa del número de llave ( ). en un lugar seguro. Para hacer copias de las llaves lleve todas las llaves, la placa de número de la llave y la motocicleta a su concesionario Honda. (1) Llaves de encendido (2) Chapa del número de llave http://mototh.com...
- Page 306 MANDO DEL MANILLAR DERECHO Botón de arranque El botón de arranque está al lado de la empuñadura del acelerador. Cuando se presiona el botón de arranque, el motor de arranque hace girar el motor. Consulte el procedimiento de arranque en la página Si el soporte lateral está...
- Page 307 MANDOS DEL MANILLAR IZQUIERDO Interruptor de intensidad de luz del faro ( ) Presione el interruptor de intensidad de luz del faro hacia la posición (HI) para seleccionar la luz de carretera, y hacia la posición (LO) para seleccionar la luz de cruce. Interruptor de intermitentes ( ) Mueva el interruptor hacia la posición para...
- Page 308 CARACTERÍSTICAS (No son necesarias para el funcionamiento) BLOQUEO DE LA DIRECCIÓN La dirección puede bloquearse cuando el Para bloquear interruptor de encendido ( ) está en la posición ‘‘LOCK’’. Para bloquear la dirección, gire el manillar completamente hacia la izquierda o derecha, y gire la llave de encendido ( ) a la posición LOCK mientras la empuja.
- Page 309 CERRADURA DEL ASIENTO El cierre ( ) del asiento, está en el costado izquierdo por debajo del asiento. Para abrir el asiento, inserte la llave de encendido ) y gírela hacia la derecha para desbloquearlo. Tire del asiento hacia arriba. Para bloquear el asiento, bájelo y presiónelo hacia abajo hasta que se bloquee.
- Page 310 PORTACASCOS Abra el sillín (página Cuelgue el casco ( ) en los ganchos ( ) que hay en la bisagra del asiento y baje el asiento para bloquearlo. Para sacar un casco, desbloquee el asiento. Levante el casco para extraerlo del portacascos y baje el asiento, asegurándose de que queda bloqueado antes de circular.
- Page 311 COMPARTIMIENTO CENTRAL El compartimiento central ( ) está debajo del asiento. Apertura y cierre: Consulte ‘‘CERRADURA DEL ASIENTO’’ (página LIMITE MAXIMO DE CARGA: 5,0 kg No sobrepase nunca el límite máximo de peso porque de lo contrario, el manejo y la estabilidad quedarían seriamente afectados.
- Page 312 BOLSA DE DOCUMENTOS La bolsa de documentos ( ) está en el compartimiento de documentos ( ) en el compartimiento del centro ( ). Abra el sillín (página Abra la cubierta ( ) soltando las lengüetas ( ). Este manual del propietario y otros documentos deberán guardarse en el compartimiento.
- Page 313 CUBIERTA FRONTAL SUPERIOR La cubierta frontal superior debe extraerse para poder quitar el protector de la pata derecha y la cubierta frontal del manillar. Desmontaje: Extraiga la cubierta frontal superior ( ) extrayendo los tornillos A ( ) y los tornillos B ( ).
- Page 314 PROTECTOR PARA LAS PIERNAS Deberá extraerse el protector de la pata derecha para realizar el mantenimiento del filtro de aire, de la bujía y de la holgura de válvulas. Desmontaje: Extraiga la cubierta frontal superior (página Quite la cubierta superior ( ) quitando el tornillo A ( ).
- Page 315 Extraiga los tornillos D ( ) y los collares ( ). Extraiga el tornillo E ( ) y los tornillos F ( ). (10) (11) Desconecte el conector ( Extraiga el protector de la pierna derecha ( liberando con cuidado las lengüetas. Montaje: La instalación puede hacerse en el orden inverso al desmontaje.
- Page 316 A f l o j e l o s e s p e j o s r e t r o v i s o r e s CUBIERTA FRONTAL DEL MANILLAR La cubierta frontal del manillar deberá extraerse aproximadamente 2 vueltas. Ajuste los espejos retrovisores.
- Page 317 AJUSTE VERTICAL DEL ENFOQUE DEL FARO DELANTERO El ajuste vertical podrá realizarse moviendo el faro ( ) como sea necesario. Para mover el faro, afloje el perno ( ). Apriete el perno después del ajuste. Respete las leyes y regulaciones locales. (1) Faro (A) Arriba (2) Perno...
- Page 318 ). Compruebe si hay det e ct a a lgún probl ema, a se gúre se de fugas. solucionarlo, o de pedirle al distribuidor Honda Frenos compruebe la operación; que lo haga por usted. Delantero: Asegúrese que no haya fugas del líquido de frenos (página...
- Page 319 PUESTA EN MARCHA DEL MOTOR Siga siempre el procedimiento correcto de Los humos de escape de su motocicleta arranque descrito a continuación. contienen gas de monóxido de carbono que es venenoso. En lugares cerrados tales como en un Esta motocicleta está provista de un sistema de garaje se pueden acumular rápidamente altos apagado del motor con el soporte lateral.
- Page 320 Preparación Antes de poner en marcha el motor, introduzca la No accione el pedal de arranque mientras el llave de contacto, gírela hacia la posición ON y motor esté en marcha porque podría dañarse el confirme los puntos siguientes: motor. No aplique fuerza excesiva en el pedal de La transmisión está...
- Page 321 Procedimiento de puesta en marcha Esta motocicleta tiene un motor de inyección de Si el acelerador está completamente abierto el combustible con estrangulador automático. Siga motor no arrancará (debido a que el módulo de el procedimiento que se indica a continuación. control electrónico cortará...
- Page 322 Motor ahogado Corte del encendido Si no arranca el motor después de varios Su motocicleta ha sido diseñada para que el mo- intentos, es posible que esté ahogado. tor y la bomba de combustible se paren automáti- Emplee el botón de arranque camente en caso de volcarse (un sensor cortará...
- Page 323 RODAJE Contribuya a garantizar la f iabilidad y rendimiento futuros de su motocicleta prestando atención especial a la forma en que conduce durante los primeros 500 km. Durante este período, evite las salidas a todo gas y las aceleraciones rápidas. http://mototh.com...
- Page 324 Esta secuencia se repite para cambiar CONDUCCIÓN Revise la sección Seguridad de la motocicleta progresivamente a la siguiente marcha más alta. (páginas ) antes de conducir. La reducción de las marchas se realiza pisando la palanca de cambios con el talón del pie. Asegúrese sobre la función del mecanismo del caballete lateral.
- Page 325 CAMBIO DE MARCHA La operación del pedal de cambio varía cuando se Avance para y cuando se avanza. Para parar, el cambio se puede hacer desde 4ta a punto muerto directamente con el sistema rotatorio de 4 etapas. Parada (N) Punto muerto (2) Segunda (1) Primera (3) Tercera...
- Page 326 Cuando se mueve se usa el sistema de retorno de Avance 4 pasos hacia adelante. No se puede hacer directamente el cambio de 4 a punto muerto. Retorne siempre la empuñadura del acelerador en primer lugar antes de cambiar de marcha. Opere ligeramente con las puntas de los dedos del pie hasta empujar hacia abajo la palanca de cambios.
- Page 327 El cambio de marcha correcto evitará dañar el Cambio a una velocidad menor motor y la transmisión. El cambio a una velocidad menor a velocidades más altas que las indicadas en la tabla de abajo, Cambio a una velocidad mayor pueden hacer que el motor sobrepase el límite de El límite de alta velocidad de cada engranaje está...
- Page 328 Cuando se conduzca bajo la lluvia o con suelo FRENADO Para frenar normalmente, aplique poco a poco el mojado, o sobre superficies deslizantes, se freno delantero y el trasero al mismo tiempo reducirá la capacidad de maniobra y de parada. mientras cambia a una velocidad inferior En estas condiciones todas sus acciones apropiada.
- Page 329 El tubo de escape y el silenciador se calientan ESTACIONAMIENTO Una vez parada la motocicleta, ponga la considerablemente durante el funcionamiento y transmisión en punto muerto, gire el manillar permanecen suficientemente calientes como para completamente hacia la izquierda, gire el causar quemaduras si se tocan, incluso después interruptor de encendido a la posición OFF y de haber parado el motor.
- Page 330 NOMBRE: SUGERENCIAS PARA EVITAR ROBOS Bloquee siempre la dirección y no deje nunca la llave de contacto en el interruptor de DIRECCIÓN: encendido. Esto parece muy sencillo pero, a menudo, nos olvidamos de ello. Asegúrese que la información del registro de su motocicleta sea precisa y esté...
- Page 331 Si la motocicleta vuelca o sufre un accidente, LA IMPORTANCIA DEL MANTENIMIENTO Para una conducción segura, económica y libre asegúrese de que el concesionario Honda de problemas será esencial dispensar un buen inspeccione todas las partes principales, aunque mantenimiento a la motocicleta. Con ello ayudará...
- Page 332 El propietario. desmontaje de las ruedas deberá ser realizado generalmente por un técnico de Honda u otro mecánico cualificado; las instrucciones incluidas en este manual solamente son para asistirle en caso de emergencia.
- Page 333 No tenga encendido el motor a menos que Para asegurar la mejor calidad y fiabilidad, lo indiquen las instrucciones. emplee sólo piezas nuevas genuinas de Honda o Lea las instrucciones antes de comenzar, y sus equivalentes para las reparaciones y asegúrese de que tiene todas las herramientas...
- Page 334 Consulte con su concesionario Honda. El servicio deberá ser realizado por un concesionario Honda, a menos que el propietario disponga de las herramientas apropiadas y de los datos de servicio de mantenimiento y esté cualificado mecánicamente. Consulte el Manual de taller oficial Honda.
- Page 335 FRECUENCIA LIQUE LACTURA DEL ODOMETRO [NOTA (1)] ACONTEZCA PRIMERO 1.000 km Consulte la página 1.000 mi ITEMS NOTA TUBERIA DE COMBUSTIBLE FUNCIONAMIENTO DEL ACELERADOR DEPURADOR DE AIRE NOTA (2) RESPIRADERO DEL CÁRTER NOTA (3) BUJÍA ESPACIO DE VALVULA ACEITE DE MOTOR PANTALLA DEL FILTRO DE ACEITE DEL MOTOR FILTRO CENTRÍFUGO DE ACEITE DEL MOTOR...
- Page 336 FRECUENCIA LIQUE LACTURA DEL ODOMETRO [NOTA (1)] ACONTEZCA PRIMERO 1.000 km Consulte la 1.000 mi página ITEMS NOTA CADENA DE TRANSMISION Cada 1.000 km I, L FLUIDO DE FRENOS NOTA (4) DESGASTE DE LAS ZAPATAS/PASTILLAS 94, 95 DE LOS FRENOS SISTEMA DE FRENOS 21 23, 94, 95...
- Page 337 JUEGO DE HERRAMIENTAS El juego de herramientas ( ) está en el compartimiento de documentos ( ), en el compartimiento central ( ). Abra el sillín (página Abra la cubierta ( ) soltando las lengüetas ( ). Con las herramientas de este juego podrá realizar algunas reparaciones en carretera, ajustes menores y cambios de piezas.
- Page 338 NÚMEROS DE SERIE Los números de serie del bastidor y del motor El número de bastidor ( ) está estampado detrás son necesarios para poder registrar su del protector de la pierna izquierda. motocicleta. También se los puede pedir su concesionario cuando pida piezas de recambio.
- Page 339 ETIQUETA DE COLOR La etiqueta de colores ( ) está adherida a la cubierta de la batería en el compartimiento central (página Sirve para pedir piezas de recambio. Anote en los espacios de abajo el color y el código para que le sirvan como referencia.
- Page 340 FILTRO DE AIRE Consulte las precauciones de seguridad de la página El filtro de aire debe atenderse a intervalos regulares (página ). Atiéndalo con más frecuencia cuando conduzca en zonas con mucho polvo o agua. Extraiga la cubierta superior frontal (página ) y el protector de las piernas derecho (página Extraiga la cubierta de la caja del filtro de aire...
- Page 341 RESPIRADERO DEL CÁRTER Consulte las precauciones de seguridad de la página Extraiga el tubo de drenaje ( ). Drene los depósitos en un recipiente apropiado. Vuelva a instalar el tubo de drenaje. Efectúe el servicio con mayor frecuencia cuando conduzca bajo la lluvia, a plena aceleración, o después de haber lavado o forzado la motocicleta.
- Page 342 SAE 10W-30 Norma JASO T 903 NO SE RECOMIENDA BIEN Aceite recomendado Honda ‘‘4-STROKE MOTORCYCLE OIL’’ No utilice aceites de competición no detergentes, (aceite de 4 tiempos para motocicletas) u vegetales o con base de aceite de risino. otro equivalente. http://mototh.com...
- Page 343 Norma JASO T 903 Viscosidad: El grado de viscosidad del aceite del motor debe La norma JASO T 903 es una referencia para basarse en la temperatura atmosférica media de aceites de motor para motores de motocicletas de la zona donde conduce. A continuación le 4 tiempos.
- Page 344 Cambie el aceite del motor como se pida a su distribuidor Honda que realice esta especifica en el programa de mantenimiento tarea por usted. (página...
- Page 345 Ponga debajo del cárter un recipiente para el una superficie firme y nivelada. Asegúrese de drenaje. que no haya fugas de aceite. Para drenar el aceite, extraiga la tapa de relleno/varilla de medición del nivel de aceite, el perno de drenaje de aceite ( ), y la arandela de sellado ( ).
- Page 346 Extraiga la cubierta superior frontal (página BUJÍA Consulte las precauciones de seguridad de la ) y el protector de las piernas derecho página (página Desconecte de la bujía la pipa de la bujía ( ). Bujías recomendadas: Limpie la suciedad que haya en torno a la base Estándar: de la bujía.
- Page 347 Inspeccione los electrodos y la porcelana Estando instalada la arandela, coloque la bujía central para ver si están sucios, corroídos o con la mano para evitar dañar la rosca. tienen acumulaciones de carbonilla. Si la Apriete la bujía: corrosión o acumulaciones de carbonilla Si la bujía usada está...
- Page 348 La comprobación o el ajuste del juego de JUEGO DE VÁLVULAS Consulte las precauciones de seguridad de la válmulas debe realizarse estando el motor frío. El página juego cambiará según aumenta la temperatura. Extraiga la cubierta superior frontal (página Un juego de válvulas excesivo causará ruidos y a ) y el protector de las piernas derecho la larga se averiará...
- Page 349 Extraiga la tapa del orificio de ajuste del Apriete los pernos. alzaválvulas ( ) y la junta tórica ( ) Torsión de los pernos: extrayendo los pernos ( ). 10 N·m (1,0 kgf·m) Compruebe la holgura de ambas válvulas Instale las partes extraídas en el orden insertando una galga de espesor ( ) entre el inverso a la extracción.
- Page 350 Excepto tipo GR CADENA DE TRANSMISIÓN Consulte las precauciones de seguridad de la Extraiga la tapa de inspección ( ). Mueva la página cadena de transmisión hacia arriba y abajo con el dedo. Deberá ajustarse la tensión de la La vida de servicio de la cadena de transmisión cadena de transmisión para que permita ( ) depende de la lubricación y ajuste aproximadamente el siguiente movimiento...
- Page 351 Haga girar la rueda trasera. Pare. Compruebe Excepto tipo GR la tensión de la cadena de transmisión. Repita Quite las cubiertas de la cadena ( ) quitando varias veces este procedimiento. La tensión de los pernos A ( ) y perno B ( ). la cadena de transmisión deberá...
- Page 352 Inspeccione los dientes de las ruedas dentadas 7. Excepto tipo GR por si estuviesen desgastados o dañados. Instale las cubiertas de la cadena y Cámbielas si fuese necesario. apriete los pernos A y el perno B a la torsión especificada. Dientes dañados Dientes desgastados Torsión de los pernos A y del perno B:...
- Page 353 Ajuste: Tipo GR Excepto tipo GR Si tiene que ajustarse la cadena de transmisión, el (5) (3) (2) procedimiento es el siguiente: Apoye la motocicleta en su soporte central con la caja de cambios en punto muerto y el interruptor de encendido en la posición OFF. Afloje la tuerca del eje trasero ( ).
- Page 354 Si la tensión o juego de la cadena de transmisión Lubricación: fuese excesiva cuando mueva el eje trasero hasta Si la cadena está seca, lubríquela cada 1.000 km o el límite más lejamo del ajuste, la cadena de antes. transmisión estará desgastada y tendrá que cambiarse.
- Page 355 Desmontaje y limpieza: Inspeccione los dientes de las ruedas dentadas Cuando se ensucie la cadena de transmisión, ésta por si estuviesen desgastados o dañados. deberá desmontarse y limpiarse antes de Cámbielas si fuese necesario. lubricarla. Nunca utilice una cadena de transmisión nueva Apoye la motocicleta en su soporte central con en ruedas dentadas muy desgastadas.
- Page 356 Pase la cadena por encima de las ruedas dentadas y una los extremos de la cadena con la articulación principal. Para facilitar el montaje, sostenga los extremos de la cadena al lado de los dientes de la rueda dentada trasera mientras inserta la articulación principal.
- Page 357 INSPECCIÓN DE LA SUSPENSION DELANTERA Y TRASERA Consulte las precauciones de seguridad de la página Compruebe el conjunto de la horquilla aplicando el freno delantero y moviendo la horquilla hacia arriba y hacia abajo vigorosamente. El movimiento de suspensión debe ser suave y no debe haber fugas de aceite. Los bujes del brazo oscilante deberán ser comprobados empujando con fuerza contra el costado de la rueda trasera mientras la...
- Page 358 Baje el soporte lateral. El motor deberá pararse cuando baje el soporte lateral. Si el sistema del caballete lateral no funciona tal y (1) Soporte lateral como se describe, acuda a su concesionario Honda para que éste se lo arregle. http://mototh.com...
- Page 359 Si se diera en caso, será necesario (1) Tapa de la tuerca del eje delantero hacer el servicio al sistema del freno. Consulte (2) Tuerca del eje delantero con su concesionario Honda para que haga este (3) Eje delantero trabajo. http://mototh.com...
- Page 360 Instale los casquillos laterales en el buje de la realizar la instalación, póngase en contacto con su rueda del lado izquierdo y del derecho. concesionario Honda tan pronto como sea posible Coloque la rueda delantera entre las patas de para verificar si el montaje es apropiado. Un la horquilla e inserte el semieje delantero montaje inapropiado puede causar la pérdida de...
- Page 361 Desmontaje de la rueda trasera Consulte las precauciones de seguridad de la (8) (9) página Apoye la motocicleta en su soporte central. Excepto tipo GR Extraiga las cubiertas de la cadena (página Extraiga la tuerca de ajuste del freno trasero (1).
- Page 362 Desconecte el brazo ( ) del tope de freno del Extraiga el semieje trasero ( ), los panel del freno quitando el pasador de chaveta ajustadores de la cadena de transmisión ( ( ), la tuerca ( ) del brazo del tope, la y los collares laterales, y entonces extraiga la arandela y la arandela aislante de goma.
- Page 363 Para instalar la rueda trasera, invierta el realizar la instalación, póngase en contacto con su procedimiento de desmontaje. concesionario Honda tan pronto como sea posible Instale los casquillos laterales en el buje de la para verificar si el montaje es apropiado. Un rueda del lado izquierdo y del derecho.
- Page 364 ( ) en cada pastilla. Si alguna pastilla está desgastada hasta la marca del indicador de desgaste, reemplace ambas pastillas como un mismo juego. Para realizar este (1) Marcas de indicación de desgaste servicio, consulte a su concesionario Honda. http://mototh.com...
- Page 365 ( ). Si la flecha se alinea con la marca de referencia en la aplicación completa de los frenos, las zapatas de los frenos deben reemplazarse. Visite su concesionario Honda para que realice este servicio. Cuando el servicio de los frenos sea necesario, consulte a su concesionario Honda.
- Page 366 (sellada). Si la batería parece estar agotada y/o pierde electrólito (dificultando la puesta en marcha u otros fallos eléctricos), póngase en contacto con su concesionario Honda. La batería desprende gas de hidrógeno durante el uso normal. Su batería es de las del tipo que no necesitan Una chispa o llama puede hacer que la mantenimiento podrá...
- Page 367 Desmontaje: Saque la batería ( ) de la caja de batería. Asegúrese de que el interruptor del encendido esté en la posición OFF. Abra el asiento (página Abra la cubierta de la batería (página Extraiga la cubierta de la batería ( ) y la cubierta del interruptor magnético del motor de arranque ( ) extrayendo los tornillos ( ).
- Page 368 Los fallos frecuentes de los fusibles indican generalemente la existencia de un cortocircuito o sobrecarga en el sistema eléctrico. Póngase en contacto con su concesionario Honda para realizar las reparaciones necesarias. Nunca utilice un fusible de amperaje diferente al especificado. De lo contrario, podría dañarse seriamente el sistema eléctrico o producirse un...
- Page 369 Caja de fusibles: La caja de fusibles ( ) está situada cerca de la batería. El fusible especificado es: Abra el asiento (página Extraiga la cubierta de la batería y la cubierta del interruptor magnético del motor de arranque (página Abra la tapa ( ) de la caja de fusibles.
- Page 370 Fusible principal: El fusible principal ( ) está situado cerca de la batería. El fusible especificado es: Abra el asiento (página Extraiga la cubierta de la batería y la cubierta del interruptor magnético del motor de arranque (página Desconecte el conector del cable ( ) del interruptor magnético de arranque ( ).
- Page 371 AJUSTE DEL INTERRUPTOR DE LA LUZ DEL FRENO Consulte las precauciones de seguridad de la página Compruebe de vez en cuando la operación del interruptor de la luz del freno ( ) del lado derecho de detrás del motor. El ajuste se efectúa girando la tuerca de ajuste ( ).
- Page 372 REEMPLAZO DE LA BOMBILLA Consulte las precauciones de seguridad de la Asegúrese de colocar en OFF el interruptor de página encendido cuando reemplace la bombilla. No emplee bombillas que no sean las La bombilla se calienta mucho mientras la luz especificadas.
- Page 373 Bombilla del faro Extraiga la cubierta frontal del manillar (página Quite el asiento de goma ( ). Quite la bombilla del faro ( ) oprimiendo el pasador ( ). Instale la nueva bombilla en el orden inverso al desmontaje. Instale la goma del asiento con su marca ‘‘TOP’’...
- Page 374 Bombilla del luz de posición Extraiga la cubierta frontal del manillar (página Seque el casquillo ( ). Saque la bombilla ( ) sin girarla. Instale la nueva bombilla en el orden inverso al desmontaje. (1) Llave (2) Bombilla http://mototh.com...
- Page 375 Bombilla de la luz del freno Extraiga la lente de la luz de cola ( ) extrayendo los tornillos ( ). Presione ligeramente la bombilla ( ) y gírela hacia la izquierda. Instale la nueva bombilla en el orden inverso al desmontaje.
- Page 376 Bombilla de intermitencia delantera Extraiga la lente de la señal de giro delantera ( ) extrayendo el tornillo ( ). Presione ligeramente la bombilla ( ) y gírela hacia la izquierda. Instale una nueva bombilla y compruebe que la luz opere correctamente. (1) Lente de la señal de giro delantera (2) Tornillo (3) Bombilla...
- Page 377 Bombilla de intermitencia trasera Retire el cristal ( ) del intermitente trasero y la empaquetadura ( ) del cristal quitando el tornillo ( ). Extraiga la bombilla ( ) presionándola y girándola hacia la izquierda. Instale una nueva bombilla y compruebe que la luz opere correctamente.
- Page 378 Luz de la matrícula Quite el cristal de la luz de la matrícula ( ) quitando los tornillos ( ). Saque la bombilla ( ) sin girarla. Instale la nueva bombilla en el orden inverso al desmontaje. (1) Cristal de la luz de la matrícula (2) Tornillos (3) Bombilla http://mototh.com...
- Page 379 LIMPIEZA Limpie a menudo su motocicleta para proteger Lavado de la motocicleta los acabados de las superficies acabadas e Aclare bien la motocicleta con agua fría para inspecciónela por si tuviese daños, desgaste o quitar la suciedad suelta. pérdidas de aceite o líquido de frenos. Limpie la motocicleta con una esponja o paño suave utilizando agua fría.
- Page 380 Una vez finalizada la limpieza, aclare Retoques de acabado completamente la motocicleta con abundante Después de lavar la motocicleta, considere agua limpia. Los residuos de detergente utilizar un limpiador de spray/abrillantador, pueden corroer las piezas de aleación. líquido de buena calidad o cera para acabar la Seque la motocicleta, ponga en marcha el limpieza.
- Page 381 Para retirar la sal de carretera La sal para carreteras empleada en las carreteras en invierto y la sal del agua del mar causan oxidación. Lave la motocicleta de la forma siguiente después de haber circulado por agua salada o por carreteras tratadas con sal para carreteras.
- Page 382 GUÍA DE ALMACENAMIENTO Cuando guarde la motocicleta durante largos períodos de tiempo, durante el invierno por ejemplo, tendrá que tomar ciertas medidas para reducir los efectos del deterioro causado al no La gasolina es muy inflamable y explosiva. utilizarla. Además, las reparaciones necesarias Manejando el combustible se podrá...
- Page 383 Para evitar que se oxide el cilindro, realice lo Quite la batería. Guárdela en un lugar que no siguiente: esté expuesto a temperaturas de congelación Quite el capuchón de la bujía. Utilizando una ni tampoco a los rayos directos del sol. cinta o cordón, sujete el capuchón en Cargue la batería lentamente una vez al mes.
- Page 384 PARA VOLVER A UTILIZAR LA MOTOCICLETA Destape y limpie la motocicleta. Cambie el aceite del motor si han pasado más de 4 meses desde que guardó la motocicleta. Cargue la batería según sea necesario. Instale la batería. Drene el exceso de aceite para inhibir la oxidación del depósito de combustible.
- Page 385 Asegúrese también de persona u otro vehículo se han visto involucrados que su concesionario Honda comprueba el en el accidente. bastidor y la suspensión después de cualquier accidente fuerte.
- Page 386 ESPECIFICACIONES DIMENSIONES Longitud total 1.896 mm Anchura total 727 mm Altura total 1.079 mm Distancia entre ejes 1.240 mm CAPACIDADES Aceite de motor (Después del drenaje) (Después del desmontaje) Depósito de combustible Capacidad de pasajeros Conductor y un pasajero Capacidad de peso máximo 170 kg http://mototh.com...
- Page 387 MOTOR Calibre y carrera 52,4 57,9 mm Relación de compresión 9,3 : 1 Cilindrada 124,8 cm Bujía Estándar CPR6EA 9 (NGK) U20EPR9 (DENSO) Para circular prolongadamente a CPR7EA 9 (NGK) altas velocidades U22EPR9 (DENSO) Huelgo de bujía 0,80 0,90 mm Velocidad de ralentí...
- Page 388 CHASIS Y SUSPENSIÓN Inclinación del eje 26°36’ Rodadura 73,6 mm Tamaño del neumático, delantero 70/100 17M/C 40P DUNLOP TT900F Tamaño del neumático, trasero 80/90 17M/C 50P DUNLOP TT900AG Tipo de neumático tejido al sesgo, cámara TRANSMISIÓN DE POTENCIA Reducción primaria 3,350 Relación de engranajes, primera 2,500...
- Page 389 SISTEMA ELÉCTRICO Batería 12V 5Ah Generador 0,15 kW/5.000 min (rpm) LUCES Faro (luz de carretera/cruce) 12V 35/35W Luz del freno/cola 12V 21/5W Luz de la señal de giro Delantera 12V 21W Trasera 12V 21W Bombilla de la luz de posición 12V 5W Bombilla de la luz de la matrícula 12V 5W...
- Page 390 Emplee siempre gasolina sin plomo. Incluso NOx. Las piezas de recambio deberán ser un una pequeña cantidad de gasolina con plomo repuesto original de Honda o su equivalente. podrá contaminar los metales del convertidor catalítico, haciendo que el mismo resulte El convertidor catalítico debe funcionar a alta...
- Page 391 Honda ANF125 ΕΓ ΕΙΡΙ∆Ι ΚΑΤ Υ Honda Motor Co., Ltd. 2009 http://mototh.com...
- Page 392 ΣΗΜΑΝΤΙΚΕΣ ΠΛΗΡ Φ ΡΙΕΣ ∆ΗΓ Σ ΚΑΙ ΣΥΝΕΠΙΒΑΤΗΣ Αυτή η µ τ σικλέτα έ ει σ εδιαστεί για να µετα έρει έναν δηγ κι έναν συνεπι άτη. Μην υπερ αίνετε π τέ τ µέγιστ επιτρεπ µεν άρ ς π υ αναγρά εται στη σ ετική επιγρα ή ρτωσης...
- Page 393 ασί νται στις πλέ ν πρ σ ατες πληρ ρίες π υ ήταν διαθέσιµες κατά την εκτύπωση. Η εταιρία Honda Motor Co.,Ltd. διατηρεί τ δικαίωµα να πρ αίνει σε αλλαγές, π ιαδήπ τε στιγµή, ωρίς πρ ηγ ύµενη ειδ π ίηση και ωρίς...
- Page 394 Τε νικ Εγ ειρίδι της Honda, τ π ί θα σας επιτρέψει να πραγµατ π ιήσετε π λλές εργασίες συντήρησης και επισκευής. Σας ευ µαστε ‘‘ευ άριστη δήγηση’’ και σας ευ αριστ ύµε π υ επιλέ ατε µια Honda ! http://mototh.com...
- Page 395 ι κωδικ ί π υ ρησιµ π ι ύνται σε αυτ τ εγ ειρίδι για τις διά ρες ώρες είναι ι παρακάτω. ι εικ νες π υ παρατίθενται εδώ ασί νται στ ν τύπ . Ηνωµέν Βασίλει Γαλλία Άµεσες πωλήσεις στην Ευρώπη Ισραήλ...
- Page 396 ΛΙΓΑ Λ ΓΙΑ ΓΙΑ ΤΗΝ ΑΣΦΑΛΕΙΑ Η ασ άλειά σας και η ασ άλεια των άλλων είναι π λύ σηµαντική. Και η ασ αλής λειτ υργία της µ τ σικλέτας είναι σ αρή ευθύνη. Για να σας ηθήσ υµε να πληρ ρηθείτε...
- Page 397 Θα ΣΚ ΤΩΘΕΙΤΕ ή θα ΤΡΑΥΜΑΤΙΣΤΕΊΤΕ Σ ΒΑΡΑ αν δεν ακ λ υθήσετε τις δηγίες. Μπ ρεί να ΣΚ ΤΩΘΕΙΤΕ ή να ΤΡΑΥΜΑΤΙΣΤΕΙΤΕ Σ ΒΑΡΑ αν δεν ακ λ υθήσετε τις δηγίες. ΜΠ ΡΕΙ να ΤΡΑΥΜΑΤΙΣΤΕΙΤΕ αν δεν ακ λ υθήσετε τις δηγίες. Επικε...
- Page 398 ΛΕΙΤ ΥΡΓΙΑ σελίδα σελίδα ΑΣΦΑΛΕΙΑ ∆ΗΓΗΣΗΣ ΚΥΡΙΑ ΜΕΜ ΝΩΜΕΝΑ ΜΕΡΗ Μ Τ ΣΙΚΛΕΤΑΣ ΚΕΝΤΡΙΚ Σ ∆ΙΑΚ ΠΤΗΣ ΣΗΜΑΝΤΙΚΕΣ ΠΛΗΡ Φ ΡΙΕΣ ΚΛΕΙ∆ΙΑ ΑΣΦΑΛ ΥΣ ∆ΗΓΗΣΗΣ ∆ΙΑΚ ΠΤΕΣ ΕΙΡΙΣΜ Υ ΣΤΗ ΠΡ ΣΤΑΤΕΥΤΙΚ Σ Ε ΠΛΙΣΜ Σ ∆Ε ΙΑ ΠΛΕΥΡΑ Τ Υ ΤΙΜ ΝΙ Υ ΡΙΑ...
- Page 399 σελίδα σελίδα ΑΡΑΚΤΗΡΙΣΤΙΚΑ ΛΕΙΤ ΥΡΓΙΑ (∆εν απαιτ ύνται για τη λειτ υργία) ΕΛΕΓ Ι ΠΡΙΝ ΤΗΝ ∆ΗΓΗΣΗ ΚΛΕΙ∆ΑΡΙΑ ΤΙΜ ΝΙ Υ ΕΚΚΙΝΗΣΗ Τ Υ ΚΙΝΗΤΗΡΑ ΚΛΕΙ∆ΑΡΙΑ ΚΑΘΙΣΜΑΤ Σ ΣΤΡΩΣΙΜ ΚΙΝΗΤΗΡΑ ΚΛΕΙ∆ΑΡΙΕΣ ΚΡΑΝ ΥΣ ∆ΗΓΗΣΗ ΚΕΝΤΡΙΚ Σ ΑΠ ΘΗΚΕΥΤΙΚ Σ ΑΛΛΑΓΗ ΤΑ ΥΤΗΤΩΝ ΩΡ...
- Page 400 ΣΥΝΤΗΡΗΣΗ σελίδα σελίδα ΣΥΝΤΗΡΗΣΗ ΦΘ ΡΑ ΣΤΙΣ ΣΙΑΓ ΝΕΣ ΤΩΝ Η ΣΗΜΑΣΙΑ ΤΗΣ ΣΥΝΤΗΡΗΣΗΣ ΦΡΕΝΩΝ ΑΣΦΑΛΕΙΑ ΣΥΝΤΗΡΗΣΗΣ ΜΠΑΤΑΡΙΑ ∆ΗΓΙΕΣ ΑΣΦΑΛΕΙΑΣ ΑΝΤΙΚΑΤΑΣΤΑΣΗ ΑΣΦΑΛΕΙΩΝ Ρ Ν ∆ΙΑΓΡΑΜΜΑ ΣΥΝΤΗΡΗΣΗΣ ΡΥΘΜΙΣΗ ∆ΙΑΚ ΠΤΗ ΦΩΤ Σ ΕΡΓΑΛΕΙ ΘΗΚΗ ΦΡΕΝΩΝ ΑΡΙΘΜ Ι ΣΕΙΡΑΣ ΠΑΡΑΓΩΓΗΣ ΑΝΤΙΚΑΤΑΣΤΑΣΗ ΛΑΜΠΤΗΡΩΝ ΕΤΙΚΕΤΑ...
- Page 401 ΑΣΦΑΛΕΙΑ ∆ΗΓΗΣΗΣ Μ Τ ΣΙΚΛΕΤΑΣ ΣΗΜΑΝΤΙΚΕΣ ΠΛΗΡ Φ ΡΙΕΣ Κάντε τ υς εαυτ ύς σας ευδιάκριτ υς Κάπ ι ι δηγ ί δε λέπ υν τις µ τ σικλέτες ΑΣΦΑΛ ΥΣ ∆ΗΓΗΣΗΣ Η µ τ σικλέτα σας µπ ρεί να σας ανεί ρήσιµη γιατί...
- Page 402 Μην δηγείτε υπ την επήρεια αλκ λ ΠΡ ΣΤΑΤΕΥΤΙΚ Σ Ε ΠΛΙΣΜ Σ Μην δηγείτε µ ετά απ κατανάλωση Για τη δική σας ασ άλεια, σας συνιστ ύµε ιν πνεύµατ ς. Ακ µα και ένα π τ µπ ρεί να ανεπι...
- Page 403 Κράνη και Πρ στατευτικ Κάλυµµα πρ σώπ υ Πρ σθετ ς ε πλισµ ς δήγησης Τ κράν ς σας είναι τ πι σηµαντικ κ µµάτι Πέραν τ υ κράν υς και τ υ πρ στατευτικ ύ τ υ ε πλισµ ύ για την δήγηση...
- Page 404 µ τ σικλέτας. Τα α εσ υάρ άλλης πρ έλευσης σ ε τ ι κ έ ς µ ε τ η ρ τ ω σ η π υ πέραν απ εκείνα της Honda, ι ακατάλληλες εµπεριέ νται σε αυτ τ εγ ειρίδι .
- Page 405 Αν επιθυµείτε να µετα έρετε περισσ τερ και στις δύ πλευρές. ρ τ ί , ε π ι κ ι ν ω ν ή σ τ ε µ ε τ ν αντιπρ σωπ της Honda για τυ ν συµ υλές και ε αιωθείτε τι δια άσατε...
- Page 406 Σ α ς σ υ ν ι σ τ ύ µ ε α ν ε π ι ύ λ α κ τ α ν α ρήση α εσ υάρ άλλης πρ έλευσης πέρα απ ρησιµ π ιείτε µ ν γνήσια α εσ υάρ Honda, εκείνα της Honda µπ ρεί να καταστήσ υν τη...
- Page 407 Η µ τ σικλέτα αυτή δεν είναι κατάλληλη για Τρ π π ιήσεις να σέρνει τρέιλερ ή καλάθι µ τ σικλέτας. Η Σας συνιστ ύµε να µην α αιρείτε κανένα τµήµα µ τ σικλέτα αυτή δε σ εδιάστηκε για τέτ ι υ τ...
- Page 408 ασ αλείας. ∆ια άστε αυτές τις πληρ ρίες πρ σεκτικά και µην α αιρείτε τις ταµπέλες. Εάν µια ετικέτα γει ή είναι δύσκ λ να δια αστεί, ελάτε σε επα ή µε τ ν έµπ ρ της Honda για αντικατάσταση. http://mototh.com...
- Page 409 τ υ συνεργεί υ. Με γνώµ να την ασ άλεια, πηγαίνετε την µ τ σικλέτα σας για συντήρηση µ ν σεν ε υσι δ τηµέν συνεργάτη της Honda. ΚΙΝ∆ΥΝ Σ (µε Κ ΚΚΙΝ ντ ) ΜΠ ΡΕΙ ΝΑ ΤΡΑΥΜΑΤΙΣΤΕΙΤΕ Σ ΒΑΡΑ Η ΝΑ ΣΚ ΤΩΘΕΙΤΕ εάν δεν...
- Page 410 Α ΕΣ ΥΑΡ ΚΑΙ ΠΡ ΕΙ∆ Π ΙΗΤΙΚΗ ΕΤΙΚΕΤΑ Φ ΡΤΩΣΗΣ ΠΡ ΕΙ∆ Π ΙΗΣΗ Α ΕΣ ΥΑΡ ΚΑΙ Φ ΡΤΩΣΗ ασ αλής ειρισµ ς της µ τ σικλέτας µπ ρεί να επηρεαστεί απ τα α εσ υάρ και την ρτωση...
- Page 411 (Τύπ ς GR) ΠΛΗΡ Φ ΡΙΕΣ ΕΛΑΣΤΙΚΩΝ & ΠΙΝΑΚΙ∆ΑΙ ΑΛΥΣΙ∆ΑΣ Πίεση κρύ υ ελαστικ ύ: [ δηγ ς και επι άτης] 200 kPa (2,00 kgf/cm ) Εµπρ ς 250 kPa (2,50 kgf/cm ) Πίσω [Μ ν δηγ ς] 200 kPa (2,00 kgf/cm ) Εµπρ...
- Page 412 (Εκτ ς απ τις µ τ σικλέτες µε κωδικ GR) ΕΤΙΚΕΤΑ ΠΛΗΡ Φ ΡΙΩΝ ΓΙΑ ΤΑ ΕΛΑΣΤΙΚΑ Πίεση κρύ υ ελαστικ ύ: [ δηγ ς και επι άτης] 200 kPa (2,00 kgf/cm ) Εµπρ ς 250 kPa (2,50 kgf/cm ) Πίσω...
- Page 413 ΕΤΙΚΕΤΕΣ ΥΠΕΝΘΥΜΙΣΗΣ ΑΣΦΑΛΕΙΑΣ Για την ασ άλεια σας, ράτε πάντ τε τ κράν ς σας ταν δηγείτε. ΠΙΝΑΚΙ∆Ι ΚΑΥΣΙΜΩΝ Μ Ν ΑΜ ΛΥΒ∆Η ΒΕΝ ΙΝΗ ΠΙΝΑΚΙ∆Ι ΠΕΡΙ ΡΙΣΜ Υ ΒΑΡ ΥΣ 5.0 kg (11.0 lb) Μην υπερ αίνετε http://mototh.com...
- Page 414 ΘΕΣΗ Ε ΑΡΤΗΜΑΤΩΝ ∆ εί υγρών µπρ στινών ρένων ∆ιακ πτης σκάλας πρ λέα Καθρέπτης ργανα και Ενδεικτικές λυ νίες Καθρέπτης Μανέτα µπρ στιν ύ ρέν υ Σκριπ γκα ι ύ ∆ιακ πτης ωτ ς Κ υµπί µί ας αλλαγής π ρείας ( λας) Κ...
- Page 415 Κλειδαριά κράν υς Μπαταρία Θήκη εγγρά ων Εργαλει θήκη Κύρια ασ άλεια Ασ αλει θήκη Τάπα πλήρωσης/ δείκτης στάθµης λαδι ύ Μαρσπιέδες µανι έλα Μαρσπιέδες Πεντάλ πίσω ρέν υ συνεπι άτη http://mototh.com...
- Page 416 Κεντρικ ς απ θηκευτικ ς ώρ ς Κλειδαριά Τάπα στ µί υ πλήρωσης κράν υς δ εί υ καυσίµων Κλειδαριά καθίσµατ ς Μαρσπιέδες συνεπι άτη Μ λ ς επιλ γέα Μαρσπιέδες Πλάγι σταντ Κεντρικ σταντ τα υτήτων http://mototh.com...
- Page 417 ΡΓΑΝΑ ΚΑΙ ΕΝ∆ΕΙΚΤΙΚΕΣ ΛΥ ΝΙΕΣ ι ενδεικτικές λυ νίες εµπεριέ νται στ ν πίνακα των ργάνων. ι λειτ υργίες τ υς περιγρά νται στ υς πίνακες των επ µενων σελίδων. (1) (2) (1) Ένδει η σ έσης τα ύτητας (2) Ενδεικτική λυ νία αριστερ ύ λας (3) Ενδεικτική...
- Page 418 ταν γυρί ετε τ ν κεντρικ διακ πτη στη θέση ON. Αν ανάψει π ιαδήπ τε άλλη στιγµή, µειώστε τα ύτητα και πηγαίνετε τη µ τ συκλέτα σας στ ε υσι δ τηµέν συνεργεί της Honda σ τ δυνατ ν συντ µ τερα. http://mototh.com...
- Page 419 (Αριθµ ς ανα ράς) Περιγρα ή Λειτ υργία Τα ύµετρ Εµ ανί ει την τα ύτητα δήγησης. Αυτ δεί νει την τα ύτητα σας σε ιλι µετρα ανά ώρα (km/h) η µίλια ανά ώρα (mph) και ιλι µετρα ανα ώρα (km/h) ανάλ...
- Page 420 ταν ανα σ ήνει η ένδει η E ( ), η στάθµη Ενδει η δ µετρ υ/δείκτη καυσίµ υ ταν κεντρικ ς διακ πτης είναι στην θέση των καυσίµων είναι αµηλή και πρέπει να ON, τ τα ύµετρ (1) και δείκτης καυσίµ υ (2) γεµίσετε...
- Page 421 π ί ς πρέπει να α αιρεθεί. Για την ε ρ γ α σ ί α α υ τ ή , α π ε υ θ υ ν θ ε ί τ ε σ τ ν ε υσι δ τηµέν αντιπρ σωπ της Honda. Στάθµη Υγρών Φρένων: (1) Ένδει...
- Page 422 Πίσω ρένα Ρύθµιση ρένων: Στηρί τε τη µ τ σικλέτα στ κεντρικ σταντ. Υπ λ γίστε την απ σταση κίνησης τ υ πεντάλ τ υ πίσω ρέν υ ( ) πριν να αρ ίσετε να λειτ υργείτε τα ρένα. τ γ ς πρέπει να είναι: 20 30 mm Αν...
- Page 423 Αν δεν µπ ρείτε να πετύ ετε κατάλληλη ρύθµιση µ’ αυτή τη µέθ δ , απευθυνθείτε στ ν (2) Πα ιµάδι ρύθµισης πίσω ρέν υ ε υσι δ τηµέν αντιπρ σωπ της Honda. (3) Πείρ ς ρα ί να ρέν υ (4) Βρα ί νας ρέν υ...
- Page 424 κατάλληλη ρύθµιση τ υ συµπλέκτη, ή αν ρυθµιστή ( ). συµπλέκτης δεν λειτ υργεί σωστά, απευθυνθείτε Γυρίστε τ ρυθµιστή τ υ συµπλέκτη ( ) σε ε υσι δ τηµέν αντιπρ σωπ της Honda. δε ι στρ α µια ρά. Μην τ ν γυρίσετε υπερ...
- Page 425 ΚΑΥΣΙΜΑ Ρε ερ υάρ καυσίµων Τ δ εί καυσίµων ρίσκεται κάτω απ την Η εν ίνη είναι π λύ εύ λεκτη και σέλλα. Η ωρητικ τητα τ υ δ εί υ καυσίµων εκρηκτική υσία. Μπ ρεί να καείτε ή να είναι: τραυµατιστείτε...
- Page 426 τ τε αλλά τε µάρκα εν ίνης. Αν τα αιν µενα αυτά συνε ιστ ύν, επικ ινωνήστε µε τ ν αντιπρ σωπ της Honda. Η µη τήρηση των παραπάνω δηγιών θεωρείται κακή ρήση και ι ηµιές π υ πρ καλ ύνται λ γω κακής ρήσης, δεν...
- Page 427 Κάνει ηµιά στη α ή τ υ ρε ερ υάρ. αντίστ ι ς τ υ αθµ ύ π υ συνιστάται απ τη Κάνει ηµιά στα σωληνάκια τ υ ρε ερ υάρ. Honda. Υπάρ υν δύ τύπ ι αλκ λ ύ ων Πρ καλέσει σκ υριά στ ρε ερ...
- Page 428 ΛΑ∆Ι ΚΙΝΗΤΗΡΑ Τ π θετήστε ανά την τάπα πλήρωσης/δείκτη Έλεγ ς της Στάθµης Λαδι ύ τ υ Κινητήρα στάθµης λαδι ύ. Ελέγ τε για τυ ν διαρρ ές Να ελέγ ετε τη στάθµη λαδι ύ τ υ κινητήρα λαδι ύ. κάθε...
- Page 429 ΕΛΑΣΤΙΚΑ Πίεση αέρα ελαστικών Γ ι α ν α λ ε ι τ υ ρ γ ε ί τ ε µ ε α σ ά λ ε ι α τ η Η διατήρηση της πίεσης τ υ αέρα των µ τ συκλέτα σας, τα ελαστικά σας πρέπει να ελαστικών...
- Page 430 Να ελέγ ετε πάντα την πίεση τ υ αέρα ταν τα Έλεγ ς ελαστικά είναι ‘‘κρύα’’ ταν η µ τ σικλέτα Κάθε ρά π υ ελέγ ετε την πίεση των είναι σταθµευµένη για τρεις ώρες τ υλά ιστ ν. ελαστικών, πρέπει να ε ετά ετε επίσης τα Αν...
- Page 431 Φθ ρά τ υ πέλµατ ς τ υ ελαστικ ύ Αντικαταστήστε τα ελαστικά άµεσα ταν δείκτης θ ράς εµ ανιστεί στ ελαστικ . (1) ∆είκτης θ ράς (2) Σηµεί δείκτη θ ράς http://mototh.com...
- Page 432 Επισκευή και Αντικατάσταση Σαµπρέλας Α ν έ ν α ε λ α σ τ ι κ ε ί ν α ι τ ρ υ π η µ έ ν ή κατεστραµµέν , πρέπει να τ αντικαταστήσετε σ τ δυνατ ν γρηγ ρ τερα. Ένα ελαστικ π...
- Page 433 Τα συνιστώµενα ελαστικά για τη µ τ σικλέτα Αντικατάσταση ελαστικών Τα αρ ικά ελαστικά της µ τ σικλέτας σας σας είναι: 70/100 17M/C 40P Εµπρ ς: σ εδιάστηκαν να ανταπ κρίν νται στις DUNLOP επιδ σεις της και να παρέ υν...
- Page 434 ΚΥΡΙΑ ΜΕΜ ΝΩΜΕΝΑ ΜΕΡΗ ΚΕΝΤΡΙΚ Σ ∆ΙΑΚ ΠΤΗΣ θέση OFF θέση ON κεντρικ ς διακ πτης κινητήρα ( ) ρίσκεται στη δε ιά πλευρά κάτω απ τ τιµ νι. LOCK (1) Κεντρικ ς διακ πτης Θέση κλειδι ύ Λειτ υργία Α...
- Page 435 κ λ ε ι δ ι ύ κ α ι τ η µ τ σ ι κ λ έ τ α σ α ς σ ε ε υσι δ τηµέν αντιπρ σωπ της Honda. (1) Κλειδιά κεντρικ ύ διακ πτη...
- Page 436 ∆ΙΑΚ ΠΤΕΣ ΕΙΡΙΣΜ Υ ΣΤΗ ∆Ε ΙΑ ΠΛΕΥΡΑ Τ Υ ΤΙΜ ΝΙ Υ Κ υµπί µί ας Τ κ υµπί της µί ας ρίσκεται δίπλα στ σκριπ γκα ι ύ. Πατώντας τ κ υµπί της µί ας, η µί α θέτει σε λειτ...
- Page 437 ΕΙΡΙΣΤΗΡΙΑ ΣΤΗΝ ΑΡΙΣΤΕΡΗ ΠΛΕΥΡΑ Τ Υ ΤΙΜ ΝΙ Υ ∆ιακ πτης σκάλας πρ λέα ( ) Μετακινήστε αυτ τ διακ πτη στη θέση (HI) για να επιλέ ετε τη µεγάλη σκάλα τ υ πρ λέα ή στη θέση (LO) για να επιλέ ετε τη...
- Page 438 ΑΡΑΚΤΗΡΙΣΤΙΚΑ (∆εν απαιτ ύνται για τη λειτ υργία) ΚΛΕΙ∆ΑΡΙΑ ΤΙΜ ΝΙ Υ Τ τιµ νι µπ ρεί να κλειδωθεί, ταν κεντρικ ς Για να κλειδώσετε διακ πτης ( ) ρίσκεται στη θέση ‘‘LOCK’’. Για να κλειδώσετε τ τιµ νι, στρίψτε τα τιµ νι τέρµα...
- Page 439 ΚΛΕΙ∆ΑΡΙΑ ΚΑΘΙΣΜΑΤ Σ Η κλειδαριά καθίσµατ ς ( ) ρίσκεται στην αριστερή πλευρά κάτω απ τ κάθισµα. Για να αν ί ετε τ κάθισµα, άλτε τ κλειδί τ υ κεντρικ ύ διακ πτη ( ) και γυρίστε τ δε ι στρ α...
- Page 440 ΚΛΕΙ∆ΑΡΙΕΣ ΚΡΑΝ ΥΣ Σηκώστε τ κάθισµα (σελίδα Κρεµάστε τ κράν ς σας ( ) στα άγκιστρα ( ) στ υς µ εντεσέδες τ υ καθίσµ ατ ς και αµηλώστε τ κάθισµα για να κλειδώσει. Για να α αιρέσετε τ κράν ς, εκλειδώστε τ κάθισµα. Βγάλτε...
- Page 441 ΚΕΝΤΡΙΚ Σ ΑΠ ΘΗΚΕΥΤΙΚ Σ ΩΡ Σ κεντρικ ς απ θηκευτικ ς ώρ ς ( ) ρίσκεται κάτω απ τ κάθισµα. Άν ιγµα και κλείσιµ : Ανατρέ τε στην εν τητα ‘‘ΚΛΕΙ∆ΑΡΙΑ ΚΑΘΙΣΜΑΤ Σ’’ (σελίδα ΜΕΓΙΣΤ ΕΠΙΤΡΕΠ ΜΕΝ ΡΙ Φ ΡΤΙ Υ: 5,0 kg Π...
- Page 442 ΤΣΑΝΤΑΚΙ ΕΓΓΡΑΦΩΝ Τ τσαντάκι εγγρά ων ( ) ρίσκεται στη θήκη εγγρά ων ( ) στ ν κεντρικ απ θηκευτικ ώρ ( ). Σηκώστε τ κάθισµα (σελίδα Αν ί τε τ κάλυµµα ( ), απελευθερών ντας τις εγκ πές ( ). Τ...
- Page 443 ΕΜΠΡ Σ ΠΑΝΩ ΚΑΛΥΜΜΑ Τ µπρ στιν πάνω κάλυµµα πρέπει να α α ι ρ ε θ ε ί γ ι α ν α α α ι ρ ε θ ε ί τ δ ε ί πρ στατευτικ κάλυµµα και τ επάνω κάλυµµα τ...
- Page 444 Π ∆ΙΑ Τ δε ί πρ στατευτικ κάλυµµα πρέπει να α αιρεθεί για συντήρηση τ υ ίλτρ υ αέρα, τ υ µπ υ ί και τ υ διάκεν υ αλ ίδων. Α αίρεση: Α αιρέστε τ µπρ στιν πάνω κάλυµµα (σελίδα...
- Page 445 Α αιρέστε τις ίδες D ( ) και τις ρ δέλες ( ). Α αιρέστε τη ίδα E ( ) και τις ίδες F ( ). (10) (11) Απ συνδέστε τη ίσα ( Α αιρέστε τη δε ιά π διά ( ) µε...
- Page 446 αλαρώστε τ υς καθρέπτες περίπ υ 2 ΕΜΠΡ Σ ΚΑΛΥΜΜΑ ΤΙΜ ΝΙ Υ στρ ές. Τ µπρ στιν κάλυµµα τ υ τιµ νι ύ πρέπει να Ρυθµίστε τ υς καθρέπτες. α αιρεθεί για την αντικατάσταση της λυ νίας Σ ί τε τα κ ντρα πα ιµ άδια και τ...
- Page 447 ΚΑΤΑΚ ΡΥΦΗ ΡΥΘΜΙΣΗ ∆ΕΣΜΗΣ ΠΡ Β ΛΕΑ Η κατακ ρυ η ρύθµιση µπ ρεί να γίνει µετακινώντας τ ν πρ λέα ( ) σ ρειά εται. Για να µετακινήσετε τ ν πρ λέα, αλαρώστε τη ίδα ( ). Σ ί τε τη ίδα µετά τη ρύθµιση. Τηρείτε...
- Page 448 τι θα απευθυνθείτε για να τ δι ρθώσετε σε Εµπρ ς: Βε αιωθείτε τι δεν υπάρ ει διαρρ ή έναν ε υσι δ τηµέν αντιπρ σωπ της Honda. υγρ ύ ρένων (σελίδα Πίσω: Ρυθµίστε τ τ γ αν είναι απαραίτητ...
- Page 449 ΕΚΚΙΝΗΣΗ Τ Υ ΚΙΝΗΤΗΡΑ Πάντα να ακ λ υθείτε τη διαδικασία εκκίνησης Τ σύστηµα ε άτµισης της µ τ σικλέτας σας π υ περιγρά εται παρακάτω. γά ει δηλητηριώδες µ ν είδι τ υ άνθρακα. Η στάθµη τ υ µ ν ειδί...
- Page 450 Πρ ετ ιµασία Πριν θέσετε σε λειτ υργία τ ν κινητήρα, άλτε Μην ρησιµ π ιείτε τη µανι έλα ενώ τ κλειδί, γυρίστε τ ν κεντρικ διακ πτη στη κινητήρας λειτ υργεί, καθώς θα µπ ρ ύσε να θέση ON και ε αιωθείτε τι: πρ...
- Page 451 ∆ιαδικασία εκκίνησης Η µ τ σικλέτα αυτή έ ει ψεκασµ µε αυτ µατ κινητήρας δε θα λειτ υργήσει αν τ σκριπ τσ κ. Ακ λ υθήστε την παρακάτω διαδικασία. γκα ι ύ είναι τελείως αν ι τ (γιατί η η λ ε κ τ ρ ν ι κ ή µ ν ά δ α ε µ π δ ί ε ι τ η ν π...
- Page 452 Μπ υκωµέν ς κινητήρας Σύστηµα απ κ πής της λειτ υργίας τ υ Εάν κινητήρας δεν παίρνει µπρ στά µετά απ κινητήρα π λλές πρ σπάθειες, µπ ρεί να έ ει µπ υκώσει. Η µ τ σικλέτα σας είναι σ εδιασµένη να ρησιµ...
- Page 453 ΣΤΡΩΣΙΜ ΚΙΝΗΤΗΡΑ Για να είναι εγγυηµένη η α ι πιστία και ι ε π ι δ σ ε ι ς τ η ς µ τ σ ι κ λ έ τ α ς , π ρ έ π ε ι απαραιτήτως...
- Page 454 Α υ τ έ ς ι δ ι α δ ι κ έ ς ε ν έ ρ γ ε ι ε ς ∆ΗΓΗΣΗ επαναλαµ άν νται για να αλλά ετε σταδιακά Πριν εκινήσετε, αναδια άστε τις δηγίες τ υ στην...
- Page 455 ΑΛΛΑΓΗ ΤΑ ΥΤΗΤΩΝ Η λειτ υργία τ υ πεντάλ αλλαγής τα υτήτων Εµπρ ς δια έρει κατά την παύση και κατά την κίνηση. ταν σταµατάτε, η αλλαγή µπ ρεί να γίνει απ την 4η στη νεκρά άµεσα µε τ περιστρ ικ...
- Page 456 Εµπρ ς περιστρ ικ σύστηµα 4 τα υτήτων της HONDA. Η αλλαγή απ την 4η στη νεκρά δεν µπ ρεί να γίνει ταν η µ τ συκλέτα είναι σε στάση. Πριν αλλά ετε τα ύτητα, α ήστε πρώτα τ σκριπ γκα ι ύ να επιστρέψει στη θέση τ υ.
- Page 457 Η σωστή αλλαγή µπ ρεί να απ τρέψει τη Κατέ ασµα τα υτήτων πρ κληση λά ης στ ν κινητήρα και στ ταν ‘‘κατε ά ετε’’ τα ύτητες π υ υπερ αίν υν κι ώτι τα υτήτων. αυτές π υ παρ υσιά νται...
- Page 458 ΦΡΕΝΑΡΙΣΜΑ δηγώντας σε υγρές/ ρ ερές συνθήκες ή σε Για ένα καν νικ ρενάρισµα, ρησιµ π ιείστε ασταθείς επι άνειες, η δυνατ τητα ελιγµών τ εµπρ ς και τ πίσω ρέν , ενώ παράλληλα κ α ι η α π τ ε λ ε σ µ α τ ι κ τ η τ α τ υ κάνετε...
- Page 459 σωλήνας ε άτµισης και σιγαστήρας ΣΤΑΘΜΕΥΣΗ Α ύ σταµατήσετε τη µ τ σικλέτα, άλτε ε άτµισης θερµαίν νται π λύ ταν δηγείτε τ νεκρά τα ύτητα, στρίψτε τ τιµ νι µέ ρι σκ ύτερ και παραµέν υν αρκετά εστά έτσι τέρµα...
- Page 460 Ν ΜΑ: ΣΥΜΒ ΥΛΕΣ ΠΡ ΣΤΑΣΙΑΣ ΑΠ ΚΛ ΠΗ Πάντα να κλειδώνετε τ τιµ νι και να µην α ήνετε π τέ τ κλειδί στ ν κεντρικ ∆ΙΕΥΘΥΝΣΗ: διακ πτη. Η πρά η αυτή µπ ρεί να σας αίνεται αυτ ν ητη, υπάρ υν...
- Page 461 ρ ν διάγραµµα Συντήρησης. Συµ υλευτείτε συντήρησης π υ ρίσκ νται σε αυτ τ τ ν ε υσι δ τηµέν αντιπρ σωπ της Honda, εγ ειρίδι τ υ ρήστη. σ ετικά µε συστάσεις π υ α ρ ύν τη δική σας...
- Page 462 επαγγελµατίες. Η σε αυτ τ εγ ειρίδι τ υ ρήστη. α αίρεση τρ ύ θα πρέπει καν νικά να γίνεται µ ν απ ε υσι δ τηµέν τε νικ της Honda ή άλλ ν ειδικευµέν µη ανικ . ι δηγίες π υ...
- Page 463 Θ υ µ η θ ε ί τ ε τ ι ε υ σ ι δ τ η µ έ ν ς αντιπρ σωπ ς της Honda έρει τη µ τ σικλέτα Εγκαύµατα απ τα εστά τµήµατα της µ τ σικλέτας.
- Page 464 νται µ ν απ ε υσι δ τηµέν αντιπρ σωπ της Honda. Η Honda συνιστά µετά απ κάθε περι δική συντήρηση, να γίνεται δ κιµή της µ τ σικλέτας στ δρ µ απ τ ν ε υσι δ τηµέν αντιπρ σωπ .
- Page 465 ΕΝ∆ΕΙ ΕΙΣ ∆ ΜΕΤΡ Υ ΣΥ Ν ΤΗΤΑ ΒΑΣΕΙ [ΣΗΜΕΙΩΣΗ 1] ΠΡ ΤΕΡΑΙ ΤΗΤΑΣ Ανατρέ τε 1.000 km 1.000 mi στις σελίδες ΣΤ Ι ΕΙΑ ΣΗΜΕΙΩΣΗ ΜΗΝΕΣ ΣΥΣΤΗΜΑ ΤΡ Φ ∆ ΣΙΑΣ ΚΑΥΣΙΜΩΝ ΛΕΙΤ ΥΡΓΙΑ ΓΚΑ Ι Υ ΦΙΛΤΡ ΚΑΘΑΡΙΣΜ Υ ΑΕΡΑ ΣΗΜΕΙΩΣΗ...
- Page 466 ΕΝ∆ΕΙ ΕΙΣ ∆ ΜΕΤΡ Υ ΣΥ Ν ΤΗΤΑ ΒΑΣΕΙ [ΣΗΜΕΙΩΣΗ 1] ΠΡ ΤΕΡΑΙ ΤΗΤΑΣ 1.000 km Ανατρέ τε 1.000 mi στις σελίδες ΣΤ Ι ΕΙΑ ΣΗΜΕΙΩΣΗ ΜΗΝΕΣ ΑΛΥΣΙ∆Α ΜΕΤΑ∆ ΣΗΣ ΚΙΝΗΣΗΣ ΚΑΘΕ 1.000 km I, L ΥΓΡΑ ΦΡΕΝΩΝ ΣΗΜΕΙΩΣΗ (4) 94, 95 ΦΘ...
- Page 467 ΕΡΓΑΛΕΙ ΘΗΚΗ Η εργαλει θήκη ( ) ρίσκεται στη θήκη εγγρά ων ( ) στ ν κεντρικ απ θηκευτικ ώρ ( ). Σηκώστε τ κάθισµα (σελίδα Αν ί τε τ κάλυµµα ( ), απελευθερών ντας τις εγκ πές ( ). Τα...
- Page 468 ΑΡΙΘΜ Ι ΣΕΙΡΑΣ ΠΑΡΑΓΩΓΗΣ ι αριθµ ί σειράς παραγωγής τ υ πλαισί υ και αριθµ ς πλαισί υ ( ) είναι αραγµέν ς πίσω τ υ κινητήρα απαιτ ύνται για την κατα ώρηση απ τη δε ιά π διά. της µ τ σικλέτας σας. Ίσως να σας ητηθ ύν και...
- Page 469 ΕΤΙΚΕΤΑ ΚΩ∆ΙΚ Υ ΡΩΜΑΤ Σ Η ετικέτα κωδικ ύ ρώµατ ς ( ) είναι κ λληµένη στ κάλυµµα της µπαταρίας στην κεντρική θήκη (σελίδα Η ετικέτα ρησιµεύει ταν παραγγέλνετε ανταλλακτικά. Σηµειώστε εδώ τ ρώµα και τ ν κωδικ για δική σας ευκ λία. ΡΩΜΑ...
- Page 470 ΦΙΛΤΡ ΑΕΡΑ Ανατρέ τε στις δηγίες Ασ αλείας στη σελίδα Πρέπει να γίνεται συντήρηση στ ίλτρ αέρα ανά τακτά ρ νικά διαστήµατα (σελίδα ). Η συντήρηση πρέπει να γίνεται συ ν τερα, ταν δηγείτε σε περι ές µε ασυνήθιστη υγρασία ή σκ...
- Page 471 Ε ΑΕΡΙΣΤΗΡΑΣ ΚΑΡΤΕΡ Ανατρέ τε στις δηγίες Ασ αλείας στη σελίδα Α αιρέστε τ σωλήνα απ στράγγισης ( ). Μεταγγίστε τα κατάλ ιπα σε κατάλληλ δ εί . Τ π θετήστε ανά τ σωλήνα απ στράγγισης. Η συντήρηση θα πρέπει να γίνεται συ ν τερα, ταν...
- Page 472 SAE 10W-30 Πρ τυπ JASO T 903 Πρ τειν µεν Λάδι ∆ΕΝ ΣΥΝΙΣΤΑΤΑΙ Κ Honda ‘‘4-STROKE MOTORCYCLE Μην ρησιµ π ιείτε µη απ ρρυπαντικά, ή OIL’’ ή ισ δύναµ . υτικά λάδια ή αγωνιστικά λάδια µε άση τ καστ ρέλαι .
- Page 473 Πρ τυπ JASO T 903 Ι ώδες: Η επιλ γή τ υ αθµ ύ ι ώδ υς τ υ λαδι ύ τ υ Τ πρ τυπ JASO T 903 είναι ένας δείκτης για κινητήρα θα πρέπει να γίνεται άσει της µέσης τ...
- Page 474 Εάν δεν ρησιµ π ιήσετε δυναµ κλειδ (ρ π κλειδ ) για αυτή την τ π θέτηση, επισκε θείτε τ ν αντιπρ σωπ της Honda τ Παρακαλ ύµε να πετάτε τ ρησιµ π ιηµέν λάδι κατά τρ π τέτ ι , ώστε να µην ρυπαίνετε...
- Page 475 Τ π θετήστε ένα δ εί απ στράγγισης τάπας πλήρωσης λαδι ύ, ταν η µ τ σικλέτα κάτω απ τ π δι. ρίσκεται σε ρθια θέση και σε επίπεδ Για απ στραγγίσετε τ λάδι, α αιρέστε την έδα ς. Βε αιωθείτε τι...
- Page 476 Α αιρέστε τ µπρ στιν πάνω κάλυµµα ΜΠ Υ Ι Ανατρέ τε στις δηγίες Ασ αλείας στη σελίδα (σελίδα ) και τ δε ί πρ στατευτικ κάλυµµα (σελίδα Απ συνδέστε τις πίπες των µπ υ ί ( ) απ Συνιστώµενα µπ υ ί: τα...
- Page 477 Ελέγ τε τα ηλεκτρ δια και την π ρσελάνη Βε αιωθείτε τι η ρ δέλα των µπ υ ί για τυ ν διά ρωση ή για τυ ν ακαθαρσίες. ρίσκεται σε καλή κατάσταση. Αν η διά ρωση είναι µεγάλη ή αν είναι Με...
- Page 478 έλεγ ς ή η ρύθµιση τ υ διάκεν υ θα πρέπει ∆ΙΑΚΕΝΑ ΒΑΛΒΙ∆ΩΝ Ανατρέ τε στις δηγίες Ασ αλείας στη σελίδα να πραγµατ π ιείται σ η µη ανή είναι κρύα. Τ διάκεν αλλά ει, καθώς η θερµ κρασία τ υ κινητήρα...
- Page 479 Α αιρέστε την τάπα των αλ ίδων ( ) και τ Σ ί τε τις ίδες. λαστι άκι ( ) α αιρώντας τα µπ υλ νια ( ). Ρ πή σύσ ι ης ίδας: 10 N·m (1,0 kgf·m) Ελέγ τε τ διάκεν...
- Page 480 Εκτ ς απ τις µ τ σικλέτες µε κωδικ GR ΑΛΥΣΙ∆Α ΜΕΤΑ∆ ΣΗΣ ΚΙΝΗΣΗΣ Ανατρέ τε στις δηγίες Ασ αλείας στη σελίδα Α α ι ρ έ σ τ ε τ η ν τ ά π α ε λ έ γ υ...
- Page 481 Γυρίστε αργά τ ν πίσω τρ , σταµατήστε κι Εκτ ς απ τις µ τ σικλέτες µε κωδικ GR ελέγ τε τ τ γ της αλυσίδας. Επαναλά ετε Α αιρέστε τα καλύµµατα αλυσίδας ( ) τη διαδικασία αρκετές ρές. τ γ ς της α...
- Page 482 Ελέγ τε τα δ ντια γρανα ι ύ για ενδε µενη 7. Εκτ ς απ τις µ τ σικλέτες µε κωδικ GR θ ρά ή ηµιά. Αντικαταστήστε τα αν είναι Τ π θετήστε τα καλύµµατα της αλυσίδας και απαραίτητ . σ...
- Page 483 Εκτ ς απ τις Ρύθµιση: Τύπ ς GR µ τ σικλέτες µε Για να ρυθµίσετε της αλυσίδας µετάδ σης κωδικ GR κ ί ν η σ η ς , α κ λ υ θ ή σ τ ε τ η ν π α ρ α κ ά τ ω (5) (3) (2) διαδικασία: Στηρί...
- Page 484 Αν τ γ ς της αλυσίδα µετάδ σης κίνησης Λίπανση: είναι υπερ λικ ς ταν πίσω ά νας είναι στ Να λιπαίνετε την αλυσίδα κάθε 1.000 ιλι µετρα απώτερ ρι της ρύθµισης, η αλυσίδα ή νωρίτερα, αν σας αίνεται στεγν ς. µετάδ...
- Page 485 Α αίρεση και καθαρισµ ς: Ελέγ τε τα δ ντια γρανα ι ύ για ενδε µενη ταν η αλυσίδα µετάδ σης κίνησης λερωθεί, θα θ ρά ή ηµιά. Αντικαταστήστε τα αν είναι πρέπει να α αιρεθεί και να καθαριστεί πριν τη απαραίτητ...
- Page 486 Περάστε την αλυσίδα πάνω απ τα γρανά ια και ενώστε τα άκρα της µε τ σύνδεσµ . Για εύκ λη συναρµ λ γηση, κρατήστε τα άκρα της αλυσίδας ‘‘κ ντρα’’ στα συνε µενα πίσω δ ντια γρανα ι ύ ενώ εισάγετε τ σύνδεσµ . σύνδεσµ...
- Page 487 ΕΛΕΓ Σ ΜΠΡ ΣΤΙΝΗΣ ΚΑΙ ΠΙΣΩ ΑΝΑΡΤΗΣΗΣ Ανατρέ τε στις δηγίες Ασ αλείας στη σελίδα Να ελέγ ετε τη λειτ υργία τ υ µπρ στιν ύ πιρ υνι ύ, πατώντας τ µπρ στιν ρέν και πιέ ντας µε δύναµη πάνω-κάτω τ πιρ ύνι αρκετές...
- Page 488 θα πρέπει να σ ήσει καθώς κατε ά ετε τ (1) Ελατήρι πλάγι υ σταντ πλάγι σταντ. Εάν τ πλάγι σταντ δε λειτ υργεί σύµ ωνα µε την παραπάνω περιγρα ή, απευθυνθείτε στ ν αντιπρ σωπ της Honda για επισκευή. http://mototh.com...
- Page 489 ρένων. Εάν συµ εί αυτ , θα ρειαστεί (2) Πα ιµάδι µπρ στιν ύ ά να επισκευή τ σύστηµα ρένων. Για την εργασία (3) Μπρ στιν ς ά νας τρ ύ αυτή, απευθυνθείτε στ ν ε υσι δ τηµέν αντιπρ σωπ της Honda. http://mototh.com...
- Page 490 Τ π θετήστε τ µπρ στιν τρ ανάµεσα της Honda για να επι ε αιώσει τι η τ π θέτηση στις µπ υκάλες τ υ πιρ υνι ύ και εισάγετε τ έγινε σωστά. Μια λανθασµένη τ π θέτηση µπρ στιν...
- Page 491 Απ συνδέστε τ ρα ί να ρύθµισης τ υ Α αίρεση Πίσω Τρ ύ Ανατρέ τε στις δηγίες Ασ αλείας στη σελίδα ρέν υ ( ) απ τ πλαίσι τ υ ρέν υ α αιρώντας την κ πίλια ( ), τ πα...
- Page 492 Α αιρέστε τ ν πίσω ά να τρ ύ ( ), τ υς ρυθµιστές αλυσίδας ( ) και τ ν πλευρικ κ λάρ , στη συνέ εια α αιρέστε την αλυσίδα ) απ τ γρανά ι κίνησης, σπρώ ν ντας τ...
- Page 493 τ συντ µ τερ δυνατ σε έναν αντιπρ σωπ Τ π θετήστε τ υς απ στάτες µέσα την της Honda για να επι ε αιώσει τι η τ π θέτηση αριστερή και δε ιά πλήµνη τ υ τρ ύ. έγινε σωστά. Μια λανθασµένη τ π θέτηση...
- Page 494 Αν κάπ ι τακάκι έ ει θαρεί µέ ρι τ δείκτη θ ράς, τ τε αντικαταστήστε και τα δύ τακάκια µ α ί. Για την εργασία αυτή, (1) ∆είκτες θ ράς απευθυνθείτε στ ε υσι δ τηµέν συνεργεί της Honda. http://mototh.com...
- Page 495 αντιπρ σωπ της Honda. ρησιµ π ιείτε µ ν γνήσια ανταλλακτικά της (1) Βέλ ς (3) Ένδει η ανα ράς Honda ή άλλα ανάλ γης π ι τητας µε αυτά. (2) Βρα ί νας ρέν υ (4) Κιθάρα ρέν υ http://mototh.com...
- Page 496 ηλεκτρικά πρ λήµατα), επικ ινωνήστε µε τ ν Η µπαταρία εκλύει εκρηκτικά υδρ γ να ε υσι δ τηµέν αντιπρ σωπ της Honda. αέρια κατά την καν νική λειτ υργία της. Μια σπίθα ή µια λ γα µπ ρεί να...
- Page 497 Α αίρεση: Βγάλτε τη µπαταρία ( ) απ τη θήκη Βε αιωθείτε τι γενικ ς διακ πτης µπαταρίας. ρίσκεται στη θέση OFF. Σηκώστε τ κάθισµα (σελίδα Αν ί τε τ καπάκι της µπαταρίας (σελίδα Α αιρέστε τ κάλυµµα της µπαταρίας ( ) και...
- Page 498 είναι ένδει η ρα υκυκλώµατ ς ή υπερ ρτισης τ υ ηλεκτρικ ύ συστήµατ ς. Απευθυνθείτε στ ν ε υσι δ τηµέν αντιπρ σωπ της Honda για επισκευή. Μη ρησιµ π ιείτε π τέ ασ άλεια δια ρετικής έντασης απ...
- Page 499 Ασ αλει θήκη: Η ασ αλει θήκη ( ) ρίσκεται κ ντά στη µπαταρία. Η καθ ρισµένη ασ άλεια είναι: Σηκώστε τ κάθισµα (σελίδα Α αιρέστε τ κάλυµµα µπαταρίας και τ κάλυµµα τ υ ρελέ της µί ας (σελίδα Αν ί τε τ καπάκι της ασ αλει θήκης ( ). Τρα...
- Page 500 Κύρια ασ άλεια: Η κύρια ασ άλεια ( ) ρίσκεται κ ντά στη µπαταρία. Η καθ ρισµένη ασ άλεια είναι: Σηκώστε τ κάθισµα (σελίδα Α αιρέστε τ κάλυµµα µπαταρίας και τ κάλυµµα τ υ ρελέ της µί ας (σελίδα Απ συνδέστε τη ίσα...
- Page 501 ΡΥΘΜΙΣΗ ∆ΙΑΚ ΠΤΗ ΦΩΤ Σ ΦΡΕΝΩΝ Ανατρέ τε στις δηγίες Ασ αλείας στη σελίδα Να ελέγ ετε περι δικά τη λειτ υργία τ υ διακ πτη για τ ως των ρένων ( ) π υ ρίσκεται στην δε ιά πλευρά πίσω απ τ...
- Page 502 ΑΝΤΙΚΑΤΑΣΤΑΣΗ ΛΑΜΠΤΗΡΩΝ Ανατρέ τε στις δηγίες Ασ αλείας στη σελίδα Βε αιωθείτε τι, κατά την αντικατάσταση τ υ λαµπτήρα, διακ πτης είναι στη θέση OFF. Μ η ν ρ η σ ι µ π ι ε ί τ ε λ α µ π τ ή ρ ε ς , λαµπτήρας...
- Page 503 Λαµπτήρας Πρ λέα Α αιρέστε τ µπρ στιν κάλυµµα τ υ τιµ νι ύ (σελίδα Α αιρέστε τ ελαστικ κάλυµµα ( ). Α αιρέστε τ λαµπτήρα τ υ πρ λέα ( ) πιέ ντας πρ ς τα κάτω τ ν πείρ ( ). Τ...
- Page 504 Λαµπτήρας Φωτ ς θέσης Α αιρέστε τ µπρ στιν κάλυµµα τ υ τιµ νι ύ (σελίδα Τρα ή τε τ ντ υί πρ ς τα έ ω ( ). Τρα ή τε έ ω τ λαµπτήρα ( ) ωρίς να τ ν στρίψετε.
- Page 505 Λαµπτήρας πίσω ώτων/ ρένων Βγάλτε τ κρύσταλλ τ υ πίσω ωτ ς ( ) α αιρώντας τις ίδες ( ). Πιέστε ελα ρώς τ λαµπτήρα ( ) και στρέψτε τ ν πρ ς τα αριστερά. Τ π θ ε τ ή σ τ ε κ α ι ν ύ ρ ι λ...
- Page 506 Λαµπτήρας µπρ στιν ύ ωτ ς αλλαγής π ρείας (Φλας) Α αιρέστε τα κρύσταλλα των µπρ στινών λας ( ) α αιρώντας τη ίδα ( ). Πιέστε ελα ρώς τ λαµπτήρα ( ) και στρέψτε τ ν πρ ς τα αριστερά. Τ...
- Page 507 Λαµπτήρας Πίσω Φωτ ς αλλαγής π ρείας (Φλας) Α αιρέστε τα κρύσταλλα τ υ πίσω λας ( ) και τα λαστι άκια τ υς ( ) α αιρώντας τη ίδα ( ). Α αιρέστε τ λαµπτήρα ( ) πιέ ντας τ ν πρ...
- Page 508 Λαµπτήρας της Πινακίδας Κυκλ ρίας Βγάλτε τ κρύσταλλ ωτ ς πινακίδας κυκλ ρίας ( ) α αιρώντας τις ίδες ( ). Τρα ή τε έ ω τ λαµπτήρα ( ) ωρίς να τ ν στρίψετε. Τ π θ ε τ ή σ τ ε κ α ι ν ύ ρ ι λ...
- Page 509 ΚΑΘΑΡΙΣΜ Σ Να καθαρί ετε τακτικά τη µ τ σικλέτα σας για Πλύσιµ της µ τ σικλέτας να πρ στατεύετε τ ινίρισµα των επι ανειών. επλύνετε λ κληρη τη µ τ σικλέτα µε κρύ Να επιθεωρείτε συ νά για πιθανές ηµιές, νερ...
- Page 510 Μετά τ ν καθαρισµ , επλύνετε π λύ καλά Τελευταίες Λεπτ µέρειες τη µ τ σικλέτα µε ά θ ν καθαρ νερ . Τα Α ύ πλύνετε τη µ τ σικλέτα σας, µπ ρείτε να κατάλ ιπα ισ υρών καθαριστικών µπ ρεί να τη...
- Page 511 Α αίρεση των αλάτων τ υ δρ µ υ Τ αλάτι π υ υπάρ ει στ υς δρ µ υς για την καταπ λέµηση της παγωµένης επι άνειας τ ειµώνα και τ θαλασσιν νερ µπ ρ ύν να δηµι υργήσ υν σκ υριά. Αν...
- Page 512 ∆ΗΓ Σ ΓΙΑ ΤΗΝ ΑΠ ΘΗΚΕΥΣΗ Πριν απ τη ύλα η της µ τ σικλέτας για µ εγάλα ρ νικά διαστήµ ατα, πως για παράδειγµα στη διάρκεια τ υ ειµώνα, απαιτείται η λήψη κάπ ιων µέτρων για να Η εν ίνη είναι π λύ εύ λεκτη και απ...
- Page 513 Πραγµατ π ιήστε τις παρακάτω εργασίες για Α αιρέστε την µπαταρία. Απ θηκεύστε τη σε να απ ύγετε τη διά ρωση των κυλίνδρων: ώρ πρ στατευµέν απ π λύ αµηλές Βγάλτε τις πίπες των µπ υ ί απ τα µπ υ ί. θερµ...
- Page 514 ΕΠΑΝΑ ΡΗΣΙΜ Π ΙΗΣΗ ΜΕΤΑ ΤΗΝ ΑΠ ΘΗΚΕΥΣΗ Βγάλτε τ κάλυµµα και καθαρίστε τη µ τ σικλέτα. Ανανεώστε τ λάδι τ υ κινητήρα, εάν έ υν περάσει πάνω απ 4 µήνες απ τη στιγµή της απ θήκευσης. Να ρτί ετε τη µπαταρία π...
- Page 515 ΛΑΜΒΑΝ ΝΤΑΣ ΦΡ ΝΤΙ∆Α ΓΙΑ Τ ΑΠΡ ΣΜΕΝ Εάν υπάρ υν µικρές ηµιές, η δεν είστε ΕΑΝ ΤΡΑΚΑΡΕΤΕ Η πρ σωπική σας ασ άλεια είναι η πρώτη σίγ υρ ι για πιθανή ηµιά, δηγείστε αργά και πρ τεραι τητά σας µετά απ µία...
- Page 516 ΤΕ ΝΙΚΑ ΑΡΑΚΤΗΡΙΣΤΙΚΑ ∆ΙΑΣΤΑΣΕΙΣ 1.896 mm λικ µήκ ς 727 mm λικ πλάτ ς 1.079 mm λικ ύψ ς 1.240 mm Απ σταση α νων ΩΡΗΤΙΚ ΤΗΤΕΣ Λάδι κινητήρα (Μετά απ απ στράγγιση) (Μετά απ απ συναρµ λ γηση) ∆ εί καυσίµων ωρητικ...
- Page 517 ΚΙΝΗΤΗΡΑΣ 52,4 57,9 mm ∆ιάµετρ ς διαδρ µή 9,3 : 1 Σ έση συµπίεσης 124,8 cm Κυ ισµ ς Μπ υ ί CPR6EA 9 (NGK) Καν νικ ή U20EPR9 (DENSO) CPR7EA 9 (NGK) Για δήγηση σε υψηλές τα ύτητες ή U22EPR9 (DENSO) 0,80 0,90 mm ∆ιάκεν...
- Page 518 ΠΛΑΙΣΙ ΚΑΙ ΑΝΑΡΤΗΣΗ 26°36’ Κάστερ 73,6 mm Ι ν ς τρέιλ 70/100 17M/C 40P ∆ιάσταση ελαστικ ύ, Εµπρ σθι DUNLOP TT900F 80/90 17M/C 50P ∆ιάσταση ελαστικ ύ, πίσθι DUNLOP TT900AG Μάρκα ελαστικ ύ πλέγµα- λ ι ύ, ελαστικ ΣΥΣΤΗΜΑ ΜΕΤΑ∆ ΣΗΣ ΚΙΝΗΣΗΣ 3,350 Πρωτεύ...
- Page 519 ΗΛΕΚΤΡΙΚ ΚΥΚΛΩΜΑ 12V 5Ah Μπαταρία 0,15 kW/5.000 min (rpm) Γεννήτρια ΦΩΤΑ 12V 35/35W Πρ λέας (Υψηλή/ αµήλη) 12V 21/5W Φως ρέν υ/ υράς 12V 21W Φώς λάς Εµπρ σθι 12V 21W πίσθι 12V 5W Λάµπακι ωτ ς θέσης 12V 5W Λαµπάκι...
- Page 520 είδι τ υ α ώτ υ. Η µ νάδα τύπ υ εν ίνης µπ ρεί να λάψει τ µέταλλ αντικατάστασης πρέπει να είναι Honda ή τ υ καταλύτη, και ως εκ τ ύτ υ καταλύτης αντίστ ι ης π ι τητας.
Need help?
Do you have a question about the ANF125 and is the answer not in the manual?
Questions and answers