Best K260A Installation Instructions Manual
Hide thumbs
Also See for K260A:
- Specification sheet (3 pages) ,
- Installation instructions manual (37 pages) ,
- Instructions manual (36 pages)
Table of Contents
Advertisement
Available languages
Available languages
Quick Links
INSTALLATION INSTRUCTIONS
HB0024
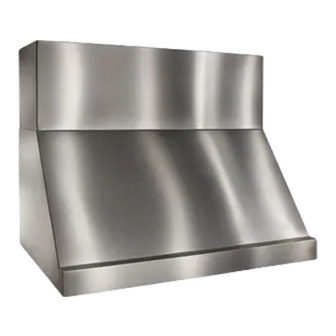
MODEL K260A
!
!
INTENDED FOR DOMESTIC USE ONLY
READ AND SAVE THESE INSTRUCTIONS
INSTALLER: LEAVE THIS MANUAL WITH HOMEOWNER.
HOMEOWNER: USE AND CARE INFORMATION
ON PAGES 10 AND 11.
BEST; Hartford, Wisconsin www.BestRangeHoods.com 800-558-1711
BEST; Drummondville, QC, Canada www.BestRangeHoods.com 866-737-7770
REGISTER YOUR PRODUCT ON LINE AT: www.BestRangeHoods.com/register
For additional information - visit www.BestRangeHoods.com
SV02789 rev. Q
Advertisement
Table of Contents

Subscribe to Our Youtube Channel
Related Manuals for Best K260A


Summary of Contents for Best K260A
-
Page 1: Installation Instructions
INSTALLER: LEAVE THIS MANUAL WITH HOMEOWNER. HOMEOWNER: USE AND CARE INFORMATION ON PAGES 10 AND 11. BEST; Hartford, Wisconsin www.BestRangeHoods.com 800-558-1711 BEST; Drummondville, QC, Canada www.BestRangeHoods.com 866-737-7770 REGISTER YOUR PRODUCT ON LINE AT: www.BestRangeHoods.com/register For additional information - visit www.BestRangeHoods.com SV02789 rev. Q... -
Page 2: To Reduce The Risk Of Fire, Electric Shock Or Injury To Persons, Observe The Following
To reduce the risk of fire and electric shock, the Best K260A range hood must be installed with Best Always turn hood ON when cooking at high heat interior blower models P6 or P12; Best exterior or when cooking flambeing foods (i.e.: Crêpes... -
Page 3: Range Hood System
/left) FK260 Series Soffit Chimney (optional) Model P6 Blower/ Rough-in kit (600 cfm Interior Blower K260A Series Hood & Rough-in Plate) Model P12 Blower/Rough-in kit (Canopy with blower controls & lighting. (1200 cfm Interior Blower Required for all & Rough-in Plate) installations.) - Page 4 (includes one 8” to 10” (10” round duct —2 ft. round transition) sections) FK260 Series Soffit Chimney (optional) K260A Series Hood (Canopy with blower controls & lighting. Required for all installations.) In-line and exterior blower rough-in kit (included with EB6, EB9, EB12, EB15, ILB3, ILB6, ILB9 and ILB11 blowers).
-
Page 5: Select Blower Option And Install Ductwork
1. SELECT BLOWER OPTION AND INSTALL DUCTWORK Either an interior or exterior blower or in-line blower may be used with this hood. The Best K260A Series range hood must be installed with blower models P6, P12, ILB3, ILB6, ILB9, ILB11, EB6, EB9, EB12 or EB15 only. Other blowers cannot be substituted. -
Page 6: Measure Installation
Adjust your measurements for various heights of ceiling, soffits, cabinets or cooktops. The minimum hood distance above cooktop must not be less than 24’’. A maximum of 30” above cooktop is highly recommended for best capture of cooking impurities. Distances over 30” are at the installer and users discretion. -
Page 7: Install Backsplash
4. INSTALL BACKSPLASH (OPTIONAL) Backsplash must be installed before the hood shell because the hood shell covers the backsplash top mounting screws. In order to be able to install the backsplash, make sure you have at least 18’’ clearance between bottom of hood and range control panel or cooktop. (See instructions packed with backsplash.) 5. -
Page 8: Install Transition To Rough-In Plate
8. INSTALL TRANSITION TO ROUGH-IN PLATE (INTERIOR BLOWER ONLY) Model 423, 424, 427, 453, or 454 Attach transition (if required) to blower rough-in plate. Use duct tape to make all joints secure and air-tight. NOTE: Model P6 blower plate connects directly to 7’’... -
Page 9: Light Bulbs
11. INSTALL THE OPTIONAL SOFFIT CHIMNEY (ALL BLOWERS) (OPTIONAL) FK260 Series From inside the hood, attach flue to top of hood at sides and front of hood using no. 8 screws (provided). HD0050 12. INSTALL THE BLOWER (INTERIOR OR EXTERIOR BLOWER) Refer to instructions included with blower. -
Page 10: Install Baffle Filters
14. INSTALL BAFFLE FILTERS CAUTION Remove protective plastic film covering filters before installing them. NOTES: 1. Assemble the metal handles to the filters, using no. 8-32 x 1/4” screws provided, before installing them in the hood. 2. A vertical arrow with the word AIR can be found on the filter border. Make sure to install the filters with this arrow pointing toward the inside of the hood (as illustrated below). -
Page 11: Operation
ONE-YEAR LIMITED WARRANTY FOR BEST PRODUCTS Broan-NuTone LLC (Broan-NuTone) warrants to the original consumer purchaser of Best products that such products will be free from defects in materials or workmanship for a period of one year from the date of original purchase. THERE ARE NO OTHER WARRANTIES, EXPRESS OR IMPLIED, INCLUDING, BUT NOT LIMITED TO, IMPLIED WARRANTIES OR MERCHANT ABILITY OR FITNESS FOR A PARTICULAR PURPOSE. -
Page 12: Service Parts
18. SERVICE PARTS MODEL K260A HL0153 KEY NO. PART NO. DESCRIPTION KEY NO. PART NO. DESCRIPTION SV12969 SV12514 SWITCH ASSEMBLY, BLACK SIDE LINER 30" SV12515 SV12970 SWITCH ASSEMBLY, WHITE SIDE LINER 36" SHIELDED HALOGEN BULB SV13113 SIDE LINER 42" SV05921... -
Page 13: Guide D'installation
PROPRIÉTAIRE : DIRECTIVES D’ENTRETIEN ET DE FONCTIONNEMENT EN PAGES 22 ET 23. BEST; Hartford, Wisconsin www.BestRangeHoods.com 800 558-1711 BEST; Drummondville (QC), Canada www.BestRangeHoods.com 866 737-7770 ENREGISTREZ VOTRE PRODUIT EN LIGNE À : www.BestRangeHoods.com/register Pour obtenir plus d’information, consultez notre site www.BestRangeHoods.com... - Page 14 (par ex. : crêpes Suzette, cerises jubilé, steak 10. Afin de réduire les risques d’incendie et d’électrocution, au poivre flambé). la hotte Best K260A doit être installée uniquement avec Nettoyez régulièrement la (les) roue(s) du ventilateur. l’un des ventilateurs intérieurs Best suivants : P6 ou Ne laissez pas la graisse s’accumuler sur le ventilateur...
- Page 15 Cheminée décorative série FK260 (optionnelle) Modèle P6 Ventilateur/ Plaque ventilateur (ventilateur intérieur de Hotte série K260A 600 PCM et plaque (Hotte avec commandes Modèle P12 Ventilateur/ ventilateur) ventilateur et éclairage. Plaque ventilateur Requise pour toutes les (ventilateur intérieur de installations.)
- Page 16 2 pi) (incluant une transition ronde de 8 po à 10 po) Cheminée décorative série FK260 (optionnelle) Hotte série K260A (Hotte avec commandes ventilateur et éclairage. Requise pour toutes les installations.) Plaque ventilateur en ligne ou extérieur (fournie avec les ventilateurs EB6, EB9, EB12, EB15, ILB3, ILB6, ILB9 et ILB11) Dosseret (série RMP)
- Page 17 Cette hotte fonctionne autant avec un ventilateur intérieur, en ligne ou extérieur. La hotte Best de la série K260A doit être installée uniquement avec l’un des ventilateurs suivants : P6, P12, ILB3, ILB6, ILB9, ILB11, EB6, EB9, EB12 ou EB15 (vendus séparément). Aucun autre ventilateur ne peut être utilisé.
-
Page 18: Mesurer L'installation
2. MESURER L’INSTALLATION Les dimensions pour les installations les plus courantes sont indiquées plus bas. Ajuster vos mesures selon les différentes hauteurs de plafond, soffites, armoires ou surfaces de cuisson. La distance minimale entre le bas de votre hotte et la surface de cuisson ne doit pas être inférieure à... -
Page 19: Installer Le Dosseret
4. INSTALLER LE DOSSERET (OPTIONNEL) Le dosseret doit être installé avant la hotte, puisque celle-ci couvre les vis d’installation du dosseret. Afin de pouvoir installer le dosseret, s’assurer d’avoir 18 po entre le dessous de la hotte et le panneau de contrôle de la cuisinière ou de la surface de cuisson. (Voir instructions fournies avec le dosseret.) 5. -
Page 20: Installer La Transition À La Plaque Ventilateur
8. INSTALLER LA TRANSITION À LA PLAQUE VENTILATEUR (VENTILATEUR INTÉRIEUR SEULEMENT) Modèle 423, 424, 427 453 ou 454 Fixer la transition (si requise) à la plaque ventilateur. Sceller tous les joints à l’aide de ruban adhésif en toile. NOTE :La plaque ventilateur du modèle P6 se branche directement à... -
Page 21: Lampes Halogènes
11. INSTALLER LA CHEMINÉE DÉCORATIVE OPTIONNELLE (TOUS LES VENTILATEURS) Série FK260 (OPTIONNELLE) Par l’intérieur de la hotte, fixer la cheminée décorative en haut de celle-ci, à l’avant et aux côtés, à l’aide des vis n 8 (fournies). HD0050 12. INSTALLER LE VENTILATEUR (INTÉRIEUR OU EXTÉRIEUR) Pour installer le ventilateur, voir les instructions fournies avec celui-ci. -
Page 22: Utilisation Et Entretien
14. INSTALLER LES FILTRES À CHICANE ATTENTION Avant d’installer les filtres à chicane, retirer le plastique protecteur de ceux-ci. NOTES : 1. Assembler les poignées de métal aux filtres à l’aide des vis n° 8-32 x 1/4 po, avant de les installer dans la hotte. 2. -
Page 23: Garantie
GARANTIE LIMITÉE DE UN AN DES PRODUITS BEST Broan-NuTone LLC (Broan-NuTone) garantit à l’acheteur consommateur initial de produits Best qu’ils sont exempts de tout défaut dans les matières premières ou la main-d’œuvre, pour une période de un an à compter de la date d’achat par le consommateur initial. -
Page 24: Pièces De Remplacement
18. PIÈCES DE REMPLACEMENT MODÈLE K260A HL0153 N° RÉF PIÈCE N° DESCRIPTION N° RÉF PIÈCE N° DESCRIPTION SV12969 SV12514 INTERRUPTEUR ASSEMBLÉ, NOIR ENTRETOISE POUR FILTRE 30 SV12970 SV12515 INTERRUPTEUR ASSEMBLÉ, BLANC ENTRETOISE POUR FILTRE 36 AMPOULE HALOGÈNE AVEC SV13113 ENTRETOISE POUR FILTRE 42 SV05921 ÉCRAN 50 W GU10... -
Page 25: Manual De Instalación
PROPIETARIO: INSTRUCCIONES DE MANTENIMIENTO Y FUNCIONAMIENTO EN LAS PÁGINAS 34 Y 35. BEST; Hartford, Wisconsin www.BestRangeHoods.com 800-558-1711 BEST; Drummondville, QC, Canada www.BestRangeHoods.com 866-737-7770 REGISTRE SU PRODUCTO EN LÍNEA EN: www.BestRangeHoods.com/register Para obtener más información, visitar nuestro sitio www.BestRangeHoods.com SV02789 rev. Q... - Page 26 P6 o P12 de ventiladores impelentes interiores de Best, los ventiladores exteriores EB6, EB9, EB12 o EB15 de Best o con los ventiladores en línea ILB3, ILB6, ILB9 o ILB11 de Best. No utilice otros ventiladores. Los ventiladores se venden aparte.
- Page 27 FK260 (opcional) Modelo P6 Ventilador/Placa del ventilador (ventilador interior de 600 pcm y placa CAMPANA serie K260A del ventilador) Modelo P12 Ventilador/ (Pabellón con controles Placa del ventilador del ventilador y (ventilador interior de 1200 pcm iluminación. Se requiere...
- Page 28 10”, secciones de 2’) (con una transicíon redonda de 8” a 10”) Chimenea de intrados serie FK260 (opcional) CAMPANA serie K260A (Pabellón con controles del ventilador y iluminación. Se requiere para todas las instalaciones) Placa del ventilador en línea o exterior (con los...
-
Page 29: Seleccione La Opción Ventiladory Instale Los Conductos
Esta campana funciona tanto con un ventilador exterior, con un ventilador en línea y como interior. La campana de modelo Best K260A debe ser instalado unicamente con ventilador modelo P6, P12, ILB3, ILB6, ILB9, ILB11, EB6, EB9, EB12 o EB15 (vendidos separadamentes). -
Page 30: Mida La Instalación
2. MIDA LA INSTALACIÓN A continuación se muestran las dimensiones para las instalaciones más comunes. La distancia mínima entre la campana y la encimera debe ser de 24’’. Asimismo, se recomienda que dicha distancia so supere las 30’’ para obtener la máxima capacidad de absorción de las impurezas creadas al cocinar. -
Page 31: Instale La Placa Para Antisalpicaduras
4. INSTALE LA PLACA PARA ANTISALPICADURAS (OPCIONAL) La placa para antisalpicaduras se debe instalar antes que la campana debido a que este cubre los tornillos de montaje de la placa para antisalpicaduras. Para instalar la placa para antisalpicadura, asegúrese de tener 18’’ entre debajo de la campana y el panel de control de la cocina o encima de la cocina. -
Page 32: Instale La Transición En La Placa Del Ventilador
8. INSTALE LA TRANSICIÓN EN LA PLACA DEL VENTILADOR (VENTILADOR INTERIOR SOLAMENTE) Modelo 423, 424, 427 453 o 454 Monte la transición en la placa del ventilador. Use cinta para ductos para que todas las juntas sean seguras y herméticas. NOTA: La placa del ventilador del modelo P6 se conecta directamente al conducto redondo de 7’’, sin... -
Page 33: Instale La Chimenea De Intrados Opcional
11. INSTALE LA CHIMENEA DE INTRADOS OPCIONAL (TODOS LOS VENTILADORES) Serie FK260 (OPTIONAL) Desde el interior de la campana, conecte la chimenea a la parte superior de la campana a los lados y al frente de la campana usando tornillos n. (proporcionados). -
Page 34: Mantenimiento
14. INSTALE LOS FILTROS DE ZIG ZAG PRECAUCIÓN Retire la película protectora de plástico que cubre los filtros antes de instalarlos. NOTAS: 1. Instale las manijas metálicas en los filtros con los tornillos n.° 8-32 x 1/4” provistos antes de instalar los filtros en la campana. 2. - Page 35 GARANTÍA LIMITADA DE UN AÑO DE LOS PRODUCTOS BEST Broan-NuTone LLC (Broan-NuTone) garantiza al consumidor comprador original de Best productos que dichos productos carecerán de defectos en materiales o en mano de obra por un período de un año a partir de la fecha original de compra.
- Page 36 18. REPUESTOS MODELO K260A HL0153 N.° REF N.° DE PIEZA DESCRIPCIÓN N.° REF N.° DE PIEZA DESCRIPCIÓN SV12969 SV12514 INTER. ENSAMBLADO, NEGRO ESPACIATOR FILTRO 30” SV12970 SV12515 INTER. ENSAMBLADO, BLANCO ESPACIATOR FILTRO 36” BOMBILLA HALÓGENA SV13113 ESPACIATOR FILTRO 42” SV05921...
Need help?
Do you have a question about the K260A and is the answer not in the manual?
Questions and answers