Advertisement
Available languages
Available languages
Quick Links
WS222 + WT440
Wireless Weather Station
Congratulations on your purchase of this
weather station set, WS222+WT440.
Please take the time to read and
understand this manual so you can begin
to enjoy the convenience and features this
product has to offer.
FEATURES
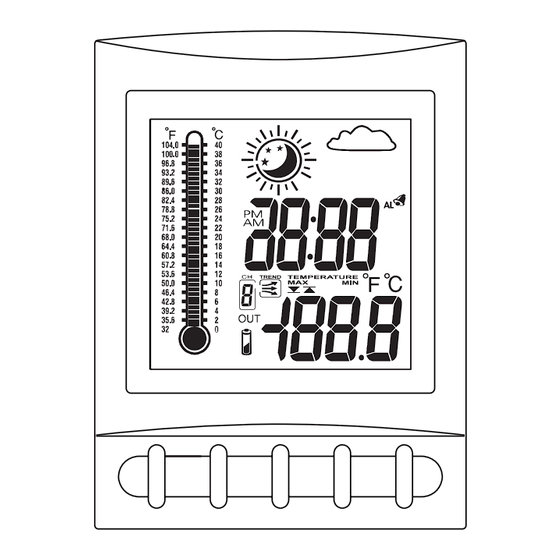
Main Display Unit WS222:
* clock and alarm clock function
* local temperature display
* receives and displays temperature
readings from up to 4 remote
transmitters via RF technology of 433MHz
* minimum/maximum temperature memory
* temperature trend indicator
WS222 receiver
* local/remote temperature alarms
* day/night icon
°
°
* user-selectable C or F
* battery type: 2 x AA
Remote Transmitter WT440:
1
* drip-proof design with LCD screen
* temperature display in user-selectable
°
°
C or F
* transmission range: up to 40 metres in
open area
* table stand or wall mountable
* battery type: 2 x AA
WT440 transmitter
PAGE 1
TEMPERATURE DISPLAY
Min and Max Temperature
Press
MIN
in the Clock mode to display
A
the minimum temperature
.
MINIMUM
The MIN symbol will appear.
To return to normal temperature
display, press
MIN
again.
Press
MAX
in Clock mode to display
B
the maximum temperature.
B
A
*
The MAX symbol will appear.
MAXIMUM
To return to normal temperature
display, press
MAX
again.
NOTE: Min/Max readings are automatically cleared daily at 00:00
Press
CHN
to view the minimum or maximum temperatures of the
*
local and remote channels 1 to 4.
Temperature Trend
The trend indicator shows the trend of the temperature
in the past half-hour interval.
Example:
The following indicates that the
temperature is rising.
Arrow Indicator
Trend
Rising
Falling
Steady
PAGE 9
BUTTON PLACEMENT
MODE/SNOOZE: scrolls through the
1
clock, alarm, and (upper & lower) temperature
alarm modes; snooze for alarm
HOUR/+/MAX: shows maximum temperature;
2
adjusts clock, alarm, and temperature alarm
values
MIN/-/MIN: shows minimum temperature;
3
adjusts clock, alarm, and temperature alarm
values
CHN: scrolls through local and remote
4
channels (1 to 4);
1 2 3
ALARM /(°C/°F): toggles between °C and °F,
5
12 and 24 hour format, and alarm ON and OFF;
disables temperature alarms
6
SET: activates SET function
7
C/F: changes House Code and Channel Code;
7
6
selects °C or °F
8
Battery Compartment
SET
C/F
10
9
LCD Screen
10
Battery Cover
11
Wall Mount Bracket & Table Stand
11
PAGE 2
TEMPERATURE ALARM
The
temperature alarm
is an ideal feature to be used for greenhouses
and wine cellars, or any place that you require controlled temperature.
Once activated, the temperature alarm would sound when the room gets
too warm or too cold depending on your settings.
You can set both an upper and lower temperature alarm for the local
temperature (main receiver unit) and/or for each of the remote
(outdoor) channels of 1 to 4.
UPPER TEMPERATURE LIMIT:
If the temperature gets too
and reaches the upper temperature limit, the alarm would sound.
LOWER TEMPERATURE LIMIT:
If the temperature gets too
and reaches the lower temperature limit, the alarm would sound.
Setting the Upper Temperature Alarm
Scroll to the Upper Temperature Alarm Setting mode by pressing
1
You should see the
symbol and dotted lines (
- - -
) or pre-existing
setting blink.
2
Select the desired channel, local or remote channels (1 to 4) using
3
Press
+
or key to set the desired value for the upper temperature limit.
-
To disable the particular alarm, press
ALARM
.
*
The dotted lines (
- - -
) would reappear to indicate
that the alarm has been disabled.
Press
MODE
to finish; or r
epeat steps for all
4
other channels if desired.
4
3
1
PAGE 10
GETTING STARTED
setting up the transmitter
*
Set up the transmitter(s)
before
setting up the receiver
1
Remove battery cover
2
2 AA size batteries (included)
Insert batteries into compartment,
3
observing proper polarity
4
House code will blink for 8 seconds
Select House code (1-15) by pressing C/F
5
* If you have multiple transmitters for a single receiver,
set each transmitter to the
same
House code
6
5
Press SET
4
7
Channel code will blink for 8 seconds
Select Channel code (1-4) by pressing C/F
8
* If you have multiple transmitters for a single receiver,
set each transmitter to a
different
Channel code
9
9
Press SET
10
The temperature will appear on the LCD screen
1
11
°
°
Select temperature display in C or F by pressing C/F
12
Replace battery cover
1
Remove battery cover
8
2
2 AA size batteries (included)
Insert batteries into compartment,
3
observing proper polarity; replace cover
PAGE 3
TEMPERATURE ALARM
Setting the Lower Temperature Alarm
Scroll to the Lower Temperature Alarm Setting mode by pressing
1
You should see the
symbol and dotted lines (
setting blink.
2
Select the desired channel, local or remote channels (1 to 4) using
3
Press
+
or key to set the desired value for the lower temperature limit.
-
warm
To disable the particular alarm, press
ALARM
*
The dotted lines (
- - -
) would reappear to indicate
cold
that the alarm has been disabled.
Press
MODE
to finish; or r
epeat steps for all
4
other channels if desired.
MODE
.
NOTE: In the normal clock display, when either the upper or lower
temperature alarm has been set for a particular channel, the
CHN
.
symbol will show up solid on the LCD screen when that channel is displayed.
When the Temperature Alarm Sounds
The temperature alarm will sound when the actual temperature has
reached (or exceeded) the upper or lower temperature limit.
or
symbol and temperature limit will blink
The temperature alarm has a distinctive tone different to that of
the clock alarm.
Press ANY key to stop the temperature alarm. Or without interruption,
2
*
the temperature alarm will automatically stop after one minute.
PAGE 11
WIRELESS TRANSMISSION
Automatic Learn Function:
The learn function starts automatically and runs for approximately
6
1
3 minutes when batteries are first installed in the receiver.
9
2
5
Within the 3 minutes, the receiver will pick up the temperature
2
signal from the remote transmitter and display the reading.
SET
C/F
8
11
1
3
1
12
1
1
4
1
7
Manual Learn Function (Remote Signal Search):
1
10
If a new remote transmitter is added or if signal is lost (outdoor readout
on the receiver is blinking), the learn function must be executed again.
Press and hold
CHN
1
3 seconds to start.
Unit will beep to indicate that
2
setting up the receiver
learn function has started.
Channel symbol will blink and
3
unit will continue to beep as
3
each remote transmitter is detected.
1
Within 3 minutes, the temperature reading of the remote transmitter
4
2
will display on the receiver.
LOW BATTERY INDICATION
WS222 Receiver
MODE
.
Replace the batteries when the Low Battery Indication lights up on
A
- - -
) or pre-existing
the LCD screen by the local (indoor) temperature display.
WT440 Remote Transmitter
CHN
.
Replace the batteries when the Low Battery Indication lights up on
B
the bottom-left corner of the LCD screen on the WT440 transmitter.
.
When the batteries are low on a transmitter, a Low Battery Indication
C
will also light up on the LCD screen of the WS222 receiver for that
particular channel.
1
4
3
2
*
or
A
NOTE: After replacing the batteries, you will need to perform the Setup
and Learn Function procedures again. Refer to the GETTING STARTED
and WIRELESS TRANSMISSION sections.
2
Synchronized!!!
for
2
3
1
4
PAGE 4
1
B
C
PAGE 12
Advertisement

Related Manuals for UPM WS222


Summary of Contents for UPM WS222
- Page 1 The dotted lines ( - - - ) would reappear to indicate To return to normal temperature will also light up on the LCD screen of the WS222 receiver for that LOWER TEMPERATURE LIMIT: If the temperature gets too cold that the alarm has been disabled.
- Page 2 This may occur when you move the remote transmitter from one If, at any time during the warranty period, the product is defective or malfunctions, UPM shall repair or replace it (at does not match the data displayed on the environment to another.
- Page 3 Toutes nos félicitations pour votre achat de Alarme à répétition. réception pour la première fois. cette station de météo: WS222 + WT440. 2 piles de type AA (inclus) Veuillez s'il vous plaît prendre le temps de HOUR/+/MAX: Affichage de la temp rature é...
- Page 4 GARANTIE LIMITÉE A DEUX ANS UPM garantit que ce produit, à l'exception des piles, est exempt de tout défaut matériel et de fabrication et qu'il est couvert par une garantie limitée, dans des conditions normales d'usage et de service, pendant une période de deux (2) ans qui PROBLÈME...
Need help?
Do you have a question about the WS222 and is the answer not in the manual?
Questions and answers