Table of Contents
Advertisement
Quick Links
Advertisement
Table of Contents

Subscribe to Our Youtube Channel
Related Manuals for Russell Hobbs RHJM05


Summary of Contents for Russell Hobbs RHJM05
- Page 1 INSTRUCTIONS AND WARRANTY RHJM05 RUSSELL HOBBS POWER GEAR SUPER JUICER...
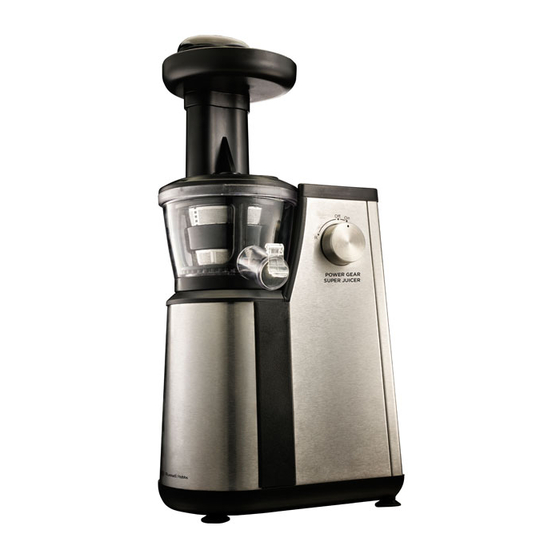
- Page 2 Thank you for purchasing the Russell Hobbs Power Gear Super Juicer. Each unit has been manufactured to ensure safety, reliability and ease of use. Before use, please read these instructions carefully and keep them for further reference. FEATURES OF THE RUSSELL HOBBS POWER GEAR SUPER JUICER Traditional Juicers use steel blades that turn at high speeds and heat the food causing its oxidation.
-
Page 3: Important Safeguards
Lower speeds means less heat is generated, preserving more nutrients and enzymes Low noise Reverse function Easily cleaned Easy to assemble and disassemble Dry waste output 1L dry waste container 1L juice container with Easy-Pour spout ... - Page 4 use of the appliance by a person responsible for their safety. Children should be supervised to ensure that they do not play with the appliance. Do not fill the juicer with hot or boiling liquids. Do not come into contact with moving parts. Do not put any objects (spoon, spatula, etc.) into the juicer and especially not while the juicer is plugged in.
- Page 5 appliance has been dropped. Do not attempt to make any modifications to this appliance. To avoid any risk and to remain within warranty, repairs to this appliance must be carried out by an authorised service agent only. If the supply cord is damaged, it must be replaced by the manufacturer, its authorised service agent or similarly qualified persons in order to avoid any hazard.
-
Page 6: Parts Diagram
PARTS DIAGRAM BEFORE FIRST USE Before using your appliance for the first time take it out of the box and take off any protective wrappings. REMEMBER: DO NOT LEAVE PROTECTIVE PACKAGING LYING AROUND, AS IT COULD BE DANGEROUS AROUND INFANTS. Carefully wipe the exterior of the appliance to remove any dust that may have accumulated. - Page 7 in warm soapy water with a soft cloth or nylon brush. Rinse and dry thoroughly. Note: These parts are not dishwasher safe. This appliance has a built-in safety lock; this feature ensures that you can only switch on the appliance if you have assembled the juicer correctly on the motor unit. When assembled correctly, the built-in safety lock will be unlocked.
- Page 8 Fig.2 Fig. 3 5. Insert the strainer into the strainer holder, then place these assembled parts into the juicing bowl.(see Fig.3) Note that the triangle mark on the strainer needs to align with the triangle mark on the juicing bowl. Ensure that the strainer is completely pushed down.
- Page 9 7. Place the Hopper onto the juice bowl. Align the triangle mark on the Hopper with the triangle mark on the juice bowl and turn it clockwise to the locked position. The Hopper will click into position.(see Fig.6) Fig. 6 8.
- Page 10 through the juicer. Do not press the food pusher down too quickly as the juicer will not be as effective. CAUTION: do not put your hand or any other object in the food chute during operation. 7. The juice from the fruit and/or vegetables will flow directly into the juice cup and the pulp will be collected in the pulp bin.
- Page 11 Fig. 9 4. The juice bowl, auger, strainer and strainer holder can all be removed together. Grip the juice bowl and turn it to the open position (anti-clockwise) slightly, it will click out of position. This is a very small movement. The juicing bowl and all the internals can now be lifted off the motor base for cleaning.
-
Page 12: Metric Conversion Chart
When juicing fruit and vegetables of different consistency it may help to juice different combinations, i.e. juice soft fruit first, (i.e. oranges) then follow with hard fruit (i.e. apples). This will help you achieve maximum juice extraction. If juicing herbs or leafy vegetables, wrap them together to form a bundle before placing in the juicer or combine them with other ingredients on low speed. - Page 13 2 tbsp 1 fl. oz. 30 ml tablespoons grams 1/4 cup 2 fl. oz. 60 ml 56.7 1/4 cup tablespoons ounces grams 1/2 cup 4 fl. oz. 125 ml 5 1/3 75.6 1 cup 8 fl. oz. 250 ml 1/3 cup tablespoons ounces grams...
- Page 14 Juicing Recipes Important: Temperature settings, quantities and volumes as given in recipes are approximate. Due to personal differences in taste, some foods may be desired more or less crisp, more or less done. Therefore, heat settings may be increased, decreased or varied in any way to suit individual preference.
- Page 15 bottom of saucepan. Add tomatoes, juice pulp, salt, basil, oregano and red pepper flakes. Bring to a boil. Reduce heat to low; cover and simmer 30 to 45 minutes or until vegetables are tender, stirring occasionally and adding additional water if needed. Serve marinara over hot pasta.
- Page 16 3⁄4 cup fresh parsley 1 clove garlic 2 tablespoons soy protein powder Assemble Russell Hobbs Slow Juicer. Cut papaya and orange to fit in food chute. Juice papaya, orange, parsley and garlic. Stir in soy protein powder until well blended; serve immediately.
- Page 17 4 whole cloves 1 teaspoon honey Assemble Russell Hobbs Slow Juicer. Cut grapefruit and pineapple to fit in food chute. Juice grapefruit, pineapple and ginger. Stir. Pour into medium saucepan. Add cloves and honey; simmer over low heat until heated through. Remove from heat; let stand 5 minutes.
-
Page 18: Fruit Juices
1 cup alfalfa sprouts 1 cup bean sprouts 4 sprigs fresh parsley Assemble Russell Hobbs Slow Juicer. Cut apples to fit in food chute. Juice apples, carrot, alfalfa sprouts, bean sprouts and parsley. Stir and serve immediately. Floreta (Makes 2 servings) - Page 19 Assemble Russell Hobbs Slow Juicer. Cut apple, pear and orange to fit in food chute. Juice apple, pear and orange. Stir and serve immediately. Sweet ‘o Sour (Makes 2 servings) 1⁄2 grapefruit, peeled 1⁄8 papaya, peeled and seeded 11⁄2 cups raspberries Assemble Russell Hobbs Slow Juicer.
- Page 20 Nightshade (Makes 4 servings) 4 apples, cored 1 sweet potato, peeled 1 carrot, ends trimmed Assemble Russell Hobbs Slow Juicer. Cut apples and sweet potato to fit in food chute. Juice apples, sweet potato and carrots. Stir and serve immediately.
-
Page 21: Vegetable Juices
Pomegranate Kiss (Makes 2 servings) 1 Gala apple, cored 11⁄2 cups pomegranate seeds Assemble Russell Hobbs Slow Juicer. Cut apple to fit in food chute. Juice apple and pomegranate seeds. Stir and serve immediately. Vegetable Juices Absolute Green (Makes 1 serving) 1⁄4 pineapple, peeled... - Page 22 1 beet, peeled 3 medium carrots, ends trimmed 1⁄2 cup packed kale leaves Assemble Russell Hobbs Slow Juicer. Cut apple and beet to fit in food chute. Juice apple, beet, carrots and kale. Stir and serve immediately. Ginger Ninja (Makes 1 serving) 12 small to medium carrots, ends trimmed 1⁄2 inch fresh ginger, peeled...
- Page 23 1⁄2 jalapeno pepper, stemmed 1 inch fresh ginger, peeled Assemble Russell Hobbs Slow Juicer. Cut cucumber and beet to fit in food chute. Juice cucumber, beet, lemon, jalapeño pepper and ginger. Stir and serve immediately. Miss Pepper (Makes 2 servings)
- Page 24 2 cups fresh spinach 1⁄2 lemon, peeled and seeded 1 inch fresh ginger, peeled Assemble Russell Hobbs Slow Juicer. Cut cucumbers and pear to fit in food chute. Juice cucumbers, pear, spinach, lemon and ginger. Stir and serve immediately. Marinades and Savoury Sauces...
- Page 25 1⁄4 teaspoon salt 1⁄4 teaspoon freshly ground black pepper Assemble Russell Hobbs Slow Juicer. Juice tomatoes and carrot. Heat olive oil and butter in large saucepan over medium heat until mixture is frothy. Add onion and garlic; saute about 1 minute or until fragrant. Add juice and oregano; bring to a simmer. Simmer 1 to 11⁄2 hours or until sauce thickens to desired consistency, stirring occasionally.
- Page 26 1 teaspoon coarse salt 1⁄2 teaspoon freshly ground black pepper Assemble Russell Hobbs Slow Juicer. Juice oranges and ginger. Measure 13⁄4 cups juice; pour into jar with tight-fitting lid. Add sesame oil, honey, salt and pepper; seal jar and shake to blend. Store in fridge for up to 2 weeks.
- Page 27 1⁄2 teaspoon ground nutmeg 1⁄4 teaspoon ground cloves Assemble Russell Hobbs Slow Juicer. Juice pears and enough apples to yield 4 cups of pulp. Combine pulp, brown sugar, cinnamon, nutmeg and cloves in medium saucepan. Simmer over medium-low heat until thickened to desired consistency. Cool to room temperature.
- Page 28 Assemble Russell Hobbs Slow Juicer. Juice mango. Measure 1⁄2 cup juice. Whisk egg yolks, egg and sugar in top of double boiler until light and frothy. Whisk in mango juice, lime juice, and salt. Cook over simmering water 12 to 15 minutes or until mixture thickens enough to coat back of spoon (about 170°F), whisking occasionally.
-
Page 29: Cleaning And Maintenance
CLEANING AND MAINTENANCE This appliance is for household use only and is not user-serviceable. Do not open or change any parts by yourself. Please refer to a qualified electrical service department or return to the supplier if servicing is necessary. ... -
Page 30: Storing The Appliance
Wipe the motor base with a soft damp cloth and dry thoroughly. Do not use abrasive scouring pads or cleaners when cleaning the motor base as these may scratch the surface. Wipe any excess food particles from the power cord. STORING THE APPLIANCE ... -
Page 31: Changing The Plug
however, be chargeable. CHANGING THE PLUG Should the need arise to change the fitted plug, follow the instructions below. This unit is designed to operate on the stated current only. Connecting to other power sources may damage the appliance. Connect a three-pin plug as follows: The wires in this mains lead are coloured in accordance with the following code: Green/Yellow = Earth... - Page 32 IN THE EVENT OF A CLAIM UNDER WARRANTY THIS RECEIPT MUST BE PRODUCED. W A R R A N T Y Home Of Living Brands (Pty) Limited warrants to the original purchaser of this product (“the customer”) that this product will be free of defects in quality and workmanship which under normal personal, family or household use and purpose may manifest within a period of 1 (one) year from the date of purchase (“warranty period”).
Need help?
Do you have a question about the RHJM05 and is the answer not in the manual?
Questions and answers