Advertisement
Advertisement
Table of Contents

Related Manuals for Russell Hobbs 9919


Summary of Contents for Russell Hobbs 9919
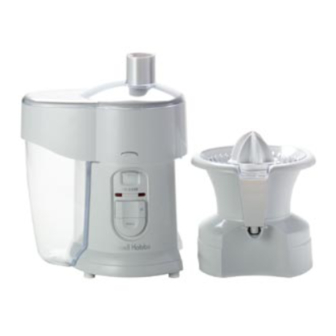
- Page 1 Classic White Juice Centre Model No. 9919 Instructions and Guarantee...
-
Page 2: Important Safeguards
Read these instructions before using your Classic White Juice Centre and keep them in a safe place for future reference. If you pass the gadget on to anyone else, you should also pass on the instructions. Remove all packaging before using the product, but keep the packaging until you are satisfied that the product is operating correctly. - Page 3 Juice Extractor Pages 4 to 6 Citrus Press Pages 4, and 7 to 9...
- Page 4 THE CONTROLS Accessory lock Pressing the accessory lock down (towards RELEASE) retracts the locking pins at the front and rear of the motor unit, to allow the juice extractor or citrus press to be fitted or removed. The motor will not function unless one of the accessories (juice extractor or citrus press) is attached to the motor unit.
- Page 5 Pusher Feed tray turned upside down for storage Feed tray Chute Juice extractor cover Locking pin slots Grating sieve Locking pins Drive Cord storage (at rear) Safety lock Juice container Pulp container Speed switch Power switch Motor unit Preparation Prepare the fruit or vegetables before bringing them to the juice extractor, and before plugging the motor unit into the power socket.
- Page 6 Remove and discard stalks, stems, leaves, fern, etc. Top and tail carrots, turnips, and the like, core apples, pears, etc. Peel oranges, lemons, and any other fruit you would normally peel. Seeds, pips and stones should be removed and discarded. Orange and lemon pips may be ignored, they will be ejected with the pulp.
- Page 7 THE CITRUS PRESS Assembly Reamers Strainer Drive shaft Spout Juice collector Grips Spout valve Locking pins Drive Cord storage Gear box housing (at rear) Safety lock Juice container Speed switch Power switch Motor unit 1. Switch off and unplug the drive unit, then disassemble the juice extractor. 2.
- Page 8 8. Place the strainer inside the juice collector. 9. Slide the small reamer on to the end of the drive shaft, and down on to the strainer. 10. If you intend to juice large fruit (grapefruit, shaddock, pomelo, ugli, etc.), you may wish to place the large reamer on top of it.
-
Page 9: Care And Cleaning
CARE AND CLEANING Switch off and unplug from the power socket before carrying out any cleaning operation. Disassemble the appliance. Wipe the motor unit and the citrus press gearbox housing with a damp cloth. Do not allow liquid to penetrate these, as this will damage them. Wash the other components in hand-hot, soapy water. -
Page 10: Connection To The Mains Supply
CONNECTION TO THE MAINS SUPPLY Check that the voltage marked on the product corresponds with your supply voltage. This product is fitted with a 13A plug complying with BS1363. If this plug is unsuitable or needs to be replaced, please note the following: This appliance is fitted with two-core flex and, as it is double insulated, does not require an earth. -
Page 11: After Sales Service
AFTER SALES SERVICE There are no user serviceable parts in this appliance. If the appliance is not operating correctly, please check that: 1. You have followed the instructions correctly. 2. The plug fuse has not blown. 3. The main supply fuse has not blown/circuit breaker has not tripped. If the appliance still does not work: In the first instance, consult your retailer for possible repair or replacement. - Page 12 GUARANTEE This product is guaranteed for a period of one year from the date of purchase or hire purchase against mechanical and electrical defects. It is particularly important that the purchaser should carefully read the instructions provided, in order to get maximum use from this product. This guarantee is only valid if the appliance is used solely for domestic purposes in accordance with the instructions and provided that it is not connected to an unsuitable electricity supply or dismantled or interfered with...
Need help?
Do you have a question about the 9919 and is the answer not in the manual?
Questions and answers