StreetStrider 3i Owner's Manual
Hide thumbs
Also See for 3i:
- Owner's manual (16 pages) ,
- Owner's manual (18 pages) ,
- Owner's manual (13 pages)
Table of Contents
Advertisement
Advertisement
Table of Contents

Related Manuals for StreetStrider 3i


Summary of Contents for StreetStrider 3i
- Page 1 3i and 7i Owner’s Manual © 2021 StreetStrider...
- Page 2 MOVES You! S H O W U S H O W Y O U S T R I D E As the StreetStrider community grows, we love to see real customers like yourself share their experience online! To join our online community, post a video or picture with your StreetStrider on your Instagram and Facebook pages.
- Page 3 StreetStrider has allowed them to truly enjoy their exercise routine and improve their overall health and quality of life. I now ride my StreetStrider to and Our mission is from work every day, and I hope your StreetStrider will soon become an integral part of your exercise routine.
-
Page 4: Table Of Contents
How To Get Started 1. About This Manual - 5 video and more! 2. Parts Identification of the StreetStrider 3i and 7i - 6 3. Assembling the 3i and 7i - 10 3.1 Unpacking and Prep - 10 3.2 Front Wheels - 11 3.3 Rear Wheel 3i - 12... -
Page 5: About This Manual
YOU SHOULD READ THIS MANUAL BEFORE YOU GO OUT ON YOUR FIRST RIDE. Riding a StreetStrider can be a hazardous activity even under the best of circumstances. It is highly recommended that your first stride on your new StreetStrider be taken in a controlled environment, away from cars, obstacles and other cyclists, and wearing your helmet. -
Page 6: Parts Identification Of The Streetstrider 3I And 7I
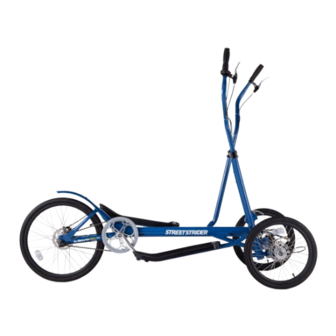
Parts Identification of the StreetStrider 3i and 7i Figure 2.1 StreetStrider 3i and 7i Parts. Refer to Table 2.1 for part numbers and descrip- tions. © 2021 StreetStrider... - Page 7 Figure 2.2 StreetStrider 3i and 7i Parts. Refer to Table 2.1 for part numbers and descriptions. Brake unlocked Brake locked Parking pin OUT Parking pin IN Outboard Rod end © 2021 StreetStrider...
- Page 8 M8 x P1.25 x L10 x W13 nylon lock nut Tighten Threaded linkage rod M8 x P1.25 x L20 rod, right and left thread ends Tighten M8 x P1.25 x L5 x W14, right and left jam nuts Tighten © 2021 StreetStrider...
- Page 9 M5 x P0.8 hole for rear luggage rack screw Shifter Cassette for 7 Sp Cassette pulley and lock ring on 7 sp hub Install-lock M=OD of threads, mm L=length W=wrench fit, mm Specification P=pitch, threads/mm H=OD of head T=washer thickness, mm © 2021 StreetStrider...
-
Page 10: Assembling The 3I And 7I
17 x 14, 15 x 13, 14 x 12, and 13 x 10 mm, seven hex wrenches 8, 6, 5, 4, 3, 2.5, 2, two tire levers, and a 19 mm front hub socket. The parts bag contains the front beam shaft assembly, a right crank arm screw, the 3i shifter push rod OR the 7i shifter cassette parts, three wheel reflectors, two front brake cable tips, zip ties, and two spare inner tubes, all shown in figure 3.1.2. -
Page 11: Front Wheels
Grease the the beam shaft, insert the bearings. 10 mm screw, and tighten with the 8 mm hex wrench. IMPORTANT: We recommend adding a liquid thread locker to the threads of the 10 mm screw. © 2021 StreetStrider... -
Page 12: Rear Wheel 3I
Insert the left and right cable and housing into the barrel adjuster on the left and right brakes, respectively. Rear Wheel 3i (see video) FIGURE 3.3.1 Remove the plastic FIGURE 3.3.2 Unscrew the acorn FIGURE 3.3.3 Slide axle into... -
Page 13: Rear Wheel 7I
Then follow the steps in Figures 3.3.1 to 3.3.3 to insert the 7i wheel into the rear dropouts. IMPORTANT: Inflate tires to 80-85 psi. © 2021 StreetStrider... -
Page 14: Poles And Skis
BB channel and is horizontal. end piece and lock onto the © 2021 StreetStrider... - Page 15 ¼ turn, push the crank arm back on, and close the QR lever. If needed, repeat until QR closes with some resistance. IMPORTANT: Make sure there is a little grease on the BB spindle so the crank arm slides on firmly. © 2021 StreetStrider...
- Page 16 A good starting pole height will position the user’s arm approximately 5’ to 7’. to have a 90° elbow bend, with forearm parallel to the ground when standing on the platforms and holding the grips of both poles in the vertical position. © 2021 StreetStrider...
- Page 17 3 mm rotate the poles to approximately hex wrench. Use 2 of the zip ties to orderly shoulder width of the user and also hold the cables to the poles. parallel from the side view. © 2021 StreetStrider...
-
Page 18: Brakes
FIGURE 3.5.2 Pull each of the brake cables down at the right and left brake calipers to make sure there is no exposed cable visible at the brake lever or at the cable doubler by inserting the cable housing ferrules into the barrel adjusters and doubler. © 2021 StreetStrider... - Page 19 To make sure both front brakes stop equally, stand in front of the StreetStrider, squeeze the left brake lever and pull the StreetStrider forward while slowly easing the brake pressure. If one wheel starts rotating before the other, which begins to turn the StreetStrider, adjust the brake pads and/or the barrel adjuster at the caliper until that wheel begins to rotate evenly with the other wheel.
-
Page 20: Rear Hub Shifter 3I
Rear Hub Shifter 3i (see video) FIGURE 3.6.1 Retrieve the 3i shifter push rod from the parts FIGURE 3.6.2 Set the twist grip shifter to gear 2. On the bell pack, apply a little grease to the rod, and insert it into the crank, make sure the interior thicker yellow line under the gear hole on the right end of the axle, black end first. -
Page 21: Front Wheel Alignment
(toe in) or point out (toe out). Alignment is important for performance so take the time to do it correctly. Inflate the tires to 80-85 psi, set the StreetStrider upright, not leaning, on a level surface. Making the crossbar parallel to a horizontal line behind the StreetStrider, such as a shelf or window, will ensure it is not leaning. - Page 22 Check to make sure that each wrenches. The left stop disc regulates the right lean angle steering linkage rod is free to rotate as the StreetStrider and the right stop disc regulates the left lean angle. When is leaned to each side.
-
Page 23: Stability Adjustment
Stability Adjustment (see video) FIGURE 3.8.1 To adjust the stability of your StreetStrider, you can tighten or loosen the kingpin bolts on the Front Beam Assembly on both the left and the right steering knuckles. Using the 8 mm hex wrench for the kingpin bolt... -
Page 24: Folding
FIGURE 3.9.1 Stabilize the StreetStrider by engaging the right parking brake pin to lock the rear brake. From the left side of the StreetStrider, rotate the left crank arm to the 6 o’clock position, lift the quick release lever, rotate the lever 180° and lower it to the left side of the crank arm. - Page 25 © 2021 StreetStrider...
-
Page 26: Seven Simple Steps To Learn To Stride
Children under 18 years old must wear helmets in some states. At night, make sure to wear light colored and/or reflective clothing and equip your StreetStrider with front and rear lights. Before starting any exercise program, check with your doctor to make sure you are physically healthy enough. - Page 27 You can pedal while turning. Practice right and left turns, shifting gears, and braking to a stop while standing on the StreetStrider. STEP 7 Have fun! Now get out there and enjoy your StreetStrider! You’ll have a blast and burn calories too! © 2021 StreetStrider...
-
Page 28: Safety Equipment
Lights. If you ride your StreetStrider after dusk, it must be equipped with lights so that you can see the road and avoid road hazards, and so that others can see you. Vehicle laws treat StreetStriders like any other vehicles, meaning you must have operational white front and red rear lights if you are riding after dusk. - Page 29 Night Striding. Even if you have excellent night vision, many other people with whom you are sharing the road may not. A StreetStrider, like any object, is more difficult for motorists and pedestrians to see at dusk, night, or any other time of poor visibility.
-
Page 30: Mechanical Safety & Maintenance
Nuts and Bolts. Lift the rear wheel off the ground by 2-3 inches, then let it bounce on the ground. If anything sounds, feels or looks loose, do a quick visual and tactile inspection of the whole StreetStrider. If any loose parts or accessories are found, secure them. - Page 31 © 2021 StreetStrider...
-
Page 32: Limited Warranty
Limited Warranty The specific warranty covering your StreetStrider is governed by the law of the state or country in which it was purchased, and applies only to mobile elliptical devices purchased from StreetStrider.com. Frames (Frame, Strider Skis, Strider Poles). StreetStrider frames are warrantied by StreetStrider (The Company) against manufacturing defects in materials and/or workmanship for a period of three (3) years from the date of original purchase. - Page 33 StreetStrider.com, or use of parts inconsistent with the use originally intended for the StreetStrider as sold are not covered by this warranty. In no event shall the Company be liable for incidental or consequential damages that might arise as a result of improper use and/or failure of the StreetStrider.
-
Page 34: Return Policy
Care must be taken to prevent damage during return shipping. DAMAGE DURING RETURN SHIPPING WILL RESULT IN AN ADDITIONAL REPAIR FEE. To avoid an additional repair fee and to make sure the StreetStrider is returned properly, we encourage you to repack it exactly as it was packed when it arrived. - Page 35 Policy. Damage Upon Delivery If your StreetStrider product is delivered to you in a damaged condition as a result of faulty shipping, you should call StreetStrider at 1-800-348-0998 or email support@streetstrider.com for return instructions. You should also notify the shipper. Photographs documenting the damage are required.
- Page 36 @streetstrider StreetStrider.com support@streetstrider.com © 2021 StreetStrider...
Need help?
Do you have a question about the 3i and is the answer not in the manual?
Questions and answers