Table of Contents
Advertisement
Advertisement
Table of Contents

Related Manuals for JBL LSR305


Summary of Contents for JBL LSR305
-
Page 1: Owners Manual
Owners Manual LSR305 LSR308 5" Powered 8" Powered Studio Monitor Studio Monitor... -
Page 2: Important Safety Instructions
Section 1: Important Safety Instructions Read these instructions. Explanation of Graphic Symbols Keep these instructions. The exclaimation point within an equilateral triangle is intended to alert the users to the Heed all warnings. presence of important operating and mainte- nance (servicing) instructions in the literature Follow all instructions. -
Page 3: Table Of Contents
Unpacking ......................6 Placement ......................6 Audio Connections ....................7 Power Connections ....................7 Making Sound ......................7 LSR305 and LSR308 Powered Studio Monitors Front and Rear Views .................... 8 Input Panel ......................9 Audio Connections ....................9 Systems Connections ....................10 Appendix –... -
Page 4: Introduction
3 Series speakers will deliver years of reliable performance. To get the most out of your JBL 3 Series Studio Monitors, please review this owner’s manual and keep it on hand for future reference. Also, please register your new speakers at www.jblpro.com/registration. -
Page 5: Setting Up Your System
• Angle the speakers so the high-frequency transducer in each speaker is aimed directly towards the ear of the listener. • Ideally, the LSR308 and LSR305 speakers should be placed on suitable speaker stands, rather than on the work surface. This will reduce resonance and deterioration of low frequency performance that occurs through the speaker’s mechanical coupling with the work surface. -
Page 6: Audio Connections
Place the speakers so the distance "D" between the speakers is the same as the distance to the listening position. Audio Connections The 3 Series Speakers are equipped with balanced XLR and 6 mm (¼") TRS inputs for connection to professional computer audio interfaces, mixing consoles and audio production equipment as well as unbalanced consumer audio products including personal music players, consumer audio receivers and audio visual equipment. -
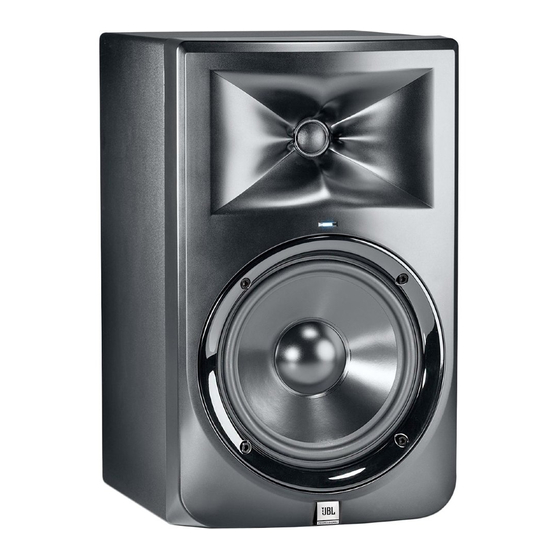
Page 7: Lsr305 And Lsr308 Powered Studio Monitors
Section 4: LSR305 and LSR308 Powered Studio Monitors Front View Back View Features 1. HIGH FREQUENCY TRANSDUCER (Tweeter) – Reproduces high frequency signals. 2. WAVEGUIDE – The specially designed Image Control Waveguide enhances imaging and optimizes the blend of direct and reflected sound in the room, ensuring neutral sound at the mix position. -
Page 8: Input Panel
Input Panel 10. XLR INPUT – Connect professional equipment using an XLR connector. 11. 6 mm (¼") INPUT - Connect equipment using a 6 mm (¼") balanced or unbalanced connector. 12. INPUT SENSITIVITY SWITCH – Set this switch to +4 dBu to protect from overload when connecting to professional equipment and sources with very high output. -
Page 9: Systems Connections
Section 5: System Connections LEFT CHANNEL RIGHT CHANNEL SPEAKER SPEAKER Disc Player Computer Audio Interface MP3 Player Mixer Electronic Musical Instrument Computer Audio System 3 Series Studio Monitors can be connected to a wide range of audio sources such as those shown above. Stereo reproduction these audio sources is accomplished by connecting the left output of the source to one INPUT of the LEFT 3 Series Studio Monitor. -
Page 10: Appendix - Trouble Shooting
• Make sure the VOLUME CONTROL is not set to the full counter-clockwise position. • Confirm the power cable is connected and the POWER SWITCH is set to the ON position. If the above measures do not correct the problem, please contact JBL Professional Customer Service... -
Page 11: Appendix - Specifications
Section 7: Appendix Specifications LSR305 LSR308 Frequency Range: 43 Hz – 24 kHz 37 Hz - 24 kHz Crossover: 1675 Hz 4th order acoustic 1800 Hz 4th order acoustic Linkwitz-Riley Linkwitz-Riley Maximum Peak SPL: 108 dB SPL C-Weighted 112 dB SPL C-Weighted... -
Page 12: Jbl Service Contact Information
Department), 8500 Balboa Boulevard, PO. Box 2200, Northridge, California 91329 (818/893-8411). We may direct you to an authorized JBL Service Agency or ask you to send your unit to the factory for repair. Either way, you’ll need to present the original bill of sale to establish the date of purchase. Please do not ship your JBL product to the factory without prior authorization.
Need help?
Do you have a question about the LSR305 and is the answer not in the manual?
Questions and answers