Table of Contents
Advertisement
Advertisement
Table of Contents

Related Manuals for Toastmaster RH36C1W

Summary of Contents for Toastmaster RH36C1W
- Page 1 Wendy's USA RH36C1W + RH36C7W - English Toastmaster ® Wendy's Chili Range MODELS RH36C1W & RH36C7W OWNER'S OPERATING & INSTALLATION MANUAL Toastmaster A Middleby Company Part No. 35720 1400 Toastmaster Drive • Elgin, IL 60120 U.S.A. • 847/741-3300 • Fax 847/741-4406 Price: $30.00 R: 11/97...
- Page 2 Using any parts other than genuine Toastmaster factory-supplied parts relieves the manufacturer of all liability. NOTICE Toastmaster (Manufacturer) reserves the right to change specifications and product design without notice. Such revisions do not entitle the buyer to corresponding changes, improvements, additions or replacements for previously purchased equipment.
- Page 3 PURCHASE, WHICHEVER IS EARLIER; PROVIDED THAT TERMS OF PAYMENT HAVE BEEN FULLY MET. As part of Toastmaster's "no quibble" warranty, all in-warranty Toastmaster products that require service, are to be serviced on site. The warranty period for Accu-Miser griddles shall be 24 months from the date of installation or 30 months from the date of purchase, whichever is earlier.
-
Page 4: Table Of Contents
Figure 4-2. Convection Oven Drawing .............……........18 Convection Oven Overall Parts List................... 19 SECTION 5 - SCHEMATICS RH36C1W Wiring Diagram ("Schematic") 208/240V (USA) .............. 22 RH36C1W Schematic ("Ladder Diagram") 208/240V (USA)............. 23 RH36C1W Wiring Diagram 480V (USA).................... RH36C1W Schematic 480V (USA).................... -
Page 5: Range Top
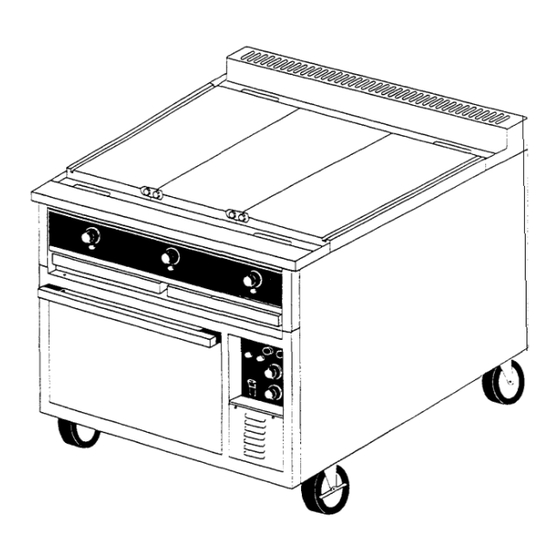
A "Wendy's Chili Range" is a special Toastmaster Oven Range that is rated 'heavy-duty for commer- cial use.' This Oven Range consists of a Range Top (RH36) fastened to an Oven Base (C036), as shown in Figure 1-1. A terminal block allows electric power... -
Page 6: Section 1 - Description
Oven Range series. Wendy's selected models RH36C1W and RH36C7W as their preferred Oven Ranges. On Casters 36" (91.5 cm) The RH36C1W Oven Range (shown in Figure 1-1) has Width three 12" x 24" Hot Plates covering its Range Top cooking Depth 38-3/4" (98.4 cm) surface. -
Page 7: Dimension Drawing
REQUIRED CLEARANCES 3" minimum clearance from Oven Range side panel to wall. 6" minimum spacing between appliances (except Toastmaster Oven Ranges). 0" minimum clearance from Oven Range rear panel to wall, when using knockout plate on bottom panel of oven. -
Page 8: Section 2 - Installation A. Inspect For Shipping Damage
A. INSPECT FOR SHIPPING DAMAGE B. MOVING THE OVEN RANGE TO ITS OPERATING SITE Each Toastmaster product is carefully inspected and packaged at the factory. The freight carrier After unloading the Oven Range shipping container from assumes responsibility for safe transport and the freight carrier's vehicle, simply remove the metal delivery. - Page 9 SECTION 2 - INSTALLATION Connect Electric Supply Ground Wire into Grounding Lug Terminal (located at right of Terminal Block) Figure 2-1. Installation of Range Top and Oven Base Modules Load-Side – Load-Side – Consult the Diagrams of Section 5 (or the Range Top &...
-
Page 10: Connecting Electric Power (One 3-0 And One 1-0 Power Source)
SECTION 2 - INSTALLATION Ø D. CONNECTING ELECTRIC POWER (ONE 3- CONNECTING ELECTRIC POWER (ONE 3- Ø Ø AND ONE 1- POWER SOURCE) POWER SOURCE) CAUTION CAUTION MAKE SURE that the electric supply wiring MAKE SURE that the electric supply wiring connections satisfy the requirements of the connections satisfy the requirements of the governing electrical code for the locality. -
Page 11: Cleaning The Griddle And Hot Plate(S)
SECTION 2 - INSTALLATION G TESTING AN OVEN RANGE FOLLOWING F. CLEANING THE GRIDDLE AND HOT PLATE(S) INSTALLATION 1. Remove the rust preventive material from the surface 1. Switch OFF all Range and Oven controls. of the Griddle and/or Hot Plate(s), using a nonflammable grease solvent. -
Page 12: Component Function And Location
D. RANGE TOP Module - Location of Hot I. COMPONENT FUNCTION AND LOCATION Plate(s) and/or Griddle cooking surfaces, (Figure 3-1) along with the operating controls. A. OVEN BASE Module - Convection Oven, E. Range Control Panel - All Griddle and/or Hot including heating element, blower fan, and Plate(s) operating controls. -
Page 13: Control Functions And Locations
SECTION 3 - OPERATION II. CONTROL FUNCTIONS AND LOCATIONS (Low-Medium-High) switch to control oven heating. The following temperature value is approximate for A. Convection Oven Control Panel (Figure 3-2) each setting: Low- 325°F(163°C); Medium- 375°F (19-TC); 1. ON Indicator - Indicator glows, when the OVEN High- 425°F(218°C). -
Page 14: Range Top Control Panel
12" x 24" Hot Plate. NOTE: Temperature range is 250°F to 850°F (121°Cto454°C). Figure 3-3. Range Top Controls - RH36C1W Oven Range Figure 3-4. Range Top Controls - RH36C7W Oven Range... -
Page 15: Oven Operations
SECTION 3 - OPERATION B. End of Shift Operation - Convection Oven III. OVEN OPERATIONS (Continued) 5. Detach the baffle surrounding the blower fan by A. Convection Oven Operation unscrewing three screws on the forward edge of the baffle. Pull the baffle forward to free it. 1. -
Page 16: Range Top Operations
SECTION 3 – OPERATION IV. RANGE TOP OPERATIONS Griddle Temperature Control(s) to 200°F (93°C) during idle periods. (Only a few minutes is required to CAUTION regain the desired operating tem perature when food Do NOT cook on a Griddle before orders become more frequent.) 'seasoning' it. -
Page 17: 12" X 24" Hot Plate Operation
SECTION 3 - OPERATION IV. RANGE TOP OPERATIONS (Continued) F. 12" x 24" Hot Plate Cleaning At least once per shift (or day): D. End of Shift Operation - Griddle (Continued) WARNING 3. Thoroughly clean the grease troughs, grease chutes, NEVER touch a operating Hot Plate. -
Page 18: Section 4- Parts List
SECTION 4- PARTS LIST... - Page 19 F706A8811 Spacer 31793 Decal, Range Top Control Panel, F706A8805 Lockwasher, Extnl Star, 1/4" id. x 5/8"od. Models RH36C1W, RH36C7W F706A8807 Nut, Hex, Brass, 1/4 - 20 7603538 24 x 24 Griddle Assembly, Complete, 208V 7603539 24 x 24 Griddle Assembly, Complete, 240V...
-
Page 20: Oven Range Overall Parts List
SECTION 4- PARTS LIST Convection Oven Overall Drawing Figure 4-2... -
Page 21: Convection Oven Overall Parts List
SECTION 4- PARTS LIST Convection Oven Overall Parts List Item Part No. Description 3002452 Heating Element, 208V, 7500W 3002453 Heating Element, 240V, 7500W 3002455 Healing Element, 480V, 7500W 3027A3083 Support, Healing Element 30919 Blower Motor Assembly, 208V - 240V 3002761 Blower Motor, 208V - 240V 3103902 Wheel, Blower Fan... - Page 22 RH36C1W Wiring Diagram ("Schematic") 208/240V (USA) [33375F, Sheet 1 of 2]…….. 22 RH36C1W Schematic ("Ladder Diagram") 208/240V (USA) [33375F, Sheet 2 of 2]…….. 23 RH36C1W Wiring Diagram ("Schematic") 480V (USA) [36093E, Sheet 1 of 2] ....24 RH36C1W Schematic ("Ladder Diagram") 480V (USA) [36093E, Sheet 2 of 2] ..... 25 RH36C7W Wiring Diagram ("Schematic") 208/240V (USA) [33376F, Sheet 1 of 2]……...
- Page 23 SECTION 5- SCHEMATICS...
- Page 24 SECTION 5- SCHEMATICS...
-
Page 25: Rh36C1W Wiring Diagram ("Schematic") 208/240V (Usa)
SECTION 5- SCHEMATICS... -
Page 26: Rh36C1W Schematic ("Ladder Diagram") 208/240V (Usa)
SECTION 5- SCHEMATICS... -
Page 27: Rh36C1W Wiring Diagram 480V (Usa)
SECTION 5- SCHEMATICS... -
Page 28: Rh36C1W Schematic 480V (Usa)
SECTION 5- SCHEMATICS... -
Page 29: Rh36C7W Wiring Diagram 208/240V (Usa)
SECTION 5- SCHEMATICS... -
Page 30: Section 5- Schematics
SECTION 5- SCHEMATICS...
Need help?
Do you have a question about the RH36C1W and is the answer not in the manual?
Questions and answers