Nextar q4 series Instruction Manual
Hide thumbs
Also See for q4 series:
- Hardware instruction manual (80 pages) ,
- Software manual (54 pages) ,
- Owner's manual (24 pages)
Table of Contents
Advertisement
Available languages
Available languages
Quick Links
Download this manual
See also:
Owner's Manual
Advertisement
Chapters
Table of Contents

Related Manuals for Nextar q4 series


Summary of Contents for Nextar q4 series
- Page 2 Thank you for choosing our product as your in-car navigator. Read the Quick Start Guide first and start using your device right away. This document is the detailed description of the navigation software. You can easily discover your device while you are using it;...
-
Page 3: Table Of Contents
Table of contents 1 Warnings and Safety information............5 2 Getting started ..................6 2.1 Startup screen: the Navigation menu........10 2.2 Buttons and other controls on the screen .........12 2.2.1 Using keyboards..............14 2.2.2 Beyond single screen tap ..........15 2.3 Map screen................18 2.3.1 Navigating on the map.............18 2.3.2 Position markers..............21 2.3.2.1 Vehimarker and Lock-on-Road.......21 2.3.2.2 Selected location (Cursor) in Find on Map....21... - Page 4 3.1.1.6 Tips on entering addresses quickly ......56 3.1.2 Selecting the destination from the Places of Interest ..57 3.1.2.1 Selecting the destination from the Places of Interest with Quick search ..............57 3.1.2.2 Selecting the destination from other Places of Interest by name ................61 3.1.2.3 Selecting the destination from other Places of Interest by category................66 3.1.2.4 Selecting nearby assistance from 'Where Am I?'..71...
- Page 5 4.1.5 Road Safety Cameras ...........102 4.1.5.1 Camera types............102 4.1.5.2 Camera directions ..........104 4.1.6 Speed limit warning ............105 4.1.7 Battery and GPS position quality indicators ....105 4.2 'More' menu................107 4.3 Settings menu.................109 4.3.1 Route settings ...............110 4.3.2 Sound settings...............113 4.3.3 3D vehicle gallery ............115 4.3.4 Color themes ..............116 4.3.5 Set starting position ............117 4.3.6 Regional settings............117...
-
Page 6: Warnings And Safety Information
1 Warnings and Safety information This software is a navigation system that helps you find your way to your destination with the built-in GPS receiver. The software does not transmit your GPS position; others cannot track you. It is important that you look at the display only when it is safe to do so. -
Page 7: Getting Started
2 Getting started The software is optimized for in-car or pedestrian use. There is no need to use a stylus. You can use it easily by tapping the screen buttons and the map with your fingertips. When using the navigation software for the first time, an initial setup process starts automatically. - Page 8 If needed, modify the time format, time zone and unit settings. Later you can change them in Regional settings (page 117). If needed, modify the default route planning options. Later you can change them in Route settings (page 110). The initial setup is now complete. Tap to proceed.
- Page 9 away, you can tap to skip the tutorial as you can run it later from the 'More' menu (page 107). After the initial setup, the Navigation menu appears and you can start using the software. This is the screen you see every time navigation starts.
- Page 10 • Select a location on the map with the Find on Map feature (page 74). • Use a previously saved Favorite destination (page 75). Select a location from the History of previously used destinations (page 77).
-
Page 11: Startup Screen: The Navigation Menu
Demo & Tutorial, run some additional applications, or to get extra content from www.nextar.com/extras. • to start navigating on the map. The button itself is a miniature live map that shows your... - Page 12 current position, the recommended route and the surrounding map area. Tap the button to enlarge the map to the full screen. • to stop navigation and exit the software.
-
Page 13: Buttons And Other Controls On The Screen
2.2 Buttons and other controls on the screen When you are using the software, you usually tap buttons on the touch screen. You only need to confirm selections or changes if the application needs to restart, it needs to perform a major reconfiguration, or you are about to lose some of your data or settings. - Page 14 List When you need to Move between select from several pages with the options, they appear in a list. buttons and tap the value that you want. Alternatively, grab the list anywhere and slide your finger up or down. Depending on the speed of the sliding, the list will scroll...
-
Page 15: Using Keyboards
Switch When there are Tap it to turn only two choices, a the switch on or checkmark shows off. whether the feature is enabled. Virtual Alphabetic and Each key is a keyboa alphanumeric touch screen keyboards to enter button. text and numbers. 2.2.1 Using keyboards You only need to enter letters or numbers when you cannot avoid it. -
Page 16: Beyond Single Screen Tap
Entering a space, for Tap the empty button at the bottom example between a first center of the screen. name and a family name or in multi-word street names Entering numbers and symbols to switch to a keyboard offering numeric and symbol characters. - Page 17 Tasks Instructions Tapping and Tap and keep pressing the following buttons to holding the reach extra functions: screen • Tap and hold on list and menu screens: the Map screen appears. • Tap and hold any of the , and buttons on the Map screen: you can rotate, tilt or scale the map continuously.
- Page 18 Depending on the speed of the sliding, the list will scroll fast or slow, only a bit or till the end. • Moving the map in map browsing mode: grab the map, and move it in the desired direction. • Shortcut to open the Map screen: slide your finger from the bottom right corner to the bottom left corner on any...
-
Page 19: Map Screen
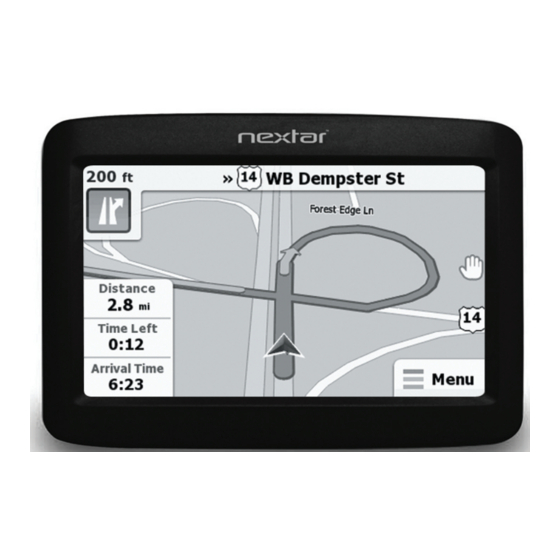
2.3 Map screen 2.3.1 Navigating on the map The Map screen is the most frequently used screen of the software. A small live map is displayed on the startup screen, the Navigation menu, as a part of the button. To enlarge this small map and open the Map screen, tap The map is displayed in black and white when there is no GPS position: ... - Page 20 This map shows the current position (the Vehimarker, a blue arrow by default), the recommended route (an orange line), and the surrounding map area. There are screen buttons and data fields on the screen to help you navigate. During navigation, the screen shows route information.
- Page 21 (The current time is always displayed in the top left corner of the high level menu screens.) Data fields when navigating a route: Field Description Shows the distance you need to travel on the route before reaching your final destination. Shows the time needed to reach the final destination of the route based on information available for the remaining segments of the route.
-
Page 22: Position Markers
2.3.2 Position markers 2.3.2.1 Vehimarker and Lock-on-Road When your GPS position is available, the software marks your current position with the Vehimarker. By default, this marker is a blue arrow, but you can change this icon in Settings. The exact location of the Vehimarker depends on the vehicle type used for route calculation. -
Page 23: Objects On The Map
2.3.3 Objects on the map 2.3.3.1 Streets and roads The software shows the streets in a way that is similar to how the paper road maps show them. Their width and colors correspond to their importance: you can easily tell a freeway from a small street. -
Page 24: Icon Description
Most of these icons are very intuitive. The following table lists some of the frequently shown route events. The same symbols are used in both fields: Icon Description Turn left. Turn right. Turn back. Bear right. Turn sharp left. Keep left. Continue straight in the intersection. -
Page 25: Lane Information And Signposts
Board ferry. Leave ferry. Approaching the destination. 2.3.3.3 Lane information and Signposts When navigating on multilane roads, it is important to take the appropriate lane in order to follow the recommended route. If lane information is available in the map data, the software displays the lanes and their directions using small arrows at the bottom of the map. -
Page 26: Object Types
Block representation of full 3D city building data buildings containing actual building size and position on the map. Building data is not part of the original software, and it is limited to the city centers of major cities in the US and Europe. Check www.nextar.com/extras for details. -
Page 27: Elements Of The Active Route
2.3.3.5 Elements of the active route your software shows the route in the following way: Symbol Name Description Current GPS Your current position displayed on position and the map. Start point • In pedestrian mode it is the exact GPS position. •... -
Page 28: Manipulating The Map
Route color The route always stands out with its color on the map, both in daytime and in night color mode. Streets and You can choose whether you want roads that are to use or avoid certain road types excluded from (page 110). - Page 29 Zooming in Changes how much of the map and out is displayed on the screen. your software uses high-quality vector maps that let you examine the map at various zoom levels, always with optimized content. It always displays street names and other text with the same font size, never upside-down, and you only see the streets and objects...
-
Page 30: Quick Menu
Compass in The direction of the compass 2D map view shows North. Tap the button to mode switch to North-up view, then tap again to rotate the map in the previous direction. Compass in The direction of the compass 3D map view shows North. -
Page 31: Button Function
Now tap any of the values and your selection takes immediate effect. The Map screen returns automatically. Buttons in the middle row: These buttons open new screens. Work on those screens, and when you get back here, tap to return to the Map screen or tap and hold on any screen to return to the Map screen directly. - Page 32 The map can be displayed in a perspective view (3D) or in a top-down view (2D), and in 3D mode buildings can be displayed on the map. Selectable values: : The map is displayed in 3D (perspective) view. If 3D building data is downloaded and activated in the software, buildings are visible on the map.
- Page 33 : The zoom level is lower than the normal. Map elemens become smaller, but more of the surrounding area is shown. Switches between the daytime and night color themes. Selectable values: : The map and the menu screens are displayed in daytime colors. : The map and the menu screens are displayed in night colors.
-
Page 34: Checking The Details Of The Current Position (Where Am I?)
2.3.6 Checking the details of the current position (Where Am I?) Opened from the Quick menu, this screen contains information about the current position (or about the last known position if GPS reception is not available) and a button to search for useful Places nearby. - Page 35 Besides these pieces of information, you can search for assistance near your current position. Tap to open a new screen for the Quick search: The following services can be searched around the current position or the last known position: • : Car repair and roadside assistance services •...
-
Page 36: Navigating
3 Navigating You can set up your route in different ways: • If you need a route for immediate navigation, you can select the destination and start navigating to it right away (normal navigation). • You can also plan a route independently of your current GPS position or even without GPS reception (to achieve this, you need to turn off the GPS receiver and set a new starting point in the Settings menu - see... -
Page 37: Entering An Address Or Part Of An Address
• Select a location from the History of previously used destinations (page 77). 3.1.1 Entering an address or part of an address If you know at least a part of the address, it is the quickest way to select the destination of the route. Using the same screen, you can find an address by entering: •... - Page 38 country name on the keyboard, and select a different one from the list. If you select a new country, you also need to select the state, or select the name of the country where it stands without a state to search for an address in all its states.
- Page 39 • The most likely city/town name is always shown in the input field. To accept it, tap • If the desired name does not show up, the names that match the string appear in a list after entering a couple of characters (to open the list of results before it appears automatically, ).
- Page 40 • If the desired name does not show up, the names that match the string appear in a list after entering a couple of characters (to open the list of results before it appears automatically, ). Select the street from the list. Enter the house number: Enter the house number on the keyboard.
- Page 41 (optional) There are long roads where house numbering is restarted at some point. This way the same house number can appear twice or even more times on the same road. If this is the case, a list appears after entering the house number. You need to select the appropriate address by the district/suburb information.
-
Page 42: Entering The Midpoint Of A Street As The Destination
and then , and save the location. The map with the destination returns automatically. Now you can start your journey. 3.1.1.2 Entering the midpoint of a street as the destination You can navigate to the midpoint of a street if the house number is not available: If you are on the Map screen, tap return to the Navigation menu. - Page 43 If you need to change the state, tap the button with the name of the state, enter the first few letters of the state name, and and select a different state from the list. If needed, select a new city/town: Tap the button with the name of the city/town, or if you have changed the country/state, tap Start entering the name of the city/town on the...
- Page 44 Enter the street name: Start entering the street name on the keyboard. Find the street you need: • The most likely street name is always shown in the input field. To accept it, • If the desired name does not show up, the names that match the string appear in a list after entering a couple of characters (to open the list of...
- Page 45 Instead of entering the house number, tap . The midpoint of the street is selected as the destination. After a short summary of the route parameters, the map appears with the selected destination in the middle. The route is automatically calculated. Tap to modify route parameters, or tap and start your...
-
Page 46: Selecting An Intersection As The Destination
3.1.1.3 Selecting an intersection as the destination To enter an address as the destination, do as follows: If you are on the Map screen, tap return to the Navigation menu. In the Navigation menu, tap the following buttons: By default, the software proposes the country, state and city where you are. - Page 47 If needed, select a new city/town: Tap the button with the name of the city/town, or if you have changed the country/state, tap Start entering the name of the city/town on the keyboard. Find the city/town you need: • The most likely city/town name is always shown in the input field.
- Page 48 Enter the street name: Start entering the street name on the keyboard. Find the street you need: • The most likely street name is always shown in the input field. To accept it, • If the desired name does not show up, the names that match the string appear in a list after entering a couple of characters (to open the list of...
- Page 49 • If only a few intersecting streets exist, their list appears immediately. • In case of a longer street, a keyboard screen appears. Start entering the name of the intersecting street on the keyboard. As soon as the street names that match the entered string can be shown on one screen, their list appears automatically.
-
Page 50: Selecting A City/Town Center As The Destination
3.1.1.4 Selecting a city/town center as the destination The city/town center is not the geometric center of the city but an arbitrary point the map creators have chosen. In towns and villages, it is usually the most important intersection; in larger cities, it is one of the important intersections. - Page 51 If needed, select a new city/town: Tap the button with the name of the city/town, or if you have changed the country/state, tap Start entering the name of the city/town on the keyboard. Find the city/town you need: • The most likely city/town name is always shown in the input field.
- Page 52 Instead of entering the street name, tap This way the center of the displayed city/town becomes the destination of the route. After a short summary of the route parameters, the map appears with the selected destination in the middle. The route is automatically calculated. Tap to modify route parameters, or tap and start your...
-
Page 53: Entering An Address With A Zip Code
3.1.1.5 Entering an address with a ZIP code All of the above address searching possibilities can be performed with entering the ZIP code instead of the city name. Find below an example with a full address: If you are on the Map screen, tap return to the Navigation menu. - Page 54 Enter a new city/town using its ZIP code: Tap the button with the name of the city/town, or if you have changed the country/state, tap to open the numeric keypad. Start entering the ZIP code. Find the city/town you need: •...
- Page 55 Enter the street name: Start entering the street name on the keyboard. Find the street you need: • The most likely street name is always shown in the input field. To accept it, • If the desired name does not show up, the names that match the string appear in a list after entering a couple of characters (to open the list of...
- Page 56 Enter the house number: Enter the house number on the keyboard. (To enter letters, tap to finish entering the address. (If the entered house number cannot be found, the midpoint of the street is selected as the destination.) After a short summary of the route parameters, the map appears with the selected destination in the middle.
-
Page 57: Tips On Entering Addresses Quickly
3.1.1.6 Tips on entering addresses quickly • When you are entering the name of a city/town or a street: • Only those letters are offered on the keyboard that appear in possible search results. All other characters are grayed out. •... -
Page 58: Selecting The Destination From The Places Of Interest
• You can search for both the type and the name of a road. If the same word appears in several names, for example in the name of streets, roads and avenues, you can obtain the result faster if you enter the first letter of the street type: For example, enter 'PI A' to obtain Pine Avenue and skip all Pine Streets and Pickwick Roads. - Page 59 If you are on the Map screen, tap return to the Navigation menu. In the Navigation menu, tap the following buttons: The Quick search categories appear: • • If an active route exists, gas stations are searched along the route. •...
- Page 60 • If there is no active route (destination is not selected), they are searched around the current position. • If the current position is not available either (no GPS signal), they are searched around the last known position. • • If an active route exists, parking lots are searched around the destination of the route.
- Page 61 • If the current position is not available either (no GPS signal), they are searched around the last known position. Tap any of the quick search buttons to get an instant list of Places. The Places in the list are ordered by their distance from the current position, from the destination or by the length of the necessary detour.
-
Page 62: Selecting The Destination From Other Places Of Interest By Name
(optional) If the selected Place is a Rich POI, you can to display additional information. Then tap to return to the basic details. to select the displayed Place of Interest as the destination of the route. After a short summary of the route parameters, the map appears with the selected destination in the middle. - Page 63 If you are on the Map screen, tap return to the Navigation menu. In the Navigation menu, tap the following buttons: The Quick search categories appear. Tap Select the area where the Place should be searched for: • to search around the current position or if it is not available, around the last know position.
- Page 64 searching for upcoming gas stations or restaurants. (The result list will be ordered by the length of the necessary detour.) (optional) If you have selected , select the city/town, then tap Using the keyboard, start entering the name of the Place.
- Page 65 After entering a few letters, tap to open the list of Places with names similar to the entered characters. The Places in the list are ordered by their distance from the current position, from the destination, from the center of the selected city/town or by the length of the necessary detour.
- Page 66 (optional) If the selected Place is a Rich POI, you can to display additional information. Then tap to return to the basic details. to select the displayed Place of Interest as the destination of the route. After a short summary of the route parameters, the map appears with the selected destination in the middle.
-
Page 67: Selecting The Destination From Other Places Of Interest By Category
3.1.2.3 Selecting the destination from other Places of Interest by category You can search for Places of Interest by their categories and subcategories. If you are on the Map screen, tap return to the Navigation menu. In the Navigation menu, tap the following buttons: The Quick search categories appear. - Page 68 will be ordered by the distance from the center of the selected city/town.) • to search for a place around the destination of the active route. (The result list will be ordered by the distance from the destination.) • to search along the active route, and not around a given point.
- Page 69 Select one of the main Place categories (e.g. Accommodation) or tap to list all Places around the selected location or along the route. Select one of the main Place subcategories (e.g. Hotel or Motel) or tap to list all Places in the selected main category around the selected location or along the route.
- Page 70 The Places in the list are ordered by their distance from the current position, from the destination, from the center of the selected city/town or by the length of the necessary detour. The Places in the list are ordered by their distance from the current position, from the destination, from the center of the selected city/town or by the length of the necessary detour.
- Page 71 (optional) If the selected Place is a rich POI, you can to display additional information. Then tap to return to the basic details. to select the displayed Place of Interest as the destination of the route. After a short summary of the route parameters, the map appears with the selected destination in the middle.
-
Page 72: Selecting Nearby Assistance From 'Where Am I
3.1.2.4 Selecting nearby assistance from 'Where Am You can quickly search for nearby assistance from the 'Where Am I?' screen. On the Map screen, tap the map anywhere to open the Quick menu. , and then The Quick search categories appear, all for searching around the current position (or around the last known position if the current position is not available): •... - Page 73 • : Police stations • : Cash dispensers Tap any of the quick search buttons to get an instant list of that type of Places. The Places in the list are ordered by their distance from the current position, from the destination or by the size of the needed detour.
- Page 74 (optional) If the selected Place is a 'rich POI', you can to display additional information. Then tap to return to the basic details. to select the displayed Place of Interest as the destination of the route. After a short summary of the route parameters, the map appears with the selected destination in the middle.
-
Page 75: Selecting A Map Location As The Destination
3.1.3 Selecting a map location as the destination If you are on the Map screen, tap return to the Navigation menu. In the Navigation menu, tap the following buttons: Locate your destination on the map: move and scale the map as needed. Tap the location that you want to select as your destination. -
Page 76: Selecting The Destination From Your Favorites
3.1.4 Selecting the destination from your Favorites You can select a location that you have already saved as a Favorite to be your destination. Adding a location to the list of Favorite destinations is described on page 95. Access the list of Favorites: •... -
Page 77: Selecting The Most Likely Destination (Smart History)
Select the Favorite that you want to set as your destination. If necessary, move between pages with to see more of the list. After a short summary of the route parameters, the map appears with the selected destination in the middle. -
Page 78: Selecting The Destination From The History
In the Navigation menu, tap Tap the destination in the History field. After a short summary of the route parameters, the map appears with the selected destination in the middle. The route is automatically calculated. Tap to modify route parameters, or tap and start your journey. - Page 79 In the Navigation menu, tap The list of recent destinations appear. Smart History promotes three destinations to the first page based on your previous routes (most likely destinations). The rest of the destinations are ordered by time they were last selected.
-
Page 81: Viewing The Entire Route On The Map
3.2 Viewing the entire route on the map It is easy to get a map overview of the active route. Do as follows: If you are on the Map screen, tap return to the Navigation menu. In the Navigation menu, tap . -
Page 82: Checking The Route Parameters
3.3 Checking the route parameters You can check different parameters of the route recommended by the software. If you are on the Map screen, tap return to the Navigation menu. In the Navigation menu, tap The map showing the active route appears in top- down view facing North. - Page 83 • The route planning method (e.g. Fast). • The symbol of the vehicle type used in route calculation. • The total length of the route. • The total time of the route. You have the following options on this screen: •...
-
Page 84: Modifying The Route
3.4 Modifying the route When navigation is already started, there are several ways to modify the active route. The following sections show the different options. 3.4.1 Replacing the destination of the route It is easy to replace the destination of the active route. Select a new destination as described before (starting at page 35), and the route will be automatically recalculated to lead to the new destination. - Page 85 to scroll down and then Tap the large button in the center of the screen. A screen similar to the address search screen is displayed. Select the address for the starting position, tap , and then tap confirm.
-
Page 86: Pausing The Active Route
The map returns in grayscale (showing that there is no GPS reception). If an active route already existed, it is now recalculated starting from the selected location. (optional) Tap to modify the route or to check its parameters. To return to normal navigation, tap 3.4.3 Pausing the active route You do not need to pause the active route: when you start driving again, the software restarts the voice instructions from... -
Page 87: Changing The Route Planning Method
If you are on the Map screen, tap return to the Navigation menu. In the Navigation menu, tap . The active route is displayed it in its full length on the map together with additional information and controls. to confirm. 3.4.5 Changing the route planning method To recalculate the active route with a different route planning method, do as follows. - Page 88 , and then tap one of the following: • - Gives a quick route if you can travel at or near the speed limit on all roads. Usually the best selection for fast and normal cars. • - Gives a short route. Usually practical for pedestrians, cyclists or slow vehicles.
-
Page 89: Checking The Route Alternatives
• - Results in a route with fewer turns and no difficult maneuvers. With this option, you can make your software to take, for example, the freeway instead of series of smaller roads or streets. The software recalculates the route with the selected route planning method. - Page 90 . The map returns with the route fit to screen, and the total route distance together with the estimated duration of the route is displayed for each route planning method. Tap any of the methods, and the orange line line on the map immediately shows the route with the selected route planning method.
-
Page 91: Changing The Vehicle Used In Route Planning
were calculating the Fast route, but it takes other roads as well to save fuel. • - Results in a route with fewer turns and no difficult maneuvers. With this option, you can make your software to take, for example, the freeway instead of series of smaller roads or streets. - Page 92 , and then tap one of the following: • • • • • •...
-
Page 93: Changing The Road Types Used In Route Planning
The software recalculates the route optimized for the new vehicle type. The orange line now shows the new recommended route. Note! If you select and you forget to change it back to a vehicle later, the software warns you when you travel with a speed that is too high for a pedestrian. - Page 94 Tap any of the listed road types to modify the route. If needed, tap to list all road types. You have the following options (their order depends on the selected vehicle type): • - Charge roads are pay roads where you can purchase a pass or vignette to use the road for a longer period of time.
- Page 95 the accessibility of temporary ferries. You might also need to pay a fare on ferries. • - The software includes toll roads (pay roads where there is a per-use charge) in the routes by default. If you disable toll roads, your software plans the best toll-free route.
-
Page 96: Adding The Destination Of The Route To Favorites
3.5 Adding the destination of the route to Favorites You can add the destination of the active route to Favorites, the list of frequently used destinations. Planning a route to one of the Favorite destinations is described on page 75. If you are on the Map screen, tap return to the Navigation menu. - Page 97 . Using the keyboard, enter a name for the Favorite. Tap to enter numbers or symbols. to save the location as a new Favorite destination.
-
Page 98: Watching The Simulation Of The Route
3.6 Watching the simulation of the route You can run a simulated navigation that demonstrates the active route. Do as follows: If you are on the Map screen, tap return to the Navigation menu. In the Navigation menu, tap . The active route is displayed it in its full length on the map together with additional information and controls. - Page 99 You have the following controls during the simulation (the control buttons disappear after a few seconds but you can open them again if you tap the map): • : Jump to the next route event (maneuver). • : Pause the simulation. •...
-
Page 100: Reference Guide
4 Reference Guide On the following pages you will find the description of the different concepts and menu screens of the software. 4.1 Concepts 4.1.1 Smart Zoom Smart Zoom provides much more than just a usual automatic zoom feature: • While following a route: when approaching a turn, it will zoom in and raise the view angle to let you easily recognize your maneuver at the next junction. -
Page 101: Color Theme In Tunnels
• The night color themes use dark colors for large objects to keep the average brightness of the screen low. The software offers different daytime and night color profiles. It can also switch automatically between the daytime and the night schemes based on the current time and GPS position a few minutes before sunrise, when the sky has already turned bright, and a few minutes after sunset, before it becomes dark. - Page 102 • • Vehicle types: • • • • • • • Road types used or avoided in route calculation: • • • • • •...
-
Page 103: Road Safety Cameras
Is the software shipped with a built-in No, they can be database of Road Safety Cameras? downloaded as extra content from www.nextar.com/extr Can Road Safety Camera locations be uploaded in a text file? Can you save the Cursor as the location of a Road Safety Camera? 4.1.5.1 Camera types... - Page 104 The software warns you when you approach these speed cameras in the measured direction. If your speed exceeds the speed limit near the speed camera, a special warning sound is played. Some speed cameras are operated from vehicles. They do not always work and they are not set to check a preset speed Mobile limit.
-
Page 105: Camera Directions
with the other speed camera types. In the rare case your software cannot register the moment you pass the second speed camera (for example, it is placed at the exit of a tunnel where GPS position is not yet available) the warning continues. Just tap the speed camera symbol displayed on the screen to stop the warning. -
Page 106: Speed Limit Warning
4.1.6 Speed limit warning Maps sometimes contain information about the speed limits of the road segments. This information may not be available for your region (ask your local dealer) or may not be fully correct for all roads on the map. When you exceed the speed limit, a symbol with the speed limit appears in the corner of the map (for example: Furthermore, you can turn on an audible warning: a voice... - Page 107 Icon Description You need to recharge the battery. In the top right corner, the GPS reception quality icon shows the current accuracy of the position information. Icon Description The software has no connection to the GPS receiver: GPS navigation is not possible. Devices with a built-in GPS receiver are permanently connected.
-
Page 108: More' Menu
Access travel applications: the unit converter, the clothing size converter, the list of international phone numbers and a calculator. First, you need to get an activation key for the application kit. - Page 109 Get additional content, such as new maps or 3D landmarks; activate or download games and other applications. Fine-tune route planning options, change the Vehimarker, turn on or off warnings, start the Configuration wizard, etc. See the next chapter for details.
-
Page 110: Settings Menu
4.3 Settings menu You can configure the program settings, and modify the behavior of the software. Tap the following buttons: The Settings menu has several options. Tap or scroll the list with your finger to see the full list. Button Description These settings determine how routes will be calculated. -
Page 111: Route Settings
Both the active and the preinstalled inactive content items (activation needed at www.nextar.com/extras) are listed. Modify the basic software parameters set during the initial setup process. For details, see page 6. Delete all saved data and reset all settings to their factory defaults. - Page 112 different situations and vehicle types by changing the planning method. See below for details. To let the route fit your needs, you can also set which road types are to be considered for or to be excluded from the route if possible. Excluding a road type is a preference.
- Page 113 contain information about the accessibility of temporary ferries. You might also need to pay a fare on ferries. The software excludes unpaved roads by default: unpaved roads can be in a bad condition and usually you cannot reach the speed limit on them.
-
Page 114: Sound Settings
Route Planning Method types: Option Description Gives a quick route if you can travel at or near the speed limit on all roads. Usually the best selection for fast and normal cars. Gives a route that has the smallest total distance of all possible routes. - Page 115 slider sounds of the application are affected. The loudness of your software is independent of your device settings. When you exit the program, the device default settings return. Use the switch to mute all sounds of the device and then to re-enable them again. Key sounds provide audible confirmation of tapping the touch screen.
-
Page 116: Vehicle Gallery
or just alert sounds if you exceed the speed limit while approaching one of these cameras. • Visible Warning: the type of the camera and the monitored speed limit appear on the Map screen while you are approaching one of these cameras. This button is not displayed when GPS position is not available or if you are in certain countries where Road Safety Camera warning is... -
Page 117: Color Themes
Select a 3D Vehimarker for all other vehicle types. Tip! You can get more Vehimarkers at www.nextar.com/extras. 4.3.4 Color themes You can fine-tune the appearance of the Map screen and the menus. Choose suitable color themes from the list for both daytime and night use. -
Page 118: Set Starting Position
4.3.5 Set starting position For normal navigation, all routes are planned from the current position. In order to check future routes, you can turn off the GPS receiver, and set the starting point of the route to a different location than the current GPS position. The procedure is explained here: page 83. -
Page 119: Button Description
new profile from the list of available languages and speakers. Tap any of these to hear a sample voice prompt. Just tap OK when you have selected the new spoken language. See below. Select the virtual keyboard to be used when searching for an address or when entering a name to a Favorite destination. -
Page 120: Content
If needed, browse the list. Tap any of the categories to see its content. Both the active and the preinstalled inactive content items (activation needed at www.nextar.com/extras) are listed. Inactive content items are displayed in red. Tap in the 'More' menu to buy activation keys for the inactive content. -
Page 121: Glossary
5 Glossary 2D/3D GPS reception The GPS receiver uses satellite signals to calculate its (your) position and needs at least four signals to give a three- dimensional position, including elevation. Because the satellites are moving and because objects can block the signals, your GPS device might not receive four signals. -
Page 122: Gps Accuracy
One daytime scheme and one night scheme is always selected for the map and for the menus. The software uses them when it switches from day to night and back. GPS accuracy Several factors have impact on the deviation between your real position and the one given by the GPS device. - Page 123 Road Safety Camera A special Place of Interest type for speed cameras and red light cameras. Different data sources are available. You can configure the software to warn you when you approach one of these cameras. Detecting the location of Road Safety Cameras is prohibited in certain countries.
-
Page 124: Copyright Note
All products distributed by Nextar Inc. unless otherwise indicated Made in China © 2009 Nextar (Hong Kong) Limited. Nextar is a trademark and service mark of Nextar (Hong Kong) Limited. All other brand names, trademarks and service marks are property of their owners. - Page 125 Merci d'avoir choisi notre produit comme navigateur pour votre voiture. Lisez tout d'abord le manuel de démarrage Express, puis commencez à utiliser your device. Ce document est la description détaillée du logiciel de navigation. Vous pouvez aisément découvrir your device tout en l'utilisant. Nous vous conseillons cependant de lire ce manuel pour vous familiariser avec les écrans et les fonctions du your software.
- Page 126 Table des matières 1 Avertissements et informations de sécurité........5 2 Démarrage..................6 2.1 Écran de démarrage : le menu de Navigation......10 2.2 Boutons et autres commandes à l'écran ........12 2.2.1 Utilisation des claviers ............. 14 2.2.2 Au delà du toucher simple de l'écran........16 2.3 Écran Carte ................17 2.3.1 Navigation sur la carte .............
- Page 127 3.1.2.4 Recherche des services d'assistance voisins depuis la rubrique « Où suis-je ? »..................73 3.1.3 Sélection d'un emplacement sur la carte comme destination.. 76 3.1.4 Sélection de la destination à partir de vos Favoris ....77 3.1.5 Sélection de la destination la plus probable (Historique intelligent) ....................
- Page 128 4.3.3 Galerie de véhicule en 3D............118 4.3.4 Systèmes de couleurs............119 4.3.5 Définition du point de départ ..........120 4.3.6 Paramètres régionaux............120 4.3.7 Contenu ................. 122 5 Glossaire ..................123 6 Note sur le droit d'auteur .............127...
-
Page 129: Avertissements Et Informations De Sécurité
1 Avertissements et informations de sécurité Ce logiciel est un système de navigation qui vous permet, grâce à son récepteur GPS intégré, de vous rendre à votre destination. The software ne transmet pas votre position GPS ; personne ne peut vous suivre. Veillez à... -
Page 130: Démarrage
2 Démarrage The software est optimisé pour une utilisation en voiture ou piétonne. Vous n'avez pas besoin de stylet pour l'utiliser. Vous l'utiliserez facilement en touchant du bout des doigts les boutons de l'écran et la carte. S'il s'agit d'une première utilisation, un processus de configuration initiale démarrera automatiquement. - Page 131 Sélectionnez la langue et le locuteur à utiliser pour les instructions vocales. Vous pourrez les modifier ultérieurement dans Paramètres régionaux (page 120). Si nécessaire, modifiez les paramètres de format de l'heure, de fuseau horaire et de l'unité. Vous pourrez les modifier ultérieurement dans Paramètres régionaux (page 120).
- Page 132 configuration peut être redémarré plus tard depuis le menu Paramètres (page 111). Vous avez la possibilité de visionner un tutoriel qui vous guide parmi les étapes de base de la navigation, ou de lancer une simulation d'itinéraire. Pour commencer l'utilisation de the software, touchez pour éviter le tutoriel et l'exécuter plus tard à...
- Page 133 • Entrez une adresse avec un code postal (page 54). De cette façon, vous n'aurez pas à sélectionner le nom de la localité et cela accélérera la recherche des noms de rues. • Utilisez un POI intégré comme destination (page 59). •...
-
Page 134: Écran De Démarrage : Le Menu De Navigation
2.1 Écran de démarrage : le menu de Navigation Le logiciel commence par présenter le menu principal, le menu de Navigation. Vous pouvez atteindre toutes les parties de the software à partir d'ici. Vous disposez des options suivantes : • Touchez pour sélectionner votre destination en entrant une adresse ou en sélectionnant... - Page 135 • Touchez pour débuter la navigation sur la carte. Le bouton lui-même est une carte active miniature qui indique votre position actuelle, la route recommandée et la carte de la zone environnante.
-
Page 136: Boutons Et Autres Commandes À L'écran
2.2 Boutons et autres commandes à l'écran Lorsque vous utilisez the software, en général vous touchez les boutons de l'écran tactile. Vous ne devez confirmer les sélections ou les modifications que si l'application doit redémarrer, si elle doit procéder à une reconfiguration importante ou si vous êtes sur le point de perdre des données ou paramètres. - Page 137 Icône Affiche les Certaines icônes informations fonctionnent concernant l'état. également comme des boutons. Touchez-les une fois. Liste Lorsque vous Déplacez-vous de page en page avec devez faire un choix parmi plusieurs les boutons options, elles apparaissent et touchez la sous forme de valeur souhaitée.
-
Page 138: Utilisation Des Claviers
indicateur sur voulez voir une jauge qui apparaître la affiche et définit poignée. Le la valeur. pouce y va directement. Interru Si vous n'avez Touchez cet pteur que deux choix, interrupteur pour une coche l'activer ou le apparaît lorsque désactiver. la fonction est activée. - Page 139 Corriger votre entrée sur le clavier Touchez pour supprimer le(s) caractère(s) inutile(s). Touchez et maintenez le bouton enfoncé pour effacer plusieurs caractères ou la chaîne complète de caractères. Entrer un espace, par exemple Touchez le bouton vide au milieu en bas de l'écran. entre un nom et un prénom, ou entre les mots qui composent un nom de rue...
-
Page 140: Au Delà Du Toucher Simple De L'écran
2.2.2 Au delà du toucher simple de l'écran En général, il suffit de toucher l'écran une fois. Cependant, certaines fonctions utiles sont accessibles par une combinaison de touches. Ces combinaisons sont : Tâches Instructions Toucher et Touchez les boutons suivants sans relâcher maintenir la pour accéder à... -
Page 141: Écran Carte
déplacer) que dans les cas suivants : • Déplacement de la poignée sur un curseur. • Défilement de la liste : prenez la liste n'importe où et faites glisser votre doigt vers le haut ou vers le bas. Selon la vitesse à... - Page 142 Pour agrandir cette petite carte et ouvrir l'écran Carte, touchez La carte est affichée en noir et blanc lorsqu'il n'y a pas de position GPS : ... ou en couleur lorsque la position actuelle est disponible : Cette carte indique la position actuelle (le repère véhicule, par défaut uneblue arrow), l'itinéraire recommandé...
- Page 143 Touchez un des champs pour supprimer les autres et afficher seulement celui qui est sélectionné. Les champs de données sont différents selon que vous naviguez sur un itinéraire actif et ou que vous n'avez pas de destination précise (la orange line n'est pas affichée).
- Page 144 Champ Description Affiche la distance de l'itinéraire que vous devez parcourir avant d'arriver à votre destination finale. Indique le temps nécessaire pour arriver à la destination finale de l'itinéraire en fonction des informations disponibles pour les segments restants de l'itinéraire. Le calcul ne peut pas prendre en compte les bouchons et les autres ralentissements éventuels.
-
Page 145: Marqueurs De Position
2.3.2 Marqueurs de position 2.3.2.1 Repère véhicule et itinéraire verrouillé Lorsque votre position GPS est disponible, the software indique votre position actuelle sur le repère véhicule. Par défaut, ce marqueur est une blue arrow, mais vous pouvez changer l'icône dans Paramètres. L'emplacement exact du repère véhicule dépend du type de véhicule utilisé... -
Page 146: Objets Sur La Carte
2.3.3 Objets sur la carte 2.3.3.1 Rues et routes The software représente les rues de la même façon que les cartes routières papier. La largeur et les couleurs utilisées correspondent à leur importance : on distingue aisément une autoroute d'une petite rue. 2.3.3.2 Présentation des virages et prochaine rue En navigant sur un itinéraire, la partie supérieure de l'écran Carte affiche des informations concernant le prochain... - Page 147 La plupart de ces icônes sont très intuitives. Le tableau suivant répertorie une partie des événements d'itinéraire fréquemment affichés. Les mêmes symboles sont utilisés dans les deux champs : Icône Description Tournez à gauche. Tournez à droite. Faites demi-tour. Tournez légèrement à droite. Tournez franchement à...
-
Page 148: Informations Sur Les Voies Et Les Panneaux
Prenez le rond-point. La disposition du rond- point et le numéro de la sortie est indiqué uniquement pour le prochain virage. Entrez sur l'autoroute. Sortez de l'autoroute. Embarquez sur le ferry. Débarquez du ferry. Vous vous approchez de la destination. 2.3.3.3 Informations sur les voies et les panneaux Lorsque vous roulez sur une route à... -
Page 149: Types D'objets 3D
Tous les panneaux se ressemblent lors de la conduite et en l'absence d'itinéraire conseillé. En cas de navigation sur un itinéraire, les panneaux vers les voies à emprunter s'affichent en couleurs vives tandis que les autres sont plus sombres. 2.3.3.4 Types d'objets 3D your software prend en charge les types d'objets 3D suivants : Type Description... -
Page 150: Éléments De L'itinéraire Actif
Les repères 3D sont uniquement disponibles dans les villes et pays sélectionnés. Vérifiez www.nextar.com/extras pour plus de détails. Bâtiments Représentation en blocs des données de en 3D bâtiments en 3D représentant la taille réelle des bâtiments et leur position sur la carte. - Page 151 En l'absence de position GPS valide, your software utilise la dernière position GPS connue comme point de départ. Destination Dernier point de l'itinéraire. (point d'arrivée) Couleur de la La carte est claire et colorée carte lorsque la position GPS est disponible.
-
Page 152: Manipulation De La Carte
2.3.4 Manipulation de la carte Pour parcourir la carte pendant la navigation, touchez . La carte cesse de suivre la position actuelle (le repère véhicule, par défaut une blue arrow n'est plus verrouillé dans une position fixe à l'écran) et les boutons de commande apparaissent pour vous permettre de modifier la vue de la carte. - Page 153 objets dont vous avez besoin sont affichés. La mise à l'échelle de la carte est limitée en mode Carte 3D. Si vous zoomez encore plus, la carte passe en mode carte 2D. Touchez le bouton une fois pour effectuer une modification importante de la vue, ou touchez le bouton sans le relâcher pour la modifier de façon continue et...
-
Page 154: Menu Rapide
haut, puis touchez-le de nouveau pour faire pivoter la carte dans la direction précédente. Boussole en Le sens de la boussole indique le mode carte Nord. Touchez le bouton pour en 3D basculer à la vue Nord vers le haut, puis touchez-le de nouveau pour faire pivoter la carte dans la direction précédente. - Page 155 Touchez maintenant une des valeurs et votre sélection prend effet immédiatement. L'écran Carte revient automatiquement. Boutons sur la rangée du milieu : Ces boutons ouvrent de nouveaux écrans. Utilisez ces écrans, et lorsque vous reviendrez ici, touchez pour retourner à l'écran Carte ou touchez sans relâcher sur n'importe quel écran pour revenir à...
- Page 156 La carte peut être affichée en vue en perspective (3D) ou en vue du haut vers le bas (2D), et en mode 3D les bâtiments s'affichent sur la carte. Valeurs sélectionnables : : la carte est affichée en vue 3D (perspective).
- Page 157 : le niveau de zoom est plus faible que la normale. Les éléments de la carte deviennent plus petits, mais la zone environnante affichée est plus grande. Bascule manuellement entre les systèmes de couleurs diurnes et nocturnes. Valeurs sélectionnables : : les écrans carte et menu sont affichés en couleurs diurnes.
-
Page 158: Vérification Des Détails De La Position Actuelle (Où Suis-Je ?)
2.3.6 Vérification des détails de la position actuelle (Où suis-je ?) Ouvert depuis le menu Rapide, cet écran contient les informations sur la position actuelle (ou sur la dernière position connue si le récepteur GPS n'est pas disponible) et un bouton permettant de chercher les lieux utiles à... - Page 159 • : indique s'il s'agit de la position actuelle, ou du temps qui reste depuis sa dernière mise à jour. En plus de ces informations, vous pouvez rechercher des secours près de votre position actuelle. Touchez pour ouvrir un nouvel écran de recherche rapide : Vous pouvez rechercher les services suivants à...
-
Page 160: Navigation
3 Navigation Vous pouvez configurer votre itinéraire de plusieurs façons : • Si vous avez besoin d'un itinéraire pour naviguer immédiatement, vous pouvez sélectionner la destination et débuter la navigation vers celui-ci immédiatement (navigation normale). • Vous pouvez également planifier un itinéraire indépendamment de votre position GPS actuelle ou même sans réception GPS (pour ce faire, vous devez arrêter le récepteur GPS et définir un nouveau point de... -
Page 161: Saisie D'une Adresse Ou D'une Partie D'adresse
• Sélectionnez un endroit sur la carte en utilisant la fonction Chercher sur la carte (page 76). • Utilisez une destination Favorite pré-enregistrée (page 77). • Sélectionnez un emplacement dans l'Historique des destinations déjà utilisées (page 80) 3.1.1 Saisie d'une adresse ou d'une partie d'adresse Entrez au moins une partie de l'adresse de manière à... - Page 162 Sur l'écran Carte, touchez pour retourner au menu de Navigation. Dans le menu de Navigation, touchez les boutons suivants : Par défaut, the software propose le pays, l'état et la localité où vous vous trouvez. Si nécessaire, touchez le bouton portant le nom du pays, entrez les premières lettres du nom du pays sur le clavier, et sélectionnez un autre pays dans la liste.
- Page 163 Touchez le bouton portant le nom de la ville/localité ou touchez si vous avez modifié le nom du pays/de l'état. Entrez le début du nom d'une rue de la ville/localité sur le clavier. Cherchez la ville/localité que vous souhaitez : •...
- Page 164 Touchez Entrez le début du nom de la rue sur le clavier. Cherchez la rue que vous souhaitez : • Le nom de rue le plus probable est toujours affiché dans le champ de saisie. Pour l'accepter, touchez • Si le nom recherché n'apparaît pas, les noms qui correspondent à...
- Page 165 Saisissez le numéro de l'habitation sur le clavier. (Pour entrer des lettres, touchez Touchez pour finir de saisir l'adresse. (Si le numéro de l'habitation entré est introuvable, le milieu de la rue sera sélectionné comme destination.) (en option) Sur certaines longues routes, la numérotation des habitations reprend à...
-
Page 166: Saisie Du Point Central De La Rue En Tant Que Destination
Touchez pour modifier les paramètres de l'itinéraire, ou touchez et débutez votre voyage. Si vous savez que vous utiliserez souvent cette Astuce ! destination, avant de toucher , mettez d'abord la destination dans vos Favoris : touchez puis , et enregistrez l'emplacement. - Page 167 Dans le menu de Navigation, touchez les boutons suivants : Par défaut, the software propose le pays, l'état et la localité où vous vous trouvez. Si nécessaire, touchez le bouton portant le nom du pays, entrez les premières lettres du nom du pays sur le clavier, et sélectionnez un autre pays dans la liste.
- Page 168 Touchez le bouton portant le nom de la ville/localité ou touchez si vous avez modifié le nom du pays/de l'état. Entrez le début du nom d'une rue de la ville/localité sur le clavier. Cherchez la ville/localité que vous souhaitez : •...
- Page 169 Touchez Entrez le début du nom de la rue sur le clavier. Cherchez la rue que vous souhaitez : • Le nom de rue le plus probable est toujours affiché dans le champ de saisie. Pour l'accepter, touchez • Si le nom recherché n'apparaît pas, les noms qui correspondent à...
-
Page 170: Sélection D'une Intersection En Tant Que Destination
Après un court résumé des paramètres de l'itinéraire, la carte apparaît avec la destination sélectionnée au milieu. L'itinéraire est calculé automatiquement. Touchez pour modifier les paramètres de l'itinéraire, ou touchez et débutez votre voyage. 3.1.1.3 Sélection d'une intersection en tant que destination Pour entrer une adresse en tant que destination, procédez comme suit :... - Page 171 Par défaut, the software propose le pays, l'état et la localité où vous vous trouvez. Si nécessaire, touchez le bouton portant le nom du pays, entrez les premières lettres du nom du pays sur le clavier, et sélectionnez un autre pays dans la liste. Si vous sélectionnez un nouveau pays, vous devez aussi sélectionner l'état, ou le nom du pays dans lequel il se trouve pour chercher une adresse dans tous les états.
- Page 172 Cherchez la ville/localité que vous souhaitez : • Le nom de ville/localité le plus probable est toujours affiché dans le champ de saisie. Pour l'accepter, touchez • Si le nom recherché n'apparaît pas, les noms qui correspondent à la chaîne de caractères apparaissent dans une liste après la saisie de quelques caractères (pour ouvrir la liste des résultats avant qu'elle...
- Page 173 • Le nom de rue le plus probable est toujours affiché dans le champ de saisie. Pour l'accepter, touchez • Si le nom recherché n'apparaît pas, les noms qui correspondent à la chaîne de caractères apparaissent dans une liste après la saisie de quelques caractères (pour ouvrir la liste des résultats avant qu'elle n'apparaisse automatiquement,...
-
Page 174: Sélection Du Centre De La Ville/Localité Comme Destination
clavier. Dès que les noms des rues correspondants peuvent être affichés à l'écran, une liste apparaît automatiquement. Sélectionnez-en un dans la liste. Après un court résumé des paramètres de l'itinéraire, la carte apparaît avec la destination sélectionnée au milieu. L'itinéraire est calculé automatiquement. Touchez pour modifier les paramètres de l'itinéraire, ou touchez... - Page 175 Sur l'écran Carte, touchez pour retourner au menu de Navigation. Dans le menu de Navigation, touchez les boutons suivants : Par défaut, the software propose le pays, l'état et la localité où vous vous trouvez. Si nécessaire, touchez le bouton portant le nom du pays, entrez les premières lettres du nom du pays sur le clavier, et sélectionnez un autre pays dans la liste.
- Page 176 Si nécessaire, sélectionnez un nouveau nom de ville/localité : Touchez le bouton portant le nom de la ville/localité ou touchez si vous avez modifié le nom du pays/de l'état. Entrez le début du nom d'une rue de la ville/localité sur le clavier. Cherchez la ville/localité...
- Page 177 Au lieu d'entrer le nom de rue, touchez De cette façon, le centre de la ville/localité devient la destination de l'itinéraire. Après un court résumé des paramètres de l'itinéraire, la carte apparaît avec la destination sélectionnée au milieu. L'itinéraire est calculé automatiquement. Touchez pour modifier les paramètres de l'itinéraire, ou touchez...
-
Page 178: Saisie D'une Adresse Avec Un Code Postal
3.1.1.5 Saisie d'une adresse avec un code postal Toutes les possibilités de recherche d'adresses décrites précédemment peuvent être réalisées en entrant le code postal au lieu de la localité. Voici un exemple avec une adresse complète : Sur l'écran Carte, touchez pour retourner au menu de Navigation. - Page 179 Entrer le code postal de la nouvelle ville/localité : Touchez le bouton portant le nom de la ville/localité, ou touchez vous avez changé de nom de pays/d'état. Touchez pour ouvrir le clavier numérique. Commencez à saisir le code postal. Cherchez la ville/localité que vous souhaitez : •...
- Page 180 Entrez le nom de la rue : Touchez Entrez le début du nom de la rue sur le clavier. Cherchez la rue que vous souhaitez : • Le nom de rue le plus probable est toujours affiché dans le champ de saisie.
- Page 181 Saisissez le numéro de l'habitation : Touchez Saisissez le numéro de l'habitation sur le clavier. (Pour entrer des lettres, touchez Touchez pour finir de saisir l'adresse. (Si le numéro de l'habitation entré est introuvable, le milieu de la rue sera sélectionné...
-
Page 182: Astuces Pour Entrer Rapidement Les Adresses
3.1.1.6 Astuces pour entrer rapidement les adresses • Lorsque vous entrez le nom de la ville/localité ou la rue : • Seules ces lettres sont proposées sur le clavier qui apparaît dans les résultats de recherche possibles. Les autres caractères apparaissent en gris. -
Page 183: Sélection De La Destination À Partir Des Poi
• Si l'une des rues est plus courte, recherchez d'abord cette rue. Vous trouverez la seconde rue plus rapidement. • Vous pouvez chercher pour les deux, le type et le nom d'une route. Si le même mot apparaît dans plusieurs noms, par exemple dans le nom d'une rue, d'une route et d'une avenue, vous pouvez obtenir le résultat plus rapidement en entrant la première lettre du type de rue :... -
Page 184: Sélection De La Destination À Partir Des Poi À L'aide De La Recherche Rapide
3.1.2.1 Sélection de la destination à partir des POI à l'aide de la Recherche rapide La fonction de Recherche rapide permet de trouver rapidement les types de Lieux sélectionnés le plus souvent. Sur l'écran Carte, touchez pour retourner au menu de Navigation. Dans le menu de Navigation, touchez les boutons suivants : Les catégories de Recherche rapide apparaissent :... - Page 185 GPS), la recherche s'effectue autour de la dernière position connue. • • S'il existe un itinéraire actif, les restaurants seront identifiés le long de l'itinéraire. • S'il n'y a pas d'itinéraire actif (la destination n'est pas sélectionnée), la recherche s'effectue autour de la position actuelle.
- Page 186 • • S'il existe un itinéraire actif, les hébergements seront identifiés autour de la destination de l'itinéraire. • S'il n'y a pas d'itinéraire actif (la destination n'est pas sélectionnée), la recherche s'effectue autour de la position actuelle. • Si la position actuelle n'est pas disponible non plus (aucun signal GPS), la recherche s'effectue autour de la dernière position connue.
- Page 187 Touchez un des éléments de la liste pour le voir en détail. (en option) Si le lieu sélectionné est un POI riche, vous pouvez toucher pour afficher plus d'informations. Puis, touchez pour retourner aux détails de base. Touchez pour sélectionner les POI affichés comme destination de l'itinéraire.
-
Page 188: Sélection De La Destination À Partir D'autres Poi Par Nom
3.1.2.2 Sélection de la destination à partir d'autres POI par nom Vous pouvez rechercher des POI par leurs noms. Sur l'écran Carte, touchez pour retourner au menu de Navigation. Dans le menu de Navigation, touchez les boutons suivants : Les catégories de Recherche rapide apparaissent. Touchez Sélectionnez la zone dans laquelle le Lieu doit être recherché... - Page 189 • Touchez pour rechercher un lieu à l'intérieur d'une ville/localité sélectionnée. (La liste qui en résulte sera classée selon la distance à partir du centre de la ville/localité.) • Touchez pour rechercher un lieu dans les environs d'une destination de l' itinéraire actif.
- Page 190 Touchez À l'aide du clavier, commencez à saisir le nom du Lieu. Après avoir saisi quelques lettres, touchez pour ouvrir la liste des Lieux dont le nom correspond aux caractères saisis.
- Page 191 Les Lieux de la liste sont classés selon leur distance par rapport à la position actuelle, la destination, le centre de la ville/localité sélectionnée ou par la longueur du détour nécessaire. Les Lieux dit « normaux » sont représentés par une icône de catégorie bleue ( ), alors que les Lieux comportant des détails supplémentaires (appelés «...
-
Page 192: Sélection De La Destination À Partir D'autres Poi Par Catégorie68
Touchez pour sélectionner les POI affichés comme destination de l'itinéraire. Après un court résumé des paramètres de l'itinéraire, la carte apparaît avec la destination sélectionnée au milieu. L'itinéraire est calculé automatiquement. Touchez pour modifier les paramètres de l'itinéraire, ou touchez et débutez votre voyage. - Page 193 Sélectionnez la zone dans laquelle le Lieu doit être recherché : • Touchez pour rechercher dans les environs de la position actuelle, ou si elle n'est pas disponible, dans les environs de la dernière position connue. (La liste qui en résulte sera classée selon la distance à...
- Page 194 (en option) Si vous avez sélectionné sélectionnez la ville/localité, puis touchez Touchez Sélectionnez une des catégories principales de Lieu (ex. Hébergement) ou touchez pour lister tous les Lieux autour de l'endroit sélectionné ou le long de l'itinéraire.
- Page 195 Sélectionnez une des sous-catégories principales de Lieux (ex. Hôtel ou Motel) ou touchez pour lister tous les Lieux de la catégorie principale sélectionnée autour de l'endroit sélectionné ou le long de l'itinéraire. Enfin, les résultats apparaissent dans une liste. Les Lieux de la liste sont classés selon leur distance par rapport à...
- Page 196 détails supplémentaires (appelés « POI riches ») portent le logo de leur source de données ( ). Si nécessaire, touchez pour parcourir la liste. Touchez un des éléments de la liste pour le voir en détail. (en option) Si le Lieu sélectionné est un POI riche, vous pouvez toucher pour afficher plus d'informations.
-
Page 197: Recherche Des Services D'assistance Voisins Depuis La Rubrique « Où Suis-Je
Touchez pour modifier les paramètres de l'itinéraire, ou touchez et débutez votre voyage. 3.1.2.4 Recherche des services d'assistance voisins depuis la rubrique « Où suis-je ? » Vous pouvez faire une recherche rapide des services d'assistance à proximité depuis l'écran « Où suis-je ? » Sur l'écran Carte, touchez la carte pour ouvrir le menu Rapide. - Page 198 Les catégories de Recherche rapide apparaissent, pour faire une recherche dans les environs de la position actuelle (ou autour de la dernière position connue si la position actuelle n'est pas disponible) : • : services de réparation automobile et d'assistance routière. •...
- Page 199 normaux » sont représentés par une icône de catégorie bleue ( ), alors que les Lieux comportant des détails supplémentaires (appelés POI riches) portent le logo de leur source de données ( ). Touchez un des éléments de la liste pour le voir en détail. (en option) Si le lieu sélectionné...
-
Page 200: Sélection D'un Emplacement Sur La Carte Comme Destination
Touchez pour modifier les paramètres de l'itinéraire, ou touchez et débutez votre voyage. 3.1.3 Sélection d'un emplacement sur la carte comme destination Sur l'écran Carte, touchez pour retourner au menu de Navigation. Dans le menu de Navigation, touchez les boutons suivants : Recherchez votre destination sur la carte : déplacez et modifiez l'échelle de la carte si nécessaire. -
Page 201: Sélection De La Destination À Partir De Vos Favoris
Touchez la position que vous voulez sélectionner comme destination. Le curseur ( ) apparaît. Touchez pour sélectionner le Curseur comme destination. Après un court résumé des paramètres de l'itinéraire, la carte apparaît avec la destination sélectionnée au milieu. L'itinéraire est calculé automatiquement. Touchez pour modifier les paramètres de l'itinéraire, ou touchez... - Page 202 • Si vous êtes dans le menu de Navigation, touchez Touchez . La liste des destinations Favorites s'affiche. Sélectionnez le Favori que vous voulez définir comme votre destination. Si nécessaire, déplacez-vous de page en page avec pour voir plus d'éléments de la liste.
-
Page 203: Sélection De La Destination La Plus Probable (Historique Intelligent)
3.1.5 Sélection de la destination la plus probable (Historique intelligent) Les destinations que vous avez préalablement définies apparaissent dans l'Historique. Une de ces destinations récentes est indiquée dans le menu Destination pour un accès facile. L'Historique intelligent propose ce lieu en se basant sur vos habitudes de navigation, en utilisant des paramètres tels que l'heure de la journée, le jour de la semaine, et l'emplacement actuel. -
Page 204: Sélection De La Destination À Partir De L'historique
modifier les paramètres de l'itinéraire, ou touchez et débutez votre voyage. 3.1.6 Sélection de la destination à partir de l'Historique Les destinations que vous avez préalablement définies apparaissent dans l'Historique. Sur l'écran Carte, touchez pour retourner au menu de Navigation. Dans le menu de Navigation, touchez Touchez La liste des destinations... - Page 205 page en se basant sur les itinéraires précédents (itinéraires les plus probables). Les autres destinations sont classées selon la date à laquelle elles ont été choisies pour la dernière fois. Si nécessaire, faites défiler la liste pour voir les destinations précédentes. Sélectionnez une destination dans la liste.
-
Page 206: Visualisation De L'itinéraire Complet Sur La Carte
3.2 Visualisation de l'itinéraire complet sur la carte Il est facile d'obtenir une vue d'ensemble de l'itinéraire actif sur la carte. Procédez comme suit : Sur l'écran Carte, touchez pour retourner au menu de Navigation. Dans le menu de Navigation, touchez L'itinéraire actif complet s'affiche sur la carte avec des informations et des commandes supplémentaires. - Page 207 La carte indiquant l'itinéraire actif apparaît en vue du haut vers le bas orientée vers le nord. Les informations et les commandes supplémentaires sont affichées autour de la carte. Les informations suivantes sont affichées : • L'itinéraire actif complet est affiché sur la carte. •...
- Page 208 • La durée totale de l'itinéraire. Les options ci-dessous apparaissent à l'écran : • Touchez pour identifier les itinéraires alternatifs, pour simuler l'itinéraire ou pour ajouter la destination à la liste de destinations favorites. • Touchez pour modifier les paramètres de l'itinéraire. •...
-
Page 209: Modification De L'itinéraire
3.4 Modification de l'itinéraire Lorsque la navigation a commencé, il y a plusieurs façons de modifier l'itinéraire actif. Les sections suivantes indiquent les différentes options. 3.4.1 Remplacement de la destination de l'itinéraire Il est facile de remplacer une destination de l'itinéraire actif. Sélectionnez une nouvelle destination en suivant la procédure décrite plus haut (débutant à... - Page 210 Touchez pour faire défiler vers le bas et ensuite Touchez le gros bouton au centre de l'écran. Un écran similaire à l'écran de recherche d'adresse s'affiche. Sélectionnez l'adresse du point de départ, touchez , et ensuite touchez pour confirmer.
-
Page 211: Arrêt De L'itinéraire Actif
La carte redevient grise (ce qui signifie qu'il n'y a pas de réception GPS). Si un itinéraire actif existe déjà, il est maintenant recalculé à partir de l'emplacement sélectionné. (en option) Touchez pour modifier l'itinéraire ou vérifier ses paramètres. Pour revenir en navigation normale, touchez 3.4.3 Arrêt de l'itinéraire actif Vous n'avez pas besoin d'arrêter l'itinéraire actif : lorsque vous recommencez à... -
Page 212: Suppression De L'itinéraire Actif
3.4.4 Suppression de l'itinéraire actif Pour annuler l'itinéraire sur lequel vous naviguez, procédez ainsi : Sur l'écran Carte, touchez pour retourner au menu de Navigation. Dans le menu de Navigation, touchez L'itinéraire actif complet s'affiche sur la carte avec des informations et des commandes supplémentaires. - Page 213 Sur l'écran Carte, touchez pour retourner au menu de Navigation. Dans le menu de Navigation, touchez L'itinéraire actif complet s'affiche sur la carte avec des informations et des commandes supplémentaires. Touchez Touchez , et ensuite touchez une des options suivantes : •...
-
Page 214: Vérification Des Options De L'itinéraire
• - Donne un itinéraire court. Option très pratique pour les piétons, cyclistes ou véhicules lents. • - Combine les avantages des modes Rapide et Court : The software effectue ses calculs comme s'il planifiait l'itinéraire Rapide mais choisit d'autres routes également pour économiser du carburant. - Page 215 Dans le menu de Navigation, touchez L'itinéraire actif complet s'affiche sur la carte avec des informations et des commandes supplémentaires. Touchez Touchez . La carte réapparaît avec l'itinéraire ajusté à l'écran. La distance totale et la durée estimée de l'itinéraire s'affichent alors pour chaque méthode de planification d'itinéraire.
- Page 216 • - Indique un itinéraire rapide si vous circulez en respectant plus ou moins la limitation de vitesse sur toutes les routes. Il s'agit en général de la meilleure option pour les véhicules rapides et normaux. • - Donne un itinéraire court. Option très pratique pour les piétons, cyclistes ou véhicules lents.
-
Page 217: Modification Du Véhicule Utilisé Dans La Planification De L'itinéraire
3.4.7 Modification du véhicule utilisé dans la planification de l'itinéraire Pour recalculer l'itinéraire actif pour un piéton ou pour un véhicule différent, procédez comme suit. Ces modifications peuvent aussi être réalisées dans la rubrique Paramètres (page 113). Sur l'écran Carte, touchez pour retourner au menu de Navigation. -
Page 218: Modification Des Types De Routes Utilisés Pour La Planification D'itinéraire
• • • • • • The software recalcule l'itinéraire optimisé pour le nouveau type de véhicule. La orange line indique maintenant le nouvel itinéraire recommandé. Si vous sélectionnez et que vous Remarqu oubliez de remettre véhicule plus tard, le logiciel vous avertit lorsque votre vitesse dépasse celle d'un piéton. - Page 219 Sur l'écran Carte, touchez pour retourner au menu de Navigation. Dans le menu de Navigation, touchez L'itinéraire actif complet s'affiche sur la carte avec des informations et des commandes supplémentaires. Touchez Touchez un des types de routes répertoriés pour modifier l'itinéraire. Si nécessaire, touchez pour afficher tous les types de routes.
- Page 220 indépendamment de l'option des routes à péage. • - Vous devrez peut-être éviter les autoroutes si vous conduisez un véhicule lent ou si vous remorquez un autre véhicule. • - Par défaut, The software exclut les routes non pavées : les routes non pavées sont parfois en mauvais état et ne permettent pas d'atteindre une vitesse normale.
-
Page 221: Ajout De La Destination De L'itinéraire Aux Favoris
3.5 Ajout de la destination de l'itinéraire aux Favoris Vous pouvez ajouter la destination de l'itinéraire actif aux Favoris, qui contient la liste des destinations fréquemment utilisées. La planification d'un itinéraire vers une des destinations Favorites est décrite à la page 77. Sur l'écran Carte, touchez pour retourner au menu de Navigation. - Page 222 Touchez . À l'aide du clavier, entrez le nom du Favori. Touchez pour entrer des chiffres ou des symboles. Touchez pour enregistrer l'endroit comme une nouvelle destination Favorite.
-
Page 223: Visualisation De La Simulation De L'itinéraire
3.6 Visualisation de la simulation de l'itinéraire Vous pouvez lancer une simulation de navigation montrant l'itinéraire actif. Procédez comme suit : Sur l'écran Carte, touchez pour retourner au menu de Navigation. Dans le menu de Navigation, touchez L'itinéraire actif complet s'affiche sur la carte avec des informations et des commandes supplémentaires. - Page 224 Pendant la simulation, vous disposez des commandes suivantes (les boutons de commande disparaissent après quelques secondes, mais vous pouvez les rouvrir en touchant la carte) : • : passer à l'événement d'itinéraire suivant (manœuvre). • : mettre la simulation en pause. •...
-
Page 225: Guide De Référence
4 Guide de référence Les pages suivantes décrivent les différents concepts et écrans de menu de the software. 4.1 Concepts 4.1.1 Zoom intelligent Le Zoom intelligent est bien plus qu'une simple fonction de zoom automatique : • En suivant un itinéraire : lorsque vous vous approchez d'un virage, il effectue un zoom avant et élève l'angle de vue pour vous permettre de reconnaître facilement la manœuvre que vous allez... -
Page 226: Système De Couleur Dans Les Tunnels
• Les couleurs diurnes sont semblables à celles des cartes routières en papier, et les menus sont lumineux. • Les systèmes de couleurs de nuit utilisent des teintes foncées pour les objets volumineux de façon à diminuer au maximum la luminosité de l'écran. The software offre différents profils couleurs diurnes et nocturnes. - Page 227 • • • • • Types de véhicules : • • • • • • • Types de routes utilisées ou évitées dans le calcul de l'itinéraire : • • •...
-
Page 228: Radars
Le the software est-il livré avec une Non, elle est base de données intégrée des téléchargeable à radars ? www.nextar.com/extras La position des radars peut-elle être téléchargée dans un fichier texte ? Est-il possible d'enregistrer le curseur comme emplacement d'un radar ? 4.1.5.1 Types de radars... - Page 229 Icône Type Description Fixe Certains radars sont installés sur le côté de la route, dans un seul sens, et mesurent la vitesse des véhicules dans un seul sens de circulation, ou les deux. Ils mesurent votre vitesse. The software vous prévient lorsque vous approchez de ces radars dans la direction mesurée.
- Page 230 êtes passé devant eux. Ils calculent la durée entre les deux points pour calculer votre vitesse moyenne. The software vous avertit lorsque vous approchez l'un de ces radars, mais lorsque vous passez devant, l'avertissement continue et votre vitesse moyenne est mesurée tant que vous n'avez pas atteint un autre radar de ce type.
-
Page 231: Sens Des Radars
4.1.5.2 Sens des radars Les différents radars peuvent mesurer la vitesse de la circulation dans un sens, dans les deux sens, ou même dans plusieurs sens à une intersection, lorsqu'ils sont montés sur une base pivotante. Cela s'applique également aux caméras de surveillance des feux de circulation. - Page 232 Le symbole de batterie en haut à gauche à côté de l'heure indique le niveau de charge de la batterie de l'appareil. Icône Description La batterie est en charge. L'appareil fonctionne sur une source externe. La batterie n'est pas en charge mais est pleine.
-
Page 233: Menu « Plus
The software est connecté au récepteur GPS, mais le signal est trop faible et le récepteur ne peut pas déterminer la position GPS. La navigation GPS n'est pas possible. Seuls quelques satellites sont reçus. Les informations sur la position sont disponibles, mais la hauteur (altitude) ne peut pas être calculée. - Page 234 à la version complète du jeu sélectionné. Touchez pour télécharger des jeux supplémentaires sur www.nextar.com/extras. Accès aux applications de voyage : convertisseur d'unités, convertisseur de taille de vêtements, liste des numéros de téléphone internationaux et calculatrice.
-
Page 235: Menu Paramètres
4.3 Menu Paramètres Vous pouvez configurer les paramètres du programme et modifier le comportement de the software. Touchez les boutons suivants : Le menu Paramètres dispose de plusieurs options. Touchez faites défiler la liste avec votre doigt pour la voir en entier. - Page 236 (cartes, points d'intérêt, repères etc.) installés sur your device. Les éléments de contenu actifs et inactif pré-installés (activation requise sur www.nextar.com/extras) sont répertoriés. Modifie les paramètres de base du logiciel définis lors de la configuration initiale. Pour les détails, voir page 6.
-
Page 237: Paramètres De L'itinéraire
4.3.1 Paramètres de l'itinéraire Ces paramètres déterminent le mode de calcul des itinéraires. Bouton Description Vous avez la possibilité de définir le type de véhicule que vous voulez utiliser pour naviguer dans votre itinéraire. En fonction de ce paramètre, certains types de route seront exclus de l'itinéraire ou certaines limitations peuvent ne pas être prises en compte dans le calcul de l'itinéraire. - Page 238 sur la carte. Vous devrez peut-être éviter les autoroutes si vous conduisez un véhicule lent ou si vous remorquez un autre véhicule. Les routes taxées sont des routes payantes, vous pouvez acheter une carte ou une vignette si vous devez les emprunter sur une période plus longue.
- Page 239 Types de véhicules : • • • • • • Types de Méthodes de calcul d'itinéraire : Option Description Indique un itinéraire rapide si vous circulez en respectant plus ou moins la limitation de vitesse sur toutes les routes. Il s'agit en général de la meilleure option pour les véhicules rapides et normaux.
-
Page 240: Paramètres Son
choisit d'autres routes également pour économiser du carburant. Permet d'emprunter un itinéraire avec le moins de virages et de manœuvres possibles. Grâce à cette option, vous pouvez demander à your software de choisir, par exemple, l'autoroute plutôt que de petites rues ou des routes secondaires. - Page 241 sons des touches. Les cartes peuvent contenir des informations sur les limitations de vitesse de quelques portions de route. The software est capable de vous avertir quand vous dépassez la limitation actuelle. Il est possible que cette information ne soit pas disponible pour votre région (demandez à...
-
Page 242: Galerie De Véhicule En 3D
GPS n'est pas disponible ou si vous vous trouvez dans certains pays où les avertissements radars sont interdits. Même si le bouton est disponible, il vous incombe de vérifier si l'utilisation de cette fonction est légale dans votre pays. 4.3.3 Galerie de véhicule en 3D Par défaut, la position actuelle est indiquée par une blue arrow sur la carte. -
Page 243: Systèmes De Couleurs
Sélectionnez un repère véhicule en 3D pour tous les autre types de véhicule. Vous pouvez obtenir plus de repères véhicule sur www.nextar.com/extras. Astuce ! 4.3.4 Systèmes de couleurs Vous pouvez affiner l'apparence de l'écran Carte et des menus. Choisissez les systèmes de couleurs appropriés dans la liste pour l'utilisation diurne et nocturne. -
Page 244: Définition Du Point De Départ
4.3.5 Définition du point de départ En navigation normale, tous les itinéraires sont planifiés à partir de la position actuelle. Afin de vérifier les itinéraires futurs, vous pouvez éteindre le récepteur GPS, et fixer le point de départ de l'itinéraire à un endroit différent de la position GPS actuelle. La procédure est expliquée ici : page 85. - Page 245 Voir ci-dessous. Sélectionnez le clavier virtuel qui sera utilisé lors de la recherche d'une adresse ou lors de la saisie d'un nom dans une destination Favorite. Différentes configurations de claviers internationaux sont disponibles. Formats horaires et Unités : Bouton Description Utilisez cette fonction pour synchroniser le fuseau horaire de l'horloge de votre appareil avec le fuseau horaire en fonction de votre...
- Page 246 Touchez une des catégories pour voir son contenu. Les éléments de contenu actifs et inactif pré-installés (activation requise sur www.nextar.com/extras) sont répertoriés. Les éléments de contenu inactif s'affichent en rouge. Touchez dans le menu « Plus » pour acheter des clés...
-
Page 247: Glossaire
5 Glossaire Réception GPS en 2D/3D Le récepteur GPS utilise les signaux satellites pour calculer sa (votre) position et a besoin d'au moins quatre signaux pour indiquer une position en trois dimensions, incluant l'altitude. Comme les satellites se déplacent et que des objets bloquent parfois les signaux, votre récepteur GPS peut ne pas recevoir ces quatre signaux. - Page 248 Système de couleur Your software comprend des systèmes de couleurs différents pour la carte et les écrans de menu selon que vous les utilisez le jour ou la nuit. Ces systèmes sont des paramètres graphiques personnalisés. Ils proposent des couleurs différentes pour les rues, quartiers ou plans d'eau en mode 2D et 3D.
- Page 249 Vous pouvez utiliser des cartes numériques de manière interactive : en effectuant des zooms avant ou arrière (augmenter ou réduire l'échelle), en les inclinant vers le haut ou vers le bas, ou encore en les faisant pivoter à droite ou à gauche.
- Page 250 Orientation de la carte Voie en haut En mode Voie en haut, la carte pivote pour que la partie supérieure pointe toujours dans la direction dans laquelle vous circulez actuellement. Il s'agit de l'orientation par défaut en mode Carte 3D. Voir aussi : Orientation de la carte Nord en haut.
-
Page 251: Note Sur Le Droit D'auteur
Fabriqué en Chine © 2009 Nextar (Hong Kong) Limited. Nextar est une marque déposée et une marque de service déposée de Nextar (Hong Kong) Limited. Toute autre marque de fabrique, marque de commerce et marques de service déposées sont les marques de leur propriétaire respectifs. - Page 252 Nous portons un intérêt tout particulier à la protection de l’environnement, et nous espérons que vous partagez cette préoccupation. Veuillez vous rendre sur notre site internet: http://www.nextar.com/green ou nous appeler au 1-888-849-0846 pour plus d’informations sur notre programme de recyclage.
Need help?
Do you have a question about the q4 series and is the answer not in the manual?
Questions and answers