Table of Contents
Advertisement
Quick Links
Advertisement
Table of Contents

Subscribe to Our Youtube Channel
Related Manuals for ViewSonic SC-Z56


Summary of Contents for ViewSonic SC-Z56
- Page 1 SC-Z56 Zero Client User Guide Model No.: VS15815...
-
Page 2: Compliance Information
Compliance Information FCC Statement This device complies with part 15 of FCC Rules. Operation is subject to the following two conditions: (1) this device may not cause harmful interference, and (2) this device must accept any interference received, including interference that may cause undesired operation. -
Page 3: Important Safety Instructions
Important Safety Instructions Read these instructions completely before using the equipment. Keep these instructions in a safe place. Heed all warnings. Follow all instructions. Do not use this equipment near water. Warning: To reduce the risk of fire or electric shock, do not expose this apparatus to rain or moisture. - Page 4 18. To reduce the risk of electric shock, do not perform any servicing other than that contained in the operating instructions unless you are qualified to do so. 19. CAUTION – These servicing instructions are for use by qualified service personnel only.
-
Page 5: Declaration Of Rohs2 Compliance
Declaration of RoHS2 Compliance This product has been designed and manufactured in compliance with Directive 2011/65/ EU of the European Parliament and the Council on restriction of the use of certain hazardous substances in electrical and electronic equipment (RoHS2 Directive) and is deemed to comply with the maximum concentration values issued by the European Technical Adaptation Committee (TAC) as shown below: Proposed Maximum... -
Page 6: Copyright Information
Other product names mentioned herein are used for identification purposes only and may be trademarks and/or registered trademarks of their respective companies. Disclaimer: ViewSonic Corporation shall not be liable for technical or editorial errors or omissions contained herein; nor for incidental or consequential damages resulting from furnishing this material, or the performance or use of this product. -
Page 7: Product Registration
USA & Canada: http://www.viewsonic.com/company/green/recycle-program/ Europe: http://www.viewsoniceurope.com/uk/support/recycling-information/ Taiwan: http://recycle.epa.gov.tw/recycle/index2.aspx About This User’s Manual This installation guide provides basic information on how to set up SC-Z56 zero clients. Manual Structure and Subjects Chapter Subject Provides an overview of ViewSonic SC-Z56 zero clients. -
Page 8: Table Of Contents
Introduction ........................2 Features ..........................2 Package Contents ......................2 Exterior Views ........................3 Panel Components ......................3 LED Indicators ........................4 Setting Up Your SC-Z56 ................5 Positioning Your SC-Z56 ....................6 Getting Connected ......................8 Specifications ..................... 9 Other Information .................... 10 Customer Support ..........................10 Limited Warranty ..........................11... -
Page 9: Overview
Overview This chapter provides an overview of your SC-Z56 zero clients. 1.1 Introduction Desktop virtualization and simple endpoint devices 1.2 Features Key features of ViewSonic SC-Z56 1.3 Package Contents Check your package contents 1.4 Exterior Views Overview of zero client outside elements 1.5 Panel Components... -
Page 10: Introduction
• Simplified system maintenance and Improved system security • More scalability with low-cost endpoint devices 1.2 Features The key features of ViewSonic SC-Z56 zero clients are: • Teradici™ TERA2140 processor with Teradici™ 2nd generation zero client chipset • Support for VMware® desktop virtualization solution: VMware® View™... -
Page 11: Exterior Views
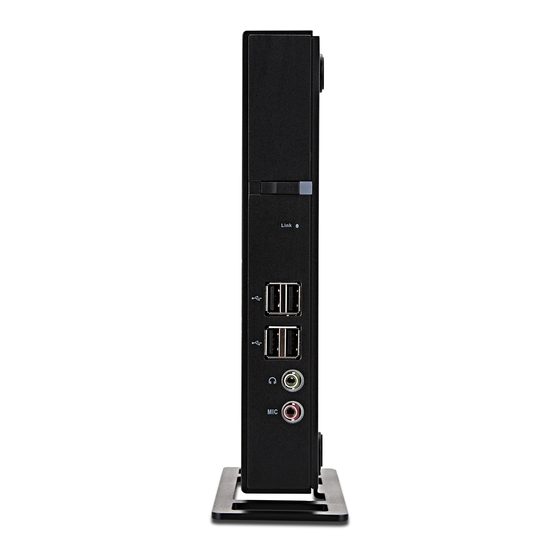
Overview Exterior Views 1.4 Exterior Views ViewSonic SC-Z56 Left Front View Right Rear View Front Rear 1.5 Panel Components ViewSonic SC-Z56 Front Panel Component Sign Name Description • Press to power on the zero client. Power button • Long press to force power off the zero client. -
Page 12: Led Indicators
Audio out DC IN Connects to an AC adapter. Kensington lock 1.6 LED Indicators Your SC-Z56 is equipped with a Power LED to indicate the state of power. The meanings of LED signals are described as follows: Signal Meaning Amber The client is off. -
Page 13: Setting Up Your Sc-Z56
This chapter provides detailed instructions on how to set up your SC-Z56 zero clients. 2.1 Positioning Your SC-Z56 To mount your SC-Z56 Step 1: Remove the Stand from Your SC-Z56 Step 2: Understand VESA Mount Plate for SC-Z56 Step 3: Mount Your SC-Z56 2.2 Getting Connected... -
Page 14: 2.1 Positioning Your Sc-Z56
• Put it (with its stand) on a desk or a desired place uprightly. • Mount it on the back of a monitor using a VESA mount kit. To mount your SC-Z56 on the back of a monitor, please follow the steps below: Step 1:... - Page 15 Step 3: Mount Your SC-Z56 To mount your SC-Z56 on the back of a monitor, please do the following: 1. Attach the mounting bracket to the back side of SC-Z56 using the 2 screws provided. M4XL8*2 (Silver) 2. Next, use the provided screws (M4XL10) to attach the VESA mounting plate to the rear side of the monitor.
-
Page 16: 2.2 Getting Connected
Otherwise, the client may fail to set an appropriate resolution for the monitor(s). 4. Connect your SC-Z56 to a power outlet using the AC adapter included in the package. 5. Connect other peripherals for your SC-Z56 if needed. -
Page 17: Specifications
Specifications ViewSonic SC-Z56 zero client Processor Teradici TERA2140 Memory 512 MB Resolutions Single: 2560x1600@60Hz Dual: 2560x1600@60Hz Quad: 1920x1200@60Hz I/O interfaces Front: Rear: 4 x USB 2.0 1 x Microphone 2 x USB 2.0 4 x DisplayPort OUT 1 x DC IN... -
Page 18: Other Information
Latin America C= http://www.viewsonic.com/ www.viewsonic.com/la/ soporte@viewsonic.com (Mexico) la/soporte/servicio-tecnico Nexus Hightech Solutions, Cincinnati #40 Desp. 1 Col. De los Deportes Mexico D.F. Tel: 55) 6547-6454 55)6547-6484 Other places please refer to http://www.viewsonic.com/la/soporte/servicio-tecnico#mexico Latin America C= http://www.viewsonic.com/ www.viewsonic.com/la/ soporte@viewsonic.com (Peru) la/soporte/servicio-tecnico Macau www.hk.viewsonic.com T= 853 2870 0303 service@hk.viewsonic.com... -
Page 19: Limited Warranty
ViewSonic Zero Client products are warranted for (3) years from the first consumer purchase for parts and labor. User is responsible for the back up of any data before returning the unit for service. ViewSonic is not responsible for any data lost. - Page 20 Exclusion of damages: ViewSonic’s liability is limited to the cost of repair or replacement of the product. ViewSonic shall not be liable for: 1. Damage to other property caused by any defects in the product, damages based upon inconvenience, loss of use of the product, loss of time, loss of profits, loss of business opportunity, loss of goodwill, interference with business relationships, or other commercial loss, even if advised of the possibility of such damages.
Need help?
Do you have a question about the SC-Z56 and is the answer not in the manual?
Questions and answers