Advertisement
Quick Links
Advertisement

Related Manuals for Numark NDX500


Summary of Contents for Numark NDX500
- Page 1 VirtualDJ 8 – Numark NDX500...
-
Page 2: Table Of Contents
Table of Contents Installation ..........................3 Connections ........................... 3 Firmware & Drivers ........................ 3 VirtualDJ 8 Setup ........................4 Advanced Setup ........................5 Layout............................6 Operation ..........................7 Useful Links ..........................11 VirtualDJ 8 – Numark NDX500... -
Page 3: Installation
SOURCE buttons. Firmware & Drivers No drivers are required to be installed for the NDX500. The NDX500 is a USB class- compliant and your Operation system (Windows or Mac) will auto-install the necessary drivers and will auto-detect the NDX500 as a Midi device with built-in Audio interface. -
Page 4: Virtualdj 8 Setup
A Pro Infinity, a PLUS Controller or a Subscription License is required to use the Numark NDX500 with VirtualDJ 8 Without any of the above Licenses, the controller will operate for 10 minutes each time you restart VirtualDJ 8. -
Page 5: Advanced Setup
Manual, however those can be adjusted to your needs via VDJ Script actions. Note. Each NDX500 unit (if more than 1 is connected) will be additionally displayed in this window, and any modifications in the mapping file will affect all units. -
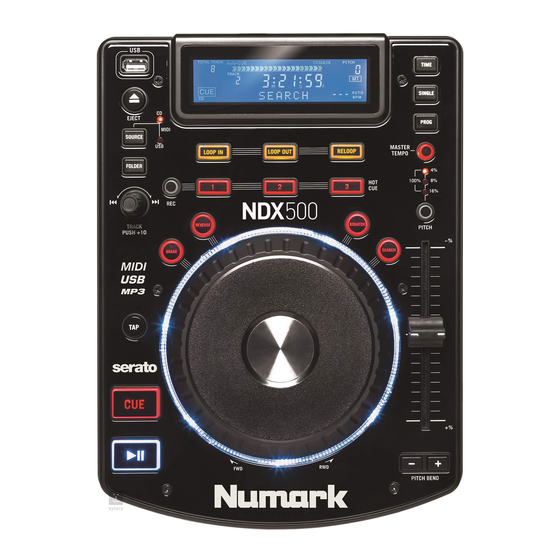
Page 6: Layout
Layout VirtualDJ 8 – Numark NDX500... -
Page 7: Operation
6. EJECT. Not used. This button selects one of the 4 available MIDI channels of the NDX500. Regardless of the selected MIDI Channel, the NDX500 will still control the assigned VirtualDJ deck. VirtualDJ 8 – Numark NDX500... - Page 8 Controllers tab of the VirtualDJ Settings window. By default, if 2 NDX500 are connected and a 4 decks skin is used, the left unit will be assigned to deck 1 and will toggle between decks 1 and 3, and the right unit will be automatically assigned to deck 2 and will toggle between decks 2 and 4.
- Page 9 Hold SHIFT down and then use this button to enable/disable Slip mode. When Slip mode is enabled, several functions such as Scratching, loops, HotCues etc. will act VirtualDJ 8 – Numark NDX500...
- Page 10 26. PITCH BEND. Press and hold down these buttons to temporary speed up/slow down the song while pressed. When released, the track playback will return to the speed designated by the Pitch Fader. VirtualDJ 8 – Numark NDX500...
-
Page 11: Useful Links
Numark NDX500 product page: http://www.numark.com/product/ndx500 Numark NDX500 User Guide: http://www.numark.com/images/product_downloads/NDX500-UserGuide-v1.1.pdf Hardware Integration Department 2015 - ATOMIX PRODUCTIONS Reproduction of this manual in full or in part without written permission from Atomix Productions is prohibited. VirtualDJ 8 – Numark NDX500...
Need help?
Do you have a question about the NDX500 and is the answer not in the manual?
Questions and answers