LG PQWRCQ0FDB Owners & Installation Manual
Wireless remote controller
Hide thumbs
Also See for PQWRCQ0FDB:
- Owner's manual (266 pages) ,
- Owners & installation manual (13 pages)
Table of Contents
Advertisement
Available languages
Available languages
Advertisement
Chapters
Table of Contents

Related Manuals for LG PQWRCQ0FDB


Summary of Contents for LG PQWRCQ0FDB
-
Page 1: Installation Manual
OWNER’S & INSTALLATION MANUAL AIR CONDITIONER Please read this manual carefully before operating your set and retain it for future reference. TYPE : Wireless Remote Controller Models : PQWRCQ0FDB PQWRHQ0FDB www.lg.com P/NO : MFL67241904... -
Page 2: Table Of Contents
Wireless Remote Controller Owner’s & Installation Manual TABLE OF CONTENTS ■ Safety Precaution.......................3 ■ Part Description ......................4 Wireless Remote Controller..................5 ■ Operating Instruction ....................6 How to insert the Batteries...................6 Wireless Remote Controller Maintenance ..............6 Operating Method ......................6 Installer Setting - Setting Address of Central Control ..........7 ■... -
Page 3: Safety Precaution
Safety Precautions Safety Precautions • The installation requires expert skills, and it should be installed by the service center or other shops specialized in the installation and recognized by our company. • For all the problems arising after installation by someone who has no relevant qualifications, our company will not provide free service. -
Page 4: Part Description
Part Description Part Description LCD Screen Wireless Remote Controller Accessory Holder(1EA) Fixing Screw (2EA) Owner's / Installation AAA(1.5V) Manual Batteries(2EA) 4 Wireless Remote Controller... -
Page 5: Wireless Remote Controller
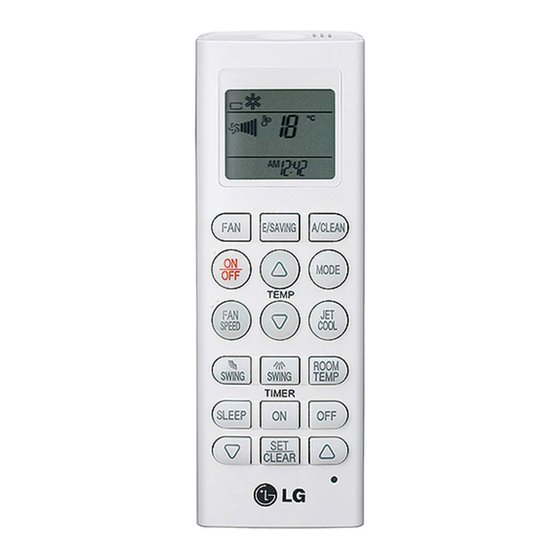
Part Description Wireless Remote Controller VANE ANGLE Button Used to set each vane angle. FUNCTION SETTING Button Used to set or clear Auto Clean, Smart Clean, Electric heater or Individual vane angle control. ON/OFF Button Used to turn on/off the unit. JET COOL Button Speed cooling operates super high fan speed. -
Page 6: Operating Instruction
Operating Instruction Operating Instruction How to insert the Batteries 1. Remove the battery cover by pulling it according to the arrow direction. 2. Insert new batteries making sure that the (+) and (-) of battery are installed correctly. 3. Reattach the cover by sliding it back into position. 1. -
Page 7: Installer Setting - Setting Address Of Central Control
Installation Instruction Installation Instructions Installer Setting - Setting Address of Central Control With the MODE button pressed, press the RESET button. By using the TEMPERATURE SETTING button, set the indoor unit address. - Setting range : 00 ~ FF Group No. Indoor Unit No. -
Page 8: Installer Setting -How To Enter Installer Setting Mode
Installation Instruction Installer Setting -How to enter installer setting mode CAUTION Installer setting mode is to set the detail function of the remote controller. If the installer setting mode is not set correctly, it can cause problems to the product, user injury or property damage. -
Page 9: Installer Setting - Installer Setting Code Table
Installation Instruction Installer Setting - Installer Setting Code Table Installer Setting Code Table Function Function Code Setting Value Remote Controller LCD 0 : Set to Master Mode Override 1 : Set to Slave 1 : Standard 2 : Low Ceiling Height Selection 3 : High 4 : Super High... -
Page 10: Owner's Instruction
Owner's Instruction Owner's Instruction Cooling Mode - Standard Operation Press the ON/OFF button. The unit will respond with beep sound. Press MODE button to select Cooling Mode. Set the desired temperature by pressing TEMP button. To raise the temperature Press ROOM TEMPERATURE CHECKING button to check the room temperature. -
Page 11: Auto Operation Mode
Owner's Instruction Auto Operation Mode Press the ON/OFF button. The unit will respond with beep sound. Press MODE button to select Auto Operation Mode. Set the desired temperature. <For Cooling Model> The temperature and fan speed are automatically set by the electronic controls based on the actual room temperature. -
Page 12: Auto Changeover Mode
Owner's Instruction Auto Changeover Mode This Function is only available on some products. Press the ON/OFF button. The unit will respond with beep sound. Press MODE button to select Auto Changeover Mode. Set the desired room temperature. ❈ Setting Temp. Range in Auto Changeover Mode : 18~30°C (64~86°F) To raise the temperature To lower the temperature... -
Page 13: Auto Changeover Mode - Setting The Mode Change Temperature
Owner's Instruction Auto Changeover Mode - Setting the Mode Change Temperature This Function is to set the operating mode of the Auto Changeover Mode. In Auto Changeover Mode, Press FUNCTION button to select Setting the Mode Change Temperature. Press the TEMPERATURE SETTING button to set desired Mode Change Temperature. (Default value is 2°C(4°F).) To raise the temperature ❈... -
Page 14: Dehumidification Mode
Owner's Instruction Dehumidification Mode Press the ON/OFF button. The unit will respond with beep sound. Press MODE button to select Dehumidification Mode. Set the fan speed. You can select the fan speed in four steps - low, medium, high, or chaos. Each time the button is pressed, the fan speed mode is shifted. -
Page 15: Heating Mode
Owner's Instruction Heating Mode This Function is only for H/P model. Press the ON/OFF button. The unit will respond with beep sound. Press MODE button to select Heating Mode. Set the desired temperature by pressing TEMP button. Press ROOM TEMPERATURE CHECKING button to check the room temperature. -
Page 16: Fan Mode
Owner's Instruction Fan Mode Press the ON/OFF button. The unit will respond with beep sound. Press MODE button to select Fan Mode. Set the fan speed again. You can select the fan speed in four steps–low, medium, high, or chaos. Each time the button is pressed, the fan speed mode is shifted. -
Page 17: Temperature Setting/Room Temperature Checking
Owner's Instruction Temperature Setting/Room Temperature checking We can simply adjust the desired temperature • Press the buttons to adjust the desired temperature : Increase Temp. per one time pressing : Decrease Temp. per one time pressing Room temp: Indicate the current room temperature Set temp: Indicate the temperature that user want to set <Cooling Mode>... -
Page 18: Airflow Setting
Airflow Setting Airflow Setting Up/Down Airflow Direction Control (Optional) The up/down airflow (Vertical Airflow) can be adjusted by using the remote controller. 1. Press the ON/OFF button to start the unit. 2. Press UP/DOWN AIRFLOW button and the louvers will swing up and down. Press the UP/DOWN AIRFLOW button again to set the vertical louver at the desired airflow direction. -
Page 19: Sub Function
PLASMA Purification only If you press the PLASMA button, Plasma Purification operates. • Plasma filter is a technology developed by LG to get rid of microscopic contaminants in the intake air generating a plasma of high charge electrons. This plasma kills and destroys the contaminants completely to provide clean and hygienic air. -
Page 20: Smart Clean (Optional)
Sub function Smart Clean (Optional) The Smart Clean function can be used by setting to manual or automatic. Auto Smart Clean operation If the accumulated operation time of the product exceeds 30 hours, the Smart Clean automatically starts when the unit is turned off. 1. -
Page 21: Lcd Luminosity Control (Optional)
Sub function LCD Luminosity Control (Optional) Press the LCD LUMINOSITY button. It is comfortable when you feel that the display of the unit too bright . Celsius/Fahrenheit Switching Press the °C/°F SWITCH button to change from Celsius to Fahrenheit or from Fahrenheit to Celsius. Whenever press TEMPERATURE SETTING button in Fahrenheit mode, the temperature will increase/drop 2°F. -
Page 22: Individual Vane Angle Control (Optional)
Sub function Individual vane angle control (Optional) It is the function that can control 4 vane angles individually in the ceiling type 4Way cassette product group. Press the FUNCTION SETTING button 3 times. (4 times during heating operation) Individual vane angle control symbol will blink. •... -
Page 23: Timer
Timer Timer Setting the Current Time 1. Press the SET / CLEAN button for 3 seconds. 2. Press TIME SETTING buttons until the desired time is set. (If you press down the button for a long time, it will change quickly in the units of 10 min.) 3. -
Page 24: Off Timer Setting
Timer Off Timer Setting 1. Press the OFF button to turn timer on or off. Timer OFF 2. Press TIME SETTING buttons until the desired time is set. 3. Press the SET / CLEAR button. To cancel the Timer Setting •... - Page 26 MANUAL DEL PROPIETARIO Y DE INSTALACIÓN APARATO DE AIRE ACONDICIONADO Lea cuidadosamente este manual antes de utilizar el aparato y guárdelo como referencia para el futuro. Tipo: Mando a distancia Modelos: PQWRCQ0FDB PQWRHQ0FDB www.lg.com...
- Page 27 Mando del propietario y de instalación del mando a distancia ÍNDICE I Precauciones de seguridad ..................3 I Descripción de las partes ..................4 Mando a distancia......................5 I Instrucciones de uso ....................6 Colocación de las pilas ....................6 Mantenimiento del mando a distancia .................6 Método de utilización ....................6 Configuración de instalador - Ajuste de la dirección del control central ......7 I Instrucciones de instalación..................7...
-
Page 28: Precauciones De Seguridad
Precauciones de seguridad Precauciones de seguridad • La instalación requiere conocimientos cualificados y deberá ser realizada por un servicio técnico u otros profesionales especializados y reconocidos por nuestra empresa. • Para todos los problemas resultantes de la instalación realizada por una personal no cualificada, nuestra empresa no facilitará... -
Page 29: I Descripción De Las Partes
Descripción de las partes Descripción de las partes Pantalla LCD Mando a distancia Accesorio Soporte (1 unid.) Tornillo de fijación Manual del propietario Pilas AAA (1,5V) (2 unid.) / instalación (2 unid.) 4 Mando a distancia... -
Page 30: Mando A Distancia
Descripción de las partes Mando a distancia Botón VANE ANGLE Se utiliza para ajustar el ángulo de cada aleta. Botón de CONFIGURACIÓN DE FUNCIONES Se utilizar para seleccionar Limpieza automática, Limpieza inteligente, calefactor electrónico o Control de ángulo de aletas individuales. Botón de encendido/apagado Enciende/apaga la unidad. -
Page 31: I Instrucciones De Uso
Instrucciones de uso Instrucciones de uso Colocación de las pilas 1. Deslice la tapa en la dirección de la flecha. 2. Introduzca las pilas nuevas asegurándose de respetar la polaridad (+) y (-) de las pilas. 3. Vuelva a colocar la tapa deslizándola a su posición. NOTA 1. -
Page 32: Configuración De Instalador - Ajuste De La Dirección Del Control Central
Instrucciones de instalación Instrucciones de instalación Configuración de instalador - Comprobación de la dirección del control central Con el botón MODE PULSADO, pulse el botón RESET. Con el botón de AJUSTE DE TEMPERATURA, seleccione la dirección de la unidad interior. - Rango de ajuste: 00 ~ FF Nº... -
Page 33: Configuración De Instalador - Entrar En El Modo De Configuración De Instalador
Instrucciones de instalación Configuración de instalador - Entrar en el modo de configuración de instalador PRECAUCIÓN El modo de configuración de instalador sirve para configurar en detalle la función del panel de control. Si el modo de configuración de instalador no se configura correctamente, podría causar problemas al producto, daños al usuario o daños materiales. -
Page 34: Configuración De Instalador - Tabla De Códigos De Configuración De Instalador
Instrucciones de instalación Configuración de instalador - Tabla de códigos de configuración de instalador Tabla de códigos de configuración de instalador Nº Función Código de función Valor de configuración LCD de mando a distancia 0: Configurar a maestro Anulación de modo 1: Configurar a esclavo 1 : Estándar 2 : Baja... -
Page 35: I Instrucciones Del Propietario
Instrucciones del propietario Instrucciones del propietario Modo de refrigeración - Funcionamiento estándar Pulse el botón de encendido/apagado. La unidad responderá con una señal acústica. Pulse el botón MODE para seleccionar el modo de refrigeración. Ajuste la temperatura deseada pulsando el botón TEMP. Para bajar la temperatura Pulse el botón de comprobación de temperatura de la habitación para comprobar la temperatura interior. -
Page 36: Modo Funcionamiento Automático
Instrucciones del propietario Modo funcionamiento automático Pulse el botón de encendido/apagado. La unidad responderá con una señal acústica. Pulse el botón MODE para seleccionar el modo de funcionamiento automático. Seleccione la temperatura deseada. <Para el modo de refrigeración> La temperatura y la velocidad del ventilador se ajustan automáticamente con los controles electrónicos según la temperatura real de la habitación. -
Page 37: Modo Cambio Automático
Instrucciones del propietario Modo cambio automático Esta función sólo está disponible en algunos productos. Pulse el botón de encendido/apagado. La unidad responderá con una señal acústica. Pulse el botón MODE para seleccionar el modo de cambio automático. Seleccione la temperatura deseada para la habitación. C Ajuste de rango de temperatura en el modo de cambio automático: 18~30°C (64~86°F) Para bajar la temperatura... -
Page 38: Modo Cambio Automático - Ajuste De La Temperatura De Cambio De Modo
Instrucciones del propietario Modo cambio automático - Ajuste de la temperatura de cambio de modo Esta función la ajuste el modo de funcionamiento del modo de cambio automático. En el modo de cambio automático, pulse el botón FUNCTION para seleccionar el ajuste de temperatura de cambio de modo. -
Page 39: Modo De Deshumidificación
Instrucciones del propietario Modo de deshumidificación Pulse el botón de encendido/apagado. La unidad responderá con una señal acústica. Pulse el botón MODE para seleccionar el modo de deshumidificación. Seleccione la velocidad del ventilador. Se utiliza para seleccionar la velocidad del ventilador en cuatro niveles: bajo, medio, alto y caos. Cada vez que se pulsa el botón, cambia el modo de velocidad del ventilador. -
Page 40: Modo De Calefacción
Instrucciones del propietario Modo de calefacción Esta función es sólo para el modelo H/P. Pulse el botón de encendido/apagado. La unidad responderá con una señal acústica. Pulse el botón MODE para seleccionar el modo de calefacción. Ajuste la temperatura deseada pulsando el botón TEMP. Pulse el botón de comprobación de temperatura de la habitación para comprobar la temperatura interior. -
Page 41: Modo De Ventilador
Instrucciones del propietario Modo de ventilador Pulse el botón de encendido/apagado. La unidad responderá con una señal acústica. Pulse el botón MODE para seleccionar el modo de ventilador. Seleccione la velocidad del ventilador de nuevo. Se utiliza para seleccionar la velocidad del ventilador en cuatro niveles: bajo, medio, alto y caos. -
Page 42: I Ajuste De Temperatura / Comprobación De La Temperatura De La Habitación
Ajuste de temperatura / comprobación de la temperatura de la habitación Ajuste de temperatura / comprobación de la temperatura de la habitación Se puede ajustar muy fácilmente la temperatura deseada. • Pulse los botones para ajustar la temperatura deseada. : La temperatura aumenta cada vez que se pulsa un botón. : La temperatura se reduce cada vez que se pulsa un botón. -
Page 43: I Ajuste Del Caudal De Aire
Ajuste del caudal de aire Ajuste del caudal de aire Control de dirección de aire arriba/abajo (opcional) El flujo de aire arriba/abajo (flujo de aire vertical) se puede cambiar con el mando a distancia. 1. Pulse el botón encendido/apagado para poner en funcionamiento la unidad. 2. -
Page 44: I Función Sub
Sólo purificación de PLASMA Si pulsa el botón PLASMA, se activa la purificación de plasma. • El filtro de plasma es una tecnología desarrollada por LG para la eliminación de contaminantes microscópicos del aire de entrada y genera un plasma de electrones de carga alta. Este plasma mata y destruye completamente los contaminantes para proporcionar aire limpio e higiénico. -
Page 45: Limpieza Inteligente (Opcional)
Función Sub Limpieza inteligente (opcional) La limpieza inteligente se puede usar con la configuración manual o automática. Funcionamiento de limpieza inteligente automática Si el tiempo de funcionamiento acumulado del producto es superior a 30 horas, se pone en funcionamiento automáticamente la limpieza inteligente cuando se apaga el aparato. 1. -
Page 46: Control De Luminosidad De Lcd (Opcional)
Función Sub Control de luminosidad de LCD (opcional) Pulse el botón LCD LUMINOSITY. Es agradable sentir que la pantalla de la unidad no es demasiado brillante. Cambio Centígrados/Fahrenheit Pulse el botón °C/°F para cambiar de Centígrados a Fahrenheit y viceversa. Cuando pulse el botón de ajuste de temperatura en el modo Fahrenheit, la temperatura subirá/bajará... -
Page 47: Control De Ángulo De Aletas Individual (Opcional)
Función Sub Control de ángulo de aletas individual (opcional) Es la función que permite controlar 4 ángulos de aleta individualmente en el grupo de productos de cassette de 4 direcciones para techo. Pulse el botón de configuración de funciones 3 veces. (4 veces durante el funcionamiento de calefacción) Parpadeará... -
Page 48: I Temporizador
Temporizador Temporizador Ajuste de la hora actual 1. Pulse el botón SET / CLEAN durante 3 segundos. 2. Pulse los botones TIME SETTING hasta ajustar la hora deseada. (Si mantiene el botón pulsado, cambiará rápidamente en unidades de 10 min.) 3. -
Page 49: Ajuste Del Temporizador De Apagado
Temporizador Ajuste del temporizador de apagado 1. Pulse el botón OFF para activar o apagar el temporizador. Temporizador apagado 2. Pulse los botones TIME SETTING hasta ajustar la hora deseada. 3. Pulse el botón SET / CLEAR. Para cancelar el ajuste del temporizador •...
Need help?
Do you have a question about the PQWRCQ0FDB and is the answer not in the manual?
Questions and answers