
Related Manuals for Block CVR 100


Summary of Contents for Block CVR 100
-
Page 1: Instruction Manual
Bedienungsanleitung 1--29 Instruction Manual 30--62 CVR 100 HIFI-CD WIFI Internet DAB+/ FM Receiver CVR 100 HI FI-CD Receiver... -
Page 2: Table Of Contents
Inhaltsverzeichnis 4 Abschnitt 1 Sicherheitshinweise Sicherheits-und Warnhinweise 7 Abschnitt 2 Vor der Inbetriebnahme 8 Abschnitt 3 Bedienung des Gerätes Fernbedienung W-Lan Fernbedienung 11 Abschnitt3 Anschlüsse am Gerät 12 Abschnitt 4 Anschlüsse Anschluss am Strom Antenne Signal Eingänge Netzwerk W-LAN 13 Abschnitt 5 Generelle Funktionen Installation (Setup) UKW/DAB Einstellung... - Page 3 20 Abschnitt 8 Musik Server Musik Player Informationen 22 Abschnitt 9 Internet Radioportal 23 Abschnitt 10 Generelle Funktionen Software Upgrade Werksrückstellung Sprache Zeiteinstellung 12/24 Stundenumstellung 25 Abschnitt 11 Fehlermeldung 26 Abschnitt 11 Fehlermeldung am Verstärker 27 Abschnitt 12 Problembehebung 28 Abschnitt 13 Pflege und Handhabung 29 Abschnitt 14 Technische Daten...
- Page 4 Sehr geehrter Kunde, danke, dass Sie sich für dieses hochwertige Gerät entschieden haben. Die Bedienungsanleitung wird ihnen eine generelle Übersicht darüber geben, wie Sie dieses Gerät bedienen können. Sie erhalten Sicherheitsinformationen und werden darüber informiert, wie Sie ihr Gerät am besten reinigen. Bitte nehmen Sie sich einige Minuten Zeit, die Bedienungsanleitung sorgfältig durchzulesen.
- Page 5 Abschnitt 1 Sicherheitshinweise -4-...
- Page 6 Umgang mit Batterien Batterien können brennbare Stoffe enthalten. Bei unsachgemäßer Behandlung können Batterien auslaufen, sich stark erhitzen, entzünden oder gar explodieren, was Schäden für Ihr Gerät und Ihre Gesundheit zur Folge haben könnte. Befolgen Sie folgende Hinweise: Halten Sie Kinder von Batterien fern. Sollten Batterien verschluckt worden sein, melden Sie dies sofort Ihrem Arzt.
- Page 7 Abschnitt 1 Sicherheitshinweise -6-...
-
Page 8: Vor Der Inbetriebnahme
Vor der Inbetriebnahme Bevor Sie Ihr Internet Radio benutzen, benötigen Sie: ●Einen Breitband - Internet Anschluss. ●Kabelloser Anschluss (Wi-Fi), angeschlossen an ein Breitband - Internet, bevorzugt über einen Router. ● Wenn Sie keine kabellose Anschlussmöglichkeit haben, können Sie einen Kabelanschluss verwenden. Ein kabelloser Anschluss wird bevorzugt. -
Page 9: Bedienung Des Gerätes
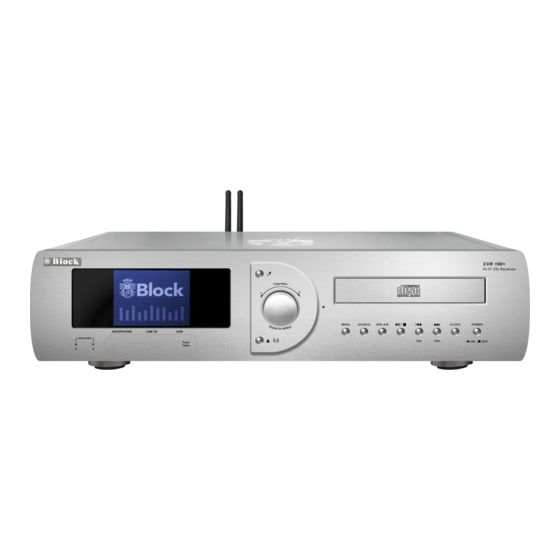
Bedienung des Gerätes Vorderseite CVR 100 HI FI-CD Receiver 10 11 12 13 14 15 16 17 PUSH OPEN ZUM ÖFFNEN DRÜCKEN 1 . Lautsprecher A: Die LED leuchtet, wenn Sie Lautsprecher A gewählt haben. 2 . Lautsprecher B: Die LED leuchtet, wenn Sie Lautsprecher B gewählt haben. -
Page 10: Fernbedienung
Repeat: Wiederholung des Titels oder der CD. Radio: Wenn Sie Radio hören, können Sie auf den Tasten Sender speichern. CD: Wenn Sie CD hören, könne Sie einzelne CVR 100 REMOTE CONTROL Titel anwählen. Bitte beachten Sie, dass die Zahl dreistellig sein muss, z.B. 008. -
Page 11: W-Lan Fernbedienung
Bevor Sie diese Funktion nutzen können, müssen Sie für Ihr iPhone, iTouch, iPad im App Store das APP „FRONTIER SELICON WIRELESS Fernbedienung DEVICE REMOTE CONTROL“ herunterladen. Im CVR 100 unter „System Settings“ gehen Sie auf „Network Settings“. Wählen Sie „Network Conectet“ und bestätigen Sie mit „Yes“. Nun ist Ihr iPhone, iPad oder iTouch im gleichen Netzwerk. -
Page 12: Anschlüsse Am Gerät
Anschlüsse am Gerät 1 2 3 Model: CVR 100 HIFI-CD Receiver DAB/FM DAB+ Internet Radio When output select to A+B, A and B Impedance must be > 8 12 13 14 15 16 17 18 Power Schalter: Mit diesem Hauptschalter können Sie das Gerät ein- und ausschalten. -
Page 13: Anschlüsse
Anschlüsse Anschlüsse -Schließen Sie das Netzkabel an einer Steckdose an. Antenne: -Schließen Sie die UKW Wurfantenne am Gerät an. Signal Eingänge: -Schließen Sie hier den CD Spieler an. Netzwerk: -Schließen Sie hier ein RJ 45 Kabel an, um das Gerät mit ihrem Router zu verbinden. W-LAN: -Um kabellos ins Internet zu gelangen, schließen Sie die WIFI 2.AG Antenne an das Gerät an. -
Page 14: Generelle Funktionen
Generelle Funktionen Setup › Sie werden gefragt, ob "Setup Wizard" gestartet werden soll, wenn das Gerät wechselt zu IR / Medien / DAB / FM. Wenn Sie nicht möchten, dass dieses passiert oder es zu einem späteren Zeitpunkt gestartet werden soll, können Sie diese Setup-Funktion erneut starten wie folgt: Menü... -
Page 15: Auswahl Eines Gespeicherten Senders
Sender speichern: -Drücken Sie die Taste 1-10 und halten diese gedrückt, um die Stationen 1-10 zu belegen 10 Sender können Sie speichern. Auswahl eines gespeicherten Senders: -Es gibt verschiedene Wege gespeicherte Sender auszuwählen -Drücken Sie eine Zahl, um einen gespeicherten Sender auszuwählen. Beispiel: -Drücken Sie kurz die „P“... -
Page 16: Anschluss An Ein Netzwerk
Anschluss an ein Netzwerk -Sie benötigen einen Netzwerk Anschluss, um das Internet Radio oder den Musikserver zu benutzen. -Sie benötigen einen Router mit einem RJ 45 Kabel, oder einen W-LAN Router mit dem dazugehörigen Passwort, um ins Netzwerk zu gelangen. -Ihr Router benötigt einen Breitband-Internet-Anschluss, um das Internet Radio und um Software Updates nutzen zu können. -
Page 17: Verbinden Mit Dem Netzwerk
-Drücken Sie die „Mode“ Taste oder wählen Sie im Menü Internet Radio, um ins Internet Radio zu gelangen. -Der CVR 100 empfängt tausende von Sendern aus aller Welt. Wenn Sie das Programm Internet Radio anwählen, wird sich der CVR 100 über das Radio Portal von Frontier Selicon mit verschiedenen Kategorien versorgen. - Page 18 4.Gateway Adresse Wählen Sie die Gateway Adresse mit den Tasten oder mit dem Control Regler, nutzen Sie die Tasten > und < um ein Feld auszusuchen. Drücken Sie Enter und suchen Sie das nächste Feld. 5.DNS Nun setzen Sie eine Adresse und wenn gewünscht, eine zweite Adresse mit den Tasten oder mit dem Control Regler.
-
Page 19: Netzwerk Profile
Netzwerk Profile -Wählen Sie im Menü > System Einstellung > Netzwerk > Netzwerk Profile, um ein nicht gewünschtes Netzwerk zu entfernen. Hier finden Sie eine Liste der genutzten Netzwerke. Wählen Sie ein Profil mit den Tasten ▲ aus und drücken Sie „Enter“. - Page 20 -Die folgenden Funktionen finden Sie unter dem Punkt „ Sender Liste“ Meine Favoriten / Sender / Podcast / Meine hinzugefügten Sender -Wählen Sie „ zuletzt gehört“, um zu den zuletzt gehörten Sendern zu gelangen Sender speichern: -Drücken Sie die Taste 1-10 und halten diese gedrückt, um die Stationen 1-10 zu belegen 10 Sender können Sie speichern.
-
Page 21: Musik Server
-Um die Funktion Musik von ihrem Computer abzuspielen - nutzen zu können, müssen Sie erst Ihren Computer konfigurieren. UPnP (Universal Plug and Play) erlaubt Geräten, wie diesem CVR 100, Musik vom Computer wiederzugeben. Sie erhalten ebenfalls die Möglichkeit ein erweitertes Menü, wie z.B. -
Page 22: Informationen
Sie können einen Wechseldatenträger an dem USB-Anschluss auf dem Gerät anschließen. Das Speichermedium muss FAT 32 formatiert werden, um mit dem Gerät in Verbindung zu treten. Die maximale Kapazität beträgt 4 GB. Der CVR 100 erkennt MP3-und WMA Audio Dateien. Wählen Sie im Hauptmenü SB Betrieb. Jetzt können Sie zwischen den verschiedenen Titeln wählen. -
Page 23: Internet Radioportal
Internet Radioportal -Die „Frontier Selicon“ Radio Webseite gibt ihnen die Möglichkeit, ihr Radio über ihren Computer zu verwalten und ihre Senderlisten zu erstellen. -Der Zugang ist kostenlos. Um ihr Radio auf dieser Seite zu registrieren, benötigen Sie einen Zugangscode. Wählen Sie im Menü Station List > Help > Access Code Schreiben Sie den Zugangscode auf. -
Page 24: Generelle Funktionen
Generelle Funktionen Software Upgrade. -Sie können manuell nach einem Software Upgrade suchen oder einen automatischen Upgrade durchführen. Prüfen Sie unter Menü > System Settings > Software Upgrade, ob das Gerät von Zeit zu Zeit eine automatische Suche nach Upgrades durchführen soll. Wenn eine neue Software Version vorliegt, werden Sie gefragt, ob Sie diese runterladen möchten. -
Page 25: Sprache
Sprache -In System Settings > Sprache > wählen Sie die gewünschte Sprache Zeiteinstellung -Wählen Sie System Settings > Time Setup > stellen Sie die Zeit ein. Wählen Sie automatisch, um die automatische Einstellung auszuwählen. Wenn Sie „Daylight Saving“ auswählen, stellt sich ihr Gerät von Sommer - auf Winterzeit. In dem Bereich „Time Zone“... -
Page 26: Fehlermeldung
Fehlermeldung Angabe Meldung Beispiel Keine Richtiges Passwort aber Der Mac Filter ist am Verbindung kein Kontakt zum Router Router deaktiviert Vergewissern Sie sich, Das File Format wird nicht Format Error dass der Stream in WMA erkannt unabhängig vom ist. Wenn nicht, bitte Netzwerk dekodieren Falsche Informationen... - Page 27 Problembehebung am Verstärker Problem Möglicher Fehler Kein Strom, obwohl das - Das Stromkabel ist nicht Gerät angeschaltet ist angeschlossen - Die Steckdose ist defekt - Die Sicherung im Gerät ist defekt! Dieser Fehler muss durch einen Techniker repariert werden - Das Stromkabel ist defekt! Auch dieser Fehler muss durch einen Techniker repariert werden.
-
Page 28: Problembehebung
Problembehebung Ihr gerade neu erworbenes Gerät ist mit der neusten Technik unserer Zeit ausgestattet und sicher zu bedienen. Probleme bei der Bedienung können auftreten, aber bevor Sie einen Servicetechniker rufen, lesen Sie sich folgende Punkte genau durch. Verzerrter Ton oder kein Ton -Kontrollieren Sie, ob die Kabel richtig angeschlossen sind Die Fernbedienung funktioniert nicht -Kontrollieren Sie, ob die Batterien richtig eingelegt sind... -
Page 29: Pflege Und Handhabung
Pflege und Handhabung Lesen Sie sich diese Bedienungsanleitung sorgfältig durch. Achten Sie darauf, dass z.B. das Stromkabel nicht beschädigt ist. Wenn Sie den Verdacht haben, dass das Gerät nicht mehr sicher zu nutzen ist, nehmen Sie das Gerät vorsichtig vom Netz, indem Sie vorsichtig den Stecker aus der Steckdose ziehen. -
Page 30: Technische Daten
Technische Daten Technische Daten › Netzspannung: AC 230 V/ ~50Hz › Leistungsaufnahme: 300W › Frequenzbereich: FM 87,5 - 108 MHz DAB 174.928 - 239.200 MHz › Verstärker: Frequenzgang: 10Hz - 50KHz Signal Rausch Abstand: >83dB Channel Seperation: >60dB Leistung: 40 Watt RMS X 2 @ 8 Ohm 60 Watt RMS X 2 @ 4 Ohm ›... - Page 31 Table of contents Chapter 1 Intended use Explanation of symbols Chapter 2 Safety information Before use Chapter 3 The device Front panel control Remote control Wireless device remote control Rear panel Information on handling batteries/rechargeable batteries Chapter 4 Connection Power supply Antenna Signal output Network...
- Page 32 Chapter 8 Music server Music player Information Chapter 9 Internet radio portal Chapter 10 General functions Software upgrade Factory default settings Language Setting the time 12/24 hour display Chapter 11 Error messages Chapter 12 Troubleshooting Chapter 13 Delivery contents Chapter 14 Specifcations Technical data...
- Page 33 Dear customer, thank you for deciding on purchasing this quality product . This instruction manual will give you a general idea of how this device operates, as well as provide you with informa- tion on cleaning and safety procedures. Please take a few minutes to read and follow all safety and operating instructions found in this manual carefully, in order to maintain this products condition and ensure safe operation.
-
Page 34: Intended Use
Intended use The unit is a hi-fi stereo internet radio. This device can be used for internet radio station reception by means of a (broadband) high-speed internet access via cable (Ethernet) or W-LAN (Wi-Fi). FM radio reception is also possible via antenna. Music fles stored on a network can also be used. - Page 35 Dear customer, the following safety and hazard warnings are not only for the protection of your device, but also serve as a protection against potential health hazards. Please take time to read the following instructions carefully. We assume no liability for personal or property damage resulting from the failure to comply with the safety instructions, improper operation and handling.
-
Page 36: Safety Information
› Always pull on the plug’s grips and never on the cable to remove from a wall outlet. › Unplug the device from the power outlet, if it is not in use for a longer period of time. › For safety reasons, always unplug the device from the power outlet during thunder storms. - Page 37 › Make sure the device is properly ventilated during operation and never operate it in constricted areas, such as for example in a bookcase or shelf. Never block ventilation openings with magazines, tablecloths, curtains or similar. › Make sure the device is placed on a frm and stable surface.
-
Page 38: Before Use
Before use Please read this instruction manual thoroughly before operating this device and retain it for fur ther reference, questions and use. Following and heeding all information found in this instruc tion manual shall maintain this products condition and ensure safe operation. This instruction manual contains information on how to operate and maintain this device. -
Page 39: The Device
The device Front panel control CVR 100 HI FI-CD Receiver 10 11 12 13 14 15 16 17 PUSH OPEN PUSH TO OPEN THIS COVER 1. A SPEAKER OUTPUT INDICATOR LED, WILL TURN ON WHEN A SPEAKER IS SELECTED. 2. B SPEAKER OUTPUT INDICATOR LED, WILL TURN ON WHEN B SPEAKER IS SELECTED. -
Page 40: Remote Control
20. BALANCE, MOVE TO RIGHT CHANNEL. 21. VOLUME DOWN. 22. VOLUME UP. CVR 100 REMOTE CONTROL 23. TONE: PRESS THIS KEY TO GO TO BASS OR TREBLE SCREEN, AND USE VOL-/+ KEY TO ADJUST THE LEVEL. 24. SUR=SURROUND. PRESS THIS KEY TO SELECT SURROUND EFFECT WITHIN LIVE/STADIUM/HALL/STEREO. -
Page 41: Wireless Device Remote Control
Frontier Silicon’s connected audio solutions and is compatible with iPhone, iPod touch Return to Mode screen Presets Audio EQ settings and iPad. Requires iOS 3.1.3 or later. *EQ is not available for CVR 100 in this App. Chapter 3 The device... -
Page 42: Rear Panel
Rear panel 1 2 3 Model: CVR 100 HIFI-CD Receiver DAB/FM DAB+ Internet Radio When output select to A+B, A and B Impedance must be > 8 12 13 14 15 16 17 18 1. POWER SWITCH: SWITCHES MAINS POWER ON/OFF TO INTERNAL COMPONENTS, HOWEVER PLEASE NOTE THAT MAINS POWER IS STILL APPLIED TO THIS UNIT EVEN THOUGH THIS SWITCH MAY BE OFF. -
Page 43: Information On Handling Batteries/Rechargeable Batteries
Information on handling batteries/rechargeable batteries › The remote control requires two „AAA” batteries for operation. Inserting/changing batteries Remove the battery compartment lid carefully. Remove the used batteries. Insert new batteries and ensure correct polarity, as graphically dis- played inside the compartment. Replace the battery lid carefully. Information on handling batteries/rechargeable batteries Please adhere to the following information when handling batteries and rechargeable batteries. - Page 44 Chapter 3 The device...
-
Page 45: Connection
Connection Power supply › Plug the power cable into a correctly installed power outlet of your public power system. Antenna › Connect the tuner antenna connector to the „Tuner Antenna” connection on the back of the device. Signal output › Connect these jacks to the respective jacks found on your amplifer. Ensure that connections have been made properly (this normally means red to red and white to white). -
Page 46: Basic Operation
Basic operation Setup › You will be asked if “Setup Wizard” is to be started, when the device is switch to IR/MEDIA/DAB/FM for first time. If you don’t want this to be installed or it is to be started at a later point in time, you will be able to start this setup function again as follows: MENU ›... - Page 47 Storing stations > Press and hold the numeric key(1-10) to save the station to preset number(1-10). 10 memory presets are available for storing. Selecting a preset station › There are diferent ways of selecting a preset station. › Press a numeric button to select a memory preset. Example ›...
-
Page 48: Connecting To A Network
Connecting to a network › You will need a network connection for „I nternet radio“ or „M usic player“ operation modes. › You will need either a router and RJ45 cable or a W-LAN router together with the required pass- word to establish a connection to your network. - Page 49 › Press the „MODE”button repeatedlly or select „Internet radio”in the main menu for radio ope- ration. › The unit has access to thousands of stations and podcasts from around the whole world. If you select the internet radio mode, then the unit will contact the Frontier Silicon Internet ra- dio portal to access a list of stations that are organized into diferent categories, such as Country or Genre.
-
Page 50: Internet Radio
4. Gateway address Set the Gateway address with „ “ and „ “ or with the „CONTROL“ dial. Use the „ u “ and „t “ buttons to switch between fields. Press „ENTER“ to switch to the next field. 5. DNS “... -
Page 51: Network Profle
Network profle › You can use the options MENU › System settings › Network › Network Profle to delete an un- wanted network. Here you will see a list of the previously used wireless networks. Select a profle with the „ ▲“ and „ “ buttons and press „ENTER“. C onfrm with „YES” to delete. Stations Selecting a station ›... -
Page 52: Storing Stations
› The following features are also available through the option „S tation List”: My favorites / Stations / Podcasts / My added stations › Select „Last Listened“ to gain access to a selection of the previously listened to stations. Storing stations >... -
Page 53: Music Server
Music server › In order for the unit to play music from your computer, you will have to configure your computer to allow access to files or media first. UPnP (Universal Plug and Play) allows devices, such as the unit to play music from a shared media library. -
Page 54: Information
Information › Press the „ INFO“ button repeatedly to browse through diverse information. The type of information and whether information is displayed all depends on the broadcasting station. USB Operation Chapter 8 Music server... -
Page 55: Internet Radio Portal
Internet radio portal › The Frontier Silicon Internet radio website allows you to listen to internet radio through your computer and also lets you organize your favorite lists. › This portal is free of charge. To register your unit to this portal, you will require an access code: 1. -
Page 56: General Functions
General functions Software upgrade › You can search for a software upgrade manually and can also select under MENU › System set tings › Software update, if the device is to automatically search for updates periodically. When a new software version has been found, you will be asked if this is to be downloaded and installed. All user settings are maintained. -
Page 57: Language
Language › Select System settings › Languages to choose a preferred language. Setting the time › Select System settings › Time setup to set the time. Select „A UTO“ to activate an automatic time adjustment. „Daylight savings” determines whether you would like to use a summer or winter time and with the „Time zone”... -
Page 58: Error Messages
Error messages Message Description Example Failed to connect Key entered correctly, but MAC fltering is deactiva- the router rejects request. ted on the router. Received *.wma , but Format error File format can not be reco gnized – independent of found that the stream the network. - Page 59 Troubleshooting of amplifier Chapter 11 Error messages...
-
Page 60: Troubleshooting
Troubleshooting The device you have just purchased is equipped with state-of-the-art technology and is safe to operate. Nevertheless, problems or malfunctions may occur. Before contacting a service technician, refer to the following possible solutions. Distorted sound or no sound is audible. ›... - Page 61 Maintenance and handling Carry out a technical safety inspection on a regular basis, e.g. check if the power cable or housing may have become damaged. If there is reason to believe that the device can no longer be operated safely, then disconnect it immediately from the power supply and secure it against any unintentional operation.
- Page 62 Cleaning the device › Unplug the power cable before cleaning. Always use a soft and dry cloth to clean the unit’s exterior. If the device is extremely dirty you can use a soft cloth, dampened with water or a mild cleaning solution to clean.
-
Page 63: Technical Data
Specifcations Technical data › Operating voltage: AC 230 V/ ~ 50 Hz › Max. power consumption: 300 W › Frequency range: FM 87.5 – 108 MHZ DAB 174.928 - 239.200 MHz › Amplifier: Frequency response: 10Hz - 50KHz Signal noise ratio: >83dB Input channel separation : >60dB...
Need help?
Do you have a question about the CVR 100 and is the answer not in the manual?
Questions and answers