Lexmark Color Jetprinter Z700 Series User Manual
Mac os 9
Hide thumbs
Also See for Color Jetprinter Z700 Series:
- User manual (73 pages) ,
- Quick manual (2 pages) ,
- User manual (76 pages)
Table of Contents
Advertisement
Z700 Series Color Jetprinter™
P700 Series Photo Jetprinter™
User's Guide for Mac OS 9
January 2003
• Setup troubleshooting
A checklist to find solutions to common setup problems.
• Printer overview
Learn about the printer parts and the printer software.
• Printing ideas
How to print several projects on various types of paper.
• Maintenance
Caring for your cartridges and ordering supplies.
• General troubleshooting
Error messages, print quality problems, paper jams, and
much more.
www.lexmark.com
Advertisement
Table of Contents
Troubleshooting

Related Manuals for Lexmark Color Jetprinter Z700 Series


Summary of Contents for Lexmark Color Jetprinter Z700 Series
- Page 1 Z700 Series Color Jetprinter™ P700 Series Photo Jetprinter™ User’s Guide for Mac OS 9 January 2003 • Setup troubleshooting A checklist to find solutions to common setup problems. • Printer overview Learn about the printer parts and the printer software.
- Page 2 Lexington, Kentucky 40550, U.S.A. In the United Kingdom and Eire, send to Lexmark International Ltd., Marketing and Services Department, Westhorpe House, Westhorpe, Marlow Bucks SL7 3RQ. Lexmark may use or distribute any of the information you supply in any way it believes appropriate without incurring any obligation to you. You can purchase additional copies of publications related to this product by calling 1-800-553-9727.
-
Page 3: Table Of Contents
Contents Chapter 1: Printer overview ... 5 Understanding the printer parts... 5 Using memory cards (Lexmark P700 Series only) ... 7 Using the printer software ... 9 Using the paper type sensor ... 14 Chapter 2: Printing ideas... 16 Printing on plain paper ... 16 Printing photos ... - Page 4 Ordering supplies ... 57 Chapter 4: Setup troubleshooting ... 58 Troubleshooting checklist... 58 When I insert the printer software CD, nothing happens... 59 Solving printer software installation problems ... 59 Chapter 5: General troubleshooting... 62 Solving network printing problems ... 62 Understanding error messages and flashing lights ...
-
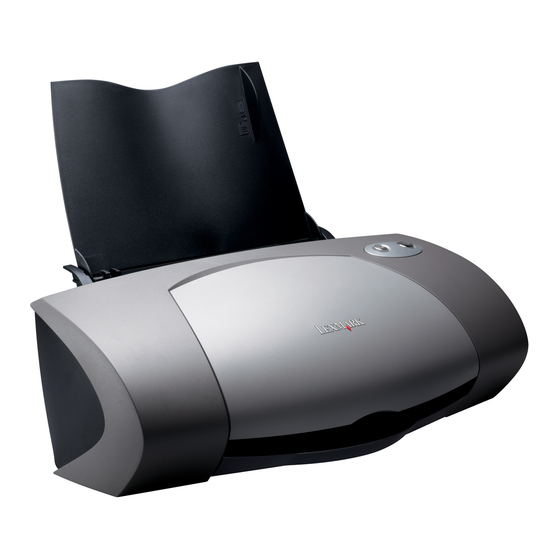
Page 5: Chapter 1: Printer Overview
Printer overview Understanding the printer parts Lexmark™ Z700 Series Color Jetprinter™ USB cable connector Paper support Paper guide and release tab Front cover Paper Feed button Power button Paper exit tray Printer overview Power supply connector... - Page 6 Lexmark P700 Series Photo Jetprinter™ USB cable connector Paper support Paper guide and release tab Front cover Use this: Front cover Memory card slots Paper exit tray Paper Feed button Power button Memory card slots USB card reader Paper exit tray When you want to: •...
-
Page 7: Using Memory Cards (Lexmark P700 Series Only)
USB cable connector USB card reader Using memory cards (Lexmark P700 Series only) Most digital cameras use a memory card to store photos. You can insert the memory card into your printer and print your photos or save them on your computer. - Page 8 Before you insert your memory card, consider the following information: • Your printer recognizes one source for photos at a time. Insert only one memory card at a time. •...
-
Page 9: Using The Printer Software
You can then remove the memory card. Using the printer software Your printer integrates with the Page Setup dialog box and Print dialog box that come with Mac OS 9. The CD that comes with your printer also includes the Control Panel. -
Page 10: Page Setup Dialog Box
Choose between portrait and landscape. Choose a watermark design. Adjust from light to heavy watermark imprint. Resize your watermark design. Select program-specific options for printing. The program name and the options available vary according to the program used. Using the printer software... -
Page 11: Print Dialog Box
Print all of the pages in a document or print a range of pages. Wait for Add more time between pages as they exit the printer. Select this option when pages to dry you want to keep documents from smearing. - Page 12 Both Sides • Choose a binding edge (side flip or top flip). Color ColorSync • Choose your printer’s profile from a list of saved color profiles and settings Color Matching • Set the document intent. Choose from Automatic, Photographic, or Built-In Choose the appropriate type of color for your document.
-
Page 13: Control Panel
Control Panel Use the Control Panel to monitor your printer and printer supplies. You can: • Install/change cartridges • Align cartridges • Clean print nozzles • Select a printer • Calibrate the paper type sensor Using the Control Panel From the Apple menu, choose Control Panels... -
Page 14: Using The Paper Type Sensor
Click the button in the upper left corner to close the Control Panel. Using the paper type sensor Your printer has a paper type sensor that detects the following paper types loaded in your printer, and automatically adjusts the Paper Type setting in the Print dialog box accordingly. - Page 15 Click Print. Note: Although the printer can detect the type of paper you are using, it cannot detect the paper size. Make sure you select the appropriate paper size in the “Page Setup dialog box” on page 10. Using the paper type sensor...
-
Page 16: Chapter 2: Printing Ideas
• Load the paper vertically against the right side of the paper support. • Do not force the paper into the printer. • Squeeze and slide the paper guide to the left side of the paper. Note: If you are using Letter size paper, adjusting the paper guide may not be necessary. -
Page 17: Step 3: Print Your Document
Step 2: Customize the print settings If you are using A4 or Letter size paper and you want to print with Normal print quality, you do not need to adjust the settings. If you are using specialty media, customize the settings by following the steps for your paper type. Step 3: Print your document From the software program, choose File Click Print. - Page 18 • Make sure the glossy or coated side is facing you. • Do not force the paper into the printer. • Squeeze and slide the paper guide to the left side of the paper. Note: If you are using Letter size photo paper, adjusting the paper guide may not be necessary.
-
Page 19: Step 3: Print Your Photos
Step 3: Print your photos Click Print. Note: To prevent smearing, remove each photo as it exits the printer, and then let it dry before stacking. You can also set extra time between pages as they exit the printer. For help, see the entry on “Wait for pages to dry” on page 11. - Page 20 • Make sure the print side is facing you. • Do not force the paper into the printer. • Squeeze and slide the paper guide to the left edge of the paper. Note: If you are using Letter size paper, adjusting the paper guide may not be necessary.
-
Page 21: Printing On Both Sides Of The Paper
Click OK. Choose a paper type and print quality: From the software program, choose File From the pop-up menu in the upper left corner, choose Paper Type/Quality. Note: If Automatic is not chosen in the Paper Type pop-up menu, choose Coated as the paper type. - Page 22 • Make sure the print side is facing you. • Do not force the paper into the printer. • Squeeze and slide the paper guide to the left edge of the paper. Note: If you are using Letter size paper, adjusting the paper guide may not be necessary.
-
Page 23: Printing Cards
Step 3: Print your document Click Print. The odd-numbered pages print, and then your printer software prompts you to reload the paper. Remove the stack of paper from the paper exit tray. - Page 24 Make sure your cards are not used or damaged. • Make sure the print side is facing you. • Do not force the cards into the printer. • Squeeze and slide the paper guide to the left edge of the cards. Step 2: Customize the print settings...
-
Page 25: Printing Envelopes
Step 3: Print your cards Click Print. Note: To prevent smudging, remove each card as it exits the printer and let it dry before stacking, or you can set extra time between pages as they exit the printer. For help, see the entry on “Wait for pages to dry”... - Page 26 Make sure the print side is facing you. • Make sure the stamp location is in the upper left corner. • Do not force the envelopes into the printer. • Squeeze and slide the paper guide to the left edge of the envelopes. Printing envelopes...
-
Page 27: Printing Color Images In Black And White
Step 2: Customize the print settings Choose an envelope size and orientation: From the software program, choose File From the Paper Size pop-up menu, choose an envelope size. To use a custom envelope size, see “Printing on custom size paper” on page 48. From Orientation, make sure that you select the landscape icon. - Page 28 • Make sure the print side is facing you. • Do not force the paper into the printer. • Squeeze and slide the paper guide to the left edge of the paper. Note: If you are using Letter size paper, adjusting the paper guide may not be necessary.
-
Page 29: Printing A Booklet
Step 1: Load the paper • Load the paper vertically against the right side of the paper support. • Make sure the print side is facing you. • Do not force the paper into the printer. Printing a booklet... - Page 30 • Squeeze and slide the paper guide to the left edge of the paper. Note: If you are using Letter size paper, adjusting the paper guide may not be necessary. Step 2: Customize the print settings Choose a paper size and orientation: From the software program, choose File From Paper Size pop-up menu, choose a paper size.
- Page 31 Step 3: Print your booklet Click Print. After the first half of your booklet prints, your printer software prompts you to reload the paper. Remove the stack from the paper exit tray. Load the stack of paper and the reloading instruction page with the printed side facing away from you and the arrows pointing down into the paper support.
-
Page 32: Printing Labels
Continue to stack the bundles on top of each other until your booklet is complete. Bind the bundles to complete your booklet. Printing labels You can load up to 25 sheets of labels, depending on the thickness of the sheets. Step 1: Load the labels •... - Page 33 • Make sure the print side is facing you. • Do not force the label sheets into the printer. • Squeeze and slide the paper guide to the left edge of the sheet of labels. Note: If you are using Letter size label paper, adjusting the paper guide may not be necessary.
-
Page 34: Printing Handouts
Load the paper vertically against the right side of the paper support. • Make sure your paper is not used or damaged. • Make sure the print side is facing you. • Do not force the paper into the printer. Printing handouts... - Page 35 • Squeeze and slide the paper guide to the left edge of the paper. Note: If you are using Letter size paper, adjusting the paper guide may not be necessary. Step 2: Customize the print settings You can print your handouts on one side or on both sides of the paper. Choose a paper size and orientation: From the software program, choose File From the Paper Size pop-up menu, choose a paper size.
- Page 36 If you formatted your handouts to print on both sides of each page, continue with the next step. After the first half of your handouts prints, your printer software prompts you to reload the paper. Load the paper and the reloading instruction page with the printed side facing away from you and the arrows pointing down into the paper support.
-
Page 37: Printing Iron-On Transfers
Load the iron-on transfers vertically against the right side of the paper support. • Make sure your iron-on transfers are not used or damaged. • Make sure the print (blank) side is facing you. • Do not force the iron-on transfers into the printer. Printing iron-on transfers... - Page 38 • Squeeze and slide the paper guide to the left edge of the iron-on transfers. Note: If you are using Letter size iron-on transfers, adjusting the paper guide may not be necessary. Step 2: Customize the print settings Choose a paper size: From the software program, choose File From the Paper Size pop-up menu, choose a paper size.
-
Page 39: Printing Transparencies
Note: To prevent smudging, remove each iron-on transfer as it exits the printer, and then let it dry before stacking. You can also set extra time between pages as they exit the printer. For help, see the entry on “Wait for pages to dry” on page 11. Printing transparencies You can load up to 50 transparencies, depending on the thickness of the transparencies. - Page 40 • Squeeze and slide the paper guide to the left edge of the transparencies. Note: If you are using Letter size transparency paper, adjusting the paper guide may not be necessary. Step 2: Customize the print settings Choose a paper size and orientation: From the software program, choose File From the Paper Size pop-up menu, choose a paper size.
-
Page 41: Printing Your Document In Reverse Order
Step 3: Print your transparencies Click Print. Note: To prevent smudging, remove each transparency as it exits the printer, and then let it dry before stacking. You can also set extra time between pages as they exit the printer. For help, see the entry “Wait for pages to dry” on page 11. Transparencies may require up to 15 minutes to dry. -
Page 42: Step 3: Print Your Document
Step 2: Customize the print settings Choose a paper size and orientation: From the software program, choose File From the Paper Size pop-up menu, choose a paper size. From Orientation, click the portrait or landscape icon. Click OK. Choose a layout for the document: From the software program, choose File From the pop-up menu in the upper left corner, choose Layout. - Page 43 Remove any paper from the paper support. Place behind the printer a stack of banner paper with only the number of sheets you need to print your banner. Your printer can accommodate a maximum banner length of 20 sheets in a continuous form paper.
- Page 44 From the Paper Size pop-up menu, choose Banner (A4) or Banner (Letter). Note: If you do not choose the correct paper size, the banner paper may cause a paper jam. For help, see “Printer has a paper jam” on page 67. From Orientation, click the portrait or landscape icon.
-
Page 45: Printing A Poster
Step 1: Load the paper • Load the paper vertically against the right side of the paper support. • Make sure your paper is not used or damaged. • Do not force the paper into the printer. Printing a poster... - Page 46 • Squeeze and slide the paper guide to the left edge of the paper. Note: If you are using Letter size paper, adjusting the paper guide may not be necessary. Step 2: Customize the print settings Choose a paper size and orientation: From the software program, choose File From the Paper Size pop-up menu, choose a paper size.
- Page 47 Choose a layout: From the Print dialog box, choose Layout from the pop-up menu in the upper left corner. Click Poster. Select a poster size. Options are 2x2 (four pages), 3x3 (nine pages), and 4x4 (16 pages). Step 3: Print your poster Click Print.
-
Page 48: Printing On Custom Size Paper
Height: 127 to 432 mm (5 to 17 in.) • Make sure the print side is facing you. • Do not force the paper into the printer. • Squeeze and slide the paper guide to the left edge of the paper. Printing on custom size paper... - Page 49 Step 2: Customize the print settings Create a custom paper size: From the software program, choose File From the Paper Size pop-up menu, choose Edit Custom Paper Sizes, and then click New. From the Units pop-up menu, choose in. (inches) or mm (millimeters), and then type the dimensions for your custom paper size.
-
Page 50: Chapter 3: Maintenance
Left cartridge carrier: Color cartridges only Note: You can use the printer with just a color cartridge or just a black cartridge. You must have a color cartridge installed when you print with a photo cartridge. For information about ordering supplies, see page 57. - Page 51 Pull the cartridges towards you until you hear a snap. Remove the used cartridges. Store them in an airtight container or dispose of them properly. When removing the photo cartridge to exchange it with a black cartridge, store the photo cartridge in the storage unit provided.
- Page 52 Install the cartridges If you are installing new cartridges, remove the sticker and transparent tape from the back and bottom of each print cartridge. Warning: Do not touch or remove the gold contact area on the back and bottom of each print cartridge.
-
Page 53: Specify Cartridge Settings In The Printer Software
Note: The front cover must be closed to start a print job. Specify cartridge settings in the printer software Before you specify the print cartridge settings in the printer software, install the cartridges. For help, see “Install the cartridges” on page 52. -
Page 54: Aligning The Print Cartridges
If you are not satisfied with the print quality of your document, first make sure you: • Use the appropriate paper for the document. For example, use photo paper if you are printing a photo. • Use paper that is heavier, bright white, or coated. Z700-P700 Series Control Panel. Aligning the print cartridges... - Page 55 If the print quality does not improve after cleaning the print cartridge nozzles, there may be dried ink on the nozzles or contacts. Remove the print cartridges. For help, see “Remove the used cartridges” on page 50. Dampen a clean, lint-free cloth with water. Print. Z700-P700 Series Control Panel. Improving print quality...
- Page 56 Gently hold the cloth against the nozzles for about three seconds, and then wipe in the direction shown. Using another clean section of the cloth, gently hold the cloth against the contacts for about three seconds, and then wipe in the direction shown. Contacts Allow the nozzles and contacts to dry completely.
-
Page 57: Preserving The Print Cartridges
Keep your photo cartridge in its own storage unit when not in use. Lexmark’s printer warranty does not cover repair of failures or damage caused by a refilled cartridge. We do not recommend the use of refilled cartridges. Refilling cartridges can affect print quality and cause damage to the printer. -
Page 58: Chapter 4: Setup Troubleshooting
Are both your printer and computer on? If you are using your printer on a network, make sure your computer is connected to the network, your Lexmark adapter is on, and all indicator lights are on. For more information, refer to the adapter documentation. -
Page 59: When I Insert The Printer Software Cd, Nothing Happens
Restart your computer. When your desktop appears, insert the printer software CD. The Lexmark Z700-P700 Series CD icon is created on your desktop. Follow the instructions in “Installing the printer software” on page 60 to complete the printer software installation. -
Page 60: Installing The Printer Software
You can install the printer software using the printer software CD that comes with your printer, or you can download it from the Lexmark Web site at www.lexmark.com. To connect your printer to a network with a Lexmark adapter, refer to the documentation that comes with your adapter. - Page 61 Check the Lexmark Web site for offers (United States and Canada only). Click Finished when you are done. The Z700-P700 Series printer icon is automatically created on your desktop. You are now ready to start using your Lexmark Z700-P700 Series printer.
-
Page 62: Chapter 5: General Troubleshooting
Understanding error messages and flashing lights Use this section to understand printer software error messages on your computer screen and blinking lights on your printer. For information about lights on a Lexmark adapter, refer to the adapter documentation. Paper Jam message For help clearing a paper jam, see “Printer has a paper jam”... -
Page 63: Power Light Is Flashing
Turn the printer off. Wait a few seconds, and then turn the printer back on. If the cartridge carrier is stalled due to a paper jam, see “Printer has a paper jam” on page 67. Understanding error messages and flashing lights... -
Page 64: Resolving Unsuccessful Or Slow Printing
The printer is on and the printer cable is securely attached at both ends. If your printer is connected to a network, make sure the Lexmark adapter is on and all indicator lights are on. For help, refer to the adapter documentation. -
Page 65: Printer Prints Very Slowly
You loaded the paper correctly and did not force the paper into the printer. • If you are connected to a network with a Lexmark adapter, the indicator lights are on. For more information, see the adapter documentation. Printer ejects a blank page after appearing to print Make sure: •... -
Page 66: Recovering When Your Computer Stops Responding
Delete the print job: From your desktop, double-click the Z700-P700 Series printer icon. The Z700-P700 Series dialog box appears, listing all pending or stalled print jobs. Highlight each print job and click the trash icon. Plug the printer cable back into the computer. -
Page 67: Printer Has A Paper Jam
Your software program is designed to print your specialty media. For help, check your software program documentation. • The specialty media is not jammed. For help, see “Printer has a paper jam” in the following section. • Your printer is not held or paused. To check the printer status: From your desktop, double-click the Z700-P700 Series printer icon. -
Page 68: Vertical Straight Lines Are Not Smooth
• Let the ink dry completely before handling the paper. You can also set extra time between pages as they exit the printer. For help, see the entry “Wait for pages to dry” on page 11. • Make sure the paper type and paper size settings in the printer software match the paper loaded in the printer. -
Page 69: Printed Characters Are Improperly Formed Or Misaligned
Cancel all print jobs and print your job again. To cancel all print jobs: From your desktop, double-click the Z700-P700 Series printer icon. The Z700-P700 Series dialog box appears, listing all pending or stalled print jobs. Highlight each print job and click the trash icon. -
Page 70: Solving Specialty Media Problems
For help, see “Printing photos” on page 17 or “Printing transparencies” on page 39. • You can also set extra time between pages as they exit the printer. For help, see the entry “Wait for pages to dry” on page 11. •... -
Page 71: Transparencies Or Photos Contain White Lines
Transparencies or photos contain white lines • Make sure you loaded the paper correctly (with print side facing you) and selected the appropriate settings in the printer software. For help, see “Printing transparencies” on page 39 or “Printing photos” on page 17. •... -
Page 72: Notices
Note: To assure compliance with FCC regulations on electromagnetic interference for a Class B computing device, use a properly shielded and grounded cable such as Lexmark part number 1329605 for parallel attach or 12A2405 for USB attach. Use of a substitute cable not properly shielded and grounded may result in a violation of FCC regulations. - Page 73 Japanese VCCI notice Notices...
-
Page 74: Glossary
Treated paper designed for high-quality printed images. collate. A printer software option that lets you automatically print one complete copy of a multiple- page document before the next copy begins, and so on. ColorSync. The industry-standard color management technology that ensures color accuracy from capture to print or online display. - Page 75 A printer software option that lets you reverse an image before printing. N-up. A printer software option that lets you print multiple pages of a document on a single sheet of paper. For example, select 4-up to print reduced images of pages 1 through 4 on the first sheet of paper, images of pages 5 through 8 on the second sheet, and so on.
- Page 76 A segment of a network that is connected to a larger network. A local area network is sometimes referred to as a local subnet. top flip. A printer software option that arranges duplexed pages so they turn like the pages of a legal pad.
-
Page 77: Index
See iron-on transfers dark or smudged print 68 default settings 9 dialog boxes Page Setup 10 Print 11 digital media, photo 7 downloaded printer driver, installing 61 duplex printing See printing on both sides of the paper edge-to-edge printing See borderless cards... - Page 78 23 handouts 34 improving print quality 54 index cards 23 Ink Low message 62 installing print cartridges 52 printer software 60 intermittent printing 68 iron-on transfers 37 labels 32 last page first, printing 41 layout 12 light paper feed 63...
- Page 79 60 removing 60 printer parts 5 printer settings, customizing 9 printer software CD, troubleshooting 59 Control Panel 13 default settings 9 installing 60 overview 9 Page Setup dialog box 10 Print dialog box 11...
- Page 80 See printing on both sides of the paper 21 USB cable connector 7 ordering 57 USB card reader 7 Wait for pages to dry 11 watermark 10 Web site, Lexmark download printer software installing printer software 60 offers 14, 61 order supplies 14, 57 Index...
- Page 81 Lexmark and Lexmark with diamond design are trademarks of Lexmark International, Inc., registered in the United States and/or other countries. Color Jetprinter and Photo Jetprinter are trademarks of Lexmark International, Inc. © 2003 Lexmark International, Inc. 740 West New Circle Road Lexington, Kentucky 40550 www.lexmark.com...
Need help?
Do you have a question about the Color Jetprinter Z700 Series and is the answer not in the manual?
Questions and answers