Table of Contents
Advertisement
Advertisement
Table of Contents

Related Manuals for Alecto FR-20


Summary of Contents for Alecto FR-20
- Page 1 FR-20 8 Channel 2- Way Radios Owners Manual and Instructions...
-
Page 2: Table Of Contents
Contents Contents .............. 2 Introduction ............3 Controls and displays ........3 Component Guide ..........4 Setting Up Your PMR Radio ......5 Battery Installation ........... 5 Battery Meter ........... 6 Low Battery Indicator ........6 Operation ............8 Turning on your PMR ........8 Communication .......... -
Page 3: Introduction
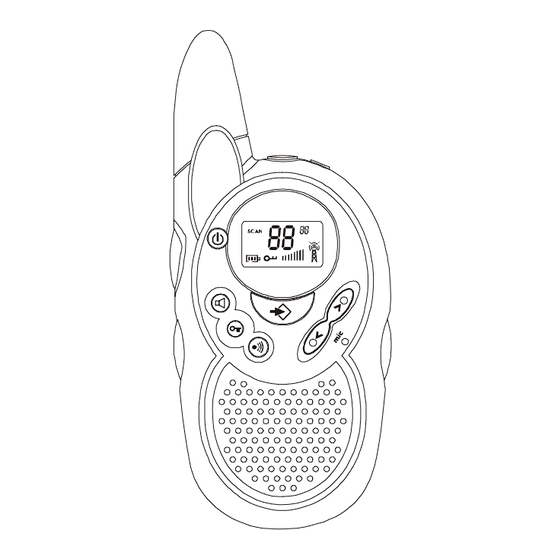
Introduction Included In Your Package When you unpack your PMR Radio, you should find the following items enclosed in the package: • 8-channel PMR unit-2PCS • Belt-Clip (attached)-2PCS • This manual X 2pcs X 2pcs Controls and Displays OPER AT ION S MAN UA L 1. -
Page 4: Component Guide
Component Guide... -
Page 5: Setting Up Your Pmr Radio
Setting Up Your PMR Radio Setting Up Your FRS Radio Battery Installation To use the radio, you must install 4 AAA size batteries. Caution: incorrect positioning of the batteries can damage both the batteries and the unit. To install the batteries: •... -
Page 6: Battery Meter
Setting Up Your FRS Radio Setting Up Your Radio charing the charge current is too low for the battery to charge up as the unit is still using power. There is no charge indicator during charging at OFF mode. It takes approximately 7 to 10 hours to fully charge the batteries if they are at the their lowest lever. - Page 7 Setting Up Your PMR Radio the batteries as soon as possible. Note: Always use alkaline batteries for replacements. If you store your radio for long periods of time, always remove the batteries. Batteries may corrode and leak when left unused over long periods of time, and permanently damage your radio.
-
Page 8: Operation
Operation Turning On Your PMR Push & hold the Power button for at least 2 seconds to turn the PMR radio ON or OFF. The unit will beep, the LCD panel will display information about your radio, and the panel will be illuminated by a green light for several seconds. -
Page 9: Respond Prompt Tone
Operation people. Failure to do so will keep your unit in transmission mode, preventing you from hearing other units. Respond Prompt Tone When the person talking to you from another radio finishes speaking and releases his TALK button, you will hear a tone from your unit. This means that the other radio is now in receive mode, and you can begin your transmission. -
Page 10: To Speak Directly To Another Radio
Operation the up or down arrow buttons until you reach the desired channel. • Press the MENU (Channel Set) button again to set the channel. If you do not press MENU the second time, The unit will automatically return to normal operation in ten seconds. -
Page 11: Calling (Paging) Another Radio
Operation The best range will be in flat, open terrain, without obstructions. Using the MON (monitor) button to override the automatic squelch will help extend the range to the maximum limits. Your range is also dependent on the battery condition of the radio, the type of terrain where you are located, and the strength of the signal from the transmitting radio. -
Page 12: Key Tone On/Off
Operation display CA 1 press UP or DN button to change the Call Ring number (5 different tones) or Call Off, the different Call-Ring tone can heard during changing . When Call-Ring number is setted to Call-Ring Off CA OF , press call key will send the default Call-Ring tone number 1 to another radio, but the PMR you held will not sound. - Page 13 Operation ) icon is flashing on the LCD screen. 2.Press the UP or DN button to enable( "On " will appear) Beep Tone feature or disable (" oF "will appear ) the Roger beef tone. 3.To exit from the Roger Beep Tone feature, press the TALK button.
-
Page 14: Special Features
Special Features Automatic Squelch Your PMR is equipped with automatic squelch circuitry, which filters out weak transmissions and unwanted noise. These signals may be picked up as background static, and are usually caused by terrain conditions, or if you have reached the limit of your range. Monitor This feature turns off the Automatic Squelch feature, either momentarily or continuously. -
Page 15: Channel Lock
Special Features Channel Lock This feature locks the channel adjustment buttons on the front to the unit so that the channel cannot be changed accidentally. To Lock the channel: • Press the Lock button for 5 seconds until you hear a “ beep “ sound. The lock symbol (shaped like a key) will appear on the LCD display. -
Page 16: Automatic Battery Save
Special Features Automatic Battery Save Your PMR unit has special circuitry designed to extend the life of your battery. When the radio is not used for 4 seconds, it will switch itself into a low power mode. Battery Save does not affect the radio ’ s ability to receive transmissions. -
Page 17: Customer Support
Customer Support Customer Support Thank you for purchasing the PMR. This is a high-quality communications device that can give you many years of reliable service. Please read these instructions carefully. Should you encounter any problems with the product or not understand its many features, please refer to this owner ` s manual. -
Page 18: Channel Frequencies And Code Charts
Channel Frequencies and Code Charts PMR Channel Frequencies Channel Frequency (MHz) Channel Frequency (MHz) 446.00625 446.05625 446.01875 446.06875 446.03125 446.08125 446.04375 446.09375... -
Page 19: Warranty
Warranty xxxxxx warrants this unit to be free from defects in material and/or workmanship for a 1-year period beginning with the date of purchase. This warranty does not cover second-hand ownership or products that are purchased for sale or lease to another. This warranty does not cover damage resulting from acts of God, lightning accident, misuse, improper installation or operation, or unauthorized repair or alteration.
Need help?
Do you have a question about the FR-20 and is the answer not in the manual?
Questions and answers