Advertisement
INTRODUCTION
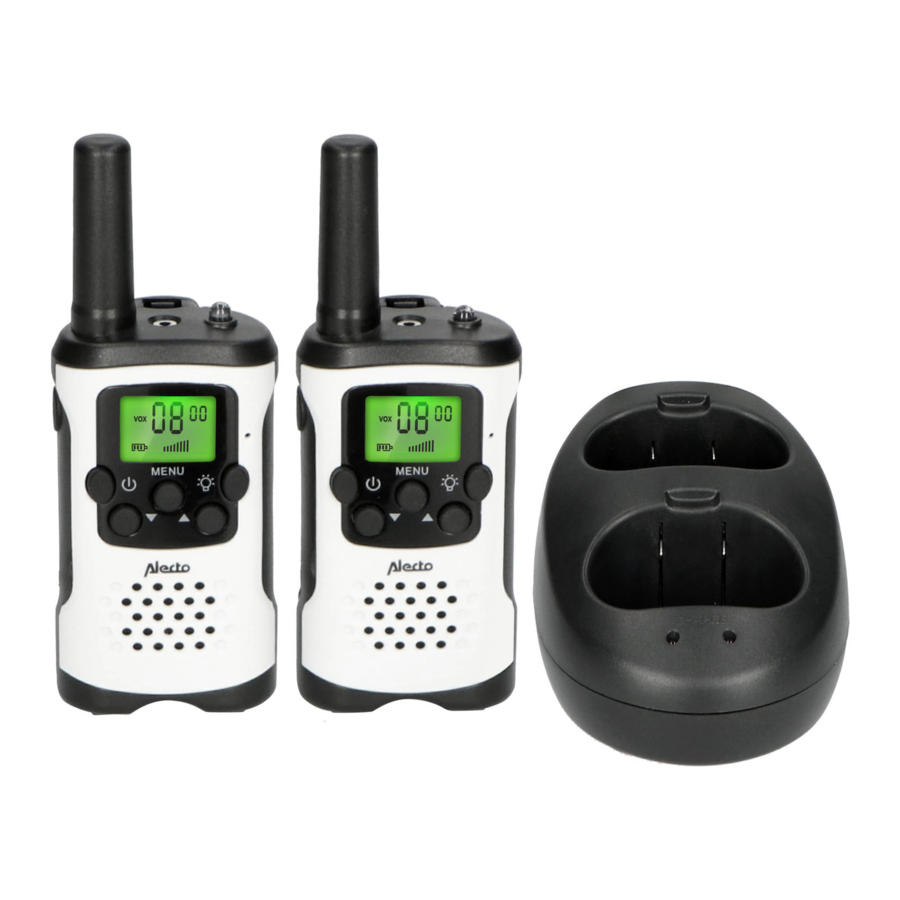
The Alecto FR-175 is a PMR-446 walkie-talkie. This walkie-talkie allows you to not only communicate with each other free of charge, but also with other (Alecto) walkie-talkies provided they meet the PMR-446 standard.
Hereby, Commaxx declares that the radio equipment type Alecto FR-175 is in compliance with directive 2014/53/EU. The full text of the EU declaration of conformity is available at the following internet address: http://DOC.hesdo.com/FR-175-DOC.pdf
DISPLAY FUNCTIONS

FUNCTIONS

INSTALLATION
POWER
The FR-175 is powered through the included rechargeable NiMH battery pack, size 3x AAA, voltage 3.6V or through the 3x AAA penlite batteries (excl.). If you choose to insert individual rechargeable batteries, you must charge them in a separate charger. The charging station supplied with the FR-175 is only suitable for charging the included battery packs.
- First remove the belt clip by pressing the retaining clip backwards and then press the belt clip upwards out of the walkie-talkie.
- Now open the battery compartment by pressing the tab at the bottom of the battery cover upwards, the battery cover can then be removed.
![]()
- Insert the battery pack (the charging contacts must remain visible and the "UP" arrow must point to the top of the walkie-talkie.
- Close the battery compartment, make sure it's closed properly and slide the belt clip back onto the walkie-talkie.


 The battery pack is provided with a small strap to easily remove it. Make sure that this strap, when replacing the rear cover, does not cover one of the charging contacts at the rear of the battery pack. Confirm this by placing the walkie-talkie into the charger, the charging indicator must then illuminate. Also see below.
CHARGING
Insert the thin low-voltage plug into the side of the charging station and plug the adapter into a 230V 50Hz wall socket. Place the walkie-talkies into the charging station to recharge the batteries.
The indicators on the charger will illuminate to indicate that the battery packs are being recharged. These indicators remain lit, also when the battery packs are fully charged. There's no risk of overcharging because the charging current is electronically limited.
You may leave the walkie-talkies enabled while charging them.
NORMAL BATTERIES
Insert normal or rechargeable individual batteries according to the drawing inside the battery compartment.

When using normal batteries, you may still place the walkie-talkies into the charger. However, the charging indicators won't illuminate and the batteries will not be recharged.
When using rechargeable batteries, you must recharge them in an external charger.
HEADSET
On top of the FR-175 you'll find the connector for a headset with a 2.5mm plug. We advise you to use an Alecto FRH-10 headset for this.
USE
Attention: for a connections between 2 walkie-talkies, both walkie-talkies must be set to the same channel, with the same sub-code. See further on in this manual how to set the channel and sub-codes.
TO SWITCH ON/OFF
Press and hold the ![]() button for 2 seconds to switch the walkie-talkie on or off.
button for 2 seconds to switch the walkie-talkie on or off.
VOLUME CONTROL
Repeatedly and briefly press the ![]() or
or ![]() button to adjust the volume. The set volume level is shown in the lower part of the display.
button to adjust the volume. The set volume level is shown in the lower part of the display.
TO SEND
Press the P button to send. Keep this button depressed while speaking. Talk at a normal voice volume and approximately 3 to 5 cm from the walkie-talkie's microphone.
TO RECEIVE
Release the P button to receive.
CALL ALERT TONE
Press the P button briefly to transmit a call alert tone. This call alert tone is adjustable, see 'To change the call alert tone' further on in this manual.
BACKGROUND LIGHTING
Each time you press a function button (except the flash light button) the background lighting of the display will illuminate. This lighting will automatically switch off 10 seconds after pressing the last button
FLASH LIGHT
Use the ![]() button to switch on the built-in flash light. This light remains lit for as long as you keep this button depressed.
button to switch on the built-in flash light. This light remains lit for as long as you keep this button depressed.
The walkie-talkie doesn't need to be switched on to use this function.
Attention: Don't stare directly into the light when lit and don't shine it in other people's eyes. The light can be bright and may damage your eyesight.
ADDITIONAL FUNCTIONS
VOX FUNCTION
When the VOX function is enabled (VOX = Voice Activated Transmission), the FR-175 starts sending as soon as you speak into the microphone.
To switch the VOX function on/off:
- press 3x the MENU button, the word "VOX" will illuminate in the left part of the display
- use the buttons
![]() or
or ![]() to set the trigger sensitivity ('OF' is off, '1' is the lowest sensitivity, '3' is the highest sensitivity)
to set the trigger sensitivity ('OF' is off, '1' is the lowest sensitivity, '3' is the highest sensitivity) - press the P button to confirm
Preferably, use this function in combination with headsets. Keep in mind that it can take over a second after you've started talking before the walkie-talkie enables the transmitter.
CHANNEL MONITORING (listening)
Use this function to disable the noise reduction, allowing you to also listen to weak transmitters on the current channel.
To switch the MONITOR function on/off:
- press and hold the
![]() button for 2 seconds to disable the noise reduction and to monitor the channel
button for 2 seconds to disable the noise reduction and to monitor the channel - release the
![]() button to turn the noise reduction on again
button to turn the noise reduction on again
CHANNEL SCAN
Use the scan function to listen in on all channels one after the other.
- Press and hold the
![]() button for 2 seconds to start the scan
button for 2 seconds to start the scan - briefly press the
![]() or
or ![]() button to continue scanning if you're only receiving noise on a certain channel
button to continue scanning if you're only receiving noise on a certain channel - press the P or MENU button to end the scan
KEYPAD LOCK
When the keypad lock is activated, the  ,
,  and MENU buttons are blocked.
- press and hold the MENU button until
![]() appears in the display after approx. 2 seconds
appears in the display after approx. 2 seconds - press and hold the MENU button again for 2 seconds to release these buttons again
SETTINGS
TO CHANGE THE SEND/RECEIVE CHANNEL
- press 1x the MENU button and the channel indication starts flashing
- press the
![]() or
or ![]() button to select the desired channel
button to select the desired channel - press the P button to confirm
TO CHANGE THE SUB-CHANNEL (CTCSS)
- press 2x the MENU button and the sub-channel indication starts flashing
- use the
![]() or
or ![]() button to set the desired sub-channel (1-38) or disable this function by selecting OF
button to set the desired sub-channel (1-38) or disable this function by selecting OF - press the P button to confirm
Keep in mind that the walkie-talkie at the receiving end must be set to the same sub-channel.
Sub-channel explanation, (CTCSS code): Continuous Tone Controlled Squelch System is a tone code that's included while transmitting. This tone code is not audible. Only when the tone code of the transmitting walkie-talkie matches the tone code of the receiving walkie-talkie, the receiving walkie-talkie will reproduce the signal. This prevents you from being disturbed by other PMR-446 walkie-talkies communicating on the same channel.
TO CHANGE THE CALL ALERT TONE
You may choose from 10 different call alert tones and 'tone-off':
- press 4x the MENU button and 'CA' starts flashing in the display
- use the
![]() or
or ![]() button to set the desired call alert tone ('oF' = tone 'off'), the selected tone will sound through the speaker for you to check
button to set the desired call alert tone ('oF' = tone 'off'), the selected tone will sound through the speaker for you to check - press the P button to confirm
KEY TONES ON/OFF
Key tones are the tones that sound upon pressing a button. You may switch these tones on or off as follows:
- press 5x the MENU button and 'to' starts flashing in the display, followed by 'on' or 'oF'
- use the
![]() or
or ![]() button to enable the key tones ('on') or to disable them ('oF').
button to enable the key tones ('on') or to disable them ('oF'). - press the P button to confirm
ROGER BEEP
If this function is enabled, a signal tone will sound at the receiving end as soon as you stop transmitting. The receiving person now knows when he or she can talk back.
To switch the Roger Beep on/off:
- press 6x the MENU button and 'ro' starts flashing in the display, followed by 'on' or 'oF'
- use the
![]() or
or ![]() button to enable the Roger Beep tone ('on') or to disable it ('oF')
button to enable the Roger Beep tone ('on') or to disable it ('oF') - press the P button to confirm
USER TIPS
GENERAL
The FR-175 is a transceiver operating with radio waves on the 446 MHz band. The signal transfer could be disturbed by external influences such as other walkie-talkies, transmitters, wireless phones, etc. If your walkie-talkie receives or causes interference, this is usually resolved by switching channel.
Use of this walkie-talkie is authorized in all EU countries. If you'd like to bring your FR-175 to countries outside the EU, refer to the local restrictions on the use of PMR446 equipment of the concerned country.
Keep in mind that the signal of the FR-175 may also be heard by walkie-talkies or receivers other than yours.
It's not allowed to make any changes to the electronics or to the antenna of the FR-175. Service may only be performed by qualified electricians.
Never use the FR-175 outdoors during thunderstorms.
POWER
The battery symbol in the display indicates the charge of the inserted batteries.

batteries full

batteries 1/3 full, please recharge or replace now

this symbol flashes and every 3 seconds a double beep sounds: the battery is low and the walkie-talkie will switch off within minutes
Only recharge the supplied battery packs by placing the walkie-talkies into the supplied charger.
Individual rechargeable batteries must be recharged using a separate charger. Non-rechargeable batteries must be replaced.
RADIO CONNECTION
The FR-175 has a range of up to 7km. This range depends on local conditions such as tall buildings, high voltage towers and overhead wires. An optimal range is achieved when the walkie-talkie has a free view of the receiver.
CTCSS
A handset on which no CTCSS code is set can receive the signal from all handsets transmitting on the same channel. Talking back is possible only when you've set the same CTCSS code as the other handset.
MAINTENANCE
- Only clean the FR-175 with a moist cloth.
- Never place the walkie-talkie in direct sunlight or in a humid environment.
- Prevent water and/or sand from penetrating the FR-175.
- In case of a failure, first check whether the FR-175 can be used at a different location.
ENVIRONMENT
- In case the baby video monitor is being replaced, please return it to your supplier; they will guarantee environment-friendly processing.
![]()
- Exhausted batteries can be returned to the supplier of these walkie-talkies or you may bring them to your local depot for small chemical waste.
- Never discard empty batteries or exhausted accumulators as regular household waste.

TECHNICAL SPECIFICATIONS
Operating frequency: 446.00625 MHz to 446.09375 MHz
Power output: <27dBm
Walkie-talkie power supply: rechargeable NiMH battery pack, voltage 3.6V, 800mAh or higher or 3x 1.2V battery, size AAA
Charger power supply: 7.5V / DC / 500mA via adapter
NiMH battery pack recharge duration: 12-15 hours
Usage duration: approx. 24 hours (10% transmitting), (20% receiving), (70% standby)
Headset connector: 2.5mm stereo
Range: up to 7Km
Walkie-talkie weight: 105g (incl. battery pack)
Dimensions: 91(128) x 49 x 35mm
Information Power Adapter:
Manufacturers name and address: Shenzhen Jiakeyuan Industry Co., LTD., Building B2 Fenghuanggang Third Industrial Zone, Xixiang Bao'an District, Zhenzhen, China.
Model Identifier: JKY088 0750500EU
Input voltage: 100-240VAC
Input AC frequency: 50/60 Hz
Output voltage: 7.5V DC
Output current: 0.5 A
Output Power: 3.75 W
Average active efficiency: 76.2 %
Efficiency at low 10% load: -
No load Power consumption: 0.07 W
TROUBLESHOOTING
Nothing works
- the battery pack is empty, please recharge or replace
Poor or no reception
- weak or empty batteries, recharge them
- channel setting or sub-channel set incorrectly (the sender and receiver must be set to the same channel, with the same sub-channel)
- the distance between the receiver and transmitter is too large, please decrease the distance
Noise or other additional sounds
- other sender is present, change the channel
- interference from other devices, switch the other devices off (if possible)
High whistle
- the transmitter is too close to the receiver or the volume of the receiver is set too high, increase the distance or lower the volume
If this doesn't resolve the problem, switch off the handsets, wait several minutes and switch them on again. If the problem still remains, please contact the Alecto customer service: www.alecto.nl

Documents / Resources
References

Download manual
Here you can download full pdf version of manual, it may contain additional safety instructions, warranty information, FCC rules, etc.
Advertisement


Need help?
Do you have a question about the FR-175 and is the answer not in the manual?
Questions and answers