ClearSounds Talk500ER User Manual
Hide thumbs
Also See for Talk500ER:
- User manual (65 pages) ,
- Quick setup manual (4 pages) ,
- Features (1 page)
Table of Contents
Advertisement
Quick Links
Advertisement
Table of Contents

Related Manuals for ClearSounds Talk500ER


Summary of Contents for ClearSounds Talk500ER
- Page 1 Talk500ER 1 – ENGLISH...
-
Page 2: Important Safety Instructions
The Talk500ER does not guarantee that you will make contact or receive help. The Talk500ER is only an aid to assist you in calling for help. CAUTION: The Talk500ER phone is capable of amplifying sounds to a loud volume. -
Page 3: Location Of Controls
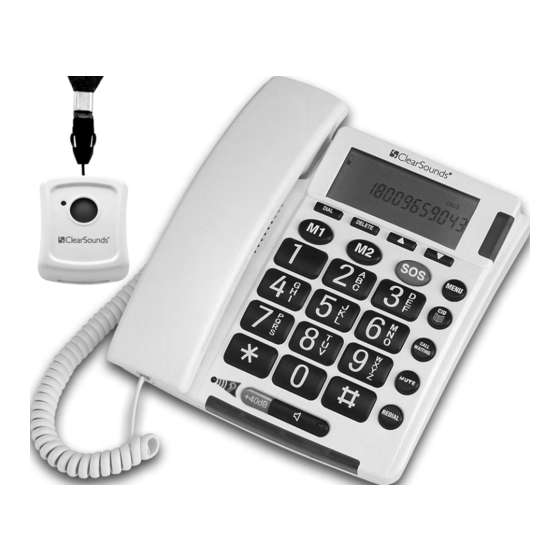
LoCATIoN oF CoNTRoLS Water Proof Pendant Hold down to activate or deactivate emergency call. LED lights RED when pressed. Remove screws to open battery compartment. 1 Hook Switch 11 Ringer LED 2 Handset Holder 12 New Call LED 3 Dial – Press to confirm phone Buttons – Use to scroll functions or automatically through menu options dial the selected caller ID... -
Page 4: Installation
INSTALLATIoN Installing Batteries in the phone Your telephone requires four AA batteries (not supplied) in case of network power failure for LCD backup & operations. When appears on the display or the display dims, replace the batteries with new batteries. Note: Should you choose not to install batteries - the telephone numbers in memory and the voice recordings are stored in non-volatile flash memory and will not be lost. -
Page 5: Connecting The Power Supply
Connecting The power Supply plug the AC adapter into the AC power Jack on the back of your phone, then into a standard electrical outlet or surge protector, if you are using one. For safety reasons, use only the AC120v DC9v 200mA adapter provided. -
Page 6: Setting The Time And Date
Note: You can select the desired LCD function by pressing the num- ber key. For example: You can press MENU button, then press 5 digit, NAME RECORDING will show. Setting the TIME and DATE 1 press and release the MENU button until ENTER TIME/DATE is shown. 2 press the DIAL button. The display shows ENTER TIME and the hours digits is flashing. 3 Select the current hour using the and confirm with DIAL button. - Page 7 Setting Flash Time 1 press and release MENU button until FLASH is shown 2 Press the DIAL button. 3 Select the desired flash time using the and confirm by pressing the DIAL button. 4 press the button to exit the set-up mode. Setting Tone /Pulse Dialing Mode You can select the required dialing type Tone/Pulse 40/60. 1 press and release the MENU button until Tone/Pulse is shown.
-
Page 8: Receiving A Call
Setting Speaker Volume Control. You can adjust the speaker volume for a more comfortable listening level by sliding the volume HI/LO switch. Dialing A Call 1 pick up the handset or press button (the speaker LED will light) and wait for a dial tone. 2 press the keypad for the telephone number you wish to dial. The display will show the number that you dialed on the keypad. -
Page 9: Call Waiting
the number matches with a name recorded in the phone book, if not, it will say the numbers of the calling party. This feature allows you to decide to pick up the phone or not depending on who is calling. If you want to talk to the caller: 1 pick up the handset or press button to answer the call. -
Page 10: Recording A Message For Emergency Calls
not PAIRING FAILURE would appear. 3 To cancel, select DELETE? And press DIAL to confirm. RECORDING A MESSAGE FOR EMERGENCY CALLS 1 press and release MENU until RECORD MESSAGE appears 2 Hold down DIAL until you hear a beep and VOICE flashes; then speak into the speakerphone simultaneously. The maximum recording time is 20 seconds. -
Page 11: Storing Numbers In The Phone Book
rings simply press the red activation button on your pendant, the call will be answered and you will be able to talk using the speakerphone. To disconnect the call simply press the red activation/deactivation button. Be careful not to hold the button for too long or you will activate the emergency call program. -
Page 12: To Dial A Number From The Phonebook
name. By repeatedly pressing the appropriate button, upper case letters as well as numbers and special characters can be entered. overview: Button Letters/symbols 1 [Space character] + & - / 1 2 A B C 2 3 D E F 3 4 G H I 4 5 J K L 5 6 M N o 6 7 p Q R S 7 8 T U V 8... - Page 13 -oR- 1 pick up the handset or press button (the speaker LED will light) and wait for a dial tone. 2 press and release button, until icon is shown. 3 Review the stored phone number by pressing or . 4 press DIAL button. Recording / Editing / Deleting Voice Prompt Of Name In phonebook With Caller ID service activated, when an incoming call is received, the unit will display and announce the caller’s phone number.
- Page 14 5 You can move the cursor to the required position by pressing . To delete the digit, press DELETE button, or press any numeric key to inset the digit and confirm with DIAL button. Then the display shows the flashing first letter of the name. 6 Move the cursor to the required position by pressing .
- Page 15 THE CALLER ID NOTE: In order to utilize the Caller ID features, you must subscribe to Caller ID service through your local phone company. There are fees for Caller ID services, and it may not be available in all areas. This product can provide information only if both you and the caller are in areas offering Caller ID service, and if both telephone compa- nies use compatible equipment. Important: When using the Caller ID features, please note it is only available at Caller ID mode (CLIP icon turns on). If the CLIP icon is off, press button once. • Receiving a Call (Can store up to 64 calls) • If an incorrect, invalid or incomplete Caller ID signal is received, the display shows LINE ERROR.
- Page 16 View the Caller ID Memory • Press to review more recent calls. The CALL# will decrease. • After you view the most recent data in memory, the display will show END OF LIST. • Press to review older calls. The CALL# will increase. • After you view the oldest data in memory, the display will show END OF LIST. • If the data in memory is being reviewed for the first time, the NEW icon will be lit.
-
Page 17: Copy From The Caller Id To The Phonebook
Copy From The Caller ID To The Phonebook You can copy Caller ID information to the phone book while you are reviewing the Caller ID information. • Select the required Caller ID memory location by pressing • Press and hold MENU button for two seconds, display will show COPY TO MEMORY. • Press DIAL button, display will show SAVED! TROUBLESHOOTING GUIDE No dial tone 1 Check that all phone cord connections (including the curly cord) and AC Adapter are securely plugged into the telephone & wall jack. -
Page 18: Fcc Wants You To Know
No Caller ID information while on a call 1 Make sure your service provides Caller ID Information while you are on a call. This is sometimes known as “Caller ID on Call Waiting” or “Type II Caller ID”. 2 The phone cannot display the information if another phone on the same line is in use. Make sure all extensions are on hook. FCC WANTS YOU TO KNOW This equipment complies with part 68 of the FCC rules and the requirements adopted by the ACTA. on the bottom of this equipment is a label that contains, among other information, a product identifier in the format US: AAAEQ##TXXXX. -
Page 19: Industry Canada Cs03 Statement
such interference, the base of the telephone should not be placed near or on top of a TV or VCR; and, if interference is experienced, moving the telephone farther away from the TV or VCR will often reduce or eliminate the interference. However, there is no guarantee that interference will not occur in a particular installation. If this equipment does cause harmful interference to radio or television reception, which can be determined by turning the equipment off and on, the user is encouraged to try to correct the interference by one or more of the following measures:... -
Page 20: Limited One-Year Warranty
ClearSounds Communications shall not be responsible for loss of time, ® inconvenience, loss of use of your TALK500ER, property damage by the TALK500ER or any consequential damages. Shipping cost must be prepaid and the product must be packaged appropriately for shipping.
Need help?
Do you have a question about the Talk500ER and is the answer not in the manual?
Questions and answers