Table of Contents
Advertisement
Advertisement
Table of Contents

Related Manuals for Sennheiser RS 175


Summary of Contents for Sennheiser RS 175
- Page 1 RS 175 Digital Wireless Headphone System Instruction Manual...
-
Page 3: Table Of Contents
Contents Contents Important safety information ..............2 The RS 175 digital wireless headphone system ........4 Package includes .................... 5 Product overview ................... 6 Overview of the HDR 175 headphones ............. 6 Overview of the TR 175 transmitter ............7 Overview of indicators .................. -
Page 4: Important Safety Information
It is considered improper use when this product is used for any application not named in this instruction manual and the associated product guides. Sennheiser does not accept liability for damage arising from abuse or mis- use of this product and its attachments/accessories. - Page 5 10 and 40°C/50 and return them to your specialist 104°F. dealer. Do not charge standard Do not mix standard and HR03 batteries. rechargeable batteries in the LR03 battery compartments. RS 175...
-
Page 6: The Rs 175 Digital Wireless Headphone System
Additionally, the user-friendly design makes it easy to set up and enjoy the RS 175. The main controls are located on the headphones, so nothing will distract you from an exciting audio experience, and the com- fortable fit is ideal for extended periods of use. -
Page 7: Package Includes
Low self-discharge NiMH rechargeable batteries, AAA size Optical digital cable, 1.5 m Stereo audio cable with 3.5 mm jack plugs, 2 m Quick guide Quick Guide Safety Guide Instruction manual CD in 15 languages (PDF files) Safety guide Safety Guide Safety Guide RS 175... -
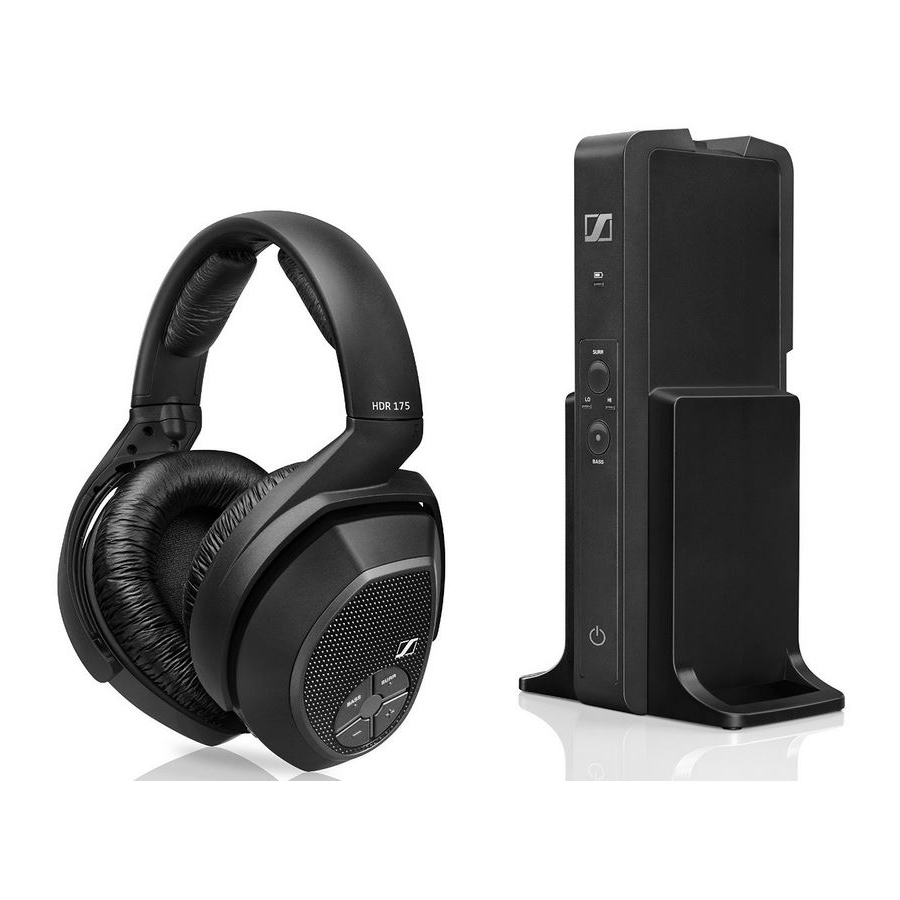
Page 8: Product Overview
Product overview Product overview Overview of the HDR 175 headphones Headband Volume button Charging contacts Volume – button Ear pads BASS button Ear cups/Battery HDR power button compartments HDR status LED SURR Virtual surround sound button RS 175... -
Page 9: Overview Of The Tr 175 Transmitter
Virtual surround sound LED ANALOG 3.5 mm IN Analog indicators, low and high audio input (3.5 mm jack) SURR Virtual surround sound DC 9V 0.3A socket for the power button supply unit Charge status LED indicator Charging contacts RS 175... -
Page 10: Overview Of Indicators
The transmitter and headphones are connected and the rechargeable batteries are almost empty. The headphones are disconnected from or cannot connect to the transmitter. The headphones are disconnected from or cannot connect to the transmitter and the rechargeable batteries are almost empty. RS 175... - Page 11 9 to 14 hours 50 to 75% approx. 14 to 18 hours 75 to 100% Surround sound LED Meaning The surround sound is deactivated. LO: Low surround sound mode is active. HI: High surround sound mode is active. RS 175...
- Page 12 The transmitter is connected to the AC wall outlet. The transmitter is in standby mode. The transmitter and headphones are connected. The transmitter detects an incompatible digital audio streaming input (see page 27). 1.5 s 1.5 s 10 | RS 175...
-
Page 13: Putting The Rs 175 Into Operation
Putting the RS 175 into operation Putting the RS 175 into operation Setting up the transmitter Choose a suitable place near your audio source. Separate the transmitter and other wireless devices in a room by at least 50 cm/20” to avoid interference. -
Page 14: Connecting The Transmitter To An Audio Source
Putting the RS 175 into operation Connecting the transmitter to an audio source You can simultaneously connect 2 different audio sources (e.g. a TV and a stereo hi-fi system) to the transmitter. The transmitter features a digital as well as an analog audio input. If you connect 2 audio sources, you can... -
Page 15: Connection Option: Optical (Digital)
Connection option A: Optical (digital) To achieve the best possible listening experience, we recommended that you connect your RS 175 headphone system to your home cinema or hi-fi system using the supplied optical digital cable. Your wireless headphone system allows digital audio streaming using only... - Page 16 Putting the RS 175 into operation Connection option B: 3.5 mm or 6.3 mm/¼“ jack socket (analog) Some TV models mute the loudspeakers when you connect the transmitter to the headphone socket. Check in the menu of your TV to see if the muting function can be deactivated.
- Page 17 Putting the RS 175 into operation Connection option C: RCA (analog) Switch your audio source off before connecting the transmitter. Plug the RCA adapter onto the stereo audio cable. Connect the stereo audio cable to the 3.5 mm jack socket of the transmitter.
-
Page 18: Connecting The Transmitter To An Ac Wall Outlet
Putting the RS 175 into operation Connecting the transmitter to an AC wall outlet Select a suitable country adapter and slide it onto the power supply unit until it locks firmly in place. Connect the power supply unit connector to the power input socket of the transmitter. -
Page 19: Inserting And Replacing The Rechargeable Batteries
Putting the RS 175 into operation Inserting and replacing the rechargeable batteries Lightly twist the ear pads counterclockwise until you overcome a slight resistance. Lift the ear pads off the ear cups to reveal the battery compartments. Insert the rechargeable batteries into the compartments. To replace the batteries, pull the batteries out of the compartments and insert the new ones. -
Page 20: Charging The Rechargeable Batteries
Putting the RS 175 into operation Charging the rechargeable batteries CAUTION Danger of damage to the headphones! If you insert non-rechargeable batteries into the battery compartments, the batteries may leak during charging and can damage your headphones. Do not place the headphones on the headphones holder if you are using non-rechargeable batteries. -
Page 21: Adjusting The Headband
Putting the RS 175 into operation Adjusting the headband For good sound quality and best possible wearing comfort, the headband has to be adjusted to properly fit your head. The headphones feature an adjustable headband with a snap-in locking mechanism for easy adjust- ment. -
Page 22: Using Your Rs 175 Headphone System
Using your RS 175 headphone system Using your RS 175 headphone system Switching your wireless headphone system on WARNING Danger due to high volume levels! Listening at high volume levels can lead to permanent hearing defects. Before putting the headphones on and before toggling between your audio inputs, adjust the volume on the headphones to a low level. -
Page 23: Selecting An Audio Input
Using your RS 175 headphone system Selecting an audio input If both analog and digital audio inputs are connected to different audio sources, the headphone system enables you to toggle between the two inputs. Push the AUDIO INPUT SELECTION switch up to listen to an audio source connected to the digital optical input (see page 13). -
Page 24: Activating/Deactivating The Virtual Surround Sound
Using your RS 175 headphone system Activating/Deactivating the virtual surround sound The RS 175 headphone system offers two virtual surround modes (high HI/low LO) that simulate the sound generated by external stereo speakers, thus, producing spatial and livelier sound. The intensity of the surround effect however differs according to the mode selected. -
Page 25: Activating/Deactivating The Dynamic Bass Boost
Using your RS 175 headphone system Activating/Deactivating the dynamic bass boost The dynamic bass boost increases the audio bass response. Press the BASS button either on the headphones or the transmitter. The bass boost effect switches between on and off modes, as indicated... -
Page 26: Pairing Headphones To The Transmitter
Using your RS 175 headphone system Pairing headphones to the transmitter The headphones and the transmitter enclosed in this package have been paired from the factory. The following procedure is only necessary if you have cleared all pairing information from your wireless headphone system and you want to revive the lost pairing, or if you want to pair another set of headphones to the transmitter. -
Page 27: Switching Your Wireless Headphone System Off
Using your RS 175 headphone system Switching your wireless headphone system off There are two ways to switch your wireless headphone system off. Press and hold the HDR power button for approx. 2 seconds. The headphones switch off. If no other pair of active wireless head- phones is connected to the transmitter, the transmitter switches to standby mode. -
Page 28: Cleaning And Maintaining The Rs 175
Replacing the ear pads For reasons of hygiene, you should replace the ear pads from time to time. Spare ear pads are available at your local Sennheiser partner. Lightly twist the ear pads counterclockwise until you overcome a slight resistance. -
Page 29: Troubleshooting
Headphone volume is adjusted too high. Reduce the volume on the headphones. distorted Volume of the analog audio source is Decrease the volume of the analog audio – adjusted too high. source at least to a medium volume level. RS 175 | 27... -
Page 30: Other Problems
If you encounter a problem that is not listed in the table, or if the solutions provided do not work, please visit the RS 175 product page at www.sennheiser.com for the most up-to-date list of frequently asked questions. You may also contact your local Sennheiser service partner for assistance. To find a Sennheiser service partner in your country, visit www.sennheiser.com. -
Page 31: Leaving The Range Of The Transmitter
Volume buttons. Release all 3 buttons. The HDR status LED lights up green or red, depending on the battery condition, and starts blinking slowly. The pair settings on the head- phones are cleared. RS 175 | 29... -
Page 32: Specifications
Standby mode: ≤ 0.3 W (without charging) Dimensions (W x H x D) approx. 12.7 cm x 23.4 cm x 10 cm Sennheiser NT 9-3AW power supply unit Rated input 100 – 240 V~, 50 – 60 Hz, 80 mA Rated output 9 V , 300 mA Operation: 0°C to +40°C/32°F to 104°F... -
Page 33: Manufacturer Declarations
Manufacturer declarations Manufacturer declarations Warranty Sennheiser electronic GmbH & Co. KG gives a warranty of 24 months on this product. For the current warranty conditions, please visit our website at www.sennheiser.com or contact your Sennheiser partner. FOR AUSTRALIA ONLY Sennheiser goods come with guarantees that cannot be excluded under the Australian Consumer Law. - Page 34 Section 2.1093 of the FCC rules. Trademarks Sennheiser is a registered trademark of Sennheiser electronic GmbH & Co. KG. Other product and company names mentioned in this instruction manual may be the trademarks or registered trademarks of their respective holders.
- Page 36 Sennheiser electronic GmbH & Co. KG Am Labor 1, 30900 Wedemark, Germany www.sennheiser.com Publ. 01/15, A01...
Need help?
Do you have a question about the RS 175 and is the answer not in the manual?
Questions and answers