Table of Contents
Advertisement
Quick Links
Advertisement
Table of Contents

Related Manuals for Iseki TM3215


Summary of Contents for Iseki TM3215
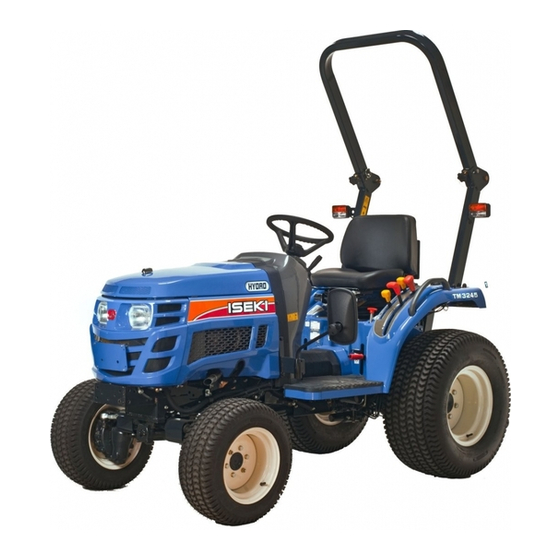
- Page 1 I S E K I T R A C T O R S MODEL: TM3215 TM3245 TM3265...
-
Page 2: To Our Customer
ISEKI TRACTORS TO OUR CUSTOMER Thank you very much for purchasing an ISEKI tractor. This operator's manual provides the information necessary for operating and maintaining your tractor safely and properly. The contents are mainly composed of the following two items:... -
Page 3: Table Of Contents
TM3215,3245,3265 TABLE OF CONTENTS TO OUR CUSTOMER ..........Parking Brakes ..........ENGINE SPEED CONTROLS ......TABLE OF CONTENTS .......... TRANSMISSION SHIFT LEVERS ...... MECHANICAL TYPE .......... 1. SAFETY ............... Range And Gear Shift Levers ......Forward/Reverse Lever ......... PERSONAL SAFETY INSTRUCTIONS .... - Page 4 ISEKI TRACTORS 6. LUBRICATION & PERIODIC MAINTENANCE ... 9. ASSEMBLY & PRE-DELIVERY INSPECTION ..SPECIFICATIONS & CAPACITIES ..... PRE-DELIVERY ..........(Mechanical Transmission) ......CHECK LIST ............(Hydrostatic Transmission) ......CHECK LIST ............Periodic Inspection and Maintenance Table .. LUBRICATION DETAILS ........
-
Page 5: Safety
TM3215,3245,3265 SAFETY PERSONAL SAFETY INSTRUCTIONS Whenever you see the words and symbols below, used in this Operator's Instruction Book and on decals, you MUST take note of their instructions as they relate to personal safety. DANGER: This symbol together with the... - Page 6 SAFETY (2) This machine cannot be driven on a public road without authorization by a local government agency, etc. When transporting an unauthorized machine on a public road, load it on a truck. When traveling with an implement wider than the tractor, put red caution markers such as flags (red lamps at night) in the most visible locations on both sides of the implements, and place a "SLOW...
-
Page 7: Dimensional Limits Of Implements
TM3215,3245,3265 ■ DIMENSIONAL LIMITS OF IMPLEMENTS Implement Items TM3215F TM3245F TM3265F Rotary mower....Mid-mount ....Max. cutting width .............. 1220 mm (2, 3 blades)....Max. weight ................. 150 kg Rear-mount ....Max. cutting width ..............1,070 mm (1 blade) .....Max. weight ................. 150 kg (2, 3 blades)....Max. weight ................. 150 kg Rotary tiller............Max. -
Page 8: For Safe Operation
SAFETY FOR SAFE OPERATION ■ HOW TO BE A SAFE OPERATOR (1) Familiarize yourself fully with machine controls by studying the operation manual before using your machine. (2) Never allow persons listed below to operate the machine. ・Persons with mental disease ・Persons who cannot operate the machine properly because of fatigue, illness, or drowsiness from medication, etc. -
Page 9: When Another Person Operates Your Machine
If safety devices are damaged or do not work, please consult your ISEKI dealer. (3) Before removing a safety device, such as a safety cover, be sure that the machine has stopped completely. -
Page 10: Starting Engine And Moving Tractor
SAFETY ■ STARTING ENGINE AND MOVING TRACTOR (1) Before starting the engine indoors, make sure that there is proper ventilation because exhaust fumes contain poisonous carbon monoxide, which cause lethal poisoning. (2) Before starting the machine, confirm that the t r a n s m i s s i o n g e a r h a s b e e n s h i f t e d t o t h e appropriate speed, that there is no one near the machine, and that the implement is securely installed on the machine.Always operate the... - Page 11 TM3215,3245,3265 When starting to move the tractor on an up-hill slope, be sure that the front wheels do not lift up. When going down a hill, drive the tractor at a slower speed than used to climb up the hill.
-
Page 12: Loading Onto Or Unloading From A Truck
(7) Use ramps with the same or better specifications mentioned below. When the machine is equipped with attachments other than those included in the specifications mentioned below, ask your ISEKI dealer for advice. -
Page 13: During Operation
(5) If you use a trailer, use a proper one which starts your tractor. Using an improper trailer may cause serious accidents. Never attempt to haul beyond the tractor's capacity. If you have a question, please consult your ISEKI dealer. -
Page 14: Inspection And Maintenance
SAFETY (6) When moving the machine toward an implement for the purpose of installing the implement, never allow any one to stand in between. When installing the implement on the machine, be prepare to move away promptly in the event of an emergency. The brakes should be applied securely during installation. -
Page 15: Storage
Do not attempt to service a tyre unless you have the proper equipment and experience to perform the job. Have the work carried out by your ISEKI dealer or a qualified repair service. When seating tyre beads onto rims never exceed the maximum inflation specifications specified on the tyre. -
Page 16: Maintenance Of The Electric System
SAFETY (3) Safe storage of dangerous objects ・When storing dangerous implements, take appropriate safety measures to prevent accidents by covering with tarpaulin. ・Store fuel in a safe place with caution signs such as "PREVENT FIRE" or "INFLAMMABLE." ・All inflammables must also be stored in a safe, fire- resistant location. -
Page 17: To Handle Booster Cables
TM3215,3245,3265 (3) When replacing or inspecting the battery, stop the When disconnecting battery cords, engine and turn the main switch off, or elec-trical disconnect negative cord first. parts may be damaged or unexpected acci-dent may occur. (4) When disconnecting the battery cables, discon-nect the earth cable (-) first without fail. -
Page 18: Safety Decals And Their Locations
SAFETY SAFETY DECALS AND THEIR LOCATIONS (5) Ether label (Code No. 1674-904-002-1) (1) Fan warning label (Code No. 1705-902-006-0) WARNING: RISK OF EXPLOSION WARNING: RISK OF ENTANGLEMENT Ether or other starting fluid should never be used to Stay clear of the fan while it is running. start engines equipped with glow plugs. - Page 19 TM3215,3245,3265 (8) Radiator label Take care of handling the battery. (Code No. 1705-902-008-0) Improper handling may lead to explosion. Never short the poles. Charge the battery in a well ventilated place. (10) Starter warning label (Code No. 1705-902-007-0) WARNING: HIGH PRESSURE STEAM AND HOT...
- Page 20 SAFETY WARNING: RISK OF OVERTURNING (14) ROPS label Never operate the tractor on a slope of over 10 (Code No. 1674-904-005-0) degrees, or it could overturn. WARNING: RISK OF INJURY OR DAMAGE Never allow other persons to get on the tractor or the implement.
-
Page 21: (Except For H-Type)
TM3215,3245,3265 (Except for H-type) -
Page 22: (H-Type)
SAFETY (H-type) -
Page 23: Tractor Identification
(Homologation plate) FIGF FFF (Name plate) Note the serial numbers of your tractor. Always quote the numbers in any communication to your ISEKI dealer. TRACTOR HOMOLOGATION ATTESTATION NUMBER (Fig.2-1 & 2-3(1)) TRACTOR SERIAL NUMBER (Fig. 2-2 & 2-3(2)) ENGINE MODEL NUMBER (Fig. 2-4 (1)) ENGINE SERIAL NUMBER (Fig. -
Page 24: Major Components
MAJOR COMPONENTS MAJOR COMPONENTS FIFF FFF Identification and terminology of major components, as given in this book, are as follows: Front Wheels 10. Fender 19. Front Wheel-Drive Shaft Fuel Tank 11. Rear conve Light 20. Headlight Check Chain 12. Hood 21. -
Page 25: Instruments & Controls
TM3215,3245,3265 INSTRUMENTS & CONTROLS Generally layout and location of controls within operator's area on Tractor. Specific use of these controls is given later in this section and also in "Operation" section of this book: FIG.4-1: Mechanical Transmission Instrument Panel Steering Wheel... -
Page 26: Instrument Panel
INSTRUMENTS & CONTROLS INSTRUMENT PANEL FIG. 4-3 TM3215 / 3245 / 3265 : An arrangement of gauges, control switches and indicators located in instrument panel. Items are detailed in the description that follows: † FIG. 4-3 Electrical Fuel Shut-Off Turning the main switch to off will stop the engine. -
Page 27: Indicator Light Strip
TM3215,3245,3265 Indicator Light Strip FIG. 4-5: Indicator light strip contains several warning lights to monitor certain functions. Currently used posi- tions (from left to right) are: (1) 4WD - Lights up when 4WD is engaged. Lights off † when 2WD is engaged. -
Page 28: Switches
INSTRUMENTS & CONTROLS CAUTION: DO NOT service hot engine. Al- low to completely cool before servicing or removing radiator cap † (11) Tachometer Scale on gauge - Indicates engine speed on crankshaft revolutions per minutes (rpm). Index is also provided to show rear PTO speed of 540 at approximately 2475 engine rpm. -
Page 29: Power Take-Off (Pto) Switch (Hst)
TM3215,3245,3265 Hazard Light Switch, 4 Fig4-10- Press switch to turn on hazard lights. Both flashing amber warning lights will operate at the same time. CAUTION: Hazard lights must be used any time Tractor is driven on public roadway. Consult local agencies for other marking re- quirements. -
Page 30: Main Clutch Pedal (Mechanical Transmission)
INSTRUMENTS & CONTROLS MAIN CLUTCH PEDAL (Mechanical Transmission) FIG. 4-12: Foot pedal (1) disengages engine from trans- mission when fully depressed, to permit engine starting, selecting / changing gears and stopping Tractor move- ment. PTO and Mid PTO selection (if equipped) also requires clutch disengagement. -
Page 31: Engine Speed Controls
TM3215,3245,3265 ENGINE SPEED CONTROLS CAUTION: Always select engine speed to ensure safe operation. Reduce speed prior to turning or reversing tractor. IMPORTANT: DO NOT “race” or excessively load cold engine. FIG. 4-15: Throttle lever (1) - Controls engine speed and will remain in position selected by the operator. With hand lever forward (t), engine will idle. -
Page 32: Transmission Shift Levers
INSTRUMENTS & CONTROLS TRANSMISSION SHIFT LEVERS There are two type of transmission for european model. 1. Forward 3 Reverse 3 (HST) type 2. Forward 8 Reverse 8 (mechanical) type MECHANICAL TYPE Two shift levers are used to select ground travel speed through different gear reductions within the drive train. -
Page 33: Differential Lock
TM3215,3245,3265 DIFFERENTIAL LOCK FIG. 4-20: When the differential lock 1 pedal is lowered, both sides of the rear axle are locked together to ensure traction to both rear wheels. This is especially important when operating in loose soil or slippery conditions. (Me- chanical type) In case of HST type, depress forward pedal slowly. -
Page 34: Rear Pto Selector Lever
INSTRUMENTS & CONTROLS IMPORTANT: Always disengage front drive axle when operating in conditions with minimal wheel slippage (DRY OR HARD SUR- FACES). IMPORTANT: If tire replacement is necessary, identical replacements must be installed to main- tain correct front/rear axle ratio. REAR PTO SELECTOR LEVER FIG. -
Page 35: Position Control
TM3215,3245,3265 Position Control Position control is used when attaching or detaching implements and other operations requiring the imple- ment to be kept at a constant height above the ground. It is also used with tool bars having flexible row units and implements equipped with gauge (support) wheels. -
Page 36: Operation
OPERATION OPERATION BREAK-IN PERIOD STARTING The operation of Tractor within the first fifty hours can be Pre-Start Inspection a major factor in determining the performance and life of the engine and Tractor: Prior to daily start-up of Tractor, a few basic procedures should be followed to ensure Tractor is in operating or- ・The engine may be operated at full rpm but excessive der to insure life and dependability:... -
Page 37: Normal Starting
TM3215,3245,3265 Normal Starting CAUTION: Do not attempt to start the trac- tor unless seated in the operator’s seat. Do not allow anyone on the tractor except for the operator. FIGS. 5-1, 5-2 & 5-3: To start the engine proceed as follows: Apply parking brake (1). -
Page 38: Restarting Warm Engine
NOTE: Installation of accessory engine block heater is Operator Observations recommended in cold weather conditions. Consult your ISEKI dealer. Constant attention should be paid to the following points during operation: IMPORTANT: U N D E R N O C I R C U M S TA N C E S ・Engine oil pressure lamp will come on in case of low... -
Page 39: Mechanical Transmission
TM3215,3245,3265 MECHANICAL TRANSMISSION Ground Speed Selection Tractor is equipped to provide 8 forward gear speeds and 8 reverse gear speeds. FIG. 5-4: Gear shift lever, 1, provides four gear selec- tions. These gear selections are compounded by range shift lever, 2. The range shift lever provides 2 major changes in ground speed. -
Page 40: Mechanical Transmission
OPERATION MECHANICAL TRANSMISSION Ground Speed Selection FIG. 5-6: Arrangement of gears with appropriate ground speeds, in order from slow to fast, are shown in chart below, for mechanical transmissions. TM3215 TM3245 TM3265 SHIFT (Engine 2500 rpm) (Engine 2600 rpm) (Engine 2600 rpm) POSITIONS mech. -
Page 41: Stopping Tractor
TM3215,3245,3265 FIG. 5-7: Forward/reverse shuttle lever, 3, provides constant changes in travel direction in each gear/range combination. Reverse travel speed is slightly slower than forward travel in the same gear speed selection. CAUTION: Reduce engine speed before changing travel direction. Tractors with manual “shuttle”... -
Page 42: Hydrostatic Transmission
OPERATION FIG. 5-10: Always park Tractor on level area whenever possible. If hillside parking is necessary, securely block both rear wheels as shown. FIG. 5-10 HYDROSTATIC TRANSMISSION Ground Speed Selection FIGS. 5-11 & 5-12: The Hydraulic transmission provides infinite speed control in forward or reverse. The range shift lever (1) provides major changes in ground speed. -
Page 43: Stopping Tractor
TM3215,3245,3265 FIG. 5-13: Arrangment of gears with appropriate ground TM3215 TM3245 TM3265 SHIFT (Engine 2500 rpm) (Engine 2600 rpm) (Engine 2600 rpm) speeds, in order from slow to fast, as shown in the chart POSITIONS at right, for hydrostatic transmission. -
Page 44: Differential Lock Operation
OPERATION DIFFERENTIAL LOCK OPERATION FIG. 5-17: Differential lock pedal (2) should only be depressed when required as steering ability is greatly reduced. To engage the differential lock, depress the clutch pedal and allow all rear wheel movement to stop. Depress the lock pedal and slowly engage the clutch. To disengage the differential lock, depress the clutch pedal. -
Page 45: Power Take-Off (Pto)
TM3215,3245,3265 POWER TAKE-OFF (PTO) WARNING: PTO shafts and PTO driven Ensure that all PTO safety shields are in implements can be extremely dangerous. place at all times. Observe the following important points: Ensure all PTO-driven implements are in DO NOT operate tractor without a PTO cap good condition and conform to current installed. -
Page 46: Mid Pto Shaft (M Type)
2113 min (rpm) @2600 engine min (rpm) (TM 3265) 2113 min (rpm) @2600 engine min (rpm) Hydrostatic transmission FIG. 5-22 (TM3215) 2047 min (rpm) @2500 engine min (rpm) (TM 3245) 2129 min (rpm) @2600 engine min (rpm) (TM 3265) 2129 min... -
Page 47: Pto Operating Controls
TM3215,3245,3265 PTO OPERATING CONTROLS Mechanical Transmission The rear PTO is engaged and disengaged using the lever. When the lever (1) is backward the rear PTO is disengaged. Use the following procedures when operating with PTO tools, such as mowers, etc. -
Page 48: Pto Operating Controls
OPERATION PTO OPERATING CONTROLS Hydrostatic transmission FIG. 5-24... -
Page 49: Pto Operating Controls
TM3215,3245,3265 FIG. 5-24 & 5-25: Rear PTO and mid PTO are both con- trolled by PTO control switch (1). Rear PTO selector lever (2)is used to engage rear PTO gears inside the transmission housing. To select a PTO If the rear PTO is to be used, make... -
Page 50: Rear Linkage
OPERATION height in relation to the tractor. As the position control lever (1) is moved rearward, the hitch (and implement) are raised. Moving the lever forward will lower the hitch to the selected position. Each lever setting provides a specific hitch (and implement) position. FIG. - Page 51 TM3215,3245,3265 FIG. 5-31: Linkage provides two positions of connecting the top link (1) to the tractor. For most implements, securing the top link (1) in the up- per hole A is satisfactory, but position may be varied to provide increased implement height during transport.
-
Page 52: Attaching Implements
OPERATION Attaching Implements CAUTION: Always use POSITION CONTROL to attach / detach implements to provide precise control of the hitch. FIG. 5-34: Reverse the tractor to the implement, cen- tring the tractor with the implement hitch frame. Raise or lower the hitch using the position control lever (1) and align the left lower link end with the correspond- ing implement attaching pin. -
Page 53: Using Position Control
TM3215,3245,3265 Using Position Control Function - Attaching / detaching implements and op- erations requiring the implement to be kept at constant height above ground. Also used with tool bars having flexible row units and implements equipped with gauge (support) wheels. -
Page 54: Detaching Implements
OPERATION Detaching Implements CAUTION: Always use POSITION CONTROL to attach / detach implements to provide precise control of the hitch. Select a level to detach and store the implement. Lower implement to ground by moving the position control lever to DOWN. If necessary, adjust the level- ling crank on the right lift link to level the implement on ground. -
Page 55: Roll Over Protect In Structure (Rops)
TM3215,3245,3265 CAUTION: Always lower implement to ground, shut off engine and relieve system pressure (by operating control levers with engine off) before connecting or discon- necting implement hoses. CAUTION: Make sure all hydraulic hoses, couplers and cylinders are in good condi- tion before use. -
Page 56: Center Rops Type
OPERATION Center ROPS type (view from operator’s seat) This tractor is equipped with center mounted roll-over protective structure (Center ROPS). Seat belt must be worn. When the tractor is not being operated, the ROPS can be folded down if it will hit the roof of the garage where it is parked. -
Page 57: Lubrication & Periodic Maintenance
TM3215,3245,3265 LUBRICATION & PERIODIC MAINTENANCE SPECIFICATIONS & CAPACITIES (Mechanical Transmission) Engine Oil Use engine oil of the appropriate SAE viscosity. Oil must meet or exceed; MIL-L-2104 C requirements, API Service “CD”. TM3215F TM3245F TM3265F Capacity (litres)............2.7 ........2.7 ........3.1 Recommended Viscosity: 78F (25C) and Above ...... -
Page 58: (Hydrostatic Transmission)
LUBRICATION & PERIODIC MAINTENANCE (Hydrostatic Transmission) Engine Oil Use engine oil of the appropriate SAE viscosity. Oil must meet or exceed; MIL-L-2104 C requirements, API Service “CD”. TM3215FH TM3245FH TM3265FH Capacity (litres)............2.7 ........2.7 ........3.1 Recommended Viscosity: 78F (25C) and Above ......SAE 30W, 10W - 30 ..SAE 30W, 10W- 30 ..SAE 30W, 10W- 30 32-78F (0 -25C) ......... - Page 59 Radiator drain Radiator FIG. 6-1 Filling position Engine Radiator Transmission case Front axle Fuel tank ISEKI diesel engine oil Antifreeze ISEKI malti deluxe API: more than “CC” ISEKI U.T.H. oil Light diesel oil (LLC) 50% oil #80 grade Capacity (liter)
- Page 60 Radiator drain Radiator FIG. 6-2 Filling position Engine Radiator Transmission case Front axle Fuel tank ISEKI diesel engine oil Antifreeze ISEKI malti deluxe API: more than “CC” ISEKI U.T.H. oil Light diesel oil (LLC) 50% oil #80 grade Capacity (liter)
- Page 61 Brake pedal Engine FIG. 6-3 Filling position Engine Radiator Transmission case Front axle Fuel tank ISEKI diesel engine oil Antifreeze ISEKI malti deluxe API: more than “CC” ISEKI U.T.H. oil Light diesel oil (LLC) 50% oil #80 grade Capacity (liter)
- Page 62 Radiator Brake pedal FIG. 6-4 Filling position Engine Radiator Transmission case Front axle Fuel tank ISEKI diesel engine oil Antifreeze ISEKI malti deluxe API: more than “CC” ISEKI U.T.H. oil Light diesel oil (LLC) 50% oil #80 grade Capacity (liter)
-
Page 63: Periodic Inspection And Maintenance Table
TM3215,3245,3265 Periodic Inspection and Maintenance Table ○ : Inspect, replenish or adjust ● : Replace △ : Clean or wash ★ : Replacement or servicing at authorized service facility recommended. ★ ★ ★ ★ Remarks ★ ★ ○ ● ● ● ● ● ● ●... - Page 64 LUBRICATION & PERIODIC MAINTENANCE ○ : Inspect, replenish or adjust ● : Replace △ : Clean or wash ★ : Replacement or servicing at authorized service facility recommended. ★ ★ ★ ★ Remarks ★ ★ ○ ○ ○ ○ ○ 21 Tire air pressure Inspect/add air every 200 Hr.
-
Page 65: Lubrication Details
TM3215,3245,3265 LUBRICATION DETAILS Grease Fittings Lubricate all grease fittings (refer to Fig. 6-1,6-2,6-3 & 6-4) every 50 hours of operation using No.2 multipur- pose lithiumbase grease. Clean the grease gun and fit- tings before and after greasing to prevent contamination from dirt. - Page 66 LUBRICATION & PERIODIC MAINTENANCE FIG. 6-9 FIGS. 6-10 & 6-11: To remove front grill; Pull the upper portion of grill to front direction and lift up and remove the front grill. Never fail to insert the projection under the grill into the hole of battery base, and fix with the hook locating upper left and right.
-
Page 67: Engine Oil & Filter
TM3215,3245,3265 Engine Oil & Filter Engine oil and the filter should be changed after the first 50 hours of operation and then every 100 hours thereaf- ter. FIG. 6-12: To Check Engine Oil Level-The tractor must be parked on level ground with the engine off. Pull out the dipstick (1) and check that oil level is between upper limit F and lower limit L on the dipstick. -
Page 68: Transmission Oil & Filters
LUBRICATION & PERIODIC MAINTENANCE FIG. 6-15: To Replace Engine Oil Filter-Unscrew the element (1) from the engine and discard. Make sure the original filter gasket has been removed. Lubricate the new gasket on the replacement element with clean engine oil. Screw on the new element until the gasket contacts the adapter and then tighten ele- ment by further 2/3 turn. - Page 69 TM3215,3245,3265 FIG. 6-18: To Replace Transmission Oil-Remove the drain plug (1) back of the mid PTO gearbox, and the final drain plugs (2) on each axle. Completely drain oil from the system. IMPORTANT: Completely lower the three-point hitch prior to draining transmission oil.
-
Page 70: Hydrostatic Cartridge Oil Filter Replacement
LUBRICATION & PERIODIC MAINTENANCE Hydrostatic Cartridge Oil Filter Replacement The hydrostatic cartridge oil filter is located under the left step. FIG. 6-20: Always replace the hydraulic oil filter while oil is removed. Carefully unscrew the oil filter (1) from its transmission. -
Page 71: Cooling System
TM3215,3245,3265 COOLING SYSTEM CAUTION: DO NOT remove the radiator cap when the engine is hot. After engine has cooled down, rotate the cap slowly to re- lease pressure. Then the cap can be safety removed. FIG. 6-22: Cooling system is filled at factory with anti- freeze solution to protect the engine and radiator to -34°C (-30°F). -
Page 72: Engine Air Cleaner
LUBRICATION & PERIODIC MAINTENANCE FIG. 6-25: To adjust belt tension, loosen the alternator pivot bolt and nut (1) and tensioning bracket bolt (2). Pull outward on top of the alternator to correctly tension belt and tighten the bolt (2) first and then tighten the pivot bolt (1). -
Page 73: Fuel System
/ or tractor war- ranty void and may cause severe engine dam-age. Refer to a local ISEKI Dealer. Fuel Filter FIG. 6-29: Fuel filter assembly (1) is located at the right side of the engine, and is used to strain impurities from fuel before fuel reaches the injection pump. -
Page 74: Air-Bleeding Procedure
LUBRICATION & PERIODIC MAINTENANCE Fuel filter should be replaced by ASSY. It is impossible to disassemble and maintenance. Air-bleeding Procedure Air bleeding is not necessary. NOTE: Normally, further air-bleeding is not required due to electric fuel pump operating when start- er switch in instrument panel is ON. -
Page 75: Electrical System
TM3215,3245,3265 ELECTRICAL SYSTEM Battery FIG. 6-32: Battery (1) is located under the engine hood in front of the radiator. If the battery requires only minor servicing or charging, it is recommended that the front grille be removed to reach the battery. When the bat-... -
Page 76: To Handle The Battery
LUBRICATION & PERIODIC MAINTENANCE FIG. 6-34: Water need not be added to battery, the bat- tery is of maintenance-free type. If the battery performance be questioned, the battery should be removed and recharged from an external source following battery charger instructions. Repeated battery charging may be due to a defect in Tractor charging system and / or a defective battery. -
Page 77: Wiring / Fuse Arrangement
IMPORTANT: Slow blow fuses are of specific Use only authorized parts for replacements. ・7-pin Trailer Socket D NOTE: A special fuse is used-use only genuine ISEKI parts. WIRING DIAGRAM Please refer to the folder bound at the end of this manu-... -
Page 78: Clutch Free-Play Adjustment
LUBRICATION & PERIODIC MAINTENANCE CLUTCH FREE-PLAY ADJUSTMENT Mechanical Transmission FIG. 6-36 & 6-37: Check clutch pedal free-play regularly and adjust as necessary. Correct clutch pedal free-play A is 20 to 30 mm (7/8”) when measured at the end of the pedal (1) as shown. -
Page 79: Brake Free-Play Adjustment
TM3215,3245,3265 BRAKE FREE-PLAY ADJUSTMENT FIG. 6-38 & 6-39: Unlatch the pedals and check free- play of each brake pedal. Correct free-play A of each individual brake pedal is 20 to 30 mm. NOTE: ・ Through use, free-play will increase and brake balance will be affected. -
Page 80: After The Adjustment Of Brake Pedal And Parking Brake
LUBRICATION & PERIODIC MAINTENANCE FIG. 6-41: After the adjustment of brake pedal, adjust the parking lever. Adjust the “A” and “B” of cable adjust- ment point and adjust as brake is completely engaged with the parking lever 5 or 6 notch. CAUTION: Brakes must be adjusted evenly to permit equal braking action at both rear wheels when brake pedals are latched to-... -
Page 81: Wheels & Tyres
TM3215,3245,3265 WHEELS & TYRES Examine wheels and tyres periodically for correct infla- tion pressures, tight wheel bolts, and any physical dam- age that may be a detriment to tractor operation and op- erator safety. Corect condition prior to tractor operation. -
Page 82: Rear Wheel Spacing
Remove the bolts securing both rear wheel assemblies to the rear axle hubs and switch wheel assemblies to opposite sides of the tractor. FIG. 6-45: Tyre Tread Widths AGRICULTURAL TURF TM3215 855 mm 1000 mm 950 mm TM3245 855 mm... -
Page 83: Front Axle End-Float
Any oil leakage from the engine rear crankshaft seal and / or transmission input shaft will be indicated by oil draining through the hole. Contact your ISEKI dealer if oil leakage is evident. FIG. 6-48 TORQUE CHART FIG. -
Page 84: Storage
LUBRICATION & PERIODIC MAINTENANCE STORAGE If the tractor is to be stored for extended periods such as off-season non-use, certain measures should be taken for its preservation during such periods. These mea- sures will vary according to geographical area and stor- age season. -
Page 85: Troubleshooting
TM3215,3245,3265 TROUBLESHOOTING Engine Problem Possible Cause Remedy Starter motor does not • Shift lever not in neutral Place lever in neutral operate with key turned to • PTO switch is "ON" Turn PTO switch to off START • Broken safety switch Consult your Dealer •... - Page 86 TROUBLESHOOTING Problem Possible Cause Remedy Engine stops unexpectedly • Insufficient fuel supply Top up fuel and air-bleed fuel system during operation • Defective fuel injectors Consult your Dealer • Defective fuel injection pump Consult your Dealer. • Engine seizure due to low or (If engine can be turned by pulling poor oil fan belt, fuel system is most...
-
Page 87: Clutch
TM3215,3245,3265 Clutch Problem Possible Cause Remedy Clutch slips • Poor clutch pedal adjustment Adjust free-play • Worn or burnt clutch lining Consult your Dealer • Engine, transmission oil leak Consult your Dealer Clutch won't disengage • Poor pedal adjustment Adjust free-play •... -
Page 88: Steering System
TROUBLESHOOTING Steering System Problem Possible Cause Remedy Steering wheel is hard to turn • Poorly installed steering column Coreect or turns in one direction • Air in steering hydraulic system Air-bleed steering system • Clogged suction filter Remove and clean •... -
Page 89: Specifications
TM3215,3245,3265 SPECIFICATIONS Mechanical transmission MODEL TM3215F TM3245F TM3265F Sub Models ENGINE: Make ISEKI Model E3112-B36 E3112-B34 E3CD-B71 Type indirect injection, overhead valve Aspiration Nature Displacement 1123cc 1498cc Number Of Cilinders Bore 78.2mm 87mm Stroke 78mm 84mm Engine Horsepower (Net) 14.3kW (19.2HP) @2600rpm 16.1kW (21.6HP) @2600rpm 18.7kW (25.1HP) @2600rpm PTO Horsepower (Estimate) 12.2kW(16.4HP) - Page 90 SPECIFICATIONS HYDRAULICS: Steering System Type Hydrostatic Pump Separate engine-mounting gear pump Output: 11.7 liter/min @2500rpm 12.2 liter/min @2600rpm Presure Relief valve setting 7848kPa (80kgf/cm Main Hydraulic System: Pump Engine-mounted pump Output: 20.0 liter/min @2500rpm 20.8 liter/min @2600rpm Presure Relief valve setting 14715kPa (150kgf/cm Rear Linkage: Type Three-point hitch Size...
-
Page 91: Hydrostatic Transmission
TM3215,3245,3265 Hydrostatic transmission MODEL TM3215FH TM3245FH TM3265FH Sub Models SMWR SMWR SMWR ENGINE: Make ISEKI Model E3112-B35 E3112-B33 E3CD-B70 Type indirect injection, overhead valve Aspiration Nature Displacement 1123cc 1498cc Number Of Cilinders Bore 78.2mm 87mm Stroke 78mm 84mm Engine Horsepower (Net) 14.3kW (19.2HP) @2600rpm 16.1kW (21.6HP) @2600rpm 18.7kW (25.1HP) @2600rpm... - Page 92 SPECIFICATIONS HYDRAULICS: Steering System Type Hydrostatic Pump Separate engine-mounting gear pump Output: 11.7 liter/min @2500rpm 12.2 liter/min @2600rpm Presure Relief valve setting 7848kPa (80kgf/cm Main Hydraulic System: Pump Engine-mounted pump Output: 20.0 liter/min @2500rpm 20.8 liter/min @2600rpm Presure Relief valve setting 14715kPa (150kgf/cm Rear Linkage: Type Three-point hitch Size...
- Page 93 TM3215,3245,3265...
- Page 94 SPECIFICATIONS...
-
Page 95: Assembly & Pre-Delivery Inspection
TM3215,3245,3265 ASSEMBLY & PRE-DELIVERY INSPECTION IMPORTANT: Do not commence assembly of the trac- b. Install wheel / tyre assemblies and secure them tor until reading these instructions com- using bolts and lock washers. Tighten them to 102 Nm (75 ft-lbs.). -
Page 96: Pre-Delivery
ASSEMBLY&PRE-DELIVERY INSPECTION ・Lubricate all fittings. PRE-DELIVERY ・Check tyre inflation pressures. ・Check that engine oil level is correct. ・Check front wheel toe-in. ・Check that coolant level is correct. ・Test antifreeze to see that it is adequate for local ・Check fan belt tension, 12 mm (1 / 2”) deflection, climate conditions. -
Page 97: Check List
TM3215,3245,3265 FACTORY RECOMENDED NEW TRACTOR PRE-DELIVERY INSPECTION CHECK LIST ISEKI USER’S NAME AREA DATE DEALER ADDRESS TRACTOR MODEL SERIAL NO. ENGINE SERIAL NO. COUNTRY THIS PRE-DELIVERY INSPECTION CHECK LIST IS PROVIDED TO IDENTIFY THE CHECKED AND NECESSARY ADJUST BY THE DEALER PRIOR TO DELIVERY OF THIS MACHINE. -
Page 98: Check List
ASSEMBLY&PRE-DELIVERY INSPECTION FACTORY RECOMENDED NEW TRACTOR PRE-DELIVERY INSPECTION CHECK LIST ISEKI USER’S NAME AREA DATE DEALER ADDRESS TRACTOR MODEL SERIAL NO. ENGINE SERIAL NO. COUNTRY THIS PRE-DELIVERY INSPECTION CHECK LIST IS PROVIDED TO IDENTIFY THE CHECKED AND NECESSARY ADJUST BY THE DEALER PRIOR TO DELIVERY OF THIS MACHINE. - Page 99 TM3215,3245,3265...
-
Page 100: Wiring Harness Cable
WIRING HARNESS CABLE WIRING HARNESS CABLE Wiring diagram E4 (Except for H-type) Flasher Suction coil : 0.357Ω Suction coil : 0.492Ω Safety relay Retainer coil : 0.546Ω Retainer coil : 1.074Ω Trailer monitor Key stop Winker RF Glow plug (X3) Winker RR Key stop sol Timer... - Page 101 WIRING HARNESS CABLE WIRING HARNESS CABLE Wiring diagram E4 (H-type) Flasher Suction coil : 0.357Ω Suction coil : 0.492Ω Safety relay Retainer coil : 0.546Ω Retainer coil : 1.074Ω Trailer monitor Key stop Winker RF Glow plug (X3) Winker RR Key stop sol Timer Winker RR monitor...
-
Page 102: Wiring Diagram E4 (H-Type)
WIRING HARNESS CABLE WIRING HARNESS CABLE Wiring diagram E6 Flasher Suction coil : 0.357Ω Suction coil : 0.492Ω Safety relay Retainer coil : 0.546Ω Retainer coil : 1.074Ω Trailer monitor Key stop Glow plug (X3) Winker RF Winker RR Key stop sol Timer Winker RR monitor Suction... - Page 103 TM3215 TM3245 TM3265 Overseas Business Division 3-14, Nishi-Nippori, 5-chome, Arakawa-ku, Tokyo 116-8541, Japan Phone: (03) 5604-7658 Fax: (03) 5604-7703 OM-TM3215/-EN-10 0912-01-XXX Printed in Japan...
Need help?
Do you have a question about the TM3215 and is the answer not in the manual?
Questions and answers