Table of Contents
Advertisement
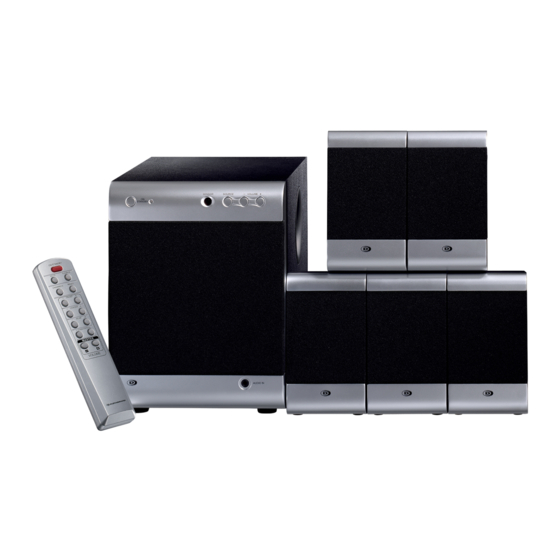
The Perfect Sound System for Your DVD Player
•
Just add your TV & DVD player; everything else is in the box
•
Incredible surround sound, perfect for DVD viewing & enhanced TV game experience
•
Also provides exceptionally great sound for your computer & MP3 player
•
Front panel audio input jack for MP3 & CD players
PLEASE READ CAREFULLY BEFORE USE
IB-HT3917-WM-E-041506
Advertisement
Table of Contents

Related Manuals for Durabrand HT-3917


Summary of Contents for Durabrand HT-3917
- Page 1 Incredible surround sound, perfect for DVD viewing & enhanced TV game experience • Also provides exceptionally great sound for your computer & MP3 player • Front panel audio input jack for MP3 & CD players PLEASE READ CAREFULLY BEFORE USE IB-HT3917-WM-E-041506...
-
Page 2: Important Safety Instructions
• Do not place the Home Theater system on an inclined or unstable place. • Do not place anything within 1 inch of the sides or 2 inches from the back of the cabinet. - Page 3 Thank you for purchasing this 5.1 Channel Home Theater Surround Sound System. This deluxe audio theater system turns your home into a virtual theater. Basic Features & Benefits of this Home Theater System: 1. 5.1 channel audio decoder for home theater surround sound.
-
Page 4: Table Of Contents
Introduction---------------------------------------------------------------------------------------------------------------------------------------------- 2 Location of Controls--------------------------------------------------------------------------------------------------------------------------------- 4 Remote Control Operation-------------------------------------------------------------------------------------------------------------------------6 • Connections Speaker Connections--------------------------------------------------------------------------------------------------------------------------------7 Speaker Positioning Information--------------------------------------------------------------------------------------------------------------- 8 Audio Connections -----------------------------------------------------------------------------------------------------------------------------------9 • Basic Operation General --------------------------------------------------------------------------------------------------------------------------------------------------- 11 About fuse replacement---------------------------------------------------------------------------------------------------------------------------- 12 • Trouble Shooting ---------------------------------------------------------------------------------------------------------------------- 13 • Specifications ----------------------------------------------------------------------------------------------------------------------------- 14 IB-HT3917-WM-E-041506... - Page 5 REMOTE CONTROL. 16. FUSE HOLDER with screw cover. 17. AC LINE CORD - Connect to a 120V/60Hz AC standard wall outlet. IMPORTANT: Each speaker must be connected to 1 colored terminal AND 1 black terminal. IB-HT3917-WM-E-041506...
-
Page 6: Location Of Controls
10. SUBWOOFER UP & DOWN VOLUME buttons - Press to adjust the individual SUBWOOFER’s sound level. 11. MASTER VOLUME UP & DOWN buttons - Press to adjust the sound level of all speakers at the same time. SEE NEXT PAGE FOR REMOTE CONTROL BATTERY INSTALLATION. IB-HT3917-WM-E-041506... -
Page 7: Remote Control Operation
Point the REMOTE CONTROL at the Home Theater’s Front Make sure there is a clear path between the REMOTE CONTROL and the HOME THEATER SYSTEM so that the signal is not blocked. Tips on REMOTE CONTROL Operation • The REMOTE control’s operating distance may vary according to the brightness of the room. -
Page 8: Connecting The Speaker Wires
4. Match the colors of the wires to the colors of the terminals. SET TERMINALS COLORED WIRE TO COLORED TERMINAL, BLACK WIRE TO BLACK TERMINAL. REMOVE YOUR FINGER FROM THE TERMINAL TO LOCK THE WIRE INSIDE THE TERMINAL. IB-HT3917-WM-E-041506... -
Page 9: To Avoid Short-Circuiting The Speakers
Stripped wires are touching each other due to excessive removal of insulation. Do not allow the above to happen on your set. MAKE SURE THE ABOVE DOES NOT HAPPEN Center Front-left Subwoofer YOUR TV SET LISTENING POSITION Front-right Rear-right IB-HT3917-WM-E-041506... -
Page 10: Audio Connections
DVD IN AUX IN This will allow the sound of DVD, VCR, TV game, or video camera to be played through the HOME THEATER SYSTEM and the picture to be displayed through your TV. YOUR DVD, VCR, TV GAME OR VIDEO CAMERA... - Page 11 DVD IN AUX IN This will allow the sound of satellite to be played through the HOME THEATER SYSTEM, and you will hear the sound from both the TV and the HOME THEATER SYSTEM, this is normal. Home Theater System + CD / MP3 / PC / Radio or other Source with 3.5mm Stereo Jack This will allow the sound of CD/MP3 player, radio, computer or other source with 3.5mm stereo jack to be played through the...
-
Page 12: Audio Connections
Press the SOURCE button on the front panel of the main set or on the REMOTE CONTROL repeatedly to select your desired audio input sources and the sound will be heard from the HOME THEATER SYSTEM. For SUBWOOFER’s volume adjustment, press the SUBWOOFER volume control buttons on the Remote control: raises the volume, and the ON/STANDBY indicator will flash in green, but at its maximum level, the ON/STANDBY indicator will stop flashing. -
Page 13: About Fuse Replacement
GOOD FUSE Examine the fuse. If a wire shows, the fuse is good. BLOWN FUSE If the wire is broken in the middle, replace with a 1.25AL 250V “T” type glass fuse. “T” means time delay or slow blow fuse. IB-HT3917-WM-E-041506... -
Page 14: Troubleshooting
3. If you are listening to 2.1 channel output mode, only 2 front speakers plus the subwoofer will have sound. Double check if input & output jacks were inserted properly. Also ask a friend to help you before calling customer service. IB-HT3917-WM-E-041506... -
Page 15: Specifications
(sales slip) with the set. During the initial 1 year period after original purchase, we will service the set that is returned to LENOXX ELECTRONICS CORP., prepaid, at no charge. After the initial 1 year period expires, we will exchange, at no charge, any part that is defective, but will charge for the cost of labor, return postage paid by Lenoxx.
Need help?
Do you have a question about the HT-3917 and is the answer not in the manual?
Questions and answers
Does it have Bluetooth
No, the Durabrand HT-3917 does not have Bluetooth.
This answer is automatically generated