
Related Manuals for JUMA PA-100D


Summary of Contents for JUMA PA-100D
- Page 1 JUMA PA100-D Operation Manual (Firmware Version 1.05c - 24 October 2011) Adrian Ryan - 5B4AIY...
-
Page 2: Table Of Contents
JUMA-TRX2......... - Page 3 High SWR............17 High Current.
-
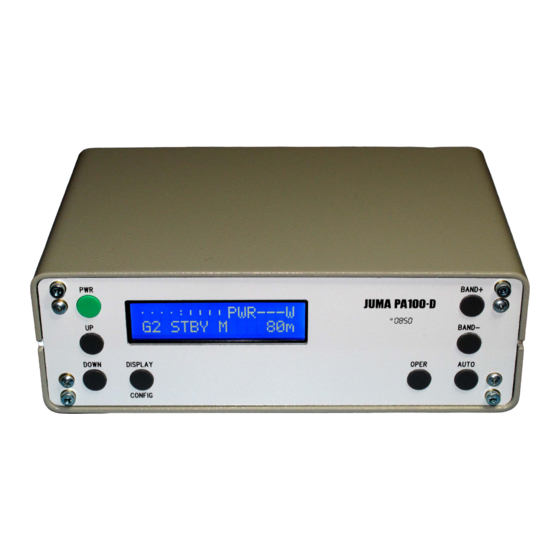
Page 4: Front Panel Controls
JUMA PA-100D OPERATING MANUAL 5B4AIY Firmware Version: 1.05c The PA-100D is a companion 100W all-band linear amplifier primarily intended for the Juma TRX-2 all-band 10W transceiver, but can also be used with almost any low-power transceiver. This document describes the operation and setup of this equipment using firmware version 1.05c, software modifications and changes made by Adrian Ryan, 5B4AIY. -
Page 5: Control Description
This button now has assigned to it the cancel alarms function, which takes priority. This is to make the alarm system consistent with the Juma TRX-2, whose alarms are cancelled with this button. In the event an alarm cannot be cancelled, press and hold this button for an emergency shutdown. -
Page 6: Auto
If this button is pressed and the power switch operated to turn the amplifier on, the flash writer will be invoked. This is used with the Ingenia loader program to update the firmware. For further details, please see the article on the Juma website which covers this procedure. AUTO This button is used to select either the manual or automatic band selection, in conjunction with the BAND+ and BAND buttons. -
Page 7: Juma-Trx2
JUMA-TRX2. This mode should be selected when the amplifier is connected to the Juma TRX2 transceiver. It relies on the presence of a serial data link between the amplifier and the transceiver. The transceiver’s RS-232 port mode should be set to JUMA TRX2, and port speeds must be the same. -
Page 8: Lcd Backlighting
LCD Backlighting Default: 300 Set the level you wish for the display illumination using the UP/DOWN buttons. Note the a setting of 0 will turn the backlighting off. The range is from 0 – 1100. LCD Contrast Default: 2000 Adjust with the UP/DOWN buttons for a suitable display. The range is from 0 – 3500. SWR Trip Limit Default: 3.0 Adjust with the UP/DOWN buttons over a range from 1.0 –... -
Page 9: Fan Control
Fan Control Default: Normal This is a new feature. Some users prefer the cooling fan to operate all the time irrespective of the heat sink temperature. Use the UP/DOWN buttons to select one of the following modes. Normal: In this mode the fan operation is entirely determined by the heat-sink temperature. -
Page 10: Band Units
When the heat-sink temperature has risen to 5 C/10 F higher than the preset cut-in temperature, the fan speed will increase to the medium setting. If the temperature rises by 10 C/20 F above the cut-in temperature, the fan will run at its maximum speed. Although the range of cut-in temperatures are from 0 C –... -
Page 11: Voltage Calibration
Release the button and the calibration menu screens can be selected by briefly pressing the DISPLAY/CONFIG button. Voltage Calibration Default: 5250 Limits : 4750 – 5750 The measurement system of the amplifier has been modified to obtain increased resolution and precision. -
Page 12: Output Power Calibration
high-side current sense amplifier/convertor and the scaled voltage is measured by the A-D convertor. The nominal scale factor is 100mV/A. The most accurate method of calibrating the ammeter is to use a clip-on DC ammeter and a precision digital multimeter. Alternatively, if you have access to a precision high-current shunt you can connected this in series with your supply and measure the shunt voltage. -
Page 13: Beep Length
Using the UP/DOWN buttons adjust for the desired polling rate. This is the time interval that will elapse between the PA-100D query attempts to the Juma TRX2. If you are using the TRX2, then any band changes or transmit status changes are conveyed via the serial port, but... -
Page 14: Power Sample Averaging
Power Sample Averaging Default: 1 This feature was added at the request of an amateur who was using the amplifier as the driver stage of a high-power linear. When operating CW there were occasions when there would be a transient high SWR alarm caused by the finite time it took for the transmit/receive relays to operate. -
Page 15: Serial Test Mode
To use this feature, in the User Configuration mode, ensure that the Auto Band detect is set to something other than JUMA-TRX2. If this latter mode is selected, then the serial port mode is automatically configured as JUMA TRX2, and cannot be altered. - Page 16 Band Select : Manual Band Display Units : Metres Your settings will, naturally, be somewhat different. Enter A, and the following display will be obtained: 925 Scaled: 1.129V 12.256 Amps ADC 10 = 2585 Scaled: 3.156V 13.669 Volts ADC 11 = 0 Scaled: 0.000V 0 Out-Of-Band ADC 12 =...
- Page 17 voltages and confirmed that when the Auto Band Select is set to Yaesu 817, the appropriate amateur band filters are selected. The voltage thresholds are: BAND VOLTAGE 1.8MHz – 160m 0.33V 3.5MHz – 75/80m 0.67V 7.0MHz – 40m 1.00V 10.0MHz – 30m 1.33V 14.0MHz –...
- Page 18 It shows that the raw output was 523, corresponding to an input voltage of 0.639V. In this case there is no software calibration factor. The design of the temperature measurement system takes advantage of the accurately known change of base-emitter voltage of a silicon transistor with temperature.
- Page 19 T = 180 + 32 T = 212 F Entering the letter t will invoke the buzzer sound test: Sound Test Enter Frequency (100 - 5000Hz): 500 Data Value: 7372 Enter duration (mS): 1500 Enter the letter E and a dump of the EEPROM contents will be obtained: Dump EEPROM contents 0000 0000 0000 0000 0000 0000 0000 0000 0000 0010 0000 0000 0000 0009 0000 07D0 012C 0001...
-
Page 20: Annex A
Annex A Juma PA100D Alarm System The PA100D was provided with an alarm system that would warn the user of over-current, over-temperature, and high SWR conditions. This has now been enhanced with the provision of over-voltage, and under-voltage alarms. The alarm system can be tested using the serial test facility described previously. Enter the letter a and you will be prompted to enter a 1, 2, 3 ,4 , 5, or 6. -
Page 21: Over-Temperature
To reset the alarm, release the PTT switch or the key, and briefly press the PWR button. If the alarm cannot be cleared this indicates a serious fault and the amplifier must be immediately powered down, and the fault investigated. Over-Temperature The heat-sink temperature is continuously monitored, and in the event of the temperature exceeding the preset threshold, the alarm will be raised. -
Page 22: Under-Voltage (Adjust)
Under-Voltage (Adjust) When operating portable from a sealed lead-acid battery it is important that to maximise the service life, operation is terminated before the battery is completely discharged. Most manufacturers recommend that the discharge be terminated when the voltage has fallen to no lower than 10.5V The amplifier is provided with a pre-limit alarm feature that will warn you when the input voltage has fallen to the low voltage threshold plus 100mV, and in that event, this alarm will...
Need help?
Do you have a question about the PA-100D and is the answer not in the manual?
Questions and answers