Table of Contents
Advertisement
Quick Links
Mode d'emploi
User manual
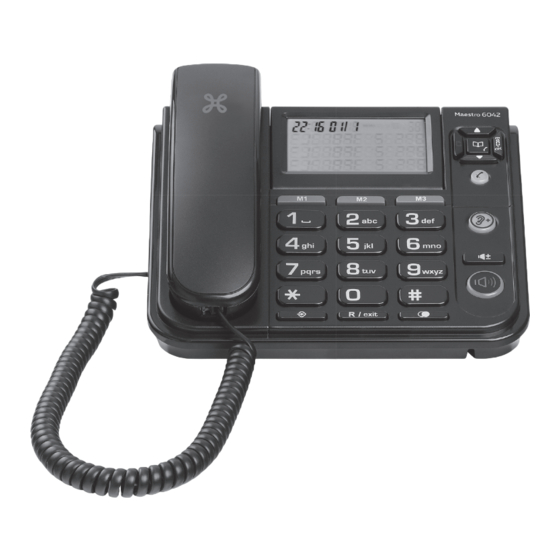
Maestro 6042
Maestro 6042
1. BEFORE STARTING
-13110042-Maestro 6042 Black-Cover.indd 1
Proximus thanks you for choosing the Maestro 6042, a
telephone specially adapted for people with hearing difficulties
or impaired vision.
The Maestro 6042 is designed for connection to the Belgian
public analogue network, and is approved in compliance with
European regulations, as attested by the CE mark.
1.1 Contents of the box
Check that the following are all in the box:
Base
Handset
Phone line cord
Spiral cord
Power cable
M1
M2
M3
Memory label
1.2 Cleaning
To clean your set, use an antistatic cloth lightly moistened
with water.
1.3 At-a-glance guide to the keys and display
Browse menu / Open
Open Phonebook /Dial
pq
from Call Log*
Call Log*
Correct / Erase
input
Open menu /
Confirm input
Display
Secrecy (mute)
Volume amplifier
Direct-access
Adjust hands-free
memories(
M1, M2
&
M3)
/ handset volume
Incoming call LED
Program key
/ Hands-free
Quit menu / Flash (access
Redial
to operator services*)
Time and date
New call not yet
of call*
consulted*
Position in Call Log*
*Subject to subscription from Proximus
2. INSTALLATION
2.1 Connections
Connect one end of the spiral cord to the handset and the
l
other into the slot on the left side of the telephone.
Plug the line cord into the slot at the back of the set (behind
l
the display) and plug the telephone jack into the wall
socket.
Connect one end of the power cable into the socket
l
provided on the back of the set (behind the display).
Plug the other end into an electricity socket.
l
Line cord connector
Power supply connector
3/07/14 13:58
Caution:
Only use the 9V DC power supply provided with the
l
telephone.
AC/DC power adapter model: K06S090010G
Manufacturer: Dongguan Guanjin Electronics Technology Co., Ltd
AC: 100-240V - 50/60 Hz -300mA
Output: 9V DC 100 mA
This appliance is equipped with a switching power supply; it
therefore has very low electricity consumption.
Line cord
Spiral cord
Power cable
3. SETTINGS
See chapter 1.3 At-a-glance guide to the keys and display.
To go into settings mode:
Press
.
l
The display shows: "SET
OR
".
u
Use the p or q keys to scroll through the menu functions.
l
Note: You can go back a step or quit the menu at any time by
pressing
.
Setting the display language (French, English, German and
Dutch)
When the menu shows "CID LANGUAGE":
Press
.
l
Select the language using the p or q keys.
l
Press
again to save.
l
3.1 Setting the clock
When the menu shows "TIME/DATE":
Press
.
l
To adjust the setting, press p to scroll through the digits.
l
To move on to the next parameter (hour/minute/day/month),
l
press q.
Press
again to save.
l
3.2 Setting the display contrast
Contrast
When the menu shows "SELECT CONTRAST":
Press
.
Use the p or q keys to select the contrast level on the
display (4 levels).
Press
again to save.
Orientation
The display can be positioned manually (raised or lowered as
preferred).
3.3 Selecting the call parameter
It is not necessary to modify the following parameter
which is preset to work on the Belgian network:
Flash time (timed loop break):
Default flash time for Belgium is 120 ms.
When the menu shows "FLASH TIME":
Press
.
l
Use the p or q keys to select the flash time.
l
Press
again to save.
l
4. MAIN FUNCTIONS
4.1 Answering a call
Pick up the handset or press
(hands-free mode).
At the end of the call, replace the handset or press
again
(hands-free mode).
4.2 Making a call
To talk via the handset:
Pick up the handset.
l
Dial the number of your correspondent (for stored numbers,
l
see §5.2 "Calling a Phonebook number").
At the end of the call, replace the handset.
l
Note: At any time during the call, you can switch to hands-
free mode by pressing
. When the red LED lights
up, you can replace the handset.
To talk without picking up the handset (i.e. in hands-free
mode):
Press
.
l
The red LED above the key lights up.
u
Dial the number of your correspondent (for stored numbers,
l
see §5.2 "Calling a Phonebook number").
When your correspondent answers, speak directly without
l
picking up the handset.
At the end of the call, press
again.
l
Dialling the number before picking up the handset:
Dial the number of your correspondent (for stored numbers,
l
see §5.2 "Calling a Phonebook number").
Pick up the handset or press
.
l
The call is initiated automatically.
u
At the end of the call, replace the handset or press
l
again.
4.3 Redial
Press
: the last number called appears on the
l
display. You have 10 seconds to initiate the call, either by
lifting up the handset, or by pressing
.
4.4 Using hands-free mode
Tips on using hands-free mode
Stay fairly close to the telephone so that the person you
l
are speaking to can hear you clearly.
Avoid talking at the same time as your correspondent.
l
Avoid using hands-free mode in noisy environments: the
l
microphone can pick up ambient noise and this will prevent
the hands-free function from switching to receive mode
when you finish saying something.
Turning hands-free mode on/off
You can switch to hands-free mode at any time.
Press
.
l
A LED lights up above the
key .
u
Similarly, at any point in a hands-free conversation, you can
turn off hands-free mode by picking up the handset (the LED
turns off).
4.5 Adjusting the volume
Setting the ringer volume:
silent
high
low
The ringer volume slider is on the right-hand side of the
telephone. Move the cursor to the desired setting: silent, low
or high.
If the ringer is silent, the red LED
lights up to signal
incoming calls.
Setting the handset volume:
At any time during a call, you can raise or lower the volume
by pressing
as many times as required (4 levels).
Setting the hands-free speaker volume:
If you are talking in hands-free mode(
active), you can
raise or lower the volume by pressing
as many times
as required (8 levels).
The telephone will remember the last volume level.
Special function: "earpiece amplifier" (on the handset)
This function is intended mainly for people with hearing
difficulties. It raises each volume level in the handset by 6
decibels.
During a call (only when using the handset), press
- the
key lights up in red.
Each volume level is increased by 6 decibels. If it still isn't
loud enough, press
again (without deactivating the
key) until you obtain the right volume. To turn off the
function, press
. When you put the handset down after the
call, the function is automatically turned off.
4.6 Secrecy mode
To put your correspondent on hold while you talk to someone
next to you, press the
key, which then lights up in red.
To exit secrecy mode, press
again.
5. USING THE PHONEBOOK
5.1 Programming / Changing / Erasing a memory
You can store up to 13 names and numbers in memory
(3 direct-access memories + 10 indirect memories). An
adhesive label (supplied in the box) can be used to record
the names corresponding to memory keys
,
and
. It is designed to be affixed under the handset to the
left of key 4.
To store a number in memory:
Press
.
l
The display shows "I0-I9".
u
Select the chosen memory location (pad keys 0 to 9 for
l
indirect memories or keys
,
,
for direct
memories).
Note: You can use the
or
keys to scroll through all the
p
q
memory locations.
Press
to confirm the memory location.
l
Enter the number (up to 32 digits).
l
Press
again to save the number.
l
Enter the associated name (up to 12 characters) using the
l
keypad.
Example: for "PAUL":
- Press
once.
- Press
once.
- Press
twice.
- Press
three times.
To insert a space, press
once.
Press
to save the name.
l
Note: At any time during this procedure, you can erase the
previous digit or letter by pressing
.
To insert a pause when storing a number, press
.
The
,
,
and
keys can be used to
enter special characters.
To erase / change a memory:
Press
.
l
Scroll through with the
or
keys (or press the selected
l
p
q
memory directly:
,
,
or 0 to 9), Now you
have two options :
Erase a memory and replace it with a new one:
Press
.
l
Enter the new number directly (using the keypad).
l
Press
.
l
Enter the new name.
l
Press
to save.
l
Change a memory or erase it without replacing it:
Press
.
l
Correct the number using the
key, or erase each digit
l
one by one, again using the
key, to delete the number
completely.
Press
.
l
Correct the name using the
key, or erase all of the letters
l
to delete the name.
Press
again to save.
l
5.2 Calling a Phonebook number
Direct-access memories (M1, M2, M3):
Pick up the handset or press
.
l
Press the direct-access memory key
,
or
l
.
The call is initiated automatically.
u
Advertisement
Table of Contents

Related Manuals for Proximus Maestro 6042

Summary of Contents for Proximus Maestro 6042
-
Page 1: User Manual
When the menu shows "FLASH TIME": To insert a space, press once. The Maestro 6042 is designed for connection to the Belgian Caution: Press Press to save the name. Only use the 9V DC power supply provided with the public analogue network, and is approved in compliance with telephone. - Page 2 If the mains adapter fails, it must be replaced by an identical In conversation, R key allows access to other Proximus take it to Proximus Center or to one of our authorized agents, model. 5.3 Saving the last dialled number...
Need help?
Do you have a question about the Maestro 6042 and is the answer not in the manual?
Questions and answers